Type
Knitting
Difficulty
intermediate
Category
custom
AI Thinking Process
Planning
Verification
Pattern
Hearthside Christmas Stocking
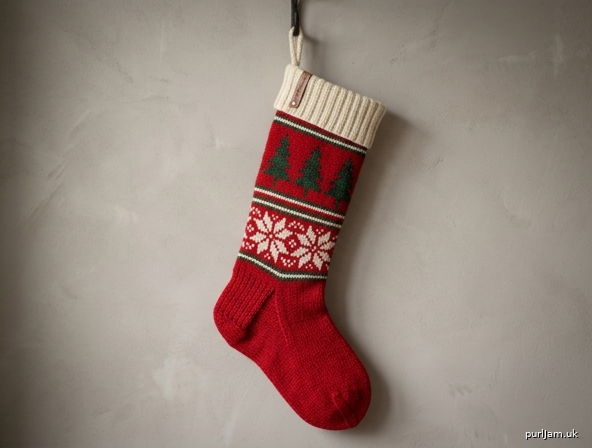
A roomy cuff-down Christmas stocking in worsted weight, worked in the round. A cream ribbed cuff leads into a red leg with two stranded colorwork bands—upright fir trees and snowflakes—then a classic slipped-stitch heel flap, gusset, and grafted wedge toe. The stocking is sized to hang on the mantel and to hold treats, not to fit a foot.
Skill level: Intermediate (stranded colorwork, heel flap and gusset, Kitchener stitch)
Finished Size
One size.
- Circumference: 12¾" (32.5 cm)
- Cuff length: 3" (7.5 cm)
- Leg length (below cuff to start of heel): 8½" (21.5 cm)
- Foot length (back of heel to toe): 8" (20.5 cm)
- Total length along the front (cuff edge to toe): about 19½" (49.5 cm)
Materials
Yarn: Worsted weight (CYCA 4), wool or wool blend recommended for colorwork and shape.
- MC (Red): 160 yd / 146 m
- CC1 (Cream): 85 yd / 78 m
- CC2 (Forest green): 35 yd / 32 m
Sample suggestion: Cascade 220 or a similar 220 yd / 100 g worsted. One skein of each color is plenty.
Needles:
- US 6 (4 mm) 16" (40 cm) circular or double-pointed needles, for the cuff
- US 7 (4.5 mm) 16" (40 cm) circular and/or DPNs, or a 32" (80 cm) circular for magic loop, for the body
Notions: 3 stitch markers (one distinct for beginning of round), tapestry needle, stitch holder or scrap yarn, scissors.
Gauge
20 sts and 28 rnds = 4" (10 cm) in stockinette stitch in the round on larger needles, after blocking.
Take time to check gauge. A firm fabric helps the stocking hold its shape when stuffed. If your stranded colorwork is tighter than stockinette, go up one needle size for the charted bands only.
Abbreviations (US)
| Abbr. | Meaning |
|---|---|
| BOR | beginning of round |
| CC | contrasting color |
| CO | cast on |
| k | knit |
| k2tog | knit 2 together (right-leaning decrease) |
| MC | main color |
| p | purl |
| p2tog | purl 2 together |
| pm | place marker |
| pwise | purlwise |
| rem | remain(ing) |
| rnd(s) | round(s) |
| RS | right side |
| sl | slip |
| sm | slip marker |
| ssk | slip, slip, knit (left-leaning decrease) |
| st(s) | stitch(es) |
| St st | stockinette stitch |
| wyib | with yarn in back |
| wyif | with yarn in front |
| WS | wrong side |
Pattern Notes
- The stocking is worked cuff down in the round. Join at the end of the cast-on round, being careful not to twist, and place a BOR marker.
- Use magic loop, a short circular, or DPNs—whichever you prefer. Switch to DPNs or magic loop when the circumference becomes too small for a 16" needle (heel, gusset, and toe).
- Join new colors at BOR (center back). Do not cut MC between the colorwork bands; carry it up the inside for short distances (4 rnds or fewer) or cut and weave in if you prefer a tidier interior.
- Colorwork: Catch floats longer than 5 sts. Keep floats relaxed so the fabric does not cinch; the stuffed stocking should still open to the full 12¾" circumference.
- Color dominance: For even trees and snowflakes, hold CC (the motif color) in your right hand / as the upper float, and hold MC in your left hand / as the lower float, if you knit two-handed. If you strand with one hand, keep motif floats slightly looser than background floats.
- Charts are worked in the round: read every round from right to left. Written round-by-round instructions are also given.
- The heel flap is worked flat on the back 32 sts only. The front 32 sts (instep) wait on a holder.
- Trees are charted point first so they point toward the cuff when the stocking is hung.
Pattern
Cuff
With smaller needles and CC1, using a long-tail cast-on, CO 64 sts. Join to work in the round, being careful not to twist. Pm for BOR.
Rnd 1: *K2, p2; rep from * to end.
Repeat Rnd 1 until cuff measures 3" (7.5 cm) from the cast-on edge.
Cut CC1, leaving a 6" (15 cm) tail.
Leg
Change to larger needles and MC.
Rnds 1–6: Knit.
Rnds 7–8: Knit with CC1.
Rnds 9–10: Knit with MC.
Rnds 11–17: Tree Band (work Tree Chart or the written rounds below). 8-st repeat × 8 = 64 sts ✓
Rnds 18–21: Knit with MC.
Rnds 22–23: Knit with CC1.
Rnds 24–25: Knit with CC2.
Rnds 26–27: Knit with CC1.
Rnds 28–33: Knit with MC.
Rnds 34–41: Snowflake Band (work Snowflake Chart or the written rounds below). 8-st repeat × 8 = 64 sts ✓
Rnds 42–45: Knit with MC.
Rnds 46–47: Knit with CC1.
Rnds 48–60: Knit with MC.
Leg measures about 8½" (21.5 cm) from the top of the MC section (60 rnds). Do not cut MC.
Tree Chart
8-st repeat. X = CC2 (green), • = MC (red). Work from right to left, Rnd 1 first (point toward the cuff).
        8 7 6 5 4 3 2 1
Rnd 7   • • • X X • • •     ← trunk
Rnd 6   • • • X X • • •
Rnd 5   • • • X X • • •
Rnd 4   X X X X X X X X
Rnd 3   • X X X X X X •
Rnd 2   • • X X X X • •
Rnd 1   • • • X X • • •     ← point (work this round first)
Written Tree Band
Rnd 11 (chart Rnd 1): *K3 MC, k2 CC2, k3 MC; rep from * to end. Rnd 12 (chart Rnd 2): *K2 MC, k4 CC2, k2 MC; rep from * to end. Rnd 13 (chart Rnd 3): *K1 MC, k6 CC2, k1 MC; rep from * to end. Rnd 14 (chart Rnd 4): *K8 CC2; rep from * to end. Rnd 15 (chart Rnd 5): *K3 MC, k2 CC2, k3 MC; rep from * to end. Rnd 16 (chart Rnd 6): *K3 MC, k2 CC2, k3 MC; rep from * to end. Rnd 17 (chart Rnd 7): *K3 MC, k2 CC2, k3 MC; rep from * to end.
Cut CC2.
Snowflake Chart
8-st repeat. X = CC1 (cream), • = MC (red). Work from right to left, Rnd 1 first.
        8 7 6 5 4 3 2 1
Rnd 8   • • • X X • • •
Rnd 7   • • X • • X • •
Rnd 6   • X • X X • X •
Rnd 5   X • X X X X • X
Rnd 4   X • X X X X • X
Rnd 3   • X • X X • X •
Rnd 2   • • X • • X • •
Rnd 1   • • • X X • • •
Written Snowflake Band
Rnd 34 (chart Rnd 1): *K3 MC, k2 CC1, k3 MC; rep from * to end. Rnd 35 (chart Rnd 2): *K2 MC, k1 CC1, k2 MC, k1 CC1, k2 MC; rep from * to end. Rnd 36 (chart Rnd 3): *K1 MC, k1 CC1, k1 MC, k2 CC1, k1 MC, k1 CC1, k1 MC; rep from * to end. Rnd 37 (chart Rnd 4): *K1 CC1, k1 MC, k4 CC1, k1 MC, k1 CC1; rep from * to end. Rnd 38 (chart Rnd 5): *K1 CC1, k1 MC, k4 CC1, k1 MC, k1 CC1; rep from * to end. Rnd 39 (chart Rnd 6): *K1 MC, k1 CC1, k1 MC, k2 CC1, k1 MC, k1 CC1, k1 MC; rep from * to end. Rnd 40 (chart Rnd 7): *K2 MC, k1 CC1, k2 MC, k1 CC1, k2 MC; rep from * to end. Rnd 41 (chart Rnd 8): *K3 MC, k2 CC1, k3 MC; rep from * to end.
Heel Flap
The flap is worked flat on the back 32 sts in MC. Place the remaining 32 sts (instep) on a holder or spare needle.
Row 1 (RS): Sl 1 pwise wyib, knit to end. Row 2 (WS): Sl 1 pwise wyif, purl to end.
Repeat Rows 1–2 until 24 rows have been worked, ending with a WS row. (12 chain-edge sts along each side of the flap for pickup.)
Heel Turn
Continue on the 32 heel sts.
Row 1 (RS): Sl 1, k18, ssk, k1, turn. Row 2 (WS): Sl 1, p7, p2tog, p1, turn. Row 3: Sl 1, k8, ssk, k1, turn. Row 4: Sl 1, p9, p2tog, p1, turn. Row 5: Sl 1, k10, ssk, k1, turn. Row 6: Sl 1, p11, p2tog, p1, turn. Row 7: Sl 1, k12, ssk, k1, turn. Row 8: Sl 1, p13, p2tog, p1, turn. Row 9: Sl 1, k14, ssk, k1, turn. Row 10: Sl 1, p15, p2tog, p1, turn. Row 11: Sl 1, k16, ssk, k1, turn. Row 12: Sl 1, p17, p2tog, p1.
Do not turn after Row 12. All heel sts have been worked. 20 sts remain (32 − 12 decreases = 20 ✓).
Gusset
Resume working in the round with MC.
Setup rnd: Knit the 20 heel sts, pick up and knit 12 sts along the left side of the heel flap (1 st in each slipped-st chain), pm for instep, knit 32 instep sts from the holder, pm for end of instep, pick up and knit 12 sts along the right side of the heel flap. 76 sts (20 + 12 + 32 + 12 = 76 ✓).
The BOR is at the start of the 20 heel sts (center back of the stocking). You now have 44 sole/gusset sts and 32 instep sts (44 + 32 = 76 ✓).
Rnd 1 (decrease): Knit to 3 sts before the first instep marker, k2tog, k1, sm, knit 32 instep sts, sm, k1, ssk, knit to end of rnd. 74 sts (76 − 2 = 74 ✓).
Rnd 2: Knit.
Repeat Rnds 1–2 five more times (6 decrease rnds total, 5 even rnds between them). 64 sts (76 − 12 = 64 ✓). Sole and instep are now 32 sts each.
Remove the instep markers if you like, or leave them to mark the sides of the foot for the toe.
Foot
Work even in St st with MC on 64 sts until the foot measures 5½" (14 cm) from the end of the heel turn (the back of the heel), or until the foot is 2½" (6.5 cm) shorter than your desired total foot length.
Toe
Place (or keep) markers so the round is divided into 32 sole sts and 32 instep sts. BOR is at the start of the sole.
Rnd 1 (decrease): *K1, ssk, knit to 3 sts before marker, k2tog, k1, sm; rep from * once more. 60 sts (64 − 4 = 60 ✓).
Rnd 2: Knit.
Repeat Rnds 1–2 eight more times (10 decrease rnds total). 24 sts (64 − 40 = 24 ✓), with 12 sts on the sole and 12 sts on the instep.
Cut MC, leaving a 12" (30 cm) tail. Graft the remaining 12 sole sts to the 12 instep sts with Kitchener stitch (see Finishing).
Finishing
Kitchener stitch (toe)
Hold the two needles parallel, WS together, with the 12 instep sts on the front needle and the 12 sole sts on the back needle. Thread the tail onto a tapestry needle.
Setup: Insert tapestry needle pwise into the first front st (leave on needle), then kwise into the first back st (leave on needle).
Repeat:
- Front needle: insert kwise, slip that st off; insert pwise into the next front st, leave it on.
- Back needle: insert pwise, slip that st off; insert kwise into the next back st, leave it on.
Repeat steps 1–2 until 1 st remains on each needle, then work those last two sts in the same rhythm and draw the yarn through. Snug the seam so it matches the surrounding stitch size; do not pull it into a tight ridge.
Hanging loop
With CC1 and smaller needles, CO 4 sts. Work I-cord for 6" (15 cm): *K4, do not turn, slide sts back to the right end of the needle; rep from * until the cord measures 6". Bind off.
Fold the cord in half and sew both ends securely to the inside of the cuff at center back (in line with the BOR / heel), just below the cast-on edge. The loop should sit high enough that the stocking hangs straight.
Weave in ends and block
Weave in all ends on the WS, especially at color changes. Close any small gaps at the top of the gusset with the yarn tails if needed.
Block lightly: dampen the stocking, shape it into an L, and lay flat to dry. Do not stretch the colorwork bands. Once dry, the cuff may be worn unfolded (3" cream rib) or folded to the inside for a shorter brim.
Optional: add a small cream pom-pom at the toe, or duplicate-stitch a year or initial on the plain MC section above the heel.
Wear / hang & enjoy. Fill, hang from the mantel, and refill next year.
Disclaimer: This pattern was generated by AI and should be reviewed for accuracy before use. While we strive for quality, AI-generated content may contain errors. Please verify measurements, stitch counts, charts, and instructions before beginning your project. Generated by purlJam.uk
Love this pattern?
Save this pattern to your free PurlJam libraryAccess your pattern anytime
Bookmark this page to access your pattern anytime