Type
Knitting
Difficulty
intermediate
Category
custom
AI Thinking Process
Planning
Verification
Pattern
Hearthside Christmas Stocking
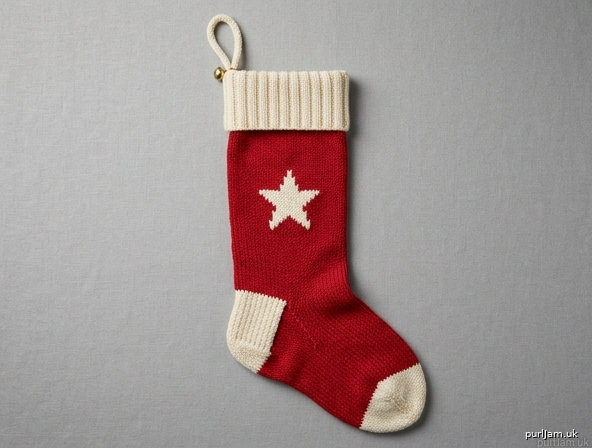
A generous top-down stocking in worsted weight, sized to hold a family pile of gifts. A folded ribbed cuff, reinforced heel, and wedge toe are worked in cream against a red leg and foot. Finish the front with an optional duplicate-stitch star.
Intermediate techniques used: joining a folded cuff, a slip-stitch heel flap, a short-row heel turn, gusset decreases, and Kitchener stitch. The knitting itself is stockinette and ribbing — the skill is in the shaping, not in colorwork.
Finished measurements
One size.
| Circumference | 13⅓ inches (34 cm) |
| Width, laid flat | 6⅔ inches (17 cm) |
| Folded cuff depth | 2 inches (5 cm) |
| Top of cuff to bottom of heel | 14 inches (35.5 cm), including the folded cuff |
| Back of heel to tip of toe | 11½ inches (29 cm) |
Measurements follow the gauge below. A stocking is forgiving of a small gauge difference, but a much looser gauge will stretch out of shape once it is filled.
Materials
Yarn — Worsted weight (CYC category 4), wool or wool blend recommended so the stocking holds its shape.
- Main color (MC): 275 yards (251 m) — classic red in the sample
- Contrast color (CC): 125 yards (114 m) — cream in the sample
Yardage includes a gauge swatch. Any strongly contrasting pair works: forest green with gold, navy with cream, or red with white.
Needles
- US 6 / 4 mm, for the cuff: double-pointed needles, or a 32-inch (80 cm) or longer circular for magic loop
- US 7 / 4.5 mm, for the body: same style as above, or size needed to obtain gauge
- One spare needle in the smaller size, for picking up the cuff edge
A 16-inch (40 cm) circular is optional for the cuff only. The leg is more comfortable on magic loop or double-pointed needles.
Notions
- Stitch markers (one distinct beginning-of-round marker, plus two side markers)
- Waste yarn or a stitch holder
- Tapestry needle
- Optional: one small jingle bell
Gauge
18 stitches and 24 rounds = 4 inches (10 cm) in stockinette stitch in the round, on the larger needles, after blocking.
Take time to check your gauge. Knit and block a swatch of at least 5 inches (12.5 cm) in the round. If you need a different needle to match gauge, use that needle for the body and a needle one size smaller for the cuff.
At this gauge, 60 stitches = 13⅓ inches (34 cm) around (60 ÷ 4.5 stitches per inch = 13⅓ ✓).
Abbreviations
| BO | bind off |
| BOR | beginning of round |
| CC | contrast color |
| CO | cast on |
| k | knit |
| k2tog | knit 2 stitches together (1 stitch decreased, right-leaning) |
| MC | main color |
| p | purl |
| p2tog | purl 2 stitches together (1 stitch decreased) |
| pm | place marker |
| rep | repeat |
| rnd(s) | round(s) |
| RS | right side |
| sl | slip purlwise |
| sm | slip marker |
| ssk | slip, slip, knit: slip 2 stitches knitwise one at a time, return them to the left needle, knit them together through the back loops (1 stitch decreased, left-leaning) |
| st(s) | stitch(es) |
| St st | stockinette stitch; in the round, knit every round |
| WS | wrong side |
| wyib | with yarn in back |
| wyif | with yarn in front |
Pattern notes
- The stocking is worked from the cuff down. The cuff, leg, gusset, foot, and toe are worked in the round. The heel flap and heel turn are worked flat.
- The first 30 stitches of the round are the front. The last 30 stitches are the back (heel side). Keep this orientation from the cast-on through the start of the heel.
- Slip all slipped stitches purlwise. On the heel, follow the wyib / wyif directions so the selvedge forms a neat chain for picking up.
- Heel-turn gaps are closed by the decrease on the following row. Do not wrap stitches, and do not pick up wraps.
- Stitch counts after shaping are given in italics. Check them before going on; a stocking that is off by a few stitches at the heel will not meet the gusset numbers.
- To lengthen or shorten the foot, change only the even stockinette section before the toe. The toe itself is about 3 inches (7.5 cm) long and should not be altered if you want the published decreases to match.
Instructions
Cuff
With CC and smaller needles, and using a long-tail cast-on, CO 60 sts. Leave a tail about 70 inches (178 cm) long. Place a BOR marker and join to work in the round, being careful not to twist. The first 30 stitches are the front; the last 30 are the back.
Rib round: *K2, p2; rep from * to end.
Work in 2×2 rib until the cuff measures 4 inches (10 cm) from the cast-on. Do not bind off.
Join the folded cuff
- With a spare smaller needle, pick up 60 stitches along the cast-on edge, 1 stitch in each cast-on stitch.
- Fold the cuff in half to the inside, wrong sides together, so the picked-up edge sits directly behind the live stitches. The fold is the top edge of the stocking; the folded cuff is 2 inches (5 cm) deep.
- Change to larger needles and join MC, leaving a 6-inch (15 cm) CC tail to weave in.
- Joining round: *Knit the next live stitch together with the next picked-up stitch; rep from * to end. 60 sts.
Work the joining round a few stitches at a time if the two layers feel awkward. The spare needle stays on the inside, behind the left needle.
If you prefer not to join the hem as you go, skip the pickup, continue with the leg, and sew the cast-on edge to the inside of the joining round when you finish. The stitch count is the same either way.
Leg
Continue with MC and larger needles.
Knit every round until the leg measures 12 inches (30.5 cm) from the joining round, about 72 rounds at gauge.
The piece now measures 14 inches (35.5 cm) from the top fold to the needles: 2-inch cuff + 12-inch leg.
Heel flap
The heel flap is worked flat in CC over the back 30 stitches. The slip-stitch pattern reinforces the heel.
Next round: K30 and place these front stitches on waste yarn or a holder. Cut MC, leaving a 6-inch (15 cm) tail. Join CC to the remaining 30 back stitches. Work back and forth on these 30 stitches only.
Row 1 (RS): *Sl 1 wyib, k1; rep from * to end. Row 2 (WS): Sl 1 wyif, p to end.
Repeat Rows 1–2 until you have worked 20 rows total (10 repeats of the pair), ending with a WS row. 30 heel sts; 30 front sts still on hold.
The flap measures about 3¼ inches (8.5 cm). Work all 20 rows even if your row gauge makes the flap a little longer or shorter — the pickup count depends on the row count, not the inch measurement. You should see 10 chain stitches along each selvedge.
Heel turn
The turn is worked in CC on the 30 heel stitches. Each decrease row closes the gap from the previous turn. All 10 rows are written out so the count can be checked as you go. Ten decreases take 30 stitches down to 20 (30 − 10 = 20 ✓).
Row 1 (RS): Sl 1 wyib, k18, ssk, k1, turn. 29 sts; 8 sts left unworked at the end of the row. Row 2 (WS): Sl 1 wyif, p9, p2tog, p1, turn. 28 sts; 8 sts unworked on each side, 12 sts in the center. Row 3 (RS): Sl 1 wyib, k10, ssk, k1, turn. 27 sts. Row 4 (WS): Sl 1 wyif, p11, p2tog, p1, turn. 26 sts. Row 5 (RS): Sl 1 wyib, k12, ssk, k1, turn. 25 sts. Row 6 (WS): Sl 1 wyif, p13, p2tog, p1, turn. 24 sts. Row 7 (RS): Sl 1 wyib, k14, ssk, k1, turn. 23 sts. Row 8 (WS): Sl 1 wyif, p15, p2tog, p1, turn. 22 sts. Row 9 (RS): Sl 1 wyib, k16, ssk, k1, turn. 21 sts. Row 10 (WS): Sl 1 wyif, p17, p2tog, p1. Do not turn. 20 sts. All heel stitches have been worked.
Cut CC, leaving a 6-inch (15 cm) tail. The right side is facing and the working yarn is at the right-hand edge of the 20 heel stitches, ready to begin the gusset.
If your count is not 20: You have worked an extra decrease, or knitted past a turn. Tink back to the last correct row count rather than compensating later. The gusset numbers assume 20 stitches.
Gusset
Return the 30 held front stitches to a needle so the right side faces you and the first stitch you will knit is the edge next to the pickup you are about to make. Join MC at the right-hand edge of the heel stitches.
Setup round: K20 heel sts, pick up and knit 11 sts along the selvedge you have just reached, pm (marker A), k30 instep sts, pm (marker B), pick up and knit 11 sts along the remaining selvedge. You are back at the right-hand edge of the heel stitches. 72 sts (20 + 11 + 30 + 11 = 72 ✓).
How to pick up each side: Pick up 1 stitch in each of the 10 chain selvedge stitches, working from the heel turn up toward the instep, then pick up 1 stitch in the corner gap where the flap meets the held stitches (11 stitches on that side). Picking up the corner under both legs of the corner strand helps close a hole without adding an extra stitch.
Place the beginning of round at the center of the sole: K10, pm for the new BOR. Rounds now begin at the center of the sole. From this marker the stitches are arranged 21 sole stitches, marker A, 30 instep stitches, marker B, 21 sole stitches. Remove the old side-of-round marker if it is still in place; keep marker A, marker B, and the new BOR marker.
Decrease round: K to 3 sts before marker A, k2tog, k1, sm, knit to marker B, sm, k1, ssk, knit to end. 2 sts decreased.
First decrease round, written in full so you can check placement: K18, k2tog, k1, sm, k30, sm, k1, ssk, k18. 70 sts (20 sole, 30 instep, 20 sole).
Knit 1 round even.
Continue to work a decrease round every other round, with 1 plain knit round between decrease rounds, 5 more times (6 decrease rounds total).
60 sts: 15 sole stitches, marker A, 30 instep stitches, marker B, 15 sole stitches (72 − 6 × 2 = 60 ✓).
Stop after the 6th decrease round. Do not work an extra plain round here unless you simply want the foot longer; the foot section below includes all remaining even rounds.
Foot
Continue with MC in stockinette stitch (knit every round) until the foot measures 8½ inches (21.5 cm) from the back of the heel, measuring along the sole with the foot slightly stretched.
The gusset rounds already worked are part of this measurement. At gauge you will have several inches of plain knitting left after the gusset; if the foot already measures 8½ inches when you finish the gusset, begin the toe immediately.
The toe adds about 3 inches (7.5 cm). Finished foot length is 11½ inches (29 cm): 8½ + 3 = 11½ ✓.
For a different foot length, knit until the sole measures 3 inches (7.5 cm) less than the length you want, then begin the toe.
Cut MC, leaving a 6-inch (15 cm) tail.
Toe
Join CC. Knit 1 round even. Keep BOR at the center of the sole, with marker A and marker B at the sides of the instep.
Toe decrease round: K to 3 sts before marker A, k2tog, k1, sm, k1, ssk, k to 3 sts before marker B, k2tog, k1, sm, k1, ssk, knit to end. 4 sts decreased.
First toe decrease round, written in full: K12, k2tog, k1, sm, k1, ssk, k24, k2tog, k1, sm, k1, ssk, k12. 56 sts.
Work a toe decrease round every other round 6 more times (7 decrease rounds total), with 1 plain knit round between decrease rounds.
Stitch count after each decrease round: 56, 52, 48, 44, 40, 36, 32.
32 sts: 8 sole, 16 instep, 8 sole (60 − 7 × 4 = 32 ✓).
Then work a toe decrease round every round 4 times.
Stitch count after each of these rounds: 28, 24, 20, 16.
16 sts: 4 sole, 8 instep, 4 sole (32 − 4 × 4 = 16 ✓).
The toe shaping is 1 even round + 13 rounds of every-other-round shaping (7 decrease rounds and 6 plain rounds) + 4 every-round decrease rounds = 18 rounds, about 3 inches (7.5 cm) at 6 rounds per inch.
Cut CC, leaving a 24-inch (61 cm) tail for grafting.
Finishing
Arrange stitches for grafting
The 16 remaining stitches are split by the center-sole BOR: 4 sole stitches, 8 instep stitches, 4 sole stitches.
Slip the first 4 stitches of the round (the sole stitches just after the BOR marker) onto the needle that holds the last 4 sole stitches, so all 8 sole stitches sit on one needle. Leave the 8 instep stitches on a second needle. Hold the two needles parallel, wrong sides together, with the right side facing out and the instep needle in front.
Kitchener stitch
Thread the CC tail onto a tapestry needle.
Setup (worked once):
- Insert the tapestry needle through the first front stitch purlwise; leave the stitch on the needle.
- Insert the tapestry needle through the first back stitch knitwise; leave the stitch on the needle.
Repeat until 1 stitch remains on each needle:
- Front needle: insert knitwise, slip the stitch off.
- Front needle: insert purlwise, leave the stitch on.
- Back needle: insert purlwise, slip the stitch off.
- Back needle: insert knitwise, leave the stitch on.
Work step 1 and then step 3 once more to take the last stitch off each needle. Bring the tail to the inside and weave it in.
Adjust tension along the graft so it matches the stockinette fabric. The toe should be smooth, with no gathered ridge.
Hanging loop
With CC and larger needles, CO 3 sts.
I-cord: Knit 3. Do not turn. Slide the stitches back to the left end of the needle, bringing the yarn across the back, and knit them again. Repeat until the cord measures 5 inches (12.5 cm). BO and cut the yarn, leaving an 8-inch (20 cm) tail.
Fold the cord into a loop. Sew both ends securely to the center back of the cuff (the heel side), stitching through both layers of the folded cuff, about ½ inch (1.3 cm) below the top fold. Optional: sew a jingle bell where the loop meets the cuff.
Optional duplicate-stitch star
The star is embroidered after the stocking is knitted, in CC, on the red front. It does not change the stitch count. Skip it if you prefer a plain leg.
Center one star on the 30 front stitches (the stitches that were on the holder during the heel — the side opposite the heel flap). Duplicate-stitch the chart on front stitches 12 through 18. Place the bottom row of the chart about 5½ inches (14 cm) above the top of the heel flap, so the star sits in the middle of the leg.
For a column of stars, repeat the same chart on the same 7 stitches, leaving at least 1 inch (2.5 cm) of red between motifs. Keep every star below the cuff join.
Duplicate stitch: Bring the yarn up at the base of the knit stitch you want to cover. Pass the needle under both legs of the stitch above, then back down into the base where you came out. Cover one knit stitch at a time, following the chart. Do not pull so tightly that the fabric puckers.
Chart: 7 stitches by 7 rows. Row 1 is the bottom row. X = duplicate stitch in CC. · = leave the red stitch uncovered.
· · · X · · ·
· · X X X · ·
· X · X · X ·
X X X X X X X
· X · X · X ·
· · X X X · ·
· · · X · · ·
Weave in ends and block
Weave in all ends on the wrong side, including the cuff join, the heel color changes, and the toe. Close any tiny gap at the instep corners while you weave in the heel tails.
Wet-block or steam the stocking gently to the measurements above. Do not press the ribbed cuff flat. Fold the cuff down over the outside and let it dry in shape. The hanging loop should sit at the center back.
Stitch-count checklist
Use this if you want to confirm the shaping before you bind off the ends.
| Stage | Stitches |
|---|---|
| Cast-on and cuff join | 60 |
| Start of heel (front on hold / flap) | 30 / 30 |
| After heel turn | 20 |
| After gusset pickup | 72 |
| After gusset decreases | 60 (15 + 30 + 15) |
| After 7 every-other-round toe decreases | 32 (8 + 16 + 8) |
| After 4 every-round toe decreases | 16 (4 + 8 + 4) |
| After grafting | closed; 8 stitches grafted to 8 |
Care
Hand wash in cool water and dry flat, or follow the ball-band instructions. Fold the cuff down before the stocking is stored or hung. A wool or wool-blend stocking can be refreshed with steam between seasons.
Disclaimer: This pattern was generated by AI and should be reviewed for accuracy before use. While we strive for quality, AI-generated content may contain errors. Please verify measurements, stitch counts, charts, and instructions before beginning your project. Generated by purlJam.uk
Love this pattern?
Save this pattern to your free PurlJam libraryAccess your pattern anytime
Bookmark this page to access your pattern anytime