Type
Crochet
Difficulty
intermediate
Category
pullover
AI Thinking Process
Planning
Verification
Pattern
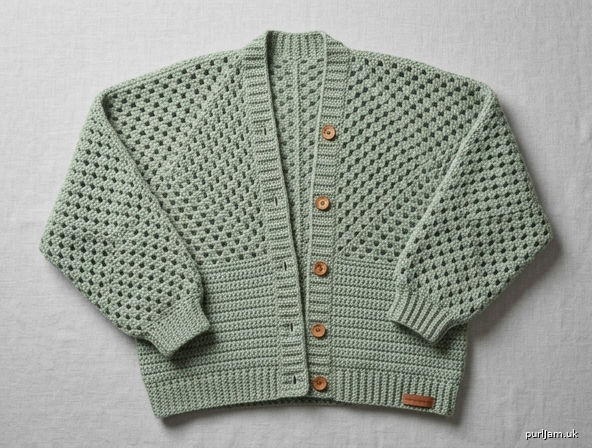
Hexagon Granny Cardigan
DK weight • US terms • Intermediate
A relaxed, drop-shoulder cardigan built from two granny-stitch hexagons that fold into the upper body and sleeves. After the hexagons are seamed, a solid double-crochet lower body and sleeve extensions are added, then stretchy single-crochet ribbing and a continuous button band. The geometric hexagon lines are the design; the extensions make a wearable hip-length garment.
Sizes
Small (Medium, Large, XL, 2XL)
To fit bust: 34–36 (38–40, 42–44, 46–48, 50–52)" / 86.5–91.5 (96.5–101.5, 106.5–112, 117–122, 127–132) cm
Shown in size Medium. Choose the size closest to your actual bust; the cardigan is designed with 4–6" (10–15 cm) of positive ease.
Finished measurements
| S | M | L | XL | 2XL | |
|---|---|---|---|---|---|
| Finished bust (buttoned) | 40" (101.5 cm) | 44" (112 cm) | 48" (122 cm) | 52" (132 cm) | 56" (142 cm) |
| Length, shoulder to hem | 24" (61 cm) | 25" (63.5 cm) | 26" (66 cm) | 27" (68.5 cm) | 28" (71 cm) |
| Sleeve length, shoulder to cuff | 17" (43 cm) | 17½" (44.5 cm) | 18" (45.5 cm) | 18½" (47 cm) | 19" (48.5 cm) |
| Hexagon side | 10" (25.5 cm) | 11" (28 cm) | 12" (30.5 cm) | 13" (33 cm) | 14" (35.5 cm) |
| Back width | 20" (51 cm) | 22" (56 cm) | 24" (61 cm) | 26" (66 cm) | 28" (71 cm) |
| Cuff opening before ribbing | 10" (25.5 cm) | 10½" (26.5 cm) | 11" (28 cm) | 11½" (29 cm) | 12" (30.5 cm) |
Bust check: 4 × hexagon side = 4 × 10 (11, 12, 13, 14)" = 40 (44, 48, 52, 56)" ✓
Materials
Yarn: DK weight (Category 3), approx 245 yd / 224 m per 100 g
- 1300 (1500, 1700, 1950, 2200) yd / 1190 (1370, 1555, 1785, 2010) m
- 6 (7, 8, 9, 10) skeins of 100 g
Suggested fibers: merino, merino blend, or a soft acrylic DK with good stitch definition.
Hooks:
- US H-8 / 5 mm (hexagons, body, sleeves)
- US G-6 / 4 mm (ribbing and button band) or sizes needed to obtain gauge
Notions:
- Yarn needle
- 8 stitch markers
- 6 (6, 7, 7, 8) buttons, ¾" (19 mm)
- Scissors
- Blocking mats and pins
Gauge
Work a gauge hexagon through Round 5, then a separate dc swatch. Check gauge before you begin; hexagon side length is the fit of this garment.
Granny hexagon (5 mm hook):
- 4 clusters = 4" (10 cm) along a side
- 5 rounds = 4" (10 cm) from center to side edge (apothem)
Double crochet fabric (5 mm hook):
- 16 dc and 8 rows = 4" (10 cm), blocked
Ribbing (4 mm hook):
- 18 sc-blo and 20 rows = 4" (10 cm)
If your 5-round hexagon side is larger than 5" (12.5 cm), go down a hook size. If smaller, go up a hook size. Recheck after changing hooks.
Abbreviations (US)
blo — back loop only ch — chain cluster — 3 dc in the same space or stitch dc — double crochet pm — place marker rep — repeat rnd(s) — round(s) RS — right side sc — single crochet sl st — slip stitch sp(s) — space(s) st(s) — stitch(es) WS — wrong side yo — yarn over
Special stitches
- Beginning corner: ch 3 (counts as dc), (2 dc, ch 2, 3 dc) in same sp
- Corner: (3 dc, ch 2, 3 dc) in ch-2 sp
- Dc2tog: yo, insert hook in next st, yo, pull up a loop, yo, pull through 2 loops, yo, insert hook in following st, yo, pull up a loop, yo, pull through 2 loops, yo, pull through all 3 loops on hook
Notes
- Cardigan is worked as two identical hexagons from the center out, then folded, seamed, and extended. It is not worked as separate front/back/sleeve rectangles.
- The side measurement of the blocked hexagon matters more than the round count. Stop when the side equals 10 (11, 12, 13, 14)" / 25.5 (28, 30.5, 33, 35.5) cm.
- Ch 3 at the start of a dc rnd or row counts as 1 dc unless stated otherwise.
- Join hexagon rounds with sl st to top of beginning ch-3. Turn hexagons only if you prefer to cancel the slight spiral; the pattern is written without turning.
- Work over yarn tails where possible. Weave remaining tails after blocking.
- RS of each hexagon is the side facing you as you work (the smoother granny face).
- Optional: change color every 2 rounds on the hexagons for stripes. Fasten off at round ends and join the new color in any ch-2 corner.
Hexagon (make 2)
With 5 mm hook, make a magic ring (or ch 4 and sl st in first ch to form a ring).
Rnd 1: Ch 3 (counts as dc here and throughout), 2 dc in ring, ch 2, (3 dc in ring, ch 2) 5 times, join. (6 clusters, 6 ch-2 corners)
Rnd 2: Sl st in next 2 dc and into first ch-2 sp, beginning corner in same sp, ch 1, *corner in next ch-2 sp, ch 1; rep from * around, join. (12 clusters: 2 per side ✓)
Rnd 3: Sl st in next 2 dc and into first ch-2 sp, beginning corner in same sp, ch 1, 3 dc in next ch-1 sp, ch 1, *corner in next ch-2 sp, ch 1, 3 dc in next ch-1 sp, ch 1; rep from * around, join. (18 clusters: 3 per side ✓)
Rnd 4: Sl st in next 2 dc and into first ch-2 sp, beginning corner in same sp, ch 1, (3 dc in next ch-1 sp, ch 1) twice, *corner in next ch-2 sp, ch 1, (3 dc in next ch-1 sp, ch 1) twice; rep from * around, join. (24 clusters: 4 per side = 4" / 10 cm at gauge ✓)
Rnd 5 and all following rnds: Sl st to first ch-2 sp, beginning corner in same sp, ch 1, (3 dc in next ch-1 sp, ch 1) across to next corner, *corner in next ch-2 sp, ch 1, (3 dc in next ch-1 sp, ch 1) across to next corner; rep from * around, join.
Each round adds 1 cluster to each side (6 clusters total per round).
Work until you have completed 10 (11, 12, 13, 14) rounds, or until each side measures 10 (11, 12, 13, 14)" / 25.5 (28, 30.5, 33, 35.5) cm from ch-2 corner to ch-2 corner, whichever matches the measurement first.
| Size | Rounds | Clusters per side | Total clusters | Side |
|---|---|---|---|---|
| S | 10 | 10 | 60 | 10" (25.5 cm) |
| M | 11 | 11 | 66 | 11" (28 cm) |
| L | 12 | 12 | 72 | 12" (30.5 cm) |
| XL | 13 | 13 | 78 | 13" (33 cm) |
| 2XL | 14 | 14 | 84 | 14" (35.5 cm) |
10 clusters × 1" = 10" side ✓ 11 × 1" = 11" ✓ 12 × 1" = 12" ✓ 13 × 1" = 13" ✓ 14 × 1" = 14" ✓
Fasten off, leaving a 24" (61 cm) tail on each hexagon for seaming.
Mark the sides on each hexagon before blocking. Place a marker in each of the 6 ch-2 corners. Number the sides 1–6 clockwise:
           Side 1
         /        \
   Side 6          Side 2
      |              |
   Side 5          Side 3
         \        /
           Side 4
Use the same numbering on both hexagons.
Block the hexagons
Pin each hexagon to the same measurements, RS up, stretching just enough to open the granny fabric and even the sides:
- Side: 10 (11, 12, 13, 14)" / 25.5 (28, 30.5, 33, 35.5) cm
- Vertex to opposite vertex: 20 (22, 24, 26, 28)" / 51 (56, 61, 66, 71) cm
- Side to opposite side: about 17¼ (19, 20¾, 22½, 24¼)" / 44 (48.5, 52.5, 57, 61.5) cm
Steam or wet-block and let dry completely. Both hexagons must match. Do not assemble unblocked hexagons.
Assemble the upper body
1. Form the sleeves
Work the same on both hexagons.
Lay one hexagon RS up. You will seam two adjacent sides to create a 3-D sleeve, leaving an opening at the shared corner for the cuff.
Left half (as worn): With RS together, align Side 2 with Side 3 (they share a corner). That shared corner is the cuff end.
Right half (as worn): With RS together, align Side 6 with Side 5. That shared corner is the cuff end.
On each aligned pair:
- Measure 4½ (4½, 5, 5, 5½)" / 11.5 (11.5, 12.5, 12.5, 14) cm from the shared (cuff) corner along both edges and place a marker. Leave this section open.
- From the marker, whipstitch or mattress-stitch the rest of those two sides together, ending at the far corners. This is the underarm seam.
- Cuff opening = 2 × 4½ (4½, 5, 5, 5½)" = 9 (9, 10, 10, 11)" plus the corner, finishing at 10 (10½, 11, 11½, 12)" / 25.5 (26.5, 28, 29, 30.5) cm around ✓
Turn each piece RS out. You now have two 3-D pieces, each with a sleeve opening and four remaining sides (front, two lower sides, and back).
2. Join center back
Place the two pieces RS together, matching Side 4 to Side 4 (the back sides).
Starting at the lower end of Side 4, seam toward the top, leaving the last 3 (3¼, 3½, 3¾, 4)" / 7.5 (8.5, 9, 9.5, 10) cm unseamed for the back neck.
The remaining open vertical edges (Side 1 on each hexagon) are the upper fronts.
Lower body
The lower edge is the remaining hexagon sides (a gentle zigzag). You will pick up across the entire lower edge in one row so the hem becomes straight.
With 5 mm hook, RS facing, join yarn at the lower corner of the left front (as worn).
Pickup row (RS): Ch 3 (counts as dc), pick up and dc 159 (175, 191, 207, 223) more sts evenly across the entire lower edge, ending at the lower corner of the right front. 160 (176, 192, 208, 224) dc
Pickup rate: about 4 dc per inch / 16 dc per 10 cm. Spread stitches evenly, working 1 dc in each dc along cluster edges, 1 dc in each ch-1 sp, and 2 dc in each ch-2 corner so the points do not pull.
Check: 160 dc ÷ 16 sts per 4" = 40" (S hem = S bust) ✓ 176 ÷ 16 × 4" = 44" ✓ 192 = 48" ✓ 208 = 52" ✓ 224 = 56" ✓
Row 1 (WS): Ch 3, turn, dc in each dc across. 160 (176, 192, 208, 224) dc
Rows 2–23: Ch 3, turn, dc in each dc across.
23 rows × 0.5" = 11.5" (29 cm) ✓
Fasten off.
Length so far (shoulder to dc edge): hexagon drop 10 (11, 12, 13, 14)" + 11.5" = 21.5 (22.5, 23.5, 24.5, 25.5)" ✓ Hem ribbing will add 2.5" (6.5 cm).
Hem ribbing
With 4 mm hook, RS facing, join yarn at the left-front lower corner.
Setup: Ch 1, sc in each dc across. 160 (176, 192, 208, 224) sc. Do not fasten off.
Ribbing is worked perpendicular to the hem and joined as you go.
Row 1: Ch 11, sc in 2nd ch from hook and in each ch across, sl st in next 2 sc of the setup row, turn. 10 sc
Row 2: Skip 2 sl sts, sc blo in each of 10 sc, turn.
Row 3: Ch 1, sc blo in each of 10 sc, sl st in next 2 sc of the setup row, turn.
Rep Rows 2–3 across the hem, ending with a Row 2. Fasten off.
10 sc-blo at ribbing gauge (18 sc = 4") = 2.2"; after a light steam, band measures 2½" (6.5 cm) ✓
Finished length: 21.5 (22.5, 23.5, 24.5, 25.5)" + 2.5" = 24 (25, 26, 27, 28)" / 61 (63.5, 66, 68.5, 71) cm ✓
Sleeves
Work both sleeves the same.
With 5 mm hook, RS facing, join yarn at the underarm seam on the cuff opening.
Rnd 1: Ch 3 (counts as dc), work 39 (41, 43, 45, 47) more dc evenly around the opening, join to top of ch-3. 40 (42, 44, 46, 48) dc
Check: 40 dc ÷ 16 sts per 4" = 10" cuff opening (S) ✓ 42 dc = 10½" ✓ 44 = 11" ✓ 46 = 11½" ✓ 48 = 12" ✓
Rnds 2–3: Ch 3, dc in each dc around, join.
Decrease rnd: Ch 3, dc2tog, dc around to last 2 sts, dc2tog, join. 2 sts decreased
Work in dc, repeating a decrease rnd every 3rd (3rd, 2nd, 2nd, 2nd) rnd 4 (4, 4, 4, 4) times total, then work even until the sleeve measures 4½ (4, 3½, 3, 2½)" / 11.5 (10, 9, 7.5, 6.5) cm from pickup, including Rnd 1.
Stitch count after 4 decrease rnds: 40 − 8 = 32 (42 − 8 = 34; 44 − 8 = 36; 46 − 8 = 38; 48 − 8 = 40) dc ✓
Row/rnd height check: 9 (8, 7, 6, 5) rnds × 0.5" = 4.5 (4, 3.5, 3, 2.5)" ✓
Do not fasten off if you prefer to change to the 4 mm hook on the next st; or fasten off and rejoin.
Cuff ribbing
With 4 mm hook, RS facing, sc around the last sleeve rnd, decreasing 0 (0, 0, 2, 4) sts evenly so you have 32 (34, 36, 36, 36) sc. Join. Do not turn.
Work perpendicular ribbing as for the hem: Row 1: Ch 11, sc in 2nd ch from hook and in each ch, sl st in next 2 sc of the cuff, turn. 10 sc Row 2: Skip 2 sl sts, sc blo in each of 10 sc, turn. Row 3: Ch 1, sc blo in each of 10 sc, sl st in next 2 sc of the cuff, turn.
Rep Rows 2–3 around. Seam the last ribbing row to the starting chain with whipstitch on the WS. Fasten off.
Repeat for the second sleeve.
Sleeve length: hexagon radius 10 (11, 12, 13, 14)" + extension 4.5 (4, 3.5, 3, 2.5)" + cuff 2.5" = 17 (17½, 18, 18½, 19)" / 43 (44.5, 45.5, 47, 48.5) cm ✓
Button band and neckband
Worked in one piece along the right front, around the neck, and down the left front.
With 4 mm hook, RS facing, join yarn at the lower right-front corner (as worn), at the outer edge of the hem ribbing.
Pickup rnd/row: Ch 1, pick up and sc evenly as follows:
- 4 sc for every 5 rows along dc fabric
- 1 sc in each sc-blo row end of the hem ribbing
- 1 sc in each st or ch-sp along hexagon front edges
- 3 sc in the corner where the front meets the back-neck opening (both sides)
- 1 sc in each st across the back neck
Place markers at: (1) start of neck shaping / top of right hexagon front, (2) right back-neck corner, (3) left back-neck corner, (4) top of left hexagon front.
Target counts (adjust by 1–2 sts if needed to lie flat):
- Each front, hem to neck marker: 86 (90, 94, 98, 102) sc
- Back neck, between corner markers: 24 (26, 28, 30, 32) sc
- Total: 196 (206, 216, 226, 236) sc
86 + 24 + 86 = 196 (S) ✓ 90+26+90=206 ✓ 94+28+94=216 ✓ 98+30+98=226 ✓ 102+32+102=236 ✓
Row 1 (WS): Ch 1, turn, sc in each sc across.
Row 2 (RS): Ch 1, turn, sc in each sc across.
Row 3 (buttonhole row, WS): Buttons sit on the left front as worn; buttonholes are on the right front.
Ch 1, turn, sc in each sc to the first front-neck marker, placing 6 (6, 7, 7, 8) buttonholes on the right front only, as follows:
Even spacing: first buttonhole 1" (2.5 cm) above the hem, last buttonhole ½" (1.5 cm) below the right neck marker, remaining holes evenly between.
Buttonhole: Ch 2, skip 2 sc, sc in next sc. On the rest of the band (neck and left front), sc in each sc.
Buttonhole count check: 6 (6, 7, 7, 8) holes ✓
Row 4 (RS): Ch 1, turn, sc in each sc, working 2 sc in each ch-2 buttonhole sp.
Row 5 (WS): Ch 1, turn, sc in each sc across.
Row 6 (RS): Ch 1, turn, sc in each sc across. Fasten off.
Band depth: 6 rows of sc at 18 sc / 4" height is not the right comparison — sc row gauge is about 4 rows = 1". 6 rows ≈ 1½" (4 cm) ✓
Finishing
- Weave in all remaining ends.
- Sew buttons to the left front, opposite the buttonholes, through the band only (not through the body), so the band stays smooth.
- Lightly steam the dc body, sleeves, and bands. Do not flatten the granny texture; hover the iron or use a steamer.
- Check that both underarm seams are secure and that the back-neck opening sits comfortably. If the neck is wider than you like, run a row of sl st on the WS of the back neck, drawing it in by ½–1" (1.5–2.5 cm).
Schematic (inches)
Finished bust (buttoned)
40 (44, 48, 52, 56)"

Length
24 (25, 26, 27, 28)"

Sleeve (shoulder to cuff)
17 (17.5, 18, 18.5, 19)"

        ____ neck ____
       /              \
      /    hexagon     \     drop shoulder
     |     upper body   |
     |                  |---- sleeve
     |   dc extension   |
     |                  |
     |____ rib hem _____|
Hexagon side 10 (11, 12, 13, 14)" forms both half-back and half-front of the upper body (back width = 2 × side = 20 (22, 24, 26, 28)" ✓).
Fit notes
- This is a drop-shoulder, relaxed cardigan. The shoulder sits at the center of each hexagon, not at the natural shoulder point.
- If you want it more cropped, work 15 dc body rows (7.5") instead of 23; finished length becomes 20 (21, 22, 23, 24)".
- If you want it longer, add dc rows in multiples of 2; every 2 rows add 1" (2.5 cm).
- If sleeves are short, add even dc rnds before the cuff; every 2 rnds add 1" (2.5 cm).
- For a denser, warmer hexagon, use ch-1 corners instead of ch-2 and keep all other instructions the same; recast gauge, because sides will grow more slowly.
Yarn substitution
Any DK that matches 16 dc = 4" (10 cm) on a 5 mm hook. Plant-fiber DK (cotton, linen) will grow more when worn; consider going down one size or working one fewer hexagon round if you use inelastic fiber.
Disclaimer: This pattern was generated by AI and should be reviewed for accuracy before use. While we strive for quality, AI-generated content may contain errors. Please verify measurements, stitch counts, charts, and instructions before beginning your project. Generated by purlJam.uk
Love this pattern?
Save this pattern to your free PurlJam libraryAccess your pattern anytime
Bookmark this page to access your pattern anytime