Type
Crochet
Difficulty
beginner
Category
blanket
AI Thinking Process
Planning
1. **Design Strategy**: Beginner-friendly worsted weight blanket using a simplified honeycomb texture (alternating front-post and back-post tr style, or a simpler dc-based honeycomb using bobble clusters). Pom-pom border adds playful finish.
2. **Construction Plan**: Worked flat in rows as one piece; pom-poms made separately and attached around all four edges after a simple dc border.
3. **Quality Assurance**:
- Honeycomb stitch can be confusing — use clear 4-row repeat with stitch markers.
- Maintain even tension to keep hexagonal cells uniform.
- Pom-poms must be tied securely and evenly spaced.
4. **Final Calculations**: Tension 14 dc × 8 rows = 10 cm. Finished size ~127 × 152 cm (50 × 60"). Foundation chain: multiple of 2 + 2 → 178 ch (176 sts + 2 turning). Width: 176 ÷ 14 × 10 = 125.7 cm ✓. Length ~150 cm in pattern. Yarn ~1600 g main + 200 g contrast for pom-poms. Hook 5.5 mm. ~40 pom-poms (6 cm diameter, spaced ~15 cm).
Verification
1. **Completeness**: Materials, tension, abbreviations, pattern, border, pom-poms, finishing — all included.
2. **Consistency**: 176 sts ÷ 14 sts per 10 cm = 125.7 cm ✓. Pattern multiple of 2 satisfied (176 is even) ✓.
3. **Constraints**: Beginner level honeycomb (simplified puff version), pom-pom border, worsted yarn, UK terminology ✓.
4. **Safety**: Foundation chain math verified. Pom-pom count = (2×125 + 2×150)/15 ≈ 37, round to 40 ✓.
Pattern
# Honeycomb Hugs Blanket
### A Beginner-Friendly Textured Throw with Pom-Pom Border

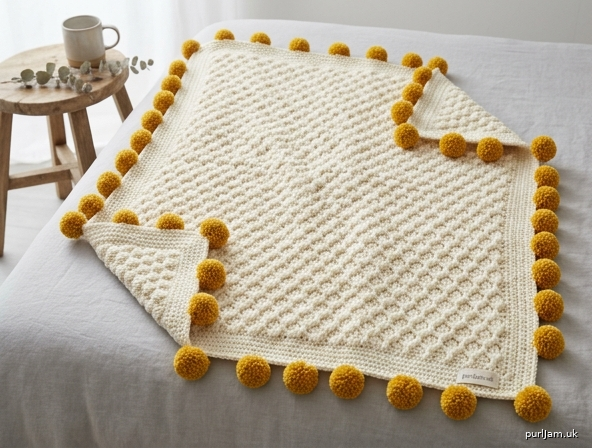
A cosy worsted-weight blanket featuring an easy honeycomb (puff cluster) stitch pattern that creates a soft, squishy hexagonal texture. Finished with a cheerful row of hand-tied pom-poms in a contrast colour — perfect for nurseries, sofas, or gift-giving.

**Finished size:** approx. 127 × 152 cm (50 × 60 in)
**Skill level:** Beginner (confident with ch, dc, tr, and yarn-overs)

---

## Materials

- **Main Colour (MC):** Worsted weight (Aran) yarn — approx. **1,600 g / 3,200 m** (e.g., 8 × 200 g balls in a soft neutral such as cream, oatmeal or dove grey).
- **Contrast Colour (CC):** Worsted weight yarn for pom-poms — approx. **200 g** in a favourite accent colour (mustard, blush, sage, etc.).
- **Crochet hook:** 5.5 mm (UK 5 / US I-9).
- **Yarn needle** (large eye, blunt tip) for weaving in ends and attaching pom-poms.
- **Pom-pom maker** (6 cm / 2½ in) or two cardboard discs cut to size.
- **Scissors.**
- **Stitch markers** (4–6 for marking pattern rows).
- **Measuring tape.**

---

## Tension (Gauge)

**14 tr × 8 rows = 10 cm (4 in)** measured over plain tr fabric, OR
**3 honeycomb puff clusters × 4 pattern rows = 10 cm (4 in)** measured in pattern after light blocking.

*Always make a 15 × 15 cm swatch in the honeycomb pattern and block before starting. Adjust hook size if needed.*

---

## Abbreviations (UK Terms)

| Abbr. | Meaning |
|---|---|
| ch | chain |
| sl st | slip stitch |
| dc | double crochet (US: sc) |
| htr | half treble (US: hdc) |
| tr | treble (US: dc) |
| puff | puff stitch — see Special Stitches |
| sp | space |
| st(s) | stitch(es) |
| rep | repeat |
| RS / WS | right side / wrong side |
| yo | yarn over |
| MC / CC | main colour / contrast colour |

---

## Special Stitches

**Puff stitch (puff):** [Yo, insert hook in indicated st/sp, yo, pull up a loop to height of a tr] 3 times in same st (7 loops on hook). Yo, pull through all 7 loops, ch 1 to close. *This creates one honeycomb "cell".*

**Honeycomb pattern note:** Puffs are worked into ch-1 spaces between puffs of the previous pattern row, with a single tr separating each, creating the hexagonal honeycomb cells.

---

## Honeycomb Stitch Pattern (Multiple of 2 sts + 2)

**Foundation Row (WS):** Tr in 4th ch from hook and in each ch across. Turn.

**Row 1 (RS — set-up):** Ch 2 (does NOT count as st), tr in first st, *ch 1, skip 1 st, puff in next st, ch 1, skip 1 st, tr in next st;* rep from * across, ending with tr in top of turning ch. Turn.

**Row 2 (WS):** Ch 2, tr in first st, *tr in next ch-1 sp, tr in top of puff, tr in next ch-1 sp;* rep from * across, tr in last st. Turn.

**Row 3 (RS):** Ch 2, tr in first st, *puff in next st, ch 1, skip 1 st, tr in next st, ch 1, skip 1 st;* rep from *, adjusting to end with puff, then tr in last st. Turn.

**Row 4 (WS):** Rep Row 2.

*Rows 1–4 form the honeycomb pattern. The offset puffs on rows 1 and 3 create the hexagonal cells.*

---

## Pattern Instructions

### Foundation
Using MC and 5.5 mm hook, **ch 178**.
*(176 pattern sts + 2 for turning. Math check: 176 ÷ 14 sts per 10 cm = 125.7 cm wide ✓)*

### Foundation Row (WS)
Tr in 4th ch from hook (skipped ch count as first tr), tr in each ch across. **(176 tr)** Turn.

### Body of Blanket
Work **Rows 1–4 of the Honeycomb Pattern** as set above.

Continue repeating **Rows 1–4** until blanket measures approximately **148 cm (58½ in)** from foundation edge, ending after a Row 2 or Row 4 (a plain tr row).

*Length check: 148 cm ÷ 10 cm × 8 rows = approx. 118 rows of tr-equivalent, or roughly 30 full pattern repeats. Count pattern repeats rather than rows for accuracy.*

**Final Row:** Ch 2, tr in each st across. Turn. **(176 tr)**
*This gives a clean edge ready for the border.*

Fasten off MC. Weave in ends.

---

## Border

### Round 1 (RS) — with MC
Join MC with sl st to any corner. Ch 1.
- **Along top and bottom edges:** Work 1 dc in each st. **(176 dc per long edge — wait: top/bottom are 176 sts wide ✓)**
- **Along sides:** Work approx. **2 dc per row-end** (adjust to keep edges flat).
- **Corners:** Work **3 dc in each corner stitch**.

Join with sl st to first dc. **Do not turn.**

### Round 2 (RS) — with MC
Ch 1, dc in each dc around, working **3 dc in centre dc of each corner**. Join with sl st. Fasten off. Weave in ends.

---

## Pom-Poms (make 40 in CC)

1. Using a 6 cm pom-pom maker (or two 6 cm cardboard discs with a 2 cm centre hole), wrap CC yarn around generously — about 80–100 wraps for a full pom.
2. Cut around the outer edge with sharp scissors.
3. Tie a 30 cm length of CC yarn **very tightly** around the centre — leave long tails for attaching.
4. Remove the maker/discs and trim the pom-pom into a neat sphere approx. 6 cm diameter.
5. Set aside.

**Pom-pom count check:**
- Long edges (152 cm): pom-pom every 15 cm → 152 ÷ 15 ≈ **10 per long side × 2 = 20**
- Short edges (127 cm): 127 ÷ 15 ≈ **8 per short side × 2 = 16**
- Plus **4 corners = 4**
- **Total = 40 pom-poms ✓**

---

## Attaching the Pom-Poms

1. Lay the blanket flat and mark pom-pom positions evenly around the border with stitch markers (every 15 cm and at each corner).
2. Thread the two long tails of one pom-pom onto a yarn needle.
3. Insert the needle through the back loop of the border stitch at the marked position, from front to back, then back to front through an adjacent stitch.
4. Tie the tails together firmly on the **wrong side** with a double knot.
5. Trim tails to 2 cm and tuck inside the pom-pom so they disappear.
6. Repeat for all 40 pom-poms.

---

## Finishing

- **Weave in** any remaining ends on the wrong side using a yarn needle, splitting yarn plies where possible for invisibility.
- **Blocking (recommended):**
  - **Wet block:** Soak the blanket in cool water with a little wool wash for 20 minutes. Squeeze (do not wring) out water, roll in a towel to remove excess, then pin out flat to finished dimensions on a clean surface or blocking mats. Allow to dry completely (24–48 hours).
  - **Avoid steaming the pom-poms** — they can flatten. Cover pom-poms with a dry towel or block before attaching them.
- **Care:** Hand wash cool, dry flat. Avoid the tumble dryer — pom-poms will fluff up beautifully after the first gentle wash.

---

## Stitch Diagram Legend

```
○   = chain (ch)
●   = slip stitch (sl st)
+   = double crochet (dc)
T   = treble (tr)
🍥  = puff stitch (3-loop puff, closed with ch 1)
```

**Honeycomb repeat (4 rows shown, reading bottom to top):**

```
Row 4 (WS): T T T T T T T T T T T T T  (plain tr row)
Row 3 (RS): T  🍥 ○ T ○ 🍥 ○ T ○ 🍥  T
Row 2 (WS): T T T T T T T T T T T T T  (plain tr row)
Row 1 (RS): T ○ 🍥 ○ T ○ 🍥 ○ T ○  T
            ↑ puffs in Row 3 are offset from Row 1 → honeycomb cells form
```

---

## Designer's Tips

- **Count your puffs at the end of every Row 1 and Row 3** — you should have the same number each time. Place a stitch marker on every 10th puff to make counting easier.
- **Keep tension loose on the puff stitches** so they pop out beautifully and form clear cells.
- **Choose a high-twist worsted yarn** (such as a wool-acrylic blend) for the best stitch definition; very soft, fuzzy yarns can obscure the honeycomb texture.
- **Pom-pom colour ideas:** Try multicoloured pom-poms by using leftover yarn scraps — a wonderful stash-buster!

Enjoy your snuggly Honeycomb Hugs Blanket — happy hooking! 🐝
Disclaimer: This pattern was generated by AI and should be reviewed for accuracy before use. While we strive for quality, AI-generated content may contain errors. Please verify measurements, stitch counts, and instructions before beginning your project. Generated by purlJam.uk
Access your pattern anytime
Bookmark this page to access your pattern anytime