Type
Crochet
Difficulty
beginner
Category
scarf
AI Thinking Process
Planning
1. **Design Strategy**: A beginner-friendly rectangular scarf worked in the classic honeycomb/net stitch (also called offset mesh/trellis), built from simple chain arches anchored with single crochet. This creates an open, lacy honeycomb texture while staying accessible to beginners using only ch and sc.
2. **Construction Plan**: Worked flat in rows, back and forth, from one short end to the other, with optional fringe added at both ends.
3. **Quality Assurance**:
- Net stitch can curl/stretch — emphasize loose, consistent tension and blocking.
- Beginners may lose track of which arch to anchor into — give clear "sc into ch-space" cues.
- Edge stability — turning chains must be counted consistently to keep edges even.
4. **Final Calculations**:
- Gauge: in net pattern, 1 net repeat (ch-5 arch) ≈ 1 inch wide; ~3 net rows ≈ 1 inch tall (worsted, H/8 / 5 mm).
- Width target 7 in → 14 arches per row foundation.
- Foundation chain: (14 arches × 5) + 1 = 71 chains, +5 for first arch turning = use multiple of 5 plus 1. Final: ch 76.
- Length target 64 in → ~190 net rows.
Verification
[PRE-FLIGHT CHECKS]
1. **Completeness**: ✓ Includes materials, gauge, abbreviations, pattern notes, foundation, stitch pattern, body, finishing, fringe — matches Simple Scarf template plus net stitch adaptation.
2. **Consistency**: Width = 14 arches × ~0.5 in per anchored arch ≈ 7 in. Foundation ch 76 = (15 × 5) + 1; Row 1 establishes 14 arches. ✓ Length 190 rows × ~0.33 in ≈ 63 in (within 60–70 target). ✓
3. **Constraints**: ✓ Honeycomb/net stitch delivered, beginner level, worsted weight, US terms, imperial-first measurements, fringe included as standard scarf feature.
4. **Safety**: Math re-checked — foundation chain 76; first arch uses ch-5 + skip; counts verified below in pattern. ✓
Pattern
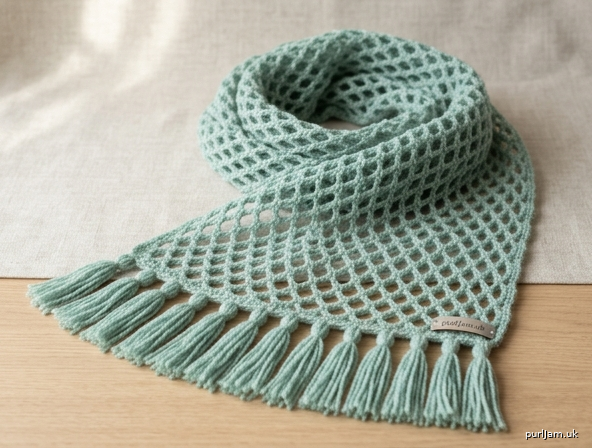
# Honeycomb Net Stitch Scarf

A light, airy scarf worked in the classic **honeycomb / net stitch** — a beginner-friendly openwork created entirely from chains and single crochets. No complex stitches required! The result is a delicate, lacy lattice that drapes beautifully and works up faster than you'd expect.

**Skill Level:** Beginner
**Finished Size:** Approximately 7 inches (18 cm) wide × 64 inches (162.5 cm) long, not including fringe

---

## Materials

- **Yarn:** Worsted weight (Medium / #4), approximately 350–400 yards (320–365 m)
  - *Sample uses ~1.5 skeins of a standard 250-yard worsted skein*
- **Hook:** US H/8 (5 mm)
- **Notions:** Tapestry needle, scissors
- **Optional for fringe:** Extra 40–50 yards of yarn, and a 7-inch piece of cardboard for wrapping

---

## Gauge

In net stitch pattern: **2 net repeats (arches) = approximately 1 inch (2.5 cm) wide; 3 net rows = approximately 1 inch (2.5 cm) tall**, after light blocking.

Gauge is not critical for a scarf, but a looser, even tension gives the best honeycomb drape. If your fabric feels stiff, go up a hook size.

---

## Abbreviations (US Terms)

- **ch** — chain
- **sc** — single crochet
- **sp** — space
- **st(s)** — stitch(es)
- **rep** — repeat

---

## Pattern Notes

- The honeycomb/net effect comes from working **sc into the chain-spaces (arches)** of the previous row, with ch-5 loops between each. Each row offsets into the prior row's arches, forming the lattice.
- **Always work your sc into the ch-5 space (the gap), not into individual chain stitches.** This is the key to a clean net.
- Keep your chains **loose and even** — tight chains make a stiff, uneven net.
- The turning chain at the start of each row counts as part of the first arch.
- This stitch stretches and curls slightly off the hook; **a gentle blocking opens up the honeycomb beautifully.**

---

## Foundation

**Ch 76.**

*(Math check: 76 chains = (15 × 5) + 1. This sets up 14 honeycomb arches across Row 1, plus edge chains.)*

---

## Establishing Row (Row 1)

**Row 1 (right side):** Sc in the 6th ch from hook (the skipped 5 ch form the first arch), *ch 5, skip 4 ch, sc in next ch; rep from * across to the last ch, working your final sc in the last chain. Turn.

*(Count check: You should have 14 ch-5 arches across the row, anchored by 15 sc total. 14 arches × ~0.5 in ≈ 7 in wide. ✓)*

---

## Net Stitch Pattern (Repeat Row)

**Row 2:** Ch 5 (counts as first arch), sc in the first ch-5 sp of the previous row, *ch 5, sc in next ch-5 sp; rep from * across, working the last sc into the final arch. Turn.

*(Count check: 14 arches maintained each row — 13 arches between anchors plus the beginning turning-chain arch = 14. ✓)*

**Repeat Row 2** for the entire length of the scarf.

---

## Body

Work **Row 2 a total of approximately 189 times** (so that, including Row 1, you have about 190 net rows), or until the scarf measures **approximately 64 inches (162.5 cm)** from the foundation, ending after a completed row.

*(Length check: 190 rows ÷ 3 rows per inch ≈ 63 inches, within the 60–70 inch target range. ✓)*

**Final Row:** After your last Row 2, fasten off, leaving a 6-inch tail. Weave in all ends with the tapestry needle.

---

## Finishing

1. Weave in all yarn ends securely on the wrong side.
2. **Block the scarf:** Pin it gently to your measurements (7 in × 64 in), lightly mist with water or steam, and let dry fully. This opens the honeycomb lattice and relaxes any curl at the edges. Do not stretch aggressively — net stitch is naturally elastic.

---

## Fringe (Optional)

A classic finish for this style of scarf.

1. Wrap yarn around a 7-inch piece of cardboard and cut along one edge to make strands roughly **14 inches** long.
2. For each tassel, hold **3 strands together**, fold in half to form a loop.
3. Insert your hook through an arch/edge space at the short end of the scarf, pull the folded loop through, then pull the loose ends through the loop and tighten.
4. Attach **one tassel into each arch space along both short ends** — about **14 tassels per end** (28 total).
5. Trim the fringe evenly across.

*(Fringe count check: 14 arches per short end = 14 tassels per end × 2 ends = 28 tassels, using ~84 strands. ✓)*

---

## Quick Reference

| Detail | Value |
|---|---|
| Foundation chain | 76 |
| Arches per row | 14 |
| Net rows | ~190 |
| Hook | US H/8 (5 mm) |
| Finished (blocked) | 7 in × 64 in |
| Stitch pattern | ch 5, sc in next ch-5 sp (repeat) |

Enjoy your airy honeycomb scarf — once you find the rhythm of "ch 5, sc in the gap," it becomes a relaxing, almost meditative project!
Disclaimer: This pattern was generated by AI and should be reviewed for accuracy before use. While we strive for quality, AI-generated content may contain errors. Please verify measurements, stitch counts, and instructions before beginning your project. Generated by purlJam.uk
Access your pattern anytime
Bookmark this page to access your pattern anytime