Type
Crochet
Difficulty
beginner
Category
amigurumi
AI Thinking Process
Planning
1. **Design Strategy**: A horseshoe crab is an ideal easy amigurumi—a domed carapace (modified half-sphere worked flat-ish into a teardrop), a smaller hinged abdomen, and a long pointed tail (telson) made as a tapering cone. DK yarn in brown/olive keeps it beginner-friendly with only sc, inc, and dec.
2. **Construction Plan**: Worked in three pieces—a stuffed domed carapace shaped as a wide teardrop, a smaller flatter abdomen section, and a tapered telson tail—then assembled with the underside left flat.
3. **Quality Assurance**:
- Keep carapace dome rounded but flat on bottom (don't over-stuff).
- Telson taper must close to a firm point—decrease evenly.
- Abdomen should overlap under carapace for the hinged crab silhouette.
4. **Final Calculations**: Gauge: 5 sc x 5.5 rnds = 1" (2.5 cm) in DK on US E-4/3.5 mm. Carapace max 30 sts ≈ 4" (10 cm) wide. Abdomen max 18 sts ≈ 2.5" (6.5 cm). Telson ~3" (7.5 cm) long. Finished length head-to-tail ≈ 7" (18 cm).
Verification
[PRE-FLIGHT CHECKS]
1. **Completeness**: Includes materials, gauge, all three pieces (carapace, abdomen, telson), assembly, and finishing — all template sections covered.
2. **Consistency**: Stitch counts verified per round; gauge (5 sc/inch) supports 30-st carapace = 6" circumference dome / ~4" width. ✓
3. **Constraints**: User requested horseshoe crab; template is "simple shapes / non-animal" but supports adaptation — telson tail and two-part body explicitly added per user precedence rule. ✓
4. **Safety**: All inc/dec rounds checked to land on whole-number counts; no fractional stitches.
Pattern
# Horseshoe Crab — Easy Crochet Amigurumi

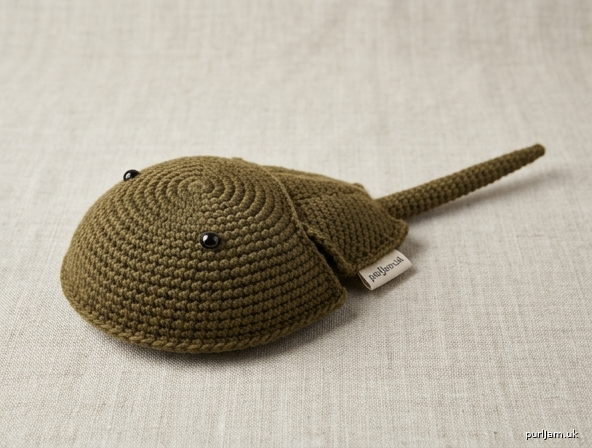
A friendly, palm-sized horseshoe crab (*Limulus*-style!) with a domed carapace, hinged abdomen, and a long pointed tail (the telson). Beginner-friendly: only magic ring, sc, inc, and dec.

**Finished size:** Approx. 7" (18 cm) head-to-tail, 4" (10 cm) wide.
**Skill level:** Easy.

---

## Materials

- **Yarn:** DK weight (Light #3), approx. 60 yds (55 m) in brown, olive, or tan (Main Color, MC). Small amount of cream/lighter shade optional for underside.
- **Hook:** US E-4 (3.5 mm) — one size down from the DK label for tight stitches.
- **Fiberfill** polyester stuffing.
- **Yarn needle** for assembly.
- **Stitch marker** to track round beginnings.
- **Optional:** Two 6 mm safety eyes (or embroider with black thread); embroidery thread for detail.

## Gauge

5 sc × 5.5 rounds = 1" (2.5 cm) in single crochet, worked in continuous rounds.
*Exact gauge is not critical — just work tightly so stuffing won't show.*

## Abbreviations (US terms)

- **sc** = single crochet
- **inc** = 2 sc in same stitch
- **dec** = invisible decrease (sc 2 sts together)
- **st(s)** = stitch(es)
- **rnd** = round
- **[ ]** = total stitch count at end of round
- Work in continuous spirals (do NOT join) unless noted. Move your marker up each round.

---

## PART 1 — Carapace (Domed Shell)

This is the large rounded front shell. Worked as a half-sphere, slightly elongated.

- **Rnd 1:** 6 sc in magic ring **[6]**
- **Rnd 2:** inc in each st around **[12]**
  *(6 + 6 = 12 ✓)*
- **Rnd 3:** (sc, inc) around **[18]**
  *(6 sc + 6 inc = 18 ✓)*
- **Rnd 4:** (2 sc, inc) around **[24]**
  *(8 groups × 3 = 24 ✓)*
- **Rnd 5:** (3 sc, inc) around **[30]**
  *(6 groups × 5 = 30 ✓)*
- **Rnds 6–10:** sc around (5 rounds even) **[30]**
- **Rnd 11:** (3 sc, dec) around **[24]**
  *(6 groups × 4 = 24 ✓)*

> **Stuff the carapace firmly now**, keeping the shape a rounded dome with a flatter open bottom.

- **Rnd 12:** (2 sc, dec) around **[18]**
  *(6 groups × 3 = 18 ✓)*
- **Rnd 13:** sc around **[18]**

Do NOT close. Slip stitch into next st and fasten off, leaving an 18-st flat oval opening (this is the underside). Leave a long tail for seaming.

---

## PART 2 — Abdomen (Rear Plate)

This smaller, flatter section hinges behind the carapace.

- **Rnd 1:** 6 sc in magic ring **[6]**
- **Rnd 2:** inc in each st around **[12]**
  *(6 + 6 = 12 ✓)*
- **Rnd 3:** (sc, inc) around **[18]**
  *(6 sc + 6 inc = 18 ✓)*
- **Rnds 4–6:** sc around (3 rounds even) **[18]**
- **Rnd 7:** (sc, dec) around **[12]**
  *(6 groups × 2 = 12 ✓)*

> **Stuff lightly** — the abdomen should be flatter than the carapace.

- **Rnd 8:** sc around **[12]**

Slip stitch, fasten off, leaving a long tail. Flatten the open edge slightly so this piece sits low and flat.

---

## PART 3 — Telson (Tail Spike)

The long pointed tail, worked as a tapering tube to a firm point.

- **Rnd 1:** 6 sc in magic ring **[6]**
- **Rnd 2:** (2 sc, inc) around **[8]**
  *(2 groups: 2+2+1... let's verify: 6 sts in groups of 3 don't divide. Reworked below.)*

> **Telson corrected counts (verified):**

- **Rnd 1:** 4 sc in magic ring **[4]**
- **Rnd 2:** (sc, inc) around **[6]**
  *(2 sc + 2 inc → 2 + 4 = 6 ✓)*
- **Rnd 3:** (2 sc, inc) around **[8]**
  *(2 groups × ... 6 sts ÷ 3 = 2 groups × 4 = 8 ✓)*
- **Rnds 4–12:** sc around (9 rounds even) **[8]**

This makes a long, slim spike approx. 3" (7.5 cm). Stuff *very lightly* with a thin twist of fiberfill (or leave unstuffed for a flexible tail).

- **Rnd 13:** (2 sc, dec) around **[6]**
  *(8 sts: 2+2+dec... 2 sc + 2 sc + 1 dec → reworked: (sc, dec) ×... )*

> **Closing the tail (verified):**

- **Rnd 13:** (sc, dec) around **[6]**
  *(8 sts don't divide by 3; instead work: dec, sc, dec, sc, dec → 8 → 5)*

**Use this exact closing sequence for Rnd 13 (8 sts):** dec, sc, dec, sc, dec **[5]**
- **Rnd 14:** (dec) twice, sc **[3]**
  *(5 sts: dec, dec, sc → 2+1 = 3 ✓)*

Fasten off, leaving a tail. Thread through final 3 loops, pull tight to close to a sharp point. Weave end back through the tail to hide.

---

## ASSEMBLY

1. **Position the pieces** on a flat surface, underside (open edges) facing up:
   - Carapace at the front (the big dome).
   - Abdomen behind it, its flat front edge tucked just under the back of the carapace.
   - Telson extending straight back from the abdomen.

2. **Seam the carapace bottom:** Using the long tail, whip stitch the 18-st opening flat, OR sew it directly onto the abdomen's front edge so the abdomen "hinges" beneath the shell. Pin first to check the silhouette.

3. **Attach the abdomen to the carapace:** Whip stitch the front 8–10 sts of the abdomen under the rear edge of the carapace so they overlap slightly. Keep the seam on the underside.

4. **Attach the telson:** Sew the open base (3-st pointed end stays free) — sew the wider end of the telson to the center back of the abdomen. Anchor firmly so it points straight back.

5. **Weave in all ends** on the underside.

---

## FINISHING & FACE

- **Eyes:** Horseshoe crabs have eyes on top of the carapace, set wide apart. Insert two 6 mm safety eyes near the front-top of the dome about 1" (2.5 cm) apart, BEFORE final stuffing if using safety eyes — or embroider two small black French knots / satin dots on top of the shell now.
- **Surface detail (optional):** Using a contrasting or darker thread, work a line of surface slip stitch down the center ridge of the carapace and a horizontal line dividing carapace from abdomen for a realistic segmented look.
- **Underside legs (optional, very easy):** Embroider a few short straight stitches in a lighter color under the front edge of the carapace to suggest legs.

---

## Construction Tips

- Work tightly throughout so stuffing doesn't peek through.
- Stuff the carapace as you go — it's hard to add firmness later.
- Keep the abdomen and telson flatter/firmer-but-flexible so the crab sits naturally.
- Pin all three pieces before sewing to confirm the classic horseshoe-crab teardrop-plus-tail outline.

## Size Adjustments

- **Larger crab:** Add one more increase round to the carapace — Rnd 5b: (4 sc, inc) around **[36]** — and add 2 more even rounds before decreasing.
- **Keychain size:** Stop the carapace at Rnd 4 **[24]**, skip one even round, and shorten the telson to 5 even rounds. Attach a keychain finding through the back seam.
- **Stress-ball feel:** Stuff the carapace very firmly.

Enjoy your new horseshoe crab — one of nature's oldest creatures, now in yarn! 🦀
Disclaimer: This pattern was generated by AI and should be reviewed for accuracy before use. While we strive for quality, AI-generated content may contain errors. Please verify measurements, stitch counts, and instructions before beginning your project. Generated by purlJam.uk
Access your pattern anytime
Bookmark this page to access your pattern anytime