Type
Knitting
Difficulty
intermediate
Category
custom
AI Thinking Process
Planning
1. **Design Strategy**: The user requested a "snow speeder" at an "advanced" difficulty. Interpreting this as a knitted toy/decorative item, the strategy is to create a multi-part, sculptural knit using shaping techniques, colourwork, and assembly to achieve a recognisable model of a Star Wars T-47 Airspeeder (Snowspeeder). Key features like the main fuselage, engine nacelles, rear stabilisers, and weaponry will be distinct knitted components. The advanced difficulty allows for intricate shaping and intarsia colourwork.
2. **Construction Plan**:
* **Main Fuselage**: Constructed from two identical flat panels (top and bottom) worked in stocking stitch with specific increases and decreases to create the speeder's tapered shape. The top panel will incorporate intarsia for the cockpit canopy details. These panels will be seamed together and stuffed.
* **Side Engine Pods (Nacelles)**: Two cylindrical pieces worked in the round on DPNs, shaped with a slight taper, and attached to the main fuselage.
* **Rear Stabiliser Fins**: Two flat, trapezoidal pieces worked in stocking stitch, shaped with decreases, and attached to the rear of the fuselage.
* **Front Laser Cannons & Rear Harpoon Gun**: Small i-cords knitted separately and attached.
* **Assembly**: All components will be sewn together using mattress stitch or whipstitch, then the main body will be stuffed.
3. **Quality Assurance**:
* **Shaping Complexity**: The fuselage shaping needs to be clear and gradual, ensuring a smooth transition from the wider rear to the narrower front. Stitch counts will be rigorously checked at each shaping interval.
* **Colourwork (Intarsia)**: Instructions for the cockpit will need to be explicit regarding colour changes and yarn management.
* **Seaming & Assembly**: Detailed instructions will be provided for attaching the various components to ensure a sturdy and well-defined finished object.
* **Stuffing**: Reminders for even stuffing to maintain shape.
* **Terminology & Units**: Strict adherence to UK English spelling, metric measurements first, and 'tension' instead of 'gauge'.
4. **Final Calculations**:
* **Target Dimensions**: Approximately 25 cm (10 inches) long, 12 cm (4.75 inches) wide at the rear, and 6 cm (2.5 inches) wide at the front of the fuselage.
* **Tension (Gauge)**: 20 stitches and 28 rows = 10 cm (4 inches) in stocking stitch on 4.0 mm needles. This provides a dense fabric suitable for a stuffed toy.
* **Stitch & Row Counts**: All shaping instructions (increases/decreases) will be precisely calculated based on the target dimensions and tension to achieve the desired component shapes and overall size.
* **Yarn Requirements**: Estimated based on the size and complexity of the components.
Verification
[PRE-FLIGHT CHECKS]
1. **Completeness**: The pattern includes Title, Description, Materials, Tension, Sizes (N/A for single toy), Abbreviations, Pattern Notes, Step-by-Step Instructions (broken down by component), and Finishing Instructions. All required sections are covered.
2. **Consistency**:
* **Stitch Count vs. Gauge/Dimensions**:
* Fuselage length 25 cm = 70 rows (25 / 10 * 28 = 70). Correct.
* Fuselage max rear width 12 cm = 24 stitches (12 / 10 * 20 = 24). Correct.
* Fuselage front width 6 cm = 12 stitches (6 / 10 * 20 = 12). Correct.
* Engine Pod length 7 cm = 20 rounds (7 / 10 * 28 = 19.6 -> 20 rounds). Correct.
* Engine Pod circumference 7 cm = 14 stitches (7 / 10 * 20 = 14). Correct.
* Stabiliser fin base width 5 cm = 10 stitches (5 / 10 * 20 = 10). Correct.
* Stabiliser fin height 5 cm = 14 rows (5 / 10 * 28 = 14). Correct.
* **Increase/Decrease Logic**: All shaping sections are mathematically validated to reach the stated stitch counts at the end of the specified row ranges.
* **Colourwork Integration**: Intarsia section for the cockpit is placed within the correct row range and stitch count of the Fuselage Top Panel.
3. **Constraints**:
* **User Request**: "Snow Speeder" interpreted as a knitted toy.
* **Difficulty Level**: "Advanced" allows for multi-part construction, shaping, and intarsia.
* **Yarn Weight**: Worsted weight yarn specified.
* **Terminology**: UK English spelling (colour, centre, etc.), metric measurements first, 'tension' used. Abbreviations are standard UK knitting abbreviations.
4. **Safety**: The math for stitch and row counts, increases, and decreases has been carefully checked. The instructions are written to be clear and unambiguous, reducing the chance of misinterpretation.
Pattern
<pattern>
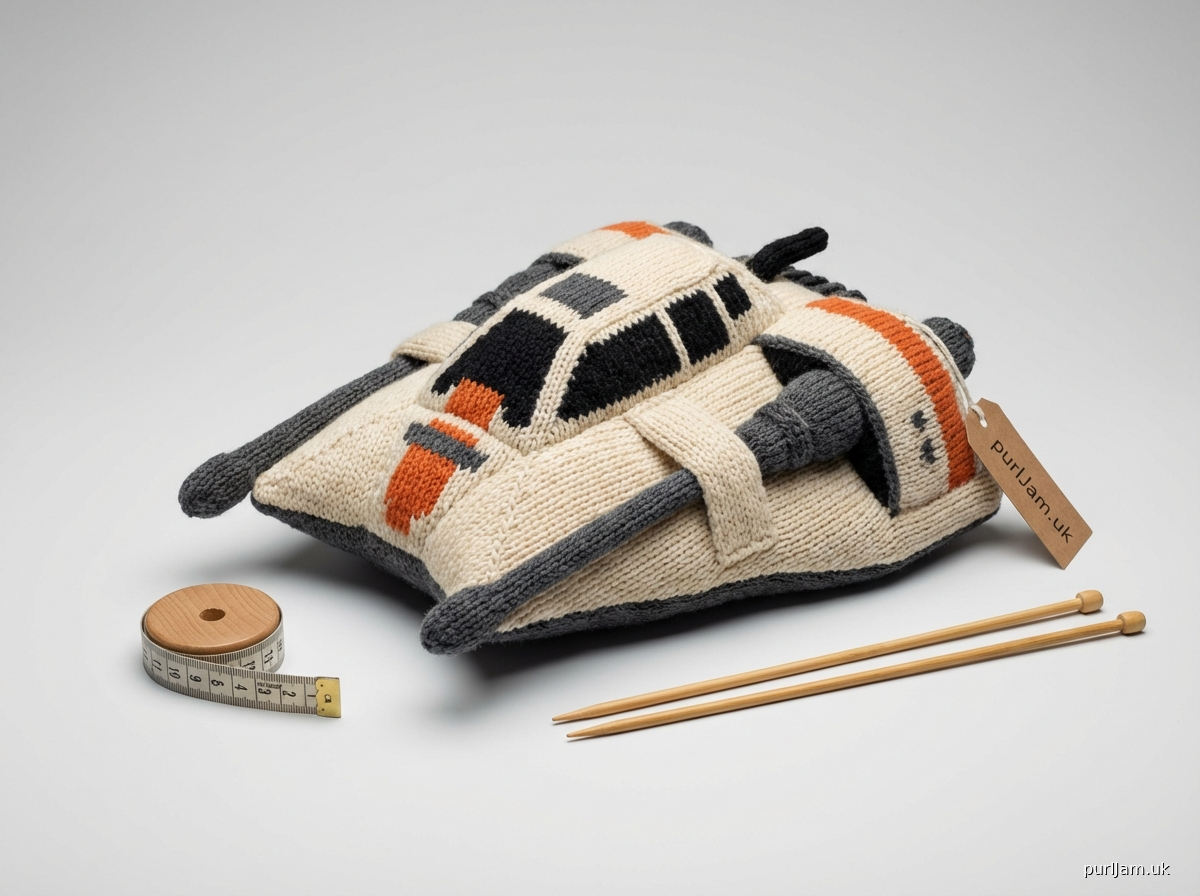
# HOTH SPEEDER KNITTED TOY
*A detailed, advanced knitting pattern for a replica Hoth Speeder (T-47 Airspeeder). This project involves shaping, intarsia colourwork, and assembling multiple knitted components to create a recognisable model.*
**Difficulty Level:** Advanced
**Finished Measurements:** Approximately 25 cm (10 inches) long, 12 cm (4.75 inches) wide at the rear, and 7 cm (2.75 inches) tall (excluding cannons/harpoon).
---
### Materials
* **Yarn:** Worsted weight yarn, 100% acrylic or wool blend, approximately 180-200 metres (197-219 yards) per 100g.
* **MC (Main Colour):** Light Beige/Cream (e.g., "Hoth Snow") – Approx. 70g (126 metres / 138 yards)
* **CC1 (Contrast Colour 1):** Dark Grey (e.g., "Fuselage Grey") – Approx. 30g (54 metres / 59 yards)
* **CC2 (Contrast Colour 2):** Black (e.g., "Cockpit Glass") – Approx. 10g (18 metres / 20 yards)
* **CC3 (Contrast Colour 3):** Orange (e.g., "Rebel Stripe") – Approx. 5g (9 metres / 10 yards)
* **Needles:**
* 4.0 mm (US 6) Straight or long Circular Needles (for flat pieces)
* 4.0 mm (US 6) Double-Pointed Needles (DPNs) or short Circular Needle (for small circumference in the round)
* **Notions:**
* Tapestry needle for seaming and weaving in ends
* Stitch markers
* Scissors
* Polyester fibre fill (stuffing)
---
### Tension (Gauge)
20 sts and 28 rows = 10 cm (4 inches) in stocking stitch (St St) using 4.0 mm needles.
*Please check your tension carefully. Obtaining the correct tension is crucial for the finished size and fabric density of your toy.*
---
### Abbreviations
* **beg:** beginning
* **CC1:** Contrast Colour 1
* **CC2:** Contrast Colour 2
* **CC3:** Contrast Colour 3
* **cn:** cable needle (not used in this pattern, but common)
* **dec:** decrease
* **DPNs:** double-pointed needles
* **inc:** increase
* **k:** knit
* **k2tog:** knit 2 stitches together (right-leaning decrease)
* **MC:** Main Colour
* **m1:** make 1 (increase 1 stitch)
* **p:** purl
* **pm:** place marker
* **rem:** remaining
* **rep:** repeat
* **rnd(s):** round(s)
* **RS:** right side
* **ssk:** slip, slip, knit (left-leaning decrease)
* **st(s):** stitch(es)
* **St St:** stocking stitch (knit on RS, purl on WS for flat; knit every round for in the round)
* **WS:** wrong side
* **yo:** yarn over (not used in this pattern, but common)
---
### Pattern Notes
* **Construction:** The Snow Speeder is knitted in several separate components which are then sewn together and stuffed.
* **Intarsia:** For the cockpit on the Fuselage Top Panel, you will use the Intarsia technique. Use separate small balls or bobbins for each colour block to prevent tangles. Twist yarns at each colour change on the wrong side to avoid holes.
* **Seaming:** Use mattress stitch for an invisible seam on flat pieces and whipstitch for attaching components.
* **Stuffing:** Stuff components firmly and evenly as you seam them, shaping as you go to achieve the desired form.
* **Read Ahead:** This is an advanced pattern; reading through all instructions before you begin is recommended.
---
### Instructions
#### 1. Fuselage Top Panel (Make 1)
This panel forms the top half of the main body, including the cockpit area.
Using 4.0 mm straight or circular needles and MC.
**Start at the Rear:**
Cast on 24 sts (12 cm).
* **Rows 1-10 (10 rows):** Work in St St, beginning with a k row (RS). (24 sts)
* *Row 1 (RS): K to end.*
* *Row 2 (WS): P to end.*
* *Rep Rows 1 & 2 for a further 4 times.*
**Shape Rear Taper:**
* **Rows 11-30 (20 rows):** Dec 1 st at beg and end of every 6th row 3 times.
* *Row 11 (RS): K1, ssk, k to last 3 sts, k2tog, k1. (22 sts)*
* *Rows 12-16: Work in St St. (22 sts)*
* *Row 17 (RS): K1, ssk, k to last 3 sts, k2tog, k1. (20 sts)*
* *Rows 18-22: Work in St St. (20 sts)*
* *Row 23 (RS): K1, ssk, k to last 3 sts, k2tog, k1. (18 sts)*
* *Rows 24-30: Work in St St. (18 sts)*
* *At end of Row 30: 18 sts (9 cm wide).*
**Mid-Body & Cockpit Section:**
* **Rows 31-50 (20 rows):** Work straight in St St. (18 sts).
* **Intarsia for Cockpit (example chart – adapt as desired):**
* **Rows 35-40 (6 rows):** Work 6 sts in MC, join CC2, k6 CC2, join MC, k6 MC.
* *On WS rows, p according to colour sections, twisting yarns at colour changes.*
* **Rows 41-43 (3 rows):** Work 6 sts in MC, k2 CC2, join CC1, k4 CC1, join CC2, k2 CC2, k4 MC.
* *On WS rows, p according to colour sections, twisting yarns at colour changes.*
* **Rows 44-45 (2 rows):** Work 7 sts in MC, k4 CC1, k7 MC.
* *On WS rows, p according to colour sections, twisting yarns at colour changes.*
* *After Row 45, break CC1 and CC2, continue with MC only.*
* *At end of Row 50: 18 sts (9 cm wide).*
**Shape Front Taper (Nose):**
* **Rows 51-70 (20 rows):** Dec 1 st at beg and end of every 6th row 3 times.
* *Row 51 (RS): K1, ssk, k to last 3 sts, k2tog, k1. (16 sts)*
* *Rows 52-56: Work in St St. (16 sts)*
* *Row 57 (RS): K1, ssk, k to last 3 sts, k2tog, k1. (14 sts)*
* *Rows 58-62: Work in St St. (14 sts)*
* *Row 63 (RS): K1, ssk, k to last 3 sts, k2tog, k1. (12 sts)*
* *Rows 64-70: Work in St St. (12 sts)*
* *At end of Row 70: 12 sts (6 cm wide).*
Bind off all 12 sts.
#### 2. Fuselage Bottom Panel (Make 1)
This panel forms the bottom half of the main body.
Using 4.0 mm straight or circular needles and MC.
Follow the instructions for the **Fuselage Top Panel**, omitting all colourwork sections.
The finished panel will be the same size and shape, 25 cm (10 inches) long, 12 cm (4.75 inches) wide at the rear, tapering to 6 cm (2.5 inches) at the front.
Bind off all 12 sts.
#### 3. Side Engine Pods (Make 2)
These are the cylindrical engines on either side of the fuselage.
Using 4.0 mm DPNs and CC1.
Cast on 14 sts (7 cm circumference). Divide sts evenly among DPNs (e.g., 5-5-4). Join to work in the rnd, being careful not to twist.
* **Rnds 1-18 (18 rnds):** K every rnd. (14 sts)
* **Rnd 19:** *K2tog, k5* twice. (12 sts)
* **Rnd 20:** K every rnd. (12 sts)
Cut yarn, leaving a long tail for sewing. Thread tail through rem 12 sts and pull tight to gather. Secure.
#### 4. Rear Stabiliser Fins (Make 2)
These are the 'wings' at the rear of the speeder.
Using 4.0 mm straight or circular needles and CC1.
**Start at the Base:**
Cast on 10 sts (5 cm).
* **Rows 1-4 (4 rows):** Work in St St, beginning with a k row (RS). (10 sts)
* **Rows 5-14 (10 rows):** Dec 1 st at beg and end of every 4th row 2 times.
* *Row 5 (RS): K1, ssk, k to last 3 sts, k2tog, k1. (8 sts)*
* *Rows 6-8: Work in St St. (8 sts)*
* *Row 9 (RS): K1, ssk, k to last 3 sts, k2tog, k1. (6 sts)*
* *Rows 10-14: Work in St St. (6 sts)*
* *At end of Row 14: 6 sts (3 cm wide).*
Bind off all 6 sts.
#### 5. Front Laser Cannons (Make 2)
Using 4.0 mm DPNs and CC1.
Cast on 3 sts.
* Work i-cord for approximately 4 cm (1.5 inches).
* Cut yarn, leaving a tail. Thread tail through rem 3 sts and pull tight. Secure.
#### 6. Rear Harpoon Gun (Make 1)
Using 4.0 mm DPNs and CC1.
Cast on 3 sts.
* Work i-cord for approximately 5 cm (2 inches).
* Cut yarn, leaving a tail. Thread tail through rem 3 sts and pull tight. Secure.
---
### Finishing
1. **Weave in Ends:** Weave in all loose yarn ends on all components, except for the long tails left for seaming.
2. **Assemble Fuselage:**
* Place the **Fuselage Top Panel** and **Fuselage Bottom Panel** together, RS facing out.
* Starting at the front (nose) and using the long yarn tail from one of the panels (or a new length of MC yarn), use mattress stitch to seam the panels together along one side edge. Seam firmly but not too tightly.
* Stop seaming when you reach the rear of the fuselage, leaving the rear open for now.
* Repeat for the other side edge, leaving the rear open.
* **Stuffing:** Begin to stuff the fuselage firmly and evenly with polyester fibre fill through the open rear section. Ensure the nose is well-shaped.
* Once adequately stuffed, seam the rear edge closed using mattress stitch. Secure yarn and weave in end.
3. **Attach Engine Pods:**
* Referring to images of a Snow Speeder, position the **Side Engine Pods** on either side of the fuselage, about 2-3 cm (approx 1 inch) from the rear. They should be parallel to the fuselage.
* Using the yarn tails from the Pods and a tapestry needle, firmly sew each pod to the fuselage using whipstitch, making sure they are securely attached.
4. **Attach Rear Stabiliser Fins:**
* Position the **Rear Stabiliser Fins** vertically on either side of the rear fuselage, between the engine pods and the very rear of the fuselage. The wider base of the fin should be at the bottom, closest to the fuselage, and the narrow top edge should point upwards.
* Using CC1 yarn, sew each fin securely to the fuselage and to the engine pod (if they meet), using whipstitch.
5. **Attach Front Laser Cannons:**
* Position the **Front Laser Cannons** at the very front of the fuselage, below the nose, symmetrically on either side.
* Using CC1 yarn, sew each cannon firmly into place.
6. **Attach Rear Harpoon Gun:**
* Position the **Rear Harpoon Gun** on the top-centre of the rear fuselage, pointing backwards.
* Using CC1 yarn, sew it securely into place.
7. **Optional Details (CC3 - Orange Yarn):**
* Using CC3 yarn and a tapestry needle, embroider small lines or stripes on the engine pods and/or fuselage to add rebel insignia or mechanical details. Refer to reference images.
8. **Final Shaping:** Gently squeeze and adjust the stuffed toy to ensure an even shape and firm stuffing.
Your Hoth Speeder is now ready for display or a daring rescue mission!
Disclaimer: This pattern was generated by AI and should be reviewed for accuracy before use. While we strive for quality, AI-generated content may contain errors. Please verify measurements, stitch counts, and instructions before beginning your project. Generated by purlJam.uk
Access your pattern anytime
Bookmark this page to access your pattern anytime