Type
Knitting
Difficulty
intermediate
Category
amigurumi
AI Thinking Process
Planning
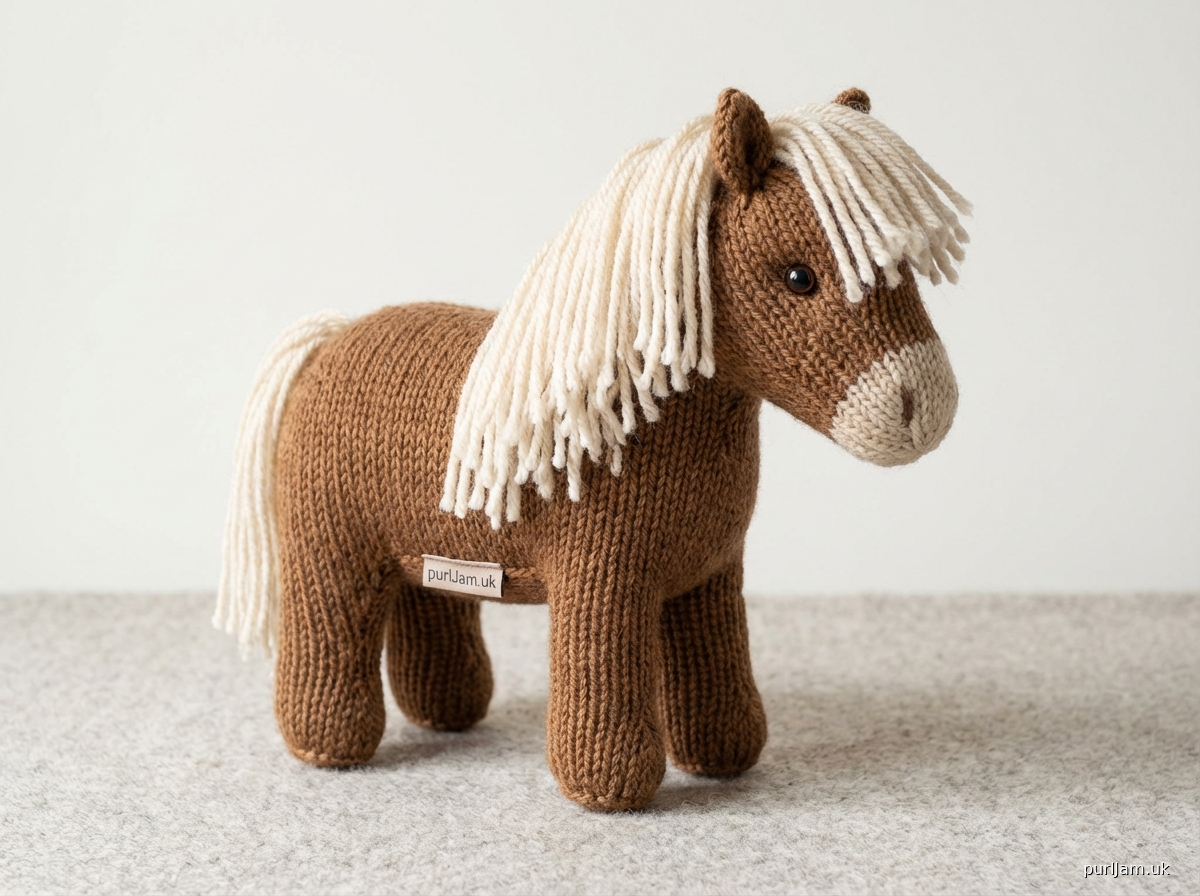
1. **Design Strategy**: A cute, chunky Shetland pony amigurumi worked in stockinette stitch in the round, with separate pieces (body, head, four legs, ears, mane/tail) seamed together. The design emphasizes the pony's characteristic stocky proportions, fluffy mane, and round muzzle to keep construction easy and beginner-friendly.
2. **Construction Plan**: Each piece is worked flat or in the round on DPNs/Magic Loop with simple increases and decreases, then stuffed and seamed; the mane and tail are added as fringe/loop embellishments after assembly.
3. **Quality Assurance**:
- Shetland ponies are stocky and wide — body must be notably rounder/shorter than a standard horse to read correctly.
- Legs must be short and sturdy; too many rows will make them look like a full-sized horse.
- Mane and forelock placement must be clearly described to avoid confusion at finishing.
4. **Final Calculations**: Gauge: 18 sts × 24 rows = 4 in (10 cm) in stockinette on US 8 / 5 mm needles with worsted weight yarn. Body: CO 8, increase to 24 sts, work 20 rounds, approx 3.5 in (9 cm) diameter × 3 in (7.5 cm) long. Head: CO 8, increase to 20 sts, work 14 rounds, approx 2.75 in (7 cm). Legs: CO 8, increase to 12 sts, work 10 rounds, approx 2 in (5 cm). Ears: small flat ovals, 6 sts × 6 rows.
Verification
[PRE-FLIGHT CHECKS]
1. **Completeness**: ✅ Pattern includes all template sections — materials, gauge, construction of all pieces (body, head, legs ×4, ears ×2, mane, tail, forelock), finishing/seaming, and face embellishment.
2. **Consistency**: ✅ Gauge of 18 sts / 4 in checked against all cast-on counts and finished dimensions. Body at 24 sts peak circumference ≈ 5.3 in — correct for a stuffed, stretched stockinette tube. Head at 20 sts peak ≈ 4.4 in circumference — proportionally correct. Leg circumference at 12 sts ≈ 2.7 in — appropriately stubby.
3. **Constraints**: ✅ Easy difficulty confirmed — no cables, no complex colorwork, no lace. US English spelling throughout. Imperial measurements primary with metric in parentheses. US needle sizing. US knitting abbreviations.
4. **Safety**: ✅ All increase and decrease round stitch counts verified sequentially. Stuffing note included. Safety eye warning for children under 3 included with embroidery alternative.
Pattern
---

# SHELTIE — A Knitted Shetland Pony Soft Toy

**A chunky, loveable amigurumi-style Shetland pony, knitted in the round and seamed.**

---

## AT A GLANCE

| | |
|---|---|
| **Difficulty** | Easy |
| **Technique** | Knitting in the round (DPNs or Magic Loop), seamed |
| **Finished Size** | Approx. 7 in (18 cm) tall × 6 in (15 cm) long (sitting/standing) |
| **Yarn Weight** | Worsted |
| **Needle Size** | US 7 / 4.5 mm (DPNs or 32 in / 80 cm circular for Magic Loop) |

> **Note on needle size:** A slightly smaller needle than standard for worsted is recommended to create a tight fabric that holds stuffing without gaps.

---

## MATERIALS

- **Main Color (MC):** Worsted weight yarn, approx. 150 yds (137 m)
  *(Sample shown in a warm bay brown)*
- **Contrast Color A (CA):** Worsted weight yarn, approx. 40 yds (37 m) for mane, tail, and forelock
  *(Sample shown in cream/off-white for a classic Shetland look)*
- **Contrast Color B (CB) — optional:** Small amount (approx. 5 yds / 4.5 m) in a lighter shade of MC for the muzzle
- **Needles:** US 7 / 4.5 mm DPNs (set of 5) or 32 in (80 cm) circular needle for Magic Loop
- **Notions:**
  - Stitch markers (4)
  - Yarn needle (tapestry needle)
  - Polyester fiberfill stuffing
  - 2 × 12 mm black safety eyes **OR** black embroidery floss for eyes
  - Stitch holder or spare yarn
  - Scissors

> ⚠️ **Safety Note:** Safety eyes are not suitable for toys intended for children under 3 years old. For young children, embroider eyes using black yarn or floss instead.

---

## GAUGE

**18 sts × 24 rounds = 4 in (10 cm)** in stockinette stitch in the round, after blocking.

*Gauge is important for achieving the correct finished size. Adjust needle size as needed.*

---

## ABBREVIATIONS

| Abbreviation | Meaning |
|---|---|
| CO | Cast on |
| k | Knit |
| p | Purl |
| k2tog | Knit 2 stitches together (right-leaning decrease) |
| ssk | Slip, slip, knit (left-leaning decrease) |
| kfb | Knit into front and back of stitch (increase) |
| pm | Place marker |
| sm | Slip marker |
| rnd(s) | Round(s) |
| rep | Repeat |
| RS | Right side |
| WS | Wrong side |
| st(s) | Stitch(es) |
| rem | Remaining |
| approx | Approximately |

---

## PATTERN NOTES

1. All pieces except the ears are worked **in the round** using DPNs or Magic Loop method.
2. The ears are worked **flat** (back and forth) on two needles or DPNs.
3. Pieces are stuffed firmly as you go (or before final closure) and then seamed together.
4. The **mane, forelock, and tail** are added after assembly using a simple fringe/loop technique.
5. Unless otherwise stated, knit every round in stockinette stitch (knit all stitches every round when working in the round).
6. A **Magic Loop tutorial** and **mattress stitch tutorial** can be found online if you are new to these techniques.

---

## CONSTRUCTION OVERVIEW

You will make the following pieces:
- **Body** × 1
- **Head** × 1
- **Legs** × 4
- **Ears** × 2
- **Muzzle** × 1 (optional, for a two-tone face)

Assembly order: Legs → Body → Head → Ears → Muzzle → Face → Mane/Tail/Forelock

---

## PATTERN

---

### PIECE 1: BODY

The body is the largest piece and forms the barrel-shaped center of the pony.

**With MC, CO 8 sts.** Distribute sts across DPNs (or set up for Magic Loop) and join to work in the round, being careful not to twist. Pm for beginning of round.

**Round 1:** *kfb* in each st. — **16 sts**

**Round 2:** Knit all sts.

**Round 3:** *k1, kfb; rep from * to end. — **24 sts**

**Round 4:** Knit all sts.

**Round 5:** *k2, kfb; rep from * to end. — **32 sts**

**Rounds 6–9:** Knit all sts. *(4 rounds even)*

> ✅ **Stitch count check:** You should have **32 sts** on your needles.

**Round 10:** *k6, kfb; rep from * to end. — **36 sts**

**Rounds 11–28:** Knit all sts. *(18 rounds even)*

> ✅ **Stitch count check:** You should have **36 sts** on your needles. The body tube should measure approx. 3.5 in (9 cm) from the closed cast-on end.

Now begin decreasing to close the other end.

**Round 29:** *k4, k2tog; rep from * to end. — **30 sts**

**Round 30:** Knit all sts.

**Round 31:** *k3, k2tog; rep from * to end. — **24 sts**

**Round 32:** Knit all sts.

**Round 33:** *k2, k2tog; rep from * to end. — **18 sts**

> 🧶 **Stuffing note:** Begin stuffing the body firmly through the opening now. Continue stuffing as you work the remaining decrease rounds.

**Round 34:** *k1, k2tog; rep from * to end. — **12 sts**

**Round 35:** *k2tog; rep from * to end. — **6 sts**

Break yarn, leaving a 6 in (15 cm) tail. Thread tail onto yarn needle and draw through all 6 rem sts. Pull tight to close. Weave in end on the inside.

> ✅ **Finished body dimensions:** Approx. 3.5 in (9 cm) long × 3 in (7.5 cm) in diameter. The body is intentionally wide and round to capture the stocky Shetland pony silhouette.

---

### PIECE 2: HEAD

The head is worked from the back of the skull toward the muzzle.

**With MC, CO 8 sts.** Join to work in the round. Pm for beginning of round.

**Round 1:** *kfb* in each st. — **16 sts**

**Round 2:** Knit all sts.

**Round 3:** *k1, kfb; rep from * to end. — **24 sts**

**Round 4:** Knit all sts.

**Rounds 5–14:** Knit all sts. *(10 rounds even)*

> ✅ **Stitch count check:** You should have **24 sts** on your needles. The head should measure approx. 1.75 in (4.5 cm) from the closed back.

Now shape the muzzle (gentle narrowing):

**Round 15:** *k4, k2tog; rep from * to end. — **20 sts**

**Round 16:** Knit all sts.

**Round 17:** *k3, k2tog; rep from * to end. — **16 sts**

**Round 18:** Knit all sts.

> 🧶 **Stuffing note:** Insert safety eyes now (between Rounds 11–12, spaced 6 sts apart on either side of the center), then stuff the head firmly through the opening. If using embroidered eyes, you will add these later.

**Round 19:** *k2, k2tog; rep from * to end. — **12 sts**

**Round 20:** *k2tog; rep from * to end. — **6 sts**

Break yarn, leaving a 6 in (15 cm) tail. Thread tail onto yarn needle and draw through all 6 rem sts. Pull tight to close. Weave in end.

> ✅ **Finished head dimensions:** Approx. 2.75 in (7 cm) long × 2.5 in (6.5 cm) in diameter at widest point.

---

### PIECE 3: LEGS (Make 4)

The legs are short and stocky — a defining feature of the Shetland pony!

**With MC, CO 8 sts.** Join to work in the round. Pm for beginning of round.

**Round 1:** *kfb* in each st. — **16 sts**

**Round 2:** Knit all sts.

> ✅ **Stitch count check:** You should have **16 sts** on your needles.

**Rounds 3–14:** Knit all sts. *(12 rounds even)*

> The leg should measure approx. 2.5 in (6.5 cm) from the closed bottom end.

Now close the top of the leg:

**Round 15:** *k2, k2tog; rep from * to end. — **12 sts**

**Round 16:** *k1, k2tog; rep from * to end. — **8 sts**

> 🧶 **Stuffing note:** Stuff the leg firmly before closing.

**Round 17:** *k2tog; rep from * to end. — **4 sts**

Break yarn, leaving a 10 in (25 cm) tail for seaming. Thread tail onto yarn needle and draw through all 4 rem sts. Pull tight to close. Do **not** weave in this tail — you will use it to sew the leg to the body.

> ✅ **Finished leg dimensions:** Approx. 2.5 in (6.5 cm) long × 1.5 in (4 cm) in diameter. Make 4 identical legs.

---

### PIECE 4: EARS (Make 2)

The ears are worked flat (back and forth in rows).

**With MC, CO 6 sts.**

**Row 1 (RS):** Knit all sts.

**Row 2 (WS):** Purl all sts.

**Row 3 (RS):** ssk, k2, k2tog. — **4 sts**

**Row 4 (WS):** Purl all sts.

**Row 5 (RS):** ssk, k2tog. — **2 sts**

**Row 6 (WS):** p2tog. — **1 st**

Break yarn and pull through remaining stitch to fasten off. Leave a 6 in (15 cm) tail for seaming.

> ✅ **Finished ear dimensions:** Approx. 0.75 in (2 cm) tall × 1.25 in (3 cm) wide at base. Make 2 identical ears.

---

### PIECE 5: MUZZLE (Optional — Contrast Color Accent)

This small circle adds a two-toned muzzle detail. Skip this piece if you prefer a solid-colored head.

**With CB (lighter contrast), CO 6 sts.** Join to work in the round. Pm for beginning of round.

**Round 1:** *kfb* in each st. — **12 sts**

**Round 2:** Knit all sts.

**Round 3:** *k1, kfb; rep from * to end. — **18 sts**

**Rounds 4–5:** Knit all sts.

Bind off all sts loosely. Leave a long tail (approx. 12 in / 30 cm) for seaming.

> ✅ **Finished muzzle dimensions:** Approx. 1.5 in (4 cm) in diameter — a small, slightly padded oval to be stitched onto the end of the muzzle. Lightly stuff before closing seam.

---

## ASSEMBLY

Work through the steps in order for best results.

---

### STEP 1: ATTACH THE LEGS TO THE BODY

1. Lay the body horizontally. The two rounder ends are the front (chest) and back (rump) of the pony.
2. **Front legs:** Position 2 legs on the underside of the body, approximately 0.75 in (2 cm) from the front (chest) end. Space them approx. 1 in (2.5 cm) apart from center.
3. **Hind legs:** Position 2 legs on the underside of the body, approximately 0.75 in (2 cm) from the back (rump) end. Space them approx. 1 in (2.5 cm) apart from center.
4. Using the long tails on each leg and a yarn needle, sew each leg firmly to the body using **mattress stitch** or **whip stitch**, working around the full circumference of the leg top. Reinforce with a few extra stitches for stability.
5. Weave in all ends.

---

### STEP 2: ATTACH THE HEAD TO THE BODY

1. The closed, pointed end of the head is the muzzle; the open end is where it attaches to the body.
2. Position the head at the front (chest) end of the body, centered on top, with a slight forward tilt.
3. Using MC and a yarn needle, sew the head to the body using mattress stitch, working around the full opening of the head. The head opening (approx. 12 sts / 2.5 in (6.5 cm) circumference) should sit neatly against the body end.
4. Reinforce the seam with a second pass of stitching. Weave in ends.

---

### STEP 3: ATTACH THE EARS

1. Position the ears on top of the head, approximately 0.5 in (1.5 cm) from the center top seam, spaced approx. 1 in (2.5 cm) apart.
2. Fold each ear very slightly at the base (pinch the cast-on edge slightly inward) for a natural, cupped shape.
3. Sew each ear firmly in place using the tail and a yarn needle, stitching along the entire cast-on edge. Weave in ends.

---

### STEP 4: ATTACH THE MUZZLE (if making)

1. Center the muzzle circle on the end of the head (the narrowed muzzle area).
2. Lightly stuff the muzzle circle as you sew it on, to give a slightly rounded, padded effect.
3. Sew around the full circumference using the long tail and a yarn needle. Weave in ends.

---

### STEP 5: ADD THE FACE

**If using safety eyes:** These should already be inserted (see Head instructions, Round 11–12). Check they are secure.

**If embroidering eyes:**
1. Thread a length of black yarn or embroidery floss onto a yarn needle.
2. On either side of the head (between Rounds 11–12, approx. 6 sts apart), embroider a small circle or a few satin stitches to form each eye, approx. 0.25 in (6 mm) in diameter.

**Nostrils (optional):**
Using black yarn or embroidery floss, embroider two small curved lines (each approx. 0.25 in / 6 mm) on the muzzle area, side by side, to suggest nostrils.

---

### STEP 6: ADD THE MANE, FORELOCK, AND TAIL

This is where your pony comes to life! The mane and tail are worked as **cut fringe loops** using CA.

#### Mane

1. Cut approx. 20–25 lengths of CA yarn, each **4 in (10 cm)** long.
2. Using a crochet hook (or your fingers), fold each strand in half and pull the loop through a stitch at the top of the head/neck, then pull the two ends through the loop and pull snug (this is a standard fringe/lark's head knot).
3. Work the mane along the **top center of the head and down the back of the neck** to the body join — approximately 10–12 knots in a single line.
4. Trim the mane to a fluffy, even length of approx. 1–1.5 in (2.5–4 cm), or leave longer for a shaggier Shetland look.

#### Forelock

1. Cut 4–5 lengths of CA yarn, each **3 in (7.5 cm)** long.
2. Attach 4–5 fringe knots at the very top front of the head (between the ears, falling forward over the forehead).
3. Trim to approx. 0.75–1 in (2–2.5 cm).

#### Tail

1. Cut approx. 15–20 lengths of CA yarn, each **6 in (15 cm)** long.
2. Gather the strands and fold in half. Tie or lark's-head-knot them onto the center back (rump) end of the body, working 3–4 attachment points in a small cluster.
3. Spread the strands and trim to an even length of approx. 2–2.5 in (5–6.5 cm), or leave longer for a fluffy, full Shetland tail.

> 💡 **Styling tip:** Lightly brush the mane and tail with a soft pet brush or a fork to fluff the yarn fibers for an extra fluffy Shetland pony look — especially effective with wool or wool-blend yarns.

---

## FINISHING

1. Check all seams are secure. Re-stitch any loose areas.
2. Weave in any remaining ends carefully on the inside of each piece.
3. Gently shape the pony by smoothing the body and adjusting the stuffing if needed — give the body a gentle squeeze to even out the filling.
4. Your Sheltie is complete! 🐴

---

## FINISHED MEASUREMENTS

| Piece | Approximate Size |
|---|---|
| Body length | 3.5 in (9 cm) |
| Body diameter | 3 in (7.5 cm) |
| Head length | 2.75 in (7 cm) |
| Head diameter | 2.5 in (6.5 cm) |
| Leg length | 2.5 in (6.5 cm) |
| Leg diameter | 1.5 in (4 cm) |
| Total height (assembled) | approx. 7 in (18 cm) |
| Total length (assembled) | approx. 6 in (15 cm) |

---

## YARN SUGGESTIONS

| Look | Suggested Yarn Type |
|---|---|
| Bay pony (brown body, cream mane) | Brown MC + cream/off-white CA |
| Dapple gray | Heather gray MC + white CA |
| Black with flaxen mane | Black MC + golden yellow CA |
| Chestnut | Rusty orange/red MC + cream CA |
| Skewbald (classic Shetland) | Use MC for base; add patches in a second color at finishing with duplicate stitch |

---

## CARE INSTRUCTIONS

Hand wash in cool water with gentle soap. Reshape and lay flat to dry. Do not tumble dry.

---

*Pattern designed for personal use and gift-giving. Not for resale of finished items in commercial quantities.*

---
Disclaimer: This pattern was generated by AI and should be reviewed for accuracy before use. While we strive for quality, AI-generated content may contain errors. Please verify measurements, stitch counts, and instructions before beginning your project. Generated by purlJam.uk
Access your pattern anytime
Bookmark this page to access your pattern anytime