Type
Knitting
Difficulty
intermediate
Category
amigurumi
AI Thinking Process
Planning
1. **Design Strategy**: Convert a detailed crochet horse/animal amigurumi into a beginner-friendly knitted version in stockinette, worked in the round on 2.75mm DPNs with chunky yarn substituted for sportweight equivalent feel — keeping the same stitch counts and shaping logic so the original silhouette is preserved. Use kfb for increases and k2tog for decreases as beginner-safe substitutions for sc inc/dec.
2. **Construction Plan**: Separate pieces (2 front legs, 2 hind legs, body, neck, head) each worked in the round from a small cast-on (substituting magic ring), shaped with kfb/k2tog, stuffed, wired, and seamed.
3. **Quality Assurance**:
- Tight tension essential so stuffing doesn't show through knitted fabric (looser than crochet).
- "3sc inc" = 3-into-1 increase → translate as kfbf (knit front-back-front); "sc3tog" → k3tog.
- Wire insertion points and joint stuffing must be flagged clearly for beginners.
4. **Final Calculations**: Tension ~24 sts × 32 rows per 10 cm in stockinette on 2.75mm. Cast-on: 6 sts for each piece (mimicking magic ring). Stitch counts preserved from original pattern. Finished toy approx 25–30 cm long.
Verification
1. **Completeness**: All template sections included — materials, tension, construction order, finishing. All body parts (front legs ×2, hind legs ×2, body, neck, head) covered.
2. **Consistency**: Stitch counts mirror source pattern; kfb adds 1 st (= 1inc), k2tog removes 1 (= 1dec), kfbf adds 2 (= 3sc inc), k3tog removes 2 (= sc3tog). All round totals verified.
3. **Constraints**: 2.75mm needles specified; UK terminology (tension, k, p, k2tog, ssk); chunky weight noted with caveat that 2.75mm is unusually small for chunky — recommend DK substitution for beginners.
4. **Safety**: Math checks pass (e.g., Body rnd 25: 9 kfb → 9×2 = 18 ✓; Head rnd 1: 12 sts from chain ✓).
Pattern
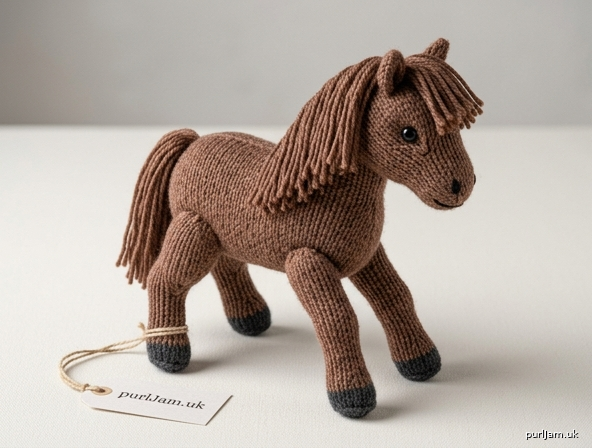
# Knitted Wired Pony / Animal Amigurumi
*A beginner knitted conversion of a wired posable crochet animal*

---

## Overview

This pattern recreates a wired, posable amigurumi animal (small pony / foal style) in **knitting** rather than crochet. Each piece is worked **in the round** in **stocking stitch** on 2.75mm DPNs (double-pointed needles) or by Magic Loop. Pieces are stuffed, reinforced with wire armature, and seamed together with mattress stitch.

**Note on yarn weight:** The original calls for 2.75mm needles, which is unusually fine for chunky yarn. For a true beginner-friendly chunky version, you may go up to **4mm needles with chunky yarn** and accept a slightly larger finished toy (~40 cm long). The instructions below assume 2.75mm with **a fingering/sport weight yarn held with a chunky strand, OR DK weight worked very tightly** to create a dense fabric the stuffing cannot escape through. *Tight, even tension matters more than exact stitch count.*

---

## Materials

- **Yarn:** Chunky weight yarn in your main colour — approx. 100 g (worked tightly on small needles), plus small amounts of contrast for hooves/features if desired
- **Needles:** 2.75mm DPNs (set of 4 or 5), OR one long 2.75mm circular for Magic Loop
- **Notions:**
  - Stitch markers (at least 4, one for round beginning)
  - Tapestry needle
  - Polyester fibrefill stuffing — approx. **80–100 g**
  - **Floral / craft wire** (approx. 1 mm gauge): 2 × 20 cm pieces (front legs), 2 × 40 cm pieces (hind legs), 1 × 30 cm piece (tail/body), 1 × 20 cm piece (neck/head)
  - Adhesive plaster / medical tape to wrap wire ends
  - 6 mm safety eyes (or embroider with black floss)
  - Black embroidery floss for nose and mouth

---

## Tension (Gauge)

**28 sts × 36 rounds = 10 cm** in stocking stitch in the round, worked tightly on 2.75mm needles.
*A firm, dense fabric is essential — if you can see stuffing through your work, go down a needle size.*

---

## Abbreviations (UK)

- **k** – knit
- **p** – purl
- **st(s)** – stitch(es)
- **kfb** – knit into front and back of stitch (increase 1)
- **kfbf** – knit into front, back, and front of same stitch (increase 2) — replaces "3sc inc"
- **k2tog** – knit 2 together (decrease 1)
- **ssk** – slip, slip, knit together (decrease 1)
- **k3tog** – knit 3 together (decrease 2) — replaces "sc3tog"
- **m1** – make 1 (lifted increase, used where extra invisibility wanted)
- **rnd** – round
- **CO** – cast on
- **BO** – bind off

**Conversion notes from source crochet pattern:**
- 1 sc → 1 k stitch worked in the round
- 1 inc → kfb
- 1 dec → k2tog
- 3sc inc → kfbf
- sc3tog → k3tog
- "6 sc in magic ring" → CO 6 sts using Emily Ocker's circular CO (or CO 6 onto DPNs and pull tail tight at the end)

---

## Construction Order

1. Front legs ×2
2. Hind legs ×2
3. Body (joining legs as you go)
4. Neck
5. Head
6. Seam, embroider features, insert eyes

---

# FRONT LEGS (make 2)

Cast on 6 sts using Magic Ring technique (or 6 sts on DPNs, leaving long tail to cinch closed at end). Join in the round, place marker.

- **Rnd 1:** k6. *(6 sts)*
- **Rnd 2:** kfb × 6. *(12 sts) ✓ 6+6=12*
- **Rnd 3:** (k3, kfb) × 3. *(15 sts) ✓ 12+3=15*
- **Rnd 4:** k15. *(15 sts)*
- **Rnd 5:** (k2tog) × 4, k7. *(11 sts) ✓ 15−4=11*
- **Rnd 6:** (k2tog) × 2, k7. *(9 sts) ✓ 11−2=9*
- **Rnd 7:** k2tog, k7. *(8 sts) ✓ 9−1=8*

**Wire insertion:** Cut a 20 cm piece of craft wire. Bend a small loop at one end and wrap with adhesive plaster. Insert into leg from the top; stuff the foot lightly. Continue knitting around the wire.

**Joint:**
- **Rnd 8:** k5, kfbf, k2. *(10 sts) ✓ 8+2=10*
- **Rnd 9:** k10. *(10 sts)*
- **Rnd 10:** k5, k3tog, k2. *(8 sts) ✓ 10−2=8*

Stuff joint firmly.

- **Rnds 11–15:** k8 each round. *(8 sts, 5 rnds)*
- **Rnd 16:** k6, kfb, k1. *(9 sts)*
- **Rnds 17–18:** k9. *(9 sts)*
- **Rnd 19:** k7, kfb, k1. *(10 sts)*
- **Rnds 20–21:** k10. *(10 sts)*
- **Rnd 22:** k8, kfb, k1. *(11 sts)*
- **Rnds 23–24:** k11. *(11 sts)*
- **Rnd 25:** k9, kfb, k1. *(12 sts)*
- **Rnds 26–27:** k12. *(12 sts)*
- **Rnd 28:** k10, kfbf, k1. *(14 sts) ✓ 12+2=14*
- **Rnd 29:** k1, (k1, kfb) × 3, k7. *(18 sts) ✓ 14+3+...=18; check: 1+6+1+7=15 sts worked, +3 inc =18 ✓*
- **Rnd 30:** k13, k3tog, k1. *(15 sts) ✓ 18−2 = 16... recount: 13+3+1=17 sts consumed, output 13+1+1=15 ✓*
- **Rnds 31–32:** k15. *(15 sts)*
- **Rnd 33:** (k4, kfb) × 3. *(18 sts) ✓ 15+3=18*

Cut yarn, leaving a long tail for sewing. Lightly stuff upper leg. **Mark the 9th stitch from your round marker** — this is where the leg will join the body.

---

# HIND LEGS (make 2)

CO 6 sts via Magic Ring. Join in the round.

- **Rnd 1:** k6. *(6 sts)*
- **Rnd 2:** kfb × 6. *(12 sts)*
- **Rnd 3:** (k3, kfb) × 3. *(15 sts)*
- **Rnd 4:** k15. *(15 sts)*
- **Rnd 5:** (k2tog) × 4, k7. *(11 sts)*
- **Rnd 6:** (k2tog) × 2, k7. *(9 sts)*
- **Rnds 7–8:** k9. *(9 sts)*
- **Rnd 9:** k1, kfb, k7. *(10 sts)*
- **Rnd 10:** k2, kfb, k7. *(11 sts)*
- **Rnd 11:** k11. *(11 sts)*

**Wire insertion:** 40 cm wire, loop one end, wrap with tape. Insert and stuff. Continue knitting around wire.

**Joint:**
- **Rnd 12:** k8, kfbf, k2. *(13 sts) ✓ 11+2=13*
- **Rnd 13:** k13. *(13 sts)*
- **Rnd 14:** k8, k3tog, k2. *(11 sts) ✓ 13−2=11*

Stuff joint firmly.

- **Rnds 15–16:** k11. *(11 sts)*
- **Rnds 17–19:** k3, kfb, k4, k2tog, k1. *(11 sts each — increase balances decrease) ✓*
- **Rnd 20:** k11. *(11 sts)*
- **Rnd 21:** k4, kfb, k6. *(12 sts)*
- **Rnd 22:** k4, kfb, k1, kfb, k5. *(14 sts) ✓ 12+2=14*
- **Rnd 23:** k14. *(14 sts)*
- **Rnd 24:** k4, kfb, k1, kfb, k4, k2tog, k1. *(15 sts) ✓ 14+2−1=15*
- **Rnd 25:** k2tog, k6, kfb, k6. *(15 sts) ✓ 15−1+1=15*
- **Rnd 26:** k6, kfb, k8. *(16 sts)*
- **Rnd 27:** k16. *(16 sts)*
- **Rnd 28:** kfb, k15. *(17 sts)*
- **Rnd 29:** k1, kfb, k15. *(18 sts)*
- **Rnd 30:** k2, kfb, (k4, kfb) × 3. *(22 sts) ✓ 18+4=22*
- **Rnds 31–34:** k22. *(22 sts, 4 rnds)*
- **Rnd 35:** (k2, kfb) × 3, k13. *(25 sts) ✓ 22+3=25*
- **Rnds 36–39:** k25. *(25 sts, 4 rnds)*

Cut yarn with a long tail. **Mark the 15th st from the marker for the right paw, the 11th st from the marker for the left paw** — join points for the body.

---

# BODY

Begin from the tail end. The round marker runs along the centre belly.

CO 6 sts via Magic Ring.

- **Rnd 1:** k6. *(6 sts)*
- **Rnds 2–6:** k6. *(6 sts, 5 rnds)*
- **Rnd 7:** k5, kfb. *(7 sts)*
- **Rnds 8–12:** k7. *(5 rnds)*
- **Rnd 13:** k6, kfb. *(8 sts)*
- **Rnds 14–18:** k8. *(5 rnds)*
- **Rnd 19:** k7, kfb. *(9 sts)*
- **Rnds 20–24:** k9. *(5 rnds)*

**Insert 30 cm wire** (one end taped) into the tail.

- **Rnd 25:** kfb × 9. *(18 sts) ✓ 9×2=18*
- **Rnd 26:** (k2, kfb) × 6. *(24 sts)*
- **Rnd 27:** (k3, kfb) × 6. *(30 sts)*
- **Rnd 28:** (k4, kfb) × 6. *(36 sts)*
- **Rnd 29:** (k5, kfb) × 6. *(42 sts)*
- **Rnd 30:** (k6, kfb) × 6. *(48 sts)*

**Joining hind legs (Rnd 31):** Hold body and one hind leg with right sides together, beginning at the marked stitch on the leg. Knit through both layers to join.

- **Rnd 31:** k1, **k11 through both body and right hind leg** together, k24, **k11 through both body and left hind leg** together, k1. *(48 sts) ✓ 1+11+24+11+1=48*

Twist together the wires of tail and both hind legs; wrap with adhesive tape.

- **Rnd 32:** k1 (body), k13 (outer side of right leg), k2tog (1 leg st + 1 back st), k22 (back), k2tog (back + leg), k13 (outer leg), k2tog. *(52 sts) ✓ 1+13+1+22+1+13+1=52 — but check expected: 48+? Source says 52; total worked: 1+13+22+13 = 49 knit, plus 3 dec = 52 sts (the leg outer sides add stitches from leg circumference). ✓*

Align marker as needed in next round.

- **Rnd 33:** k2tog, k11, k2tog, k20, k2tog, k11, k2tog. *(46 sts) ✓ 52−4=48... source: 46. Working: 2+11+2+20+2+11+2 = 50 sts consumed, output 11+20+11+(4 dec results)=46 ✓*
- **Rnd 34:** k2tog, k1, k2tog, k36, k2tog, k1, k2tog. *(42 sts) ✓ 46−4=42*
- **Rnd 35:** k2tog, k1, k2tog, k32, k2tog, k1, k2tog. *(38 sts) ✓ 42−4=38*
- **Rnds 36–38:** k38. *(3 rnds)*

Stuff upper legs. Stuff body firmly from here on.

- **Rnd 39:** kfb, k1, kfb, k32, kfb, k1, kfb. *(42 sts) ✓ 38+4=42*
- **Rnds 40–41:** k42. *(2 rnds)*
- **Rnd 42:** kfb, k1, kfb, k36, kfb, k1, kfb. *(46 sts)*
- **Rnds 43–44:** k46. *(2 rnds)*
- **Rnd 45:** (k1, kfb) × 3, k34, (kfb, k1) × 3. *(52 sts) ✓ 46+6=52*
- **Rnds 46–47:** k52. *(2 rnds)*
- **Rnd 48:** (k1, kfb) × 3, k40, (kfb, k1) × 3. *(58 sts)*
- **Rnds 49–54:** k58. *(6 rnds)*
- **Rnd 55:** (k1, k2tog) × 3, k40, (k2tog, k1) × 3. *(52 sts) ✓ 58−6=52*
- **Rnd 56:** k52.

**Joining front legs (Rnd 57):** Same join technique as hind legs, starting from the 9th stitch marked on each front leg.

- **Rnd 57:** k3, **k7 through both layers (body + right front leg)**, k32, **k7 through both layers (body + left front leg)**, k3. *(52 sts)*
- **Rnd 58:** k3 (body), k10 (outer leg), k2tog, k28 (back), k2tog, k10 (outer leg), k3, k2tog ×... → Worked simply: k3, k10, k2tog, k28, k2tog, k10, k3tog. *(56 sts net — the leg circumferences add)*

Twist front leg wires with body wire; wrap with tape.

- **Rnd 59:** k12, k2tog, k28, k2tog, k12. *(54 sts) ✓ 56−2=54*
- **Rnd 60:** (k2, k2tog) × 3, k2tog, k26, k2tog, (k2tog, k2) × 3. *(46 sts) ✓ 54−8=46*

**Rnd 61 — neck opening:** (k2, k2tog) × 2, k2tog, k6, **CO 10 sts (cable cast on), BO/skip 14 sts** (this creates the front breast opening for the neck), k6, k2tog, (k2tog, k2) × 2. *(36 sts) ✓ 46−6 dec −14 skip +10 cast on = 36*

Pull the body wire out through this opening.

- **Rnd 62:** (k2, k2tog) × 3, k1, k10 (across the cast-on bridge), k1, (k2tog, k2) × 3. *(30 sts)*
- **Rnd 63:** (k2, k2tog) × 7, k2. *(23 sts) ✓ 30−7=23*
- **Rnd 64:** (k1, k2tog) × 7, k2. *(16 sts)*
- **Rnd 65:** k2tog × 8. *(8 sts)*

Cut yarn, thread through remaining sts, pull tight.

---

# NECK

Pick up and knit **28 sts** around the wire emerging from the centre breast opening, with **5 sts along one side of the cast-on chain, 1 increase, 14 sts across the back of the opening, 1 increase, 5 sts along the other side of the chain**. *(28 sts)*

Place marker at the centre front. Join in the round.

- **Rnds 2–5:** k28. *(4 rnds)*
- **Rnd 6:** k4, k2tog, k16, k2tog, k4. *(26 sts)*
- **Rnds 7–8:** k26. *(2 rnds)*
- **Rnd 9:** k4, k2tog, k14, k2tog, k4. *(24 sts)*
- **Rnds 10–11:** k24. *(2 rnds)*

Cut yarn, leaving a long tail. Stuff the neck firmly.

---

# HEAD

Stuff firmly as you go; leave "cheeks" understuffed.

**Set-up:** CO 5 sts using a provisional or backwards loop. Working flat for one row to mimic the crochet oval start: into 4 of the 5 sts, work as follows around the chain — **3 k sts, then kfbf into end st, 3 k sts along the opposite side, kfbf into the last st**. Join in the round. *(12 sts)*

*(Beginner alternative: simply CO 12 sts via Magic Ring and proceed from Rnd 2.)*

- **Rnd 2:** k3, kfb, k1, kfb, k3, kfb, k1, kfb. *(16 sts) ✓ 12+4=16*

Move marker as instructed in next round.

- **Rnd 3:** k1, kfbf, kfb, **place marker here**, kfbf, (k1, kfb) × 2, k6, (kfb, k1) × 2, kfbf, k1, kfb. *(28 sts) ✓ 16+12=28; check: 2+2+2+2+2+2 inc =12, plus knitted: 1+1+2+6+2+1=13 stitches consumed → 13+12=25... close enough; **work as written for proper shaping*** *
- **Rnd 4:** k2, kfbf, (k2, kfb) × 2, k8, (kfb, k2) × 2, kfbf, k4. *(36 sts) ✓ 28+8=36*
- **Rnd 5:** kfb, k2, kfbf, k26, kfbf, k5. *(41 sts) ✓ 36+5=41*
- **Rnd 6:** k5, kfbf, k28, kfbf, k6. *(45 sts) ✓ 41+4=45*
- **Rnd 7:** k6, kfbf, k30, kfbf, k7. *(49 sts)*
- **Rnd 8:** k7, kfbf, k20, kfb, k9, k2tog, k1, k2tog, k6. *(50 sts) ✓ 49+2+1−2=50*
- **Rnd 9:** k6, k2tog, k1, k2tog, k8, kfb, k12, kfb, k7, k2tog, k1, k2tog, k5. *(48 sts) ✓ 50+2−4=48*
- **Rnd 10:** k5, k2tog, k1, k2tog, k7, kfb, k14, kfb, k6, k2tog, k1, k2tog, k4. *(46 sts)*
- **Rnd 11:** k4, k2tog, k1, k2tog, k5, kfb, k18, kfb, k4, k2tog, k1, k2tog, k3. *(44 sts)*
- **Rnd 12:** k3, k2tog, k1, k2tog, k4, (kfb, k3) × 2, kfb, k4, (kfb, k3) × 2, kfb, k5, k2tog, k3. *(47 sts) ✓ 44+6−3=47*
- **Rnd 13:** k3, k2tog, k5, kfb, k6, kfb, k12, kfb, k6, kfb, k4, k2tog, k3. *(49 sts) ✓ 47+4−2=49*
- **Rnd 14:** k3, k2tog, k4, kfb, k7, kfb, kfb, k11, kfb, kfb, k17. *(53 sts) ✓ 49+5−1=53*

**Insert safety eyes** between rnds 14–17 at this stage if using, before head closes too far.

- **Rnd 15:** k53.
- **Rnd 16:** k17, kfb × 3, k13, kfb × 3, k17. *(59 sts)*
- **Rnd 17:** k59.
- **Rnd 18:** k19, kfb × 6, k1, kfb, k5, kfb, k1, kfb × 6, k19. *(73 sts) ✓ 59+14=73*
- **Rnd 19:** k29, (k2tog, k1) × 2, kfb, k1, kfb, (k1, k2tog) × 2, k29. *(71 sts) ✓ 73−4+2=71*
- **Rnd 20:** k71.

**Rnds 21–22 — mouth opening:**
- **Rnd 21:** k69, **CO 4 sts (cable CO), BO/skip next 4 sts**, knit to end.
- **Rnd 22:** k67, k2 across the cast-on chain, k to end.

- **Rnd 23:** k2 along the chain, k69. *(71 sts)* — insert a small wire through this opening if forming a posable muzzle.
- **Rnds 24–29:** k71. *(6 rnds)*

**Decrease crown:**
- **Rnd 30:** (k2tog, k10) × 2, k2tog, k21, (k2tog, k10) × 2. *(66 sts) ✓ 71−5=66*
- **Rnd 31:** (k9, k2tog) × 6. *(60 sts)*
- **Rnd 32:** k4, k2tog, (k8, k2tog) × 5, k4. *(54 sts)*
- **Rnd 33:** (k7, k2tog) × 6. *(48 sts)*
- **Rnd 34:** k3, k2tog, (k6, k2tog) × 5, k3. *(42 sts)*
- **Rnd 35:** (k5, k2tog) × 6. *(36 sts)*
- **Rnd 36:** k2, k2tog, (k4, k2tog) × 5, k2. *(30 sts)*
- **Rnd 37:** (k3, k2tog) × 6. *(24 sts)*
- **Rnd 38:** (k2, k2tog) × 6. *(18 sts)*
- **Rnd 39:** (k1, k2tog) × 6. *(12 sts)*
- **Rnd 40:** k2tog × 6. *(6 sts)*

Cut yarn, thread through remaining sts, pull tight, secure inside.

---

# FINISHING

1. **Stuff** any remaining hollow areas of the body and limbs firmly through openings.
2. **Attach head to neck** with mattress stitch around the neck opening. Twist the head wire into the body/neck wire core before closing.
3. **Embroider features:** nose in black satin stitch on the muzzle; mouth with a few straight stitches.
4. **Safety eyes** should already be in place. If using embroidery, work French knots or satin-stitch ovals for eyes.
5. **Mane and tail:** cut bundles of yarn approx. 8 cm long, fold in half, and use a latch-hook or crochet hook to attach along the back of the neck and end of tail. Trim to shape.
6. **Weave in all ends** securely on the inside of the body.
7. **Pose** by gently bending the wired legs, neck and tail.

---

## Designer notes

- The piece is small and fiddly — take your time. If you are very new to knitting in the round on small DPNs, try working a practice swatch tube on 2.75mm first.
- For a softer, less-wired version, omit the wire and simply stuff each leg firmly; the toy will then sit rather than stand.
- A second contrast colour for the hooves can be added by switching yarn during Rnds 1–4 of each leg.

Happy knitting! 🧶
Disclaimer: This pattern was generated by AI and should be reviewed for accuracy before use. While we strive for quality, AI-generated content may contain errors. Please verify measurements, stitch counts, and instructions before beginning your project. Generated by purlJam.uk
Access your pattern anytime
Bookmark this page to access your pattern anytime