Type
Crochet
Difficulty
beginner
Category
amigurumi
AI Thinking Process
Planning
Verification
Pattern
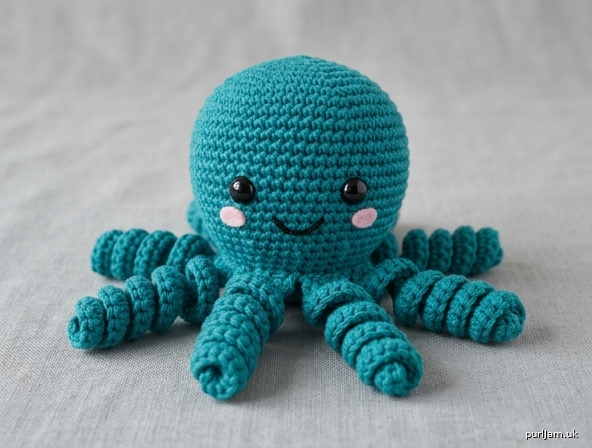
Inky the Easy Octopus
Beginner amigurumi toy · no-sew tentacles · UK crochet terms
A cheerful little octopus with a round head and eight springy, curly tentacles. Worked in one piece from the top of the head down, so you only weave in ends and stitch a smile. Perfect as a first amigurumi.
Skill level: Beginner
Time: About 2–3 hours
Finished size: Head about 6cm (2½in) tall and 5.5cm (2¼in) across. Tentacles about 8cm (3in) when curled. Sitting height about 7cm (2¾in); tentacles spread to about 18cm (7in).
Materials
- Yarn: Worsted weight (UK Aran / 10-ply), acrylic or cotton-blend. About 40g (80m / 87yd) in Main Colour (MC) — teal, coral, lavender, or any favourite shade.
- Small amounts of black (mouth), white (eye highlights, optional), and pink (cheeks, optional).
- Hook: 3.5mm (US E-4). Use 4mm (US G-6) only if your fabric is very tight; the stitches must be dense enough that stuffing does not show.
- Polyester toy stuffing (fibre filling)
- 8mm safety eyes, 1 pair (or embroider eyes — see Finishing)
- Yarn needle
- Stitch marker
- Scissors
- Optional: pins, a little pink felt for cheeks
Yarn notes: One 100g ball is plenty and will make two octopuses. A smooth, light-coloured yarn makes stitches easier to see while you learn.
Tension (gauge)
Tension is not critical, but the fabric must be firm and closed so stuffing cannot peek through.
Guide: 11 dc and 12 rounds = 5 × 5cm (2 × 2in) in spiral dc with a 3.5mm hook, using worsted yarn.
If you see gaps, go down to 3mm. If the head is stiff as a board and hard to stuff, go up to 4mm.
Abbreviations (UK)
| Abbreviation | Meaning |
|---|---|
| blo | back loop only |
| ch | chain |
| dc | double crochet (US single crochet) |
| dc2tog | double crochet 2 together (decrease) |
| FLO | front loop only |
| FO | fasten off |
| inc | increase — 2 dc in the same stitch |
| MC | main colour |
| MR | magic ring (adjustable ring) |
| rnd(s) | round(s) |
| ss | slip stitch |
| st(s) | stitch(es) |
| … | repeat the instructions between asterisks |
Special stitches
- inc: 2 dc in the next stitch.
- dc2tog (invisible decrease, recommended): insert hook through FLO of the next st, then through FLO of the following st (3 loops on hook), yarn over, pull through 2, yarn over, pull through 2. A standard dc2tog is also fine.
- Magic ring: wrap yarn around a finger, work the stated dc into the ring, then pull the tail to close. If you prefer, ch 2 and work Rnd 1 into the first ch.
Pattern notes
- Work in a continuous spiral. Do not join at the end of a round and do not turn. Mark the first stitch of every round and move the marker up as you go.
- Counts at the end of each round are shown in [square brackets].
- Work stitches firmly and evenly. Amigurumi looks neat when the fabric is dense.
- Stuff as you go. It is hard to fill the head after the tentacles are on.
- Tentacles are worked in one round onto the body — no sewing them on.
- Safety eyes are not suitable for children under 3. Embroider the eyes instead (see Finishing).
- Read the whole pattern once before you start. The face goes in before the head is closed.
Head and body
Worked from the top of the head down, in MC.
Rnd 1: 6 dc in MR. Pull tail tight to close. [6]
Rnd 2: inc in each st around. [12] (6 increases → 6 + 6 = 12 ✓)
Rnd 3: *1 dc, inc; rep from * around. [18] (6 increases → 12 + 6 = 18 ✓)
Rnd 4: *2 dc, inc; rep from * around. [24] (6 increases → 18 + 6 = 24 ✓)
Rnd 5: *3 dc, inc; rep from * around. [30] (6 increases → 24 + 6 = 30 ✓)
Rnds 6–12: dc in each st around. [30] (7 even rounds)
Place the eyes now. Insert 8mm safety eyes between Rnds 8 and 9, 6 stitches apart, centred on the face. Do not press the washers on until you are happy with the spacing. (If you are embroidering eyes, skip this and mark the spots with pins.)
Rnd 13: *3 dc, dc2tog; rep from * around. [24] (6 decreases → 30 − 6 = 24 ✓)
Rnd 14: dc in each st around. [24]
Stuff the head firmly, shaping it into a round, slightly tall ball. Leave a little room to add more stuffing after the tentacles.
Tentacles
All eight tentacles are made in this single round. Each tentacle is a chain that you work back along with 2 dc in every chain — that extra width makes them curl on their own.
Rnd 15 (tentacle round):
*Ch 18, 2 dc in 2nd ch from hook, 2 dc in each remaining ch along the chain (17 chains worked → 34 dc; the tentacle will curl), dc in next 3 sts of the body;
rep from * 7 more times. [8 tentacles; 24 body sts] (3 dc × 8 tentacles = 24 ✓)
Tentacle tips
- Do not twist the chain as you work back along it. Hold it flat between finger and thumb.
- Work under two strands of each chain (or into the back bump if you prefer a neater look).
- After each tentacle, the next 3 dc sit on the body and space the tentacles evenly.
- Give each tentacle a gentle stretch so the curl settles.
Close the underside
The tentacles now sit around the lower head. Close the hole underneath them.
Rnd 16: *2 dc, dc2tog; rep from * around. [18] (6 decreases → 24 − 6 = 18 ✓)
Push a little more stuffing into the base so the underside is plump, not dented.
Rnd 17: *1 dc, dc2tog; rep from * around. [12] (6 decreases → 18 − 6 = 12 ✓)
Rnd 18: dc2tog around. [6] (6 decreases → 12 − 6 = 6 ✓)
FO, leaving a 20cm (8in) tail. Thread the tail onto a yarn needle, weave through the FLO of the remaining 6 sts, pull tight to close the hole, and weave in the end through the stuffing. Weave in the magic-ring tail at the top of the head.
Face
Smile: With black yarn (or embroidery thread) and a yarn needle, stitch a small curved smile two rounds below the eyes, about 3 sts wide. Two or three short backstitches, or a single lazy-daisy curve, are enough. Do not pull so tight that the face puckers.
Eye highlights (optional): With white, make one tiny stitch at the upper outer corner of each safety eye.
Cheeks (optional): With pink, stitch two or three small satin stitches under each eye, or glue/sew two 8mm felt circles.
Embroidered eyes (baby-safe option): Instead of safety eyes, stitch two small black ovals or French-knot pupils between Rnds 8 and 9, 6 sts apart, with a white highlight stitch on each.
Finishing
- Roll the head between your hands to even out the stuffing.
- Arrange the tentacles. They should curl under and out. If one looks straighter than the others, run your fingernail along it or dampen it lightly and reshape; leave to dry.
- Check that all ends are woven in and that the underside is fully closed.
- Optional fun extras: a tiny bow on one tentacle, a French-knot freckle, or a second colour for the last 6 dc of each tentacle (join the contrast on the way back along the chain).
Your octopus is ready.
Size and yarn notes
| Change | What to do |
|---|---|
| Larger octopus | After Rnd 5, add Rnd 5a: *4 dc, inc; rep from * around [36]. Work 8 even rounds at 36, then 4 dc, dc2tog [30], 3 dc, dc2tog [24], and continue from Rnd 14. Use a 4mm hook if you like. |
| Smaller / keychain | Stop increasing at Rnd 4 [24]. Work Rnds 5–9 at 24, skip Rnd 13, tentacles as written (already on 24 sts). Tentacles: ch 12 instead of 18. |
| Softer curls | Work 1 dc in each chain instead of 2 dc — tentacles hang longer and straighter. |
| Tighter curls | Work 3 dc in each chain. Very springy; use ch 14 so they do not get bulky. |
Care
Hand wash in cool water, squeeze gently, and dry flat. Do not tumble dry. If a tentacle flattens, reshape it while damp.
Pattern uses UK terms throughout: dc = US sc. Worked in worsted (Aran) yarn on a 3.5mm hook. Designed as a first amigurumi — one piece, eight curls, and a friendly face.
Disclaimer: This pattern was generated by AI and should be reviewed for accuracy before use. While we strive for quality, AI-generated content may contain errors. Please verify measurements, stitch counts, charts, and instructions before beginning your project. Generated by purlJam.uk
Love this pattern?
Save this pattern to your free PurlJam libraryAccess your pattern anytime
Bookmark this page to access your pattern anytime