Type
Crochet
Difficulty
beginner
Category
blanket
AI Thinking Process
Planning
Verification
Pattern
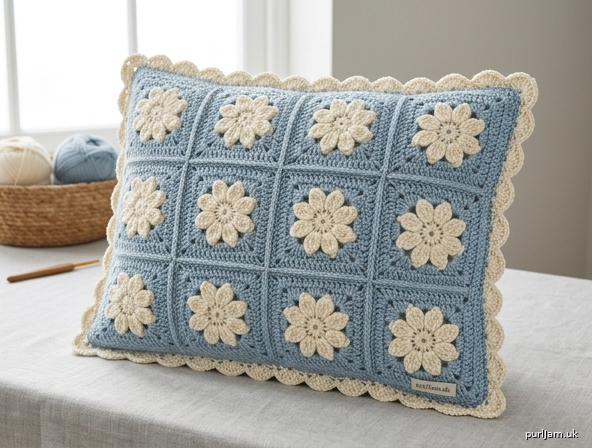
Ivory Blossom Pillow Cover
12 Floral Granny Squares · 4 × 3 Layout · Scalloped Cream Border
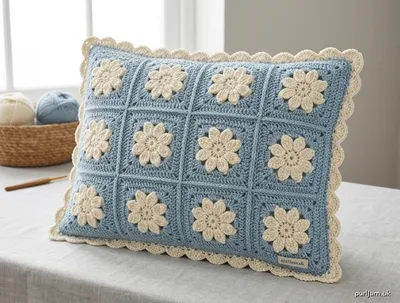
A rectangular (lumbar) pillow cover made from 12 easy floral granny squares. Each square has an eight-petal cream/ivory flower on a light dusty-blue granny background. Squares are joined 4 across by 3 down, then finished with an envelope back and a cream scalloped border.
A 4 × 3 grid of granny squares is always rectangular (4:3). This cover is designed for a 16 × 20 in (40 × 50 cm) pillow form.
Skill level: Easy
Finished measurements
| Piece | Size |
|---|---|
| One blocked square | 5 × 5 in (12.5 × 12.5 cm) |
| Joined front panel (4 × 3) | 20 × 15 in (51 × 38 cm) |
| Cover cavity (inside the seams) | 20 × 15 in (51 × 38 cm) |
| Overall after scallops | approx. 22 × 17 in (56 × 43 cm) |
| Pillow form | 16 × 20 in (40 × 50 cm) — snug, plump fit |
Layout: 4 columns × 3 rows = 12 squares.
  20 in (4 squares)
+-----------------------+
|  S1   S2   S3   S4    |  15 in
|  S5   S6   S7   S8    |  (3 squares)
|  S9  S10  S11  S12    |
+-----------------------+
Materials
Yarn: Sport weight (Category 2 Fine), approx. 140–175 yd / 50 g.
| Color | Role | Amount |
|---|---|---|
| A — Cream / Ivory | Flower petals + scalloped border | 250 yd / 229 m |
| B — Light Dusty Blue | Square backgrounds, joining, back panels | 700 yd / 640 m |
Cotton or a cotton-blend sport yarn holds granny-square shape well and wears nicely as a pillow; acrylic is a fine easy-care substitute.
Hook: US G-6 / 4 mm (or size needed to obtain gauge)
Notions:
- Yarn needle
- Scissors
- 4 stitch markers
- Blocking mats and pins (or wires)
- 16 × 20 in (40 × 50 cm) rectangular pillow form
Gauge
- Floral granny square (Rnds 1–7, blocked): 5 × 5 in (12.5 × 12.5 cm)
- Hdc fabric (back panels): 20 hdc × 16 rows = 4 × 4 in (10 × 10 cm)
Work a test square and measure after blocking. Change hook size if your square is not 5 in.
Abbreviations (US terms)
| Abbrev. | Meaning |
|---|---|
| ch | chain |
| sl st | slip stitch |
| sc | single crochet |
| hdc | half double crochet |
| dc | double crochet |
| tr | treble crochet |
| st(s) | stitch(es) |
| sp(s) | space(s) |
| rnd | round |
| rep | repeat |
| RS | right side |
| WS | wrong side |
| yo | yarn over |
Pattern notes
- US crochet terms throughout. Do not substitute UK names (US dc = UK tr).
- Ch 3 at the start of a dc round counts as 1 dc.
- Join rounds with a sl st to the top of the beginning ch-3 (or to the first sc) unless stated otherwise.
- Magic ring alternative: ch 4, sl st in first ch to form a ring, then work Rnd 1 into the ring.
- Weave in ends as you finish each color on every square — 12 squares make a lot of tails if left until the end.
- Block all 12 squares to 5 × 5 in before joining. Even squares are the whole secret of a flat pillow front.
- The envelope back needs no zipper or buttons; the 7 in (18 cm) overlap holds the form.
Floral granny square
Make 12.
Each square is a cream 8-petal flower squared off with dusty-blue granny rounds.
Flower (Color A — cream/ivory)
Rnd 1: Make a magic ring. Ch 1, 8 sc in ring. Join to first sc. (8 sc ✓)
Rnd 2: Ch 1, 2 sc in each sc around. Join to first sc. (16 sc; 8 × 2 = 16 ✓)
Rnd 3 (petals): *Sl st in next sc, (hdc, dc, tr, dc, hdc) in next sc; rep from * around. Join to first sl st. Fasten off A. (8 petals; 16 sts ÷ 2 = 8 ✓)
The 8 sl sts sit between the petals — those are the join points for the blue background.
Background (Color B — light dusty blue)
Rnd 4 (square the flower): Join B with a sl st in any sl st between petals. Ch 3 (counts as dc), (2 dc, ch 3, 3 dc) in same sl st (first corner), ch 1, 3 dc in next sl st (side), ch 1, *(3 dc, ch 3, 3 dc) in next sl st, ch 1, 3 dc in next sl st, ch 1; rep from * twice more. Join to top of ch-3.
Counts: 4 corners × 6 dc = 24, plus 4 side groups × 3 dc = 12 → 36 dc ✓. 4 ch-3 corners, 8 ch-1 sps. One 3-dc group per side.
Rnd 5: Sl st in next 2 dc and into the ch-3 corner sp. Ch 3, (2 dc, ch 3, 3 dc) in same corner sp, ch 1, (3 dc, ch 1) in each ch-1 sp across to next corner, *(3 dc, ch 3, 3 dc) in corner ch-3 sp, ch 1, (3 dc, ch 1) in each ch-1 sp across to next corner; rep from * around. Join.
Counts: 4 corners × 6 dc = 24, plus 2 groups × 3 dc × 4 sides = 24 → 48 dc ✓ (36 + 12 = 48 ✓). Two 3-dc groups per side.
Rnd 6: Work as Rnd 5.
Counts: 24 corner dc + 3 groups × 3 dc × 4 sides = 24 + 36 → 60 dc ✓ (48 + 12 = 60 ✓). Three 3-dc groups per side.
Rnd 7: Work as Rnd 5. Fasten off B, leaving a 12 in (30 cm) tail if you plan to whip-stitch with the square’s own yarn.
Counts: 24 corner dc + 4 groups × 3 dc × 4 sides = 24 + 48 → 72 dc ✓ (60 + 12 = 72 ✓). Four 3-dc groups per side. 4 ch-3 corners, 20 ch-1 sps.
Each granny round adds exactly 12 dc (one new 3-dc group on each of 4 sides).
Block the squares
Wet-block (or steam-block, if your fiber allows) every square to 5 × 5 in (12.5 × 12.5 cm). Pin through the four ch-3 corners first, then ease each side straight. Let dry fully. Do not skip this step — unblocked squares will not sit in a flat 4 × 3 grid.
Join the squares (4 × 3)
Arrangement: 4 squares wide × 3 squares high, all flowers facing the same way.
Recommended method — whip stitch (easy, flat, sturdy)
- Thread a yarn needle with Color B.
- Place two squares RS up, side by side, edges touching.
- Whip stitch through the outer loops only (the loops closest to the gap), matching dc to dc and ch to ch, including the corner ch-3 spaces.
- Join four squares into a strip. Make three strips of four.
- Whip stitch the three strips together along the long edges.
Do not pull the seaming yarn so tight that the joins cup; the seam should lie as wide as one stitch.
Optional method — join-as-you-go (on Rnd 7)
Work Rnd 7 of each new square as a joining round along any edge that already has a neighbor:
- Between clusters, instead of
ch 1, worksl st in the corresponding ch-1 sp of the neighboring square. - At a shared corner, instead of
ch 3, workch 1, sl st in neighboring corner ch-3 sp, ch 1.
Work unjoined sides of Rnd 7 in the usual way. This is tidy but a little more to track; whip stitch is the easier path at this skill level.
After joining, the front panel measures 20 × 15 in (51 × 38 cm) (4 × 5 = 20 ✓, 3 × 5 = 15 ✓).
Back panels (Color B)
The back is an envelope: two overlapping hdc rectangles, no zipper.
Hdc gauge reminder: 20 hdc = 4 in, so 5 hdc = 1 in. 16 rows = 4 in, so 4 rows = 1 in.
Make 2.
Row 1: Ch 101. Hdc in 2nd ch from hook and in each ch across. Turn. (100 hdc; 101 − 1 = 100 ✓. 100 hdc ÷ 5 hdc per inch = 20 in ✓)
Rows 2–44: Ch 1 (does not count as a st), hdc in each hdc across. Turn. (100 hdc)
44 rows ÷ 4 rows per inch = 11 in ✓.
Fasten off after Row 44.
Hem the overlap edge of each piece: With RS facing, join B at one short end of the long edge that will sit in the middle of the pillow (not an outer edge). Ch 1, sc in each st across that 20 in edge. Fasten off. This gives a firm, finished lip where the two backs overlap.
Each piece is 20 in wide × 11 in tall (51 × 28 cm). Two pieces overlapping on a 15 in side give 11 + 11 − 15 = 7 in (18 cm) overlap ✓.
Assemble the cover
- Lay the joined granny front RS down.
- Place the two back panels RS up on the WS of the front (so when the cover is turned, both RS faces show). Overlap the hemmed edges at the center of the back until the stacked backs measure exactly 15 in (38 cm) tall and 20 in (51 cm) wide. The opening runs across the 20 in width.
- Pin all four outer edges, catching front + back (and both backs in the overlap zone).
- Joining/setup round (Color B): Join B in any corner, working through both layers. Ch 1, *(sc, ch 2, sc) in the corner, then work sc evenly along the side to the next corner, placing 24 sc across each square side; rep from * around. Join to first sc. Fasten off B.
Side counts (between the corner ch-2 spaces):
- Long sides (4 squares): 24 sc × 4 = 96 sc ✓
- Short sides (3 squares): 24 sc × 3 = 72 sc ✓
Mark the four corner ch-2 spaces with stitch markers. If a side is 1 st short or long, add or skip a sc at a join — the scallop math needs those exact 96 / 72 counts.
Scalloped border (Color A — cream/ivory)
Join A with a sl st in any corner ch-2 sp.
Scallop rnd: *7 dc in corner ch-2 sp, [skip 2 sc, 5 dc in next sc, skip 2 sc, sc in next sc] across to the next corner; rep from * around, working the bracket 16 times on each long side and 12 times on each short side. Join to first dc. Fasten off A.
Checks:
- One scallop repeat uses 6 sc (skip 2 + 1 for the 5-dc shell + skip 2 + 1 for the sc) ✓
- Long side: 16 × 6 = 96 sc ✓
- Short side: 12 × 6 = 72 sc ✓
- Each side ends with an sc in the last sc, then 7 dc in the next corner ch-2 — the sc sits neatly between the last 5-dc shell and the corner shell.
- 16 + 16 + 12 + 12 = 56 five-dc scallops, plus 4 seven-dc corner shells.
Finishing
- Weave in every remaining end on the WS. Tug the cream petal joins and the blue granny joins so they stay put, then weave each tail under at least 6 sts of the same color.
- Lightly block the finished cover, pinning the four 7-dc corners out so the scallops lie flat and even. Let dry.
- Insert the 16 × 20 in (40 × 50 cm) pillow form through the back envelope opening. The 15 in cavity on the 16 in side of the form gives a plump, filled look; crochet fabric has enough give to accept the form.
- Smooth the floral front so the 4 × 3 grid is square to the edges and the overlap on the back sits flat.
Quick-reference stitch counts (one square)
| Rnd | Color | What you should have |
|---|---|---|
| 1 | A | 8 sc |
| 2 | A | 16 sc |
| 3 | A | 8 petals |
| 4 | B | 36 dc, 1 group/side, 4 ch-3 corners |
| 5 | B | 48 dc, 2 groups/side |
| 6 | B | 60 dc, 3 groups/side |
| 7 | B | 72 dc, 4 groups/side |
Granny rounds 4 → 5 → 6 → 7 = 36 → 48 → 60 → 72 (+12 dc each rnd ✓).
Disclaimer: This pattern was generated by AI and should be reviewed for accuracy before use. While we strive for quality, AI-generated content may contain errors. Please verify measurements, stitch counts, charts, and instructions before beginning your project. Generated by purlJam.uk
Love this pattern?
Save this pattern to your free PurlJam libraryAccess your pattern anytime
Bookmark this page to access your pattern anytime