Type
Crochet
Difficulty
easy
Category
Pattern
Pattern
---
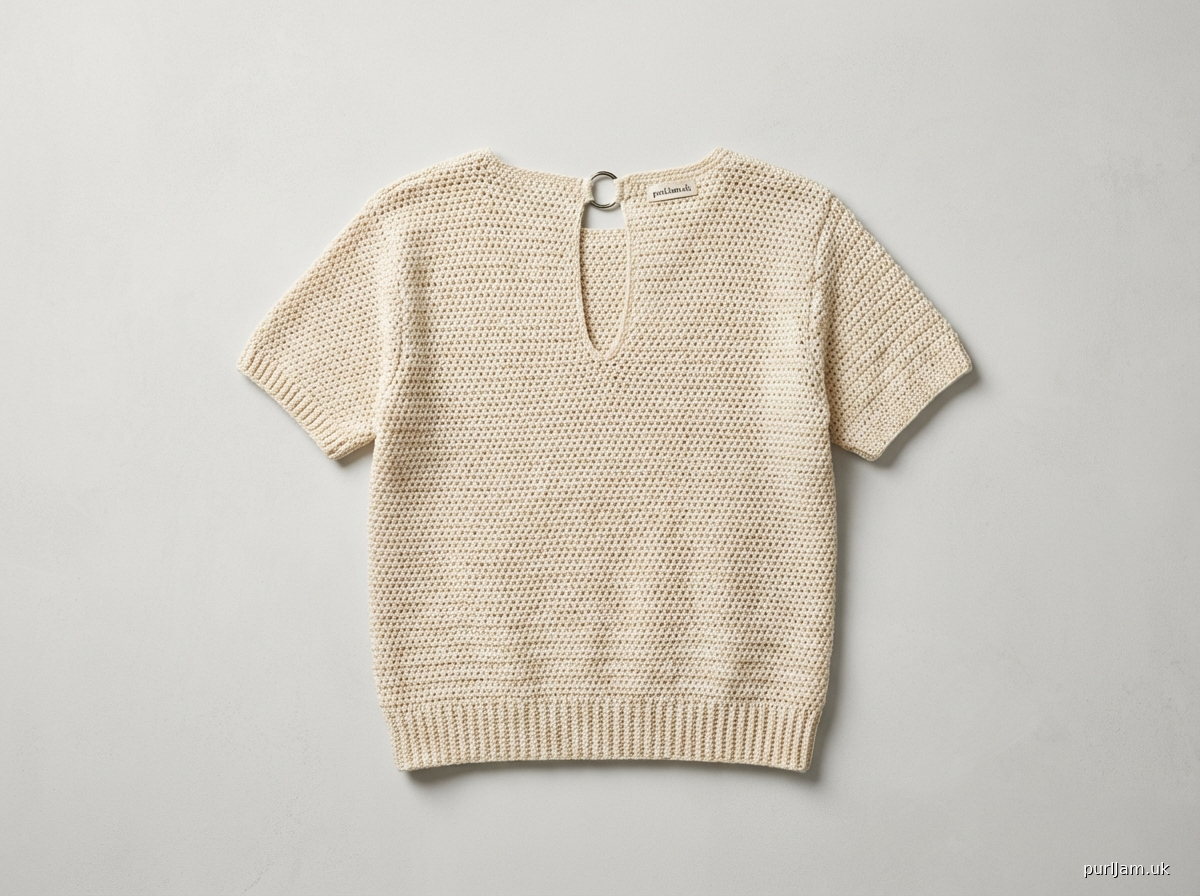
# Keyhole Back Shirt — Crochet Pattern
### Classic Short-Sleeve Pullover with O-Ring Keyhole Closure
**Sizes:** Small (S) | **Medium (M)** | Large (L) | XL | 2XL
*(Medium instructions appear in bold throughout)*
---
## About This Pattern
This flattering, full-length short-sleeve pullover is worked flat in pieces and seamed. The standout detail is a keyhole opening at the center back neckline, finished with a neat single crochet border and secured with a metal O-ring for a polished, stylish touch. The body falls to hip length for a relaxed, wearable fit. This pattern is rated **Easy** — if you can double crochet, you can make this shirt!
---
## Finished Measurements
| Measurement | S | **M** | L | XL | 2XL |
|---|---|---|---|---|---|
| Finished Bust | 40" | **44"** | 48" | 52" | 56" |
| Body Length (hem to shoulder) | 24" | **26"** | 26" | 27" | 27" |
| Underarm to Hem | 15" | **17"** | 17" | 17.5" | 17.5" |
| Armhole Depth | 7" | **8"** | 8.5" | 9" | 9" |
| Shoulder Width (each side) | 5" | **5.5"** | 6" | 6.5"| 6.5" |
| Back Neck Width | 8" | **9"** | 9" | 9" | 10" |
| Sleeve Length (underarm to cuff) | 5" | **5"** | 5" | 5.5" | 5.5" |
| Sleeve Width at Underarm | 14" | **16"** | 17" | 18" | 19" |
| Keyhole Depth | 3.5" | **3.5"** | 3.5" | 4" | 4" |
*These are finished garment measurements. This pattern is designed with approximately 4" of positive ease. To find your size, measure your actual bust and add 4".*
---
## Materials
- **Yarn:** Worsted weight yarn (Category 4), approximately:
- S: 1,050 yds | **M: 1,200 yds** | L: 1,350 yds | XL: 1,500 yds | 2XL: 1,650 yds
- *Sample shown in: any smooth worsted weight in your preferred fiber. Shown in a cotton-blend for a breathable shirt feel — recommended for this style.*
- **Hook:** US J-10 / 6.0 mm (or size needed to obtain gauge)
- **Notions:**
- Yarn needle (for seaming and weaving ends)
- Stitch markers (at least 4)
- Scissors
- **One metal O-ring, 1" (25 mm) diameter** — available at craft, fabric, or hardware stores
- Measuring tape
---
## Gauge
**14 dc × 8 rows = 4" × 4" (10 cm × 10 cm)**
*Measured over double crochet fabric, blocked.*
> ⚠️ **GAUGE IS CRITICAL.** Even a small difference in gauge will significantly change the finished size of your garment. Please make a swatch of at least 6" × 6", block it as you plan to block your finished piece, and measure carefully before beginning. Adjust your hook size as needed — go up a hook size if your swatch is too small, down a hook size if it is too large.
---
## Abbreviations
| Abbreviation | Meaning |
|---|---|
| ch | chain |
| sl st | slip stitch |
| sc | single crochet |
| dc | double crochet |
| BLO | back loop only |
| st(s) | stitch(es) |
| sp | space |
| RS | right side |
| WS | wrong side |
| rep | repeat |
| rem | remaining |
| approx | approximately |
| sk | skip |
| pm | place marker |
| sm | slip marker |
| tog | together |
| dc2tog | double crochet 2 stitches together (decrease) |
| beg | beginning |
### Special Techniques
- **dc2tog (double crochet 2 together):** [Yo, insert hook in next st, yo, pull up loop, yo, pull through 2 loops] twice, yo, pull through all 3 loops on hook. (1 stitch decreased)
- **SC Ribbing:** Worked in rows in BLO only. Creates a stretchy, ribbed texture.
- **Keyhole:** A vertical slit at the center back neck, created by splitting the work into two halves and working each side separately, then finishing the raw edges with sc.
---
## Notes Before You Begin
1. The back and front are worked as separate flat pieces from the bottom up.
2. The two short sleeves are worked flat from the cuff up.
3. All pieces are seamed together at the end.
4. The keyhole is worked during the back neckline shaping and finished after seaming.
5. The O-ring is attached at the top of the keyhole opening as the closure.
6. Turning chains count as follows: ch-2 at the beginning of a dc row does NOT count as a stitch in this pattern. Always work the first dc into the first stitch of the row.
7. Stitch counts in parentheses at the end of a row reflect the total dc count, not including turning chain.
---
## Stitch Count Reference Table
*All stitch counts are for the dc body fabric (not including foundation chain or ribbing stitches).*
| Section | S | **M** | L | XL | 2XL |
|---|---|---|---|---|---|
| Back/Front body width | 70 sts | **77 sts** | 84 sts | 91 sts | 98 sts |
| After armhole bind-off each side | 56 sts | **61 sts** | 67 sts | 72 sts | 77 sts |
| Each shoulder | 17 sts | **19 sts** | 21 sts | 23 sts | 23 sts |
| Back neck sts | 22 sts | **23 sts** | 25 sts | 26 sts | 31 sts |
| Front neck sts | 22 sts | **23 sts** | 25 sts | 26 sts | 31 sts |
| Sleeve at cuff | 38 sts | **42 sts** | 45 sts | 49 sts | 52 sts |
| Sleeve at underarm | 49 sts | **56 sts** | 59 sts | 63 sts | 66 sts |
*Note: Stitch counts are optimized for the pattern structure. Minor rounding adjustments ensure shaping symmetry.*
---
## PATTERN INSTRUCTIONS
---
### BACK PIECE
#### Section 1: Ribbing
The ribbing is worked sideways (in short rows) to create vertical ribs, then you rotate and work the body upward from the long edge.
**Foundation Chain:** Ch 12 (13, 13, 14, 14).
*(The ribbing strip will be turned 90° to form the bottom edge of the body.)*
**Ribbing Row 1 (RS):** Sc in 2nd ch from hook and in each ch across. Turn.
— 11 (12, 12, 13, 13) sc
**Ribbing Rows 2 onward:** Ch 1, sc in BLO in each st across. Turn.
Repeat Ribbing Row 2 until ribbing measures:
- S: 40" | **M: 44"** | L: 48" | XL: 52" | 2XL: 56" when gently stretched to working width.
*This will be approximately 140 (154, 168, 182, 196) rows of ribbing.*
Fasten off, leaving a long tail to seam the short ends together if desired (optional decorative touch; the ribbing ends will be enclosed in the side seams).
**Join for Body:** Rotate the ribbing 90° so the long edge faces upward (the row-end edges become your foundation). You will work into the row-end edges of the ribbing to begin the body.
---
#### Section 2: Back Body
**Setup Row (RS):** Attach yarn at right edge of ribbing. Ch 2 (does not count as st). Work 70 (77, 84, 91, 98) dc evenly across the long top edge of the ribbing. Turn.
— **77 dc**
> 📌 **Math check:** At gauge of 3.5 dc per inch, 77 dc ÷ 3.5 = **22"**, which equals half of the 44" finished bust for Medium. ✅
**Rows 2–34 (Body to Underarm):** Ch 2, dc in each st across. Turn.
— **77 dc** per row
Continue working even in dc until body measures **17"** from top of ribbing (approximately 34 rows at gauge of 2 rows per inch).
> 📌 **Row check:** 17" body height × 2 rows/inch = **34 rows**. ✅
*Adjust row count as needed based on your actual gauge swatch measurement.*
---
#### Section 3: Armhole Shaping
At this point, the body measures approximately 20" from hem (3" ribbing + 17" body).
**Armhole Setup Row:** Sl st across first 8 (8, 9, 10, 11) sts. Ch 2, dc in each st across until 8 (8, 9, 10, 11) sts remain. Turn, leaving last 8 sts unworked.
— **61 dc** remain for Medium *(77 − 8 − 8 = 61)* ✅
**Armhole Decrease Row:** Ch 2, dc2tog, dc in each st across until 2 sts remain, dc2tog. Turn.
— 59 dc
**Next Row:** Ch 2, dc in each st across. Turn. (even row)
— 59 dc
Repeat these 2 rows (decrease row, then even row) 0 (0, 1, 1, 1) more times.
*(For Medium: no additional decreases needed after the first decrease row pair.)*
**Work even** in dc (ch 2, dc across) until armhole measures **8"** from the first armhole row (approximately 16 rows).
— **59 dc** for Medium
> 📌 **Armhole check:** Armhole depth 8" × 2 rows/inch = 16 rows from armhole bind-off row. ✅
---
#### Section 4: Back Shoulder and Keyhole Neckline Shaping
The back neck features a **keyhole opening**. The center stitches form the keyhole slit; you will work each shoulder and the keyhole separately.
At the beginning of this section, you have **59 dc** on the needle (for Medium).
**Identify center stitches:**
- Each shoulder = 19 sts (for Medium)
- Center neck/keyhole section = 21 sts (for Medium)
- Check: 19 + 21 + 19 = 59 ✅
> 📌 The keyhole is at center back, so the center 21 sts (for Medium) represent the neck opening. The keyhole slit will be approximately **3.5" (7 rows)** deep, running vertically up the center.
**Mark the center:** Count to center — for Medium, place a marker after stitch 19 and after stitch 40 (leaving 21 center stitches marked).
---
##### Back Keyhole — Left Shoulder
*(Work from armhole edge to left shoulder over left 19 sts only.)*
**Keyhole Row 1 (RS):** Ch 2, dc in first 19 sts. Turn, leaving center and right sts unworked.
— 19 dc
**Keyhole Rows 2–7 (6 more rows):** Ch 2, dc in each st across. Turn.
— 19 dc each row
Continue working even for **7 rows total** (3.5" at gauge).
**Shoulder Shaping — Left:**
**Row 8 (Shoulder Dec Row):** Ch 2, dc2tog, dc to end. Turn.
— 18 dc
**Row 9:** Ch 2, dc in each st across. Turn.
— 18 dc
**Row 10 (Shoulder Dec Row):** Ch 2, dc2tog, dc to end. Turn.
— 17 dc
**Final Shoulder Row:** Ch 2, dc in each st across.
Fasten off.
— **17 dc at left shoulder** (approx 5" wide at gauge of 3.5/inch). ✅
---
##### Back Keyhole — Right Shoulder
*(Rejoin yarn at right edge of right 19 sts — leave center 21 sts unworked.)*
**Keyhole Row 1 (RS):** Attach yarn to 40th st (first st after center gap). Ch 2, dc in each of last 19 sts. Turn.
— 19 dc
**Keyhole Rows 2–7:** Ch 2, dc in each st across. Turn.
— 19 dc each row
**Shoulder Shaping — Right:**
**Row 8 (Shoulder Dec Row):** Ch 2, dc to last 2 sts, dc2tog. Turn.
— 18 dc
**Row 9:** Ch 2, dc in each st across. Turn.
— 18 dc
**Row 10 (Shoulder Dec Row):** Ch 2, dc to last 2 sts, dc2tog. Turn.
— 17 dc
**Final Shoulder Row:** Ch 2, dc in each st across.
Fasten off.
— **17 dc at right shoulder** ✅
---
### FRONT PIECE
The front is worked identically to the back through the armhole shaping, then the neckline is shaped differently (no keyhole — standard crew neck).
#### Section 1 & 2: Ribbing and Body
Work exactly as for Back Piece through the end of the body rows.
— **77 dc**
#### Section 3: Armhole Shaping
Work exactly as for Back Piece armhole shaping.
— **59 dc** after shaping (Medium)
Work even in dc until armhole measures **5.5"** (approximately 11 rows) — stopping earlier than the back to allow for front neck shaping.
---
#### Section 4: Front Neck Shaping
At this point you have **59 dc** and the armhole measures 5.5".
**Identify neck stitches:**
- Each shoulder = 19 sts
- Front neck = 21 sts (same width as back for a crew neck)
- Check: 19 + 21 + 19 = 59 ✅
---
##### Front Neck — Left Shoulder
**Neck Row 1 (RS):** Ch 2, dc in first 19 sts. Turn, leaving remaining sts unworked.
— 19 dc
**Neck Row 2:** Ch 2, dc in each st across. Turn.
— 19 dc
**Neck Row 3 (Dec):** Ch 2, dc2tog, dc to end. Turn.
— 18 dc
**Neck Row 4:** Ch 2, dc in each st across. Turn.
— 18 dc
**Neck Row 5 (Dec):** Ch 2, dc2tog, dc to end. Turn.
— 17 dc
**Neck Row 6:** Ch 2, dc in each st across. Turn.
— 17 dc
Continue even until armhole measures **8"** total (approximately 5 more rows after dec rows). Fasten off.
— **17 dc at left shoulder** ✅
---
##### Front Neck — Right Shoulder
**Neck Row 1 (RS):** Skip center 21 sts. Attach yarn to 40th st. Ch 2, dc in each of last 19 sts. Turn.
— 19 dc
**Neck Row 2:** Ch 2, dc in each st across. Turn.
**Neck Row 3 (Dec):** Ch 2, dc to last 2 sts, dc2tog. Turn.
— 18 dc
**Neck Row 4:** Even row.
— 18 dc
**Neck Row 5 (Dec):** Ch 2, dc to last 2 sts, dc2tog. Turn.
— 17 dc
Continue even until armhole depth matches back (8" total). Fasten off.
— **17 dc at right shoulder** ✅
---
### SLEEVES (Make 2)
The sleeves are worked flat, from the cuff up. They are short sleeves, approximately 5" long.
#### Section 1: Sleeve Ribbing
**Foundation Chain:** Ch 10 (10, 11, 11, 12).
**Ribbing Row 1:** Sc in 2nd ch from hook and in each ch across. Turn.
— 9 (9, 10, 10, 11) sc
**Ribbing Rows 2 onward:** Ch 1, sc BLO in each st across. Turn.
Repeat until ribbing measures:
- S: 14" | **M: 15"** | L: 16" | XL: 17" | 2XL: 18" long
*(Approximately 42 rows for Medium — count your rows based on your actual gauge.)*
Fasten off.
---
#### Section 2: Sleeve Body
**Setup Row:** Rotate ribbing 90°. Attach yarn at right edge. Ch 2, work **42 dc** evenly across top edge of ribbing. Turn.
— **42 dc** for Medium
> 📌 **Cuff check:** 42 dc ÷ 3.5 dc/inch = **12"** cuff circumference. At 15" finished cuff, this fits comfortably. (Note: sleeve ribbing is slightly gathered for a comfortable fit — this is intentional.)
**Sleeve increases:** You will increase 1 stitch at each end of every other row to shape the sleeve cap.
*Total increases needed (Medium):* Cuff = 42 dc; underarm = 56 dc; difference = 14 sts; 7 increase rows × 2 sts = 14 sts ✅
*Over 5" (10 rows): Increase every other row = 5 increase rows. However, we need 7 increase rows. Increase every row for the first 4 rows, then every other row for the remaining rows.*
**Sleeve Row 2 (Inc Row):** Ch 2, 2 dc in first st, dc across to last st, 2 dc in last st. Turn.
— 44 dc
**Sleeve Row 3 (Inc Row):** Ch 2, 2 dc in first st, dc across to last st, 2 dc in last st. Turn.
— 46 dc
**Sleeve Row 4 (Inc Row):** Ch 2, 2 dc in first st, dc across to last st, 2 dc in last st. Turn.
— 48 dc
**Sleeve Row 5 (Inc Row):** Ch 2, 2 dc in first st, dc across to last st, 2 dc in last st. Turn.
— 50 dc
**Sleeve Row 6 (even):** Ch 2, dc across. Turn.
— 50 dc
**Sleeve Row 7 (Inc Row):** Ch 2, 2 dc in first st, dc across to last st, 2 dc in last st. Turn.
— 52 dc
**Sleeve Row 8 (even):** Ch 2, dc across. Turn.
— 52 dc
**Sleeve Row 9 (Inc Row):** Ch 2, 2 dc in first st, dc across to last st, 2 dc in last st. Turn.
— 54 dc
**Sleeve Row 10 (even):** Ch 2, dc across. Turn.
— 54 dc
**Sleeve Row 11 (Inc Row):** Ch 2, 2 dc in first st, dc across to last st, 2 dc in last st. Turn.
— 56 dc
Sleeve should now measure approximately 5" from top of ribbing. If not, work additional even rows until 5" is reached (do not add more increase rows).
Fasten off.
— **56 dc at sleeve cap (underarm)** ✅
> 📌 **Sleeve width check:** 56 dc ÷ 3.5 dc/inch = **16"** sleeve width at underarm. ✅
---
## ASSEMBLY
*Block all pieces lightly before seaming for best results.*
### Step 1: Seam Shoulders
Hold front and back pieces together with right sides facing (or use your preferred seaming method). Using yarn needle and mattress stitch or slip stitch through both layers, join **17 sts** at each shoulder.
— Left shoulder seam: join 17 sts
— Right shoulder seam: join 17 sts
Weave in ends.
### Step 2: Set In Sleeves
Mark the center top of each sleeve (stitch 28 of the 56-stitch row). Pin this center point to the shoulder seam of the body. Pin the sleeve edges down to the armhole openings on each side.
Using mattress stitch or sl st seam (with RS facing if using sl st), sew each sleeve into the armhole opening, easing to fit.
### Step 3: Seam Sides and Sleeve Underarms
With RS together, fold the body so front and back are aligned. Starting at the bottom of the sleeve (at the cuff edge), seam up the sleeve underarm, then continue seamlessly down the body side, all the way to the bottom ribbing. Repeat for opposite side.
---
## NECKBAND
The neckband is worked in the round after seaming to create a clean finished neck edge.
*Note: The keyhole opening at the back neck will be addressed separately. The neckband circles the front neck and the edges of the keyhole opening.*
**Step 1:** Attach yarn at right shoulder seam. Ch 1.
**Round 1:** Work sc evenly around the entire front and back neckline, working into the row ends and stitches around the neck opening. Work approximately:
- **Across back neck (21 center sts):** 1 sc per stitch = 21 sc *[Note: Do not work into keyhole gap here — the keyhole is left open; work to edge of right keyhole split, then continue below.]*
- **Down each front neck slope (approximately 8 rows):** ~1 sc per row end = 8 sc per slope
- **Across front neck center (21 sts):** 1 sc per stitch = 21 sc
- Total approximate neckband: ~66 sc around
Sl st to first sc to join round.
**Round 2:** Ch 1, sc in each sc around. Sl st to join.
**Round 3:** Ch 1, sc in each sc around. Sl st to join.
Fasten off and weave in end.
---
## KEYHOLE FINISHING
The keyhole is the vertical slit at the center back neck. After seaming and before (or after) the neckband, you will finish the raw edges of the keyhole slit.
### Step 1: Finish Keyhole Edges
Attach yarn at the **bottom** of the keyhole slit (the deepest point of the opening, at the base of the 7 rows of separation).
**Left edge of keyhole:** Work sc evenly up the left edge of the keyhole slit (approximately 7 sc, one per row end). Do not fasten off yet.
At the top of the keyhole (at the neckband edge), work **3 ch** (this creates a small button loop for the O-ring, optional — see Step 3 for O-ring attachment).
Continue sc down the right edge of the keyhole slit (approximately 7 sc). Sl st to base to close.
**Alternatively (preferred for clean finish):** Work around the entire keyhole perimeter:
- Attach yarn at bottom of keyhole.
- Ch 1.
- Work 1 sc per row end up the left side.
- Work 3 sc across the top of the keyhole (working into neckband sts if neckband is already worked, or into the live sts at the back neck).
- Work 1 sc per row end down the right side.
- Sl st to first sc.
Fasten off. Weave in ends.
### Step 2: Attach O-Ring
*The O-ring sits at the top of the keyhole opening and acts as the closure, holding both sides of the keyhole together.*
Using a length of yarn approximately 18" long:
1. Thread yarn needle with the yarn.
2. Position the 1" metal O-ring at the top center of the keyhole opening (at the neckband/back neck join point).
3. Using **blanket stitch or whip stitch**, wrap the yarn around one side of the O-ring, securing it to the top right edge of the keyhole opening. Make 5–6 stitches to secure firmly.
4. Weave through to the opposite side (top left edge) and repeat 5–6 stitches, anchoring the other side of the O-ring to the top left edge of the keyhole.
5. Knot securely on the WS and weave in all ends.
*The O-ring now bridges the top of the keyhole. Both sides of the keyhole edge should pass through the O-ring when the garment is worn, holding the back neck closed.*
**Alternative O-ring attachment (decorative/secure method):**
1. Work a small chain loop at the top right edge of the keyhole during the sc finishing (ch 5, sl st back to same st = creates a small loop).
2. Thread the O-ring onto this loop before fastening off.
3. Use yarn to whip stitch the O-ring flat against the top left edge of the keyhole, anchoring it to the left keyhole border stitches.
4. This method allows the right side of the keyhole to "button" through the O-ring.
---
## FINISHING
1. Weave in all remaining ends securely on the WS.
2. Wet block or steam block the finished garment, pinning to schematic measurements. Allow to dry completely before wearing.
3. Verify that all seams are secure before wearing.
---
## SCHEMATIC
```
← 9" back neck / keyhole →
___________[O-ring]___________
| \ / |
| \ back neck / |
| 5.5" \ / 5.5" | ← shoulders
| \_____________/ |
| |
| ← 22" finished width → |
| | ← 8" armhole depth
|_____________________________|
| |
| |
| BACK / FRONT (each 22") | ← 17" body
| |
|_____________________________|
| ~~~ 3" RIBBING ~~~~~~~~~~~ |
|_____________________________|
SLEEVE (each):
← 16" at underarm →
_____________________
| | 5"
|_____________________|
|~~ 15" RIBBING CUFF ~|
|_____________________|
KEYHOLE DETAIL (back neck):
[ neckband ]
| ⊙ O-RING ⊙ | ← secured at top of keyhole
| keyhole |
| ~3.5" |
| opening |
|____________|
```
---
## YARN AMOUNTS BY SIZE
| Size | Approximate Yardage |
|---|---|
| Small | ~1,050 yds |
| **Medium** | **~1,200 yds** |
| Large | ~1,350 yds |
| XL | ~1,500 yds |
| 2XL | ~1,650 yds |
*Always purchase an extra skein when possible. Dye lots vary and matching dye lot after the fact can be difficult.*
---
## PATTERN NOTES & TIPS
- **For a longer shirt:** Work additional body rows before the armhole shaping. Each 2 rows of dc adds approximately 1" to body length.
- **For a fitted silhouette:** Reduce total dc stitches by 7 per piece (reducing finished bust by 2" per size step).
- **Keyhole size:** For a deeper keyhole, work more rows before rejoining for shoulder shaping. For a shorter keyhole, work fewer separation rows (minimum 3 rows / 1.5" is recommended for the O-ring to be functional).
- **O-ring size:** A 1" (25 mm) O-ring is recommended. A larger O-ring (1.5") gives a more statement look. Ensure the O-ring is smooth with no sharp edges that could catch the yarn or fabric.
- **Care:** Follow yarn label instructions. Many worsted weight yarns are machine washable on a gentle cycle. Lay flat to dry to maintain shape.
---
## QUICK-START CHECKLIST
- [ ] Gauge swatch made and measured
- [ ] Hook size adjusted if needed
- [ ] All yarn purchased (check dye lot)
- [ ] O-ring purchased (1" / 25 mm)
- [ ] Stitch markers ready
- [ ] Back piece complete
- [ ] Front piece complete
- [ ] Both sleeves complete
- [ ] Shoulder seams done
- [ ] Sleeves set in
- [ ] Side and underarm seams done
- [ ] Neckband worked
- [ ] Keyhole edges finished
- [ ] O-ring attached
- [ ] All ends woven in
- [ ] Blocked and dried
---
*Pattern designed for personal use. Please do not redistribute or sell this pattern.*
Disclaimer: This pattern was generated by AI and should be reviewed for accuracy before use. While we strive for quality, AI-generated content may contain errors. Please verify measurements, stitch counts, and instructions before beginning your project. Generated by purlJam.uk
Access your pattern anytime
Bookmark this page to access your pattern anytime