Type
Crochet
Difficulty
advanced
Category
blanket
AI Thinking Process
Planning
Verification
Pattern
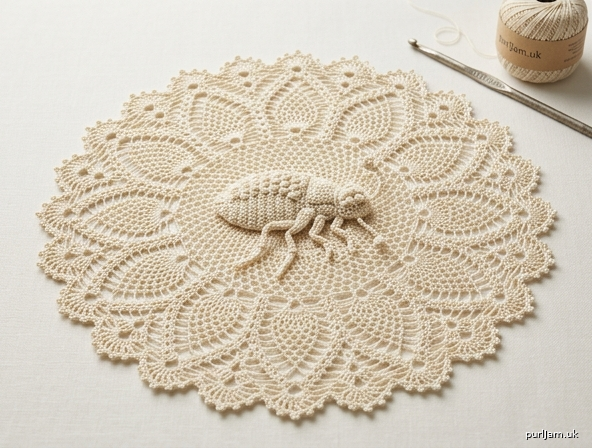
Lace Flea Doily
Advanced Pictorial Center Lace Doily
A refined circular doily worked in lace-weight cotton. The center is a detailed flea (body, head, six legs, antennae) in denser stitches; surrounding rounds open into classic pineapple and shell lace. Diameter after blocking: approximately 12 inches (30.5 cm).
Skill Level: Advanced
Finished Size: 12 inches (30.5 cm) diameter after wet blocking
Flea Motif (center): approx. 3 inches (7.5 cm) long × 1½ inches (4 cm) wide
Materials
- Yarn: Lace-weight cotton (or mercerized cotton #10–#20), approx. 200 yd (183 m). Sample uses white or natural; contrasting color optional for flea only (approx. 25 yd / 23 m).
- Hook: US 7 (1.65 mm) steel hook, or size needed to obtain gauge
- Notions: Stitch markers (at least 8); tapestry needle; blocking board, rustproof pins, and spray bottle or basin for wet blocking; optional fabric stiffener for display
Gauge
32 sts and 16 rnds = 4 inches (10 cm) in dc mesh (dc, ch 1) after wet blocking.
Make a 4-inch swatch in mesh, wet-block, and measure. Lace opens significantly when blocked — do not skip the swatch. Adjust hook size if needed; a slightly firmer fabric helps the flea silhouette stay crisp.
Abbreviations (US terms)
- ch – chain
- sc – single crochet
- hdc – half double crochet
- dc – double crochet
- tr – treble crochet
- dtr – double treble crochet
- sl st – slip stitch
- sp(s) – space(s)
- st(s) – stitch(es)
- yo – yarn over
- beg – beginning
- rep – repeat
- rnd(s) – round(s)
- lp(s) – loop(s)
- sk – skip
- pm – place marker
- RM – remove marker
Special stitches
- Picot: Ch 3, sl st in 3rd ch from hook.
- Shell: (2 dc, ch 2, 2 dc) in indicated st or sp.
- Large shell: (3 dc, ch 3, 3 dc) in indicated st or sp.
- Pineapple base: (dc, ch 1) 5 times, dc — all in same sp.
- Cluster (cl): Yo, insert hook in st, yo, pull up lp, yo, draw through 2 lps; rep from * twice more in same st, yo, draw through all 4 lps on hook.
- 2-dc cluster (2-dc cl): Yo, insert hook in st, yo, pull up lp, yo, draw through 2 lps; yo, insert hook in same st, yo, pull up lp, yo, draw through 2 lps; yo, draw through all 3 lps on hook.
- Popcorn (pc): 5 dc in indicated st, drop lp from hook, insert hook from front to back in first dc of group, pick up dropped lp, draw through st, ch 1 to close.
- Flea leg (worked as ch-lp with sc return): Ch 12, sc in 2nd ch from hook and in next 3 ch, hdc in next 3 ch, dc in next 4 ch; sl st to anchor point on body (see placement).
Notes
- Doily is worked in joined rounds from the center outward unless stated otherwise.
- Join each rnd with sl st to first st of rnd (or as directed). Turn only when instructed (legs and antennae are worked without turning the main fabric).
- Use markers liberally on leg anchor stitches and on the 12 pineapple section points.
- Keep flea-body stitches firm; lace rounds may be slightly looser so they open on blocking.
- When changing color for the flea (optional), fasten off background and weave ends before starting lace, or carry very carefully on WS.
- Inline count checks appear at the end of key rounds as (count → total ✓).
Stitch Diagram Legend
○   chain (ch)
•   slip stitch (sl st)
×   single crochet (sc)
T   half double crochet (hdc)
│   double crochet (dc)          (standard tall post)
┼   treble crochet (tr)
▲   cluster / popcorn (see notes)
⌒   picot
⊓   shell (2 dc, ch 2, 2 dc)
⌂   large shell (3 dc, ch 3, 3 dc)
—   chain-space bridge
╲╱  flea leg (ch-12 appendage, worked out and back)
Work center flea from the written rounds together with the schematic placement below; outer lace follows standard pineapple/shell chart logic (12 repeats).
Flea placement schematic (top view, head at top):
        (antennae)
           │ │
          (head)
         / pc \
    leg1— body —leg2
    leg3—      —leg4
    leg5— abdomen —leg6
Pattern
Center — Flea Body (Rnd 1–8)
Rnd 1 (abdomen base): Make a magic ring. Ch 3 (counts as dc here and throughout), 11 dc in ring; join. (12 dc ✓)
Rnd 2: Ch 3, dc in same st, 2 dc in each dc around; join. (24 dc ✓)
Rnd 3: Ch 3, dc in same st, dc in next dc, *2 dc in next dc, dc in next dc; rep from * around; join. (36 dc ✓)
Rnd 4 (shape abdomen & thorax): Ch 3, dc in next 2 dc, 2 dc in next dc, dc in next 3 dc, 2 dc in next dc, dc in next 4 dc, 2 dc in next dc (abdomen wider), dc in next 3 dc, 2 dc in next dc, dc in next 2 dc, hdc in next 2 dc, sc in next 4 dc (narrow toward head), hdc in next 2 dc, dc in next 2 dc, 2 dc in next dc, dc in next 3 dc; join.
(Count: 42 sts ✓ — slight oval established)
Rnd 5 (head & body definition): Ch 1, sc in first 8 sts, hdc in next 4 sts, dc in next 6 sts, 2 dc in next st, dc in next 6 sts, hdc in next 4 sts, sc in next 8 sts, hdc in next 2 sts, pc in next st (head dome), hdc in next 2 sts, sc in last 0–adjust to end; join.
Place markers in the 6 leg-anchor stitches now:
- Anchors A1 & A2: 2 sts on upper thorax sides (for front legs)
- Anchors B1 & B2: 2 sts mid-body sides
- Anchors C1 & C2: 2 sts lower abdomen sides
(Approx. 44–46 sts after head popcorn; body solid ✓)
Rnd 6 (front legs + antennae prep): Ch 1, sc in each st to first front-leg anchor (A1).
Leg 1: Work flea leg (ch 12, sc in 2nd ch and next 3 ch, hdc in next 3 ch, dc in next 4 ch), sl st in anchor A1 to secure, sc in next body sts to A2.
Leg 2: Work flea leg, sl st in A2.
Continue sc around body to head popcorn.
Antennae: Ch 8, sl st in 2nd ch from hook and in next 2 ch, sc in next 2 ch, hdc in next 2 ch, sl st in top of popcorn; ch 8, work second antenna the same, sl st in popcorn again.
Sc in remaining sts to end of rnd, working over any gaps; join. (Body sts maintained; 2 legs + 2 antennae added ✓)
Rnd 7 (mid legs): Ch 1, sc around body in each st (work 1 sc in base of each previous leg to keep edge even). At anchors B1 and B2 work Leg 3 and Leg 4 (same flea-leg instructions). Sc around; join. (4 legs total ✓)
Rnd 8 (hind legs & body outline): Ch 1, sc around. At anchors C1 and C2 work Leg 5 and Leg 6.
Optional: 1–2 sc increases at rear of abdomen for slight taper. Join. Fasten off if using contrast color for flea; weave ends securely on WS.
(6 legs complete; flea motif finished, approx. 3" long after light steam ✓)
Transition to Lace (Rnd 9–11)
Join lace color (or continue same yarn) with sl st in any st at side of flea, preferably near mid-body so head points “up” in finished doily.
Rnd 9: Ch 1, work 60 sc evenly around entire flea perimeter (including lightly into leg bases and around head — ease fabric so circle lies flat; approx. 1 sc every st and 2–3 sc across each leg crotch). Join. (60 sc ✓)
Pm in every 5th sc (12 markers) for section points.
Rnd 10 (mesh setup): Ch 4 (counts as dc + ch 1), sk next sc, *dc in next sc, ch 1, sk next sc; rep from * around; join to 3rd ch of beg ch-4. (30 dc + 30 ch-1 sps ✓)
Rnd 11: Ch 3, *2 dc in next ch-1 sp, dc in next dc; rep from * around, ending 2 dc in last sp; join. (90 dc ✓)
Pineapple & Shell Lace (Rnd 12–22)
Rnd 12 (divide into 12 pineapples): Ch 3, dc in next 2 dc, ch 3, sk 2 dc, sc in next dc, ch 3, sk 2 dc, *dc in next 3 dc, ch 3, sk 2 dc, sc in next dc, ch 3, sk 2 dc; rep from * around; join.
(12 groups of 3 dc + 12 sc points ✓)
Rnd 13: Sl st to center dc of first 3-dc group, ch 3, 2 dc in same st, ch 2, 3 dc in same st (beg large shell), ch 3, sc in next sc, ch 3, *large shell in center dc of next 3-dc group, ch 3, sc in next sc, ch 3; rep from * around; join.
(12 large shells ✓)
Rnd 14: Sl st to ch-3 sp of first large shell, ch 4 (dc + ch 1), (dc, ch 1) 4 times in same sp, dc in same sp (pineapple base = 6 dc + 5 ch-1), ch 2, sc in next sc, ch 2, *pineapple base in next large-shell ch-3 sp, ch 2, sc in next sc, ch 2; rep from * around; join to 3rd ch of beg ch-4.
(12 pineapple bases ✓)
Rnd 15: Sl st to first ch-1 sp of pineapple, ch 1, sc in same sp, (ch 3, sc in next ch-1 sp) 4 times, ch 3, sc in next ch-2 sp, ch 3, sc in next ch-2 sp, ch 3,* sc in first ch-1 sp of next pineapple; rep from * around, ending last rep at **; join.
Rnd 16: Sl st to first ch-3 sp, ch 1, sc in same sp, (ch 3, sc in next ch-3 sp) 3 times, ch 4, sk next sc-sp group, sc in next ch-3 sp (side), ch 4,* sc in next pineapple’s first ch-3 sp; rep from * around, ending last rep at **; join.
Rnd 17: Sl st to first ch-3 sp, ch 1, sc in same sp, (ch 3, sc in next ch-3 sp) twice, ch 3, shell in next ch-4 sp, ch 3, shell in next ch-4 sp, ch 3,* sc in next pineapple ch-3 sp; rep from * around, ending last rep at **; join.
Rnd 18: Sl st to first ch-3 sp, ch 1, sc in same sp, ch 3, sc in next ch-3 sp, ch 3, large shell in ch-2 sp of next shell, ch 2, large shell in ch-2 sp of next shell, ch 3,* sc in next ch-3 sp; rep from * around, ending last rep at **; join.
Rnd 19: Sl st to first ch-3 sp, ch 1, sc in same sp, ch 4, pineapple base in ch-3 sp of next large shell, ch 1, pineapple base in ch-3 sp of next large shell, ch 4,* sc in next sc; rep from * around, ending last rep at **; join.
(24 pineapple bases — 2 per section ✓)
Rnd 20: Sl st into first ch-1 sp of first pineapple, ch 1, sc in same sp, (ch 3, sc in next ch-1 sp) 4 times, ch 2, (ch 3, sc in next ch-1 sp) 4 times on next pineapple, ch 3,* sc in next ch-4 / linking area as needed to keep flat; rep from * around; join.
Rnd 21 (open points): Sl st to first ch-3 sp, ch 1, sc in same sp, (ch 3, sc in next ch-3 sp) 3 times, ch 5, (ch 3, sc in next ch-3 sp) 3 times on adjacent pineapple half, ch 3,* sc in next linking sp; rep from * around; join.
Rnd 22 (scallop edge): Sl st to first ch-3 sp, ch 1, *(sc, hdc, dc, picot, dc, hdc, sc) in next ch-3 sp, sc in next ch-3 sp; rep from * across each pineapple tip, and in each ch-5 sp work (sc, hdc, 2 dc, picot, 2 dc, hdc, sc); continue around entire edge so every open point receives a picot scallop; join. Fasten off.
(Picot scallops complete the 12-section lace border ✓)
Finishing
- Weave in all ends securely on WS with tapestry needle. For leg and antenna tips, weave back along the appendage so ends do not show on RS.
- Wet block (essential):
- Soak doily in lukewarm water (add mild soap if desired); rinse; roll in towel to remove excess water.
- Pin to blocking board in a perfect circle 12 inches (30.5 cm) diameter.
- Stretch lace rounds evenly; pin each picot out.
- Shape flea legs slightly curved/outstretched and antennae forward so the insect reads clearly; pin body oval.
- Allow to dry completely.
- Optional: apply fabric stiffener diluted per manufacturer directions for a display doily that holds its shape.
- Steam block alternative (if preferred): pin dry to size, hover steam iron above fabric without crushing picots or legs.
- Trim any remaining ends.
Stitch Count Summary (key checkpoints)
| Round | Key count | Running check |
|---|---|---|
| 1 | 12 dc | magic ring ✓ |
| 2 | 24 dc | ✓ |
| 3 | 36 dc | ✓ |
| 4–5 | oval body + head pc | ~44–46 sts ✓ |
| 6–8 | 6 legs + 2 antennae | flea complete ✓ |
| 9 | 60 sc | even perimeter ✓ |
| 10 | 30 dc + 30 ch-1 | mesh ✓ |
| 11 | 90 dc | ✓ |
| 12–14 | 12 pineapples | sections locked ✓ |
| 19 | 24 pineapple bases | ✓ |
| 22 | picot scallops | border closed ✓ |
Design Notes for the Maker
- The flea is intentionally denser than the surrounding lace so it remains the focal point after blocking.
- If legs curl too much, go up half a hook size for leg chains only, or block them under slight tension.
- For a more “scientific illustration” look, embroider a tiny eye with a contrasting French knot on the popcorn head after blocking.
- Diameter can be increased by repeating Rnds 19–21 logic (extra pineapple split) before the final scallop; each added full pineapple tier adds roughly 1½–2 inches (4–5 cm).
Enjoy your advanced lace flea doily — whimsical, technical, and ready for the wall or table.
Disclaimer: This pattern was generated by AI and should be reviewed for accuracy before use. While we strive for quality, AI-generated content may contain errors. Please verify measurements, stitch counts, charts, and instructions before beginning your project. Generated by purlJam.uk
Love this pattern?
Save this pattern to your free PurlJam libraryAccess your pattern anytime
Bookmark this page to access your pattern anytime