Type
Machine Knitting
Difficulty
intermediate
Category
custom
AI Thinking Process
Planning
Verification
Pattern
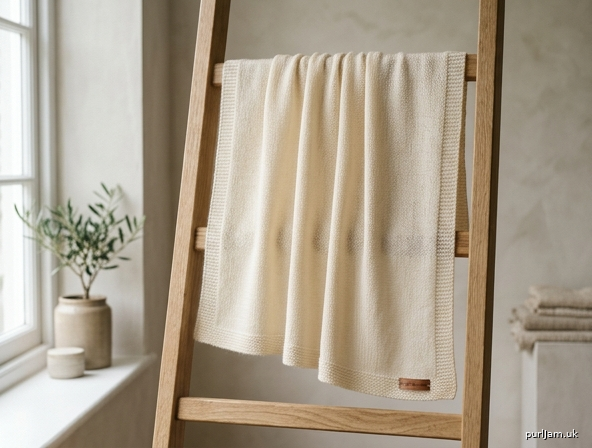
Laceweight Stocking-Stitch Throw
Beginner machine-knit blanket · one size
A soft, drapey rectangular throw worked flat in plain stocking stitch on a standard-gauge knitting machine. Clean rehung hems finish the cast-on and bind-off edges; the long sides are set with steam blocking. No ribber, punchcard, or electronic patterning is required.
Materials
Yarn
- Lace-weight yarn (approx. 2-ply; ±800–1000 m per 100 g), 1100 m / 1200 yd total
- Smooth wool, wool-blend, or cotton-blend recommended for easy knitting and blocking
- Sample used solid or gently tonal colour so fabric reads as a calm field of stitches
Machine
- Standard gauge (4.5 mm) flat-bed machine, 200 needles
- Suitable for any punchcard or electronic model (no patterning used)
- Ribber not required
Tools
- Cast-on comb and weights
- Ravel cord
- Waste yarn (contrasting colour, similar weight)
- Transfer tool (1×2 or single)
- Latch tool
- Claw weights or small edge weights
- Tapestry needle
- Steam iron or garment steamer and blocking wires/pins (optional but recommended)
Tension / Gauge
Working tension: T7 (main bed)
Gauge (measured over blocked stocking stitch):
28 stitches and 40 rows = 10 cm (4 in)
Always knit a tension swatch of at least 40 sts × 60 rows. Wash or steam as you will the blanket, then measure.
- If you have more than 28 sts / 10 cm → try T7.1 or T7.2 (looser).
- If you have fewer than 28 sts / 10 cm → try T6.2 or T6.1 (tighter).
Adjust cast-on only if your blocked gauge differs by more than 1 st / 10 cm (see Pattern Notes).
Size
One size (throw / large lap blanket)
- Finished measurements after blocking: 70 cm wide × 95 cm long (27½ × 37½ in)
- On-machine width: 196 needles
- No size grading
Abbreviations and Machine Terms
| Term | Meaning |
|---|---|
| COR / COL | Carriage on right / carriage on left |
| RC | Row counter |
| MB | Main bed |
| T# | Tension dial setting |
| WP | Working position (needles in B) |
| NWP | Non-working position (needles in A) |
| HP | Holding position (needles in E / D depending on machine) |
| NSS | Needle selection / set for stocking stitch (all needles in B, carriage set for plain knit) |
| WY | Waste yarn |
| CO | Cast on |
| BO | Bind off |
| st(s) | stitch(es) |
| R | row(s) |
Carriage settings for the entire blanket: stocking stitch (both Part buttons OUT / plain knit; no slip, tuck, or fair isle). Side levers normal (both forward on Brother-type machines).
Pattern Notes
- Beginner focus: Only plain knitting, a waste-yarn cast-on, one rehung hem, and a latch-tool bind-off. No partial knitting, no transfers for shaping.
- Why hems: Lace-weight stocking stitch rolls strongly. Rehung hems give a flat, stable top and bottom edge without hand sewing a separate border.
- Side edges: They will curl slightly on the machine. Heavy steam-blocking (or a light wet block) sets them flat. Optional crochet or hand-knit i-cord edge can be added later if desired — not required.
- Weights: Lace-weight needs even, moderate weight. Re-hang the cast-on comb after the hem is closed, and add claw weights every 30–40 needles; move them up every 20–30 rows.
- Gauge change: If blocked gauge is not 28 sts / 10 cm, cast on a multiple that yields ~70 cm:
cast-on sts = 7 × your sts per 10 cm(round to nearest even number ≤ 200).
Recompute body rows as9 × your rows per 10 cmfor the 90 cm body length between hems. - Electronic / punchcard: Leave patterning disengaged. No card or download needed.
Instructions
1. Machine set-up
- Arrange 196 needles to WP (B position) centred on the bed (needles 98 left to 98 right, or equivalent on your numbering). All other needles NWP (A).
- Carriage: COR. Tension dial T7. Stocking-stitch settings (Part buttons out).
- Hang cast-on comb and 2–3 medium weights after the waste cast-on (Step 2).
- Tools within reach: ravel cord, waste yarn, latch tool, transfer tool.
2. Waste yarn cast-on and set-up rows
(RC not yet set)
- With waste yarn, cast on over the 196 needles using your preferred open cast-on (e.g. cast-on comb method or e-wrap).
- Knit 8–10 rows waste yarn. COR.
- Thread ravel cord; knit 1 row. COL.
- Break waste yarn and ravel cord tails and set aside.
- Change to main lace-weight yarn.
- Reset RC = 000. Carriage COL. Main yarn in feeder, T7.
3. Lower hem
Goal: 2.5 cm finished hem (10 rows doubled).
- RC000. COL. Knit 10 rows stocking stitch.
RC = 010. COR. - Create hem fold: Using the transfer tool or by hand, pick up the 196 stitches from the first main-yarn row (the row immediately above the ravel cord) and hang each loop onto the corresponding needle already holding a live stitch. Each needle now holds 2 loops.
- Remove ravel cord and discard waste yarn once the hem is secure.
- Re-hang cast-on comb through the folded hem and re-apply weights evenly.
- Knit 1 row to close the hem.
RC = 011. COL.
(Stitch count remains 196 ✓)
4. Main body
Goal: 90 cm length = 360 rows at gauge.
- Continue in stocking stitch on all 196 needles.
- Knit until RC = 371 (360 body rows after the hem-closing row).
- Checkpoint A: RC = 100 — check fabric is advancing evenly; move weights up.
- Checkpoint B: RC = 200 — same.
- Checkpoint C: RC = 300 — same.
- Final body: RC = 371. COR or COL as your machine lands (note position).
- Stitch count still 196 throughout (no shaping) ✓.
5. Upper hem
- From current RC (371), knit 10 rows for the upper hem allowance.
RC = 381. - Do not bind off yet.
- To form the upper hem you will fold and bind off through both layers in the next section (method chosen so beginners avoid rehanging at the top while stitches are live on a full bed).
Alternative cleaner finish (optional): If you prefer a rehung upper hem identical to the lower one, knit only 10 rows (RC 381), then pick up the stitches of the row at RC 371 and hang them on the needles (2 loops per needle), knit 1 closing row, then bind off — same stitch count 196 ✓.
6. Bind-off
Latch-tool bind-off (recommended for lace-weight control):
- Carriage to the side opposite the yarn end if needed so the working yarn is available at the starting edge.
- Beginning at the carriage side, use the latch tool to chain bind-off loosely across all 196 stitches: pull each successive stitch through the previous, keeping tension equal to T7 or one full number looser so the edge matches the fabric width (70 cm).
- Fasten off final stitch; leave a 15 cm tail.
- If you used the optional rehung upper hem, bind off through the doubled stitches in the same way.
Stitch check at BO: 196 stitches bound off ✓.
Finishing
- Weave ends: Thread tails on a tapestry needle; weave through the inside of each hem for 4–5 cm.
- Block (essential for lace-weight):
- Wet-block or heavy steam-block.
- Pin or wire to finished measurements: 70 cm × 95 cm.
- Gently pat side edges flat so the natural stocking-stitch roll relaxes.
- Allow to dry fully.
- Optional side finish: If edges still curl after blocking, work one round of firm crochet slip stitch or single crochet along each long side, or sew a narrow machine-knit i-cord (knit separately on 3–4 needles and mattress-stitch on). Not required for a usable blanket.
- Steam hems lightly from the wrong side so they lie flat.
- No seaming — single panel is complete.
Final Measurements Checklist
| Point | Target | How verified |
|---|---|---|
| Width | 70 cm | 196 sts ÷ 28 sts/10 cm = 70 cm ✓ |
| Lower hem | 2.5 cm | 10 rows × 2 (folded) at 40 rows/10 cm ✓ |
| Body | 90 cm | 360 rows ÷ 40 rows/10 cm = 90 cm ✓ |
| Upper hem | 2.5 cm | 10 rows folded or bound through ✓ |
| Overall length | 95 cm | 2.5 + 90 + 2.5 = 95 cm ✓ |
| Yarn | ~1100 m | Light open fabric; purchase 1200 m to be safe |
Quick Reference Card
- Needles: 196 WP, centred
- Tension: T7 throughout
- Cast-on: WY + ravel cord → main yarn
- RC000 → knit 10 R → hang hem → knit 1 R (RC011)
- Body to RC371 (360 R)
- Upper hem 10 R → loose latch-tool BO
- Block to 70 × 95 cm
Happy knitting — you now have a light, elegant machine-knit throw worked entirely with beginner techniques.
Disclaimer: This pattern was generated by AI and should be reviewed for accuracy before use. While we strive for quality, AI-generated content may contain errors. Please verify measurements, stitch counts, charts, and instructions before beginning your project. Generated by purlJam.uk
Love this pattern?
Save this pattern to your free PurlJam libraryAccess your pattern anytime
Bookmark this page to access your pattern anytime