Type
Machine Knitting
Difficulty
intermediate
Category
scarf
AI Thinking Process
Planning
Verification
Pattern
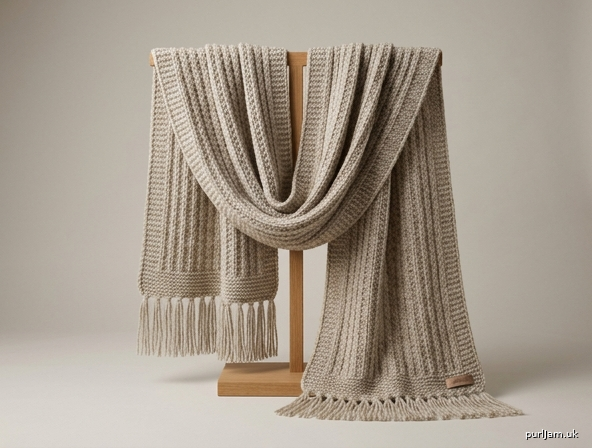
Toyota Slip-Stitch Rectangular Shawl — Beginner
A generously sized rectangular wrap knit on a standard-gauge Toyota knitting machine using the slip stitch (part/skip) setting. Slip stitch gives you rich vertical texture and a firm, drapey fabric from a single worsted yarn — no lace carriage, no ribber, no transfers required. Perfect for a first patterned project.
Finished measurements: 20 in (51 cm) wide × 60 in (152 cm) long, before fringe.
MACHINE_SETUP
- Machine: Standard-gauge Toyota (e.g., KS-858 / KS-901 class), single bed (main bed only). No ribber and no lace carriage needed.
- Carriage settings: Use the slip / part-knit setting. On Toyota carriages, set the Change Knob to the slip (skip) symbol and press the left and right Part buttons IN so needles reading a blank card cell slip rather than knit.
- Pattern source:
- Punchcard Toyota: Load a 24-stitch punchcard with a simple slip motif (see PATTERNING). Lock the card on Row 1 and pre-select before you begin patterning.
- Electronic conversion: If using an electronic bed, program the same 24×N motif; set the pattern to slip and center it on the bed. Black cells = knit, blank cells = slip.
- Needle bed: Bring 100 needles into work (Working Position B), arranged L50 to R50 around center 0.
- Cast-on: Waste-yarn cast-on. Hang the cast-on comb and even weights; knit several rows of waste yarn, then 1–2 rows of ravel cord, then begin main yarn.
- Tools at the machine: cast-on comb, claw/edge weights, latch tool (for bind-off), transfer tool (for fixing dropped stitches), tapestry needle.
MATERIALS
- Yarn: Worsted-weight (Medium / #4), approx. 900–1,000 yd (825–915 m) total. Slip stitch uses less yarn per row than plain knit, but the long shawl needs volume.
- Waste yarn: smooth contrast worsted, small amount.
- Ravel cord: 1 length.
- Tools: cast-on comb, claw weights (4–6), latch tool, single transfer tool, tapestry needle, blocking pins/wires, crochet hook (optional, for fringe).
GAUGE_AND_TENSION
Always swatch in the actual slip pattern — slip stitch pulls in width-wise and lengthens rows.
- Main tension: T7 (dial 7) for worsted on standard gauge in slip.
- Waste yarn: T8–T9 (looser, easy removal).
- Target gauge over slip pattern: 5 sts per 1 in (2 cm) and 6 rows per 1 in (2 cm), measured after light steaming.
- Swatch: Cast on 40 sts, knit 60 rows in pattern, remove, steam, measure the center 4 in.
- Check: 40 sts ÷ 5 = 8 in wide is not required here — measure your center inches directly. Adjust tension ±1 to hit 5 sts/in.
Math check: 100 sts ÷ 5 sts/in = 20 in wide ✓ · 360 rows ÷ 6 rows/in = 60 in long ✓.
PATTERNING
- Stitch repeat: 24-stitch punchcard, worked in slip. A reliable beginner motif is a staggered pindot / mock-rib slip: on odd rows slip every other needle offset, on even rows offset by one. Any pre-punched "slip stitch texture" card in the 24-st family works.
- How slip works here: With Part buttons IN and the Change Knob on slip, needles under a blank cell skip (yarn floats behind) while needles under a punched (black) cell knit. This makes the vertical texture.
- Card position: 100 sts spans just over 4 pattern repeats (100 ÷ 24 = 4.17). This is fine — slip patterns tile continuously across the bed; the motif simply continues past the last full repeat and the selvedges stay balanced.
- Pre-selection: Before each patterned pass on a punchcard machine, the card advances one row as the carriage crosses; make your first patterning pass a pre-select pass so the needles are correctly set. Keep the card released and advancing for the whole body.
- Resetting: No manual reset needed — the card loops automatically. Only reset (relock on Row 1) if you stop mid-project and restart.
- Electronic note: If converting to electronics, load the identical 24×repeat chart, choose slip, and center the motif. No further conversion math is needed.
ROW_PLAN
Work COL = Carriage on Left, COR = Carriage on Right. Slip is symmetric, so direction does not change the setting.
- RC000 — Setup: With 100 needles in work (L50–R50), waste-yarn cast-on complete, ravel cord in. Hang cast-on comb and weights. Carriage at COR.
- RC000 → begin main yarn: Thread main yarn, tension T7. Knit 6 plain rows (Part buttons OUT, plain knit) as a stable starting hem edge. Hang claw weights at both selvedges now.
- RC006 — Engage slip: Set Change Knob to slip, press both Part buttons IN, ensure punchcard is released and reading Row 1. Make one pre-select pass.
- RC006 → RC354 — Body in slip pattern: Knit in slip pattern for 348 rows. During the body:
- Advance the claw weights up every ~30–40 rows so the fabric feeds evenly and selvedges stay tidy.
- At RC100, RC200, RC300, pause and gently tug the weights down to keep tension even; check for any dropped or split stitches and repair with the transfer/latch tool.
- (Optional contrast stripes:) to add stripes, break at any 12-row boundary, knit 6–12 rows in contrast worsted at the same T7, then resume main yarn. Weave the color-change tails at finishing.
- RC354 — Slip off, end plain: Set Part buttons OUT / Change Knob to plain and knit 6 plain rows to match the starting hem. RC ends at 360.
Math check: 6 (start hem) + 348 (slip body) + 6 (end hem) = 360 rows = 60 in ✓.
- Bind-off: At RC360, work a latch-tool bind-off across all 100 sts for a firm, non-curling edge: use the latch tool to pull each stitch through the next along the row. Keep it loose enough to match the fabric's stretch.
FINISHING
- Side edges (selvedges): Slip fabric can loop at the edges. For a clean finish, run a single crochet chain down each long side with a hook, catching each edge stitch — this stabilizes and neatens the selvedge. (Alternatively, if you kept the first/last needle in plain knit as a slipped-edge guard, edges will already be tidier.)
- Remove waste yarn: Unravel the ravel cord and pull out the waste yarn from the cast-on edge; you can leave the live loops as a decorative edge or crochet-chain them closed to match the bound-off end.
- Weave in tails: Thread all yarn tails on the tapestry needle and weave into the fabric back for 1–1.5 in; trim.
- Blocking: Lay flat and steam gently (hover the iron, do not press) to relax the slip texture and set the final measurements. Pin/wire to 20 in × 60 in. For extra drape, you may hang the shawl with light weights briefly to open the pattern, then let dry flat.
- Optional fringe: Cut yarn into 12 in (30 cm) lengths, fold in pairs, and use the crochet hook to attach a fringe tassel every 1 in along both short ends. 20 in ÷ 1 in = 20 tassels per end (40 total) ✓. Trim even.
ABBREVIATIONS
- RC — Row Counter
- COL / COR — Carriage on Left / Carriage on Right
- T — Tension dial setting (e.g., T7 = tension 7)
- B / WP — Working Position B (needle in work)
- Part buttons — Toyota carriage buttons that engage part/slip knitting
- Change Knob — Toyota carriage selector for knit / slip (skip) / tuck settings
- Slip / skip / part — needle holds its stitch and does not knit; yarn floats behind
- sts — stitches
- Ravel cord — smooth cord knit between waste and main yarn for clean separation
- Cast-on comb — weighted comb hung under the first rows to tension the cast-on
- Claw / edge weights — small weights hung at selvedges to keep edges feeding
- Latch tool — hooked tool used for latch-tool bind-off and stitch repair
- Transfer tool — tool for moving/repairing stitches
Disclaimer: This pattern was generated by AI and should be reviewed for accuracy before use. While we strive for quality, AI-generated content may contain errors. Please verify measurements, stitch counts, and instructions before beginning your project. Generated by purlJam.uk
Love this pattern?
Save this pattern to your free PurlJam libraryAccess your pattern anytime
Bookmark this page to access your pattern anytime