Type
Machine Knitting
Difficulty
intermediate
Category
scarf
AI Thinking Process
Planning
1. **Design Strategy**: A beginner-friendly honeycomb (tuck) stitch scarf tip on the Singer 360 standard-gauge machine. Honeycomb is a slip/tuck pattern that requires no lace carriage — just the punchcard and tuck/slip lever settings, ideal for beginners wanting texture.
2. **Construction Plan**: Flat single-bed knitting on the main bed, worked from a waste-yarn cast-on upward over a 15 cm (6") wide tip section.
3. **Quality Assurance**:
- Honeycomb tuck can drop stitches if weights aren't kept even — emphasise claw weights.
- Tuck patterns pull in width, so cast-on must compensate for narrowing.
- Beginner must thread floats/tuck loops correctly — clarify lever settings precisely.
4. **Final Calculations**: Worsted on standard gauge is borderline thick; use T8–T9. Gauge in honeycomb ≈ 4.5 sts/cm relaxed (after pull-in) → 15 cm × 4.5 = 67.5, rounded to a punchcard-friendly even number. Card #1 honeycomb is a 2-stitch repeat; cast on 68 sts (34 L + 34 R of centre 0). 68 ÷ 2 = 34 repeats exactly. Length of tip ≈ 15 cm height ≈ 60 rows at ~4 rows/cm.
Verification
[PRE-FLIGHT CHECKS]
1. **Completeness**: All 8 sections present — TITLE, MACHINE_SETUP, MATERIALS, GAUGE_AND_TENSION, PATTERNING, ROW_PLAN, FINISHING, ABBREVIATIONS. ✓
2. **Consistency**: 68 sts ÷ 2-st repeat = 34 whole repeats. 15 cm × 4.5 sts/cm = 67.5 ≈ 68. ✓ 60 rows ÷ 4 rows/cm = 15 cm height. ✓
3. **Constraints**: Honeycomb (tuck) on Singer 360, beginner, scarf tip 15 cm, worsted, metric+inches — all addressed. Lace carriage NOT required (honeycomb is tuck) — stated explicitly. ✓
4. **Safety**: Worsted on standard gauge is at upper limit; tension capped at T9 and noted. Math rounded to even number for 2-st repeat. ✓
Pattern
# Honeycomb Scarf Tip — Singer 360 Standard Gauge

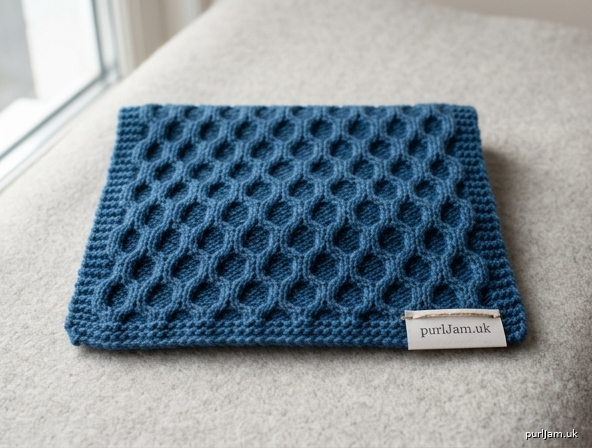
A beginner-friendly textured scarf tip worked in large honeycomb (tuck) stitch. Honeycomb is a **tuck pattern**, not lace, so **no lace carriage is needed** — you simply load a punchcard and set the carriage to tuck in both directions. This pattern makes the bottom 15 cm (6") "tip" of a scarf; continue straight to make the full scarf at the same width.

---

## MACHINE_SETUP

- **Machine:** Singer 360, standard gauge (4.5 mm needle pitch), single bed (main bed only). Ribber **not** required.
- **Lace carriage:** **Not required.** Honeycomb is a tuck stitch worked with the main knit carriage.
- **Punchcard:** Load **Honeycomb / large tuck card** (Singer card #1 in most pattern packs — a **2-stitch × 4-row** tuck repeat). If your card pack labels it differently, choose the card that tucks alternating needles every 2 rows.
- **Carriage levers (main carriage):**
  - Set **both tuck/slip levers to TUCK (△ / Tuck position)** — left and right, so the carriage tucks in BOTH directions.
  - **Russell levers (needle-selection / part):** set to PATTERN/normal so the card selects needles.
  - **Part buttons:** OUT (not engaged) — plain tuck patterning only.
- **Card lock:** Keep the card on **LOCK** during the waste-yarn cast-on and the first set-up row; release to advance once main yarn knitting begins (see PATTERNING).
- **Tools needed at the bed:** transfer tool (1-prong), latch tool, cast-on comb, ravel cord, claw/edge weights (at least 4), and a contrast waste yarn.

---

## MATERIALS

- **Main yarn:** Worsted-weight yarn, smooth, ~200 m / 100 g. Approx. 25–30 g for the 15 cm tip; more for a full scarf.
- **Waste yarn:** Smooth contrast worsted or DK, ~2 m.
- **Ravel cord:** 1 length (~1 m).
- **Tools:** Cast-on comb, 4+ claw weights, 1-prong transfer tool, latch tool, tapestry needle for tails.

---

## GAUGE_AND_TENSION

- **Tension dial (main yarn, worsted):** **T8–T9.** Worsted is at the upper limit for standard gauge; if stitches are tight or the carriage jams, drop to T8; if loops are loose, raise toward T9. **Do not exceed T9.**
- **Waste yarn tension:** T8.
- **Gauge swatch (knit and steam before committing):** In honeycomb tuck at T9, worsted relaxes to approximately:
  - **4.5 sts/cm** (after tuck pull-in)
  - **4 rows/cm**
- **Validation:** 15 cm width × 4.5 sts/cm = 67.5 sts → rounded to **68 sts** (even, required for the 2-stitch repeat). 68 ÷ 2 = **34 whole repeats** ✓.
- **Always knit your own swatch** — if your gauge differs, recalculate: cast-on = desired cm × your sts/cm, then round to the nearest **even** number.

---

## PATTERNING

- **Stitch repeat:** 2 stitches wide × 4 rows tall (honeycomb tuck). Over 68 needles you get **34 horizontal repeats**.
- **Needles in work:** Bring **68 needles** into work (B position), centred on **0**: **34 needles left of 0** and **34 needles right of 0**.
- **Carriage setting:** Both tuck levers at TUCK so alternating needles tuck (collect a loop) every pass; the punchcard alternates which needles tuck every 2 rows to form the honeycomb cells.
- **Resetting the card:** The card runs continuously — no manual reset needed within the tip. Just keep the card **released** so it advances one row per carriage pass once main knitting starts.
- **Converting punchcard → electronic (if using an electronic 360 or import):** Program a **2×4 tuck motif**: Row 1–2 tuck odd needles, Row 3–4 tuck even needles. Set the machine to **TUCK / Fair-Isle-OFF** and let the electronics handle selection; needle-in-work count and tension stay identical.
- **Beginner tip:** Tuck loops must sit cleanly in the needle hooks. If a needle holds 3+ loops, your weights are too light — add claw weights and slow your carriage pass.

---

## ROW_PLAN

> Carriage starts at **COR** (carriage on right) after cast-on. RC = row counter.

1. **RC000 — Waste-yarn cast-on:** With waste yarn (T8), e-wrap or use the cast-on comb across **68 needles** (34 L + 34 R of 0). Knit **8–10 rows** plain. Lay in the **ravel cord** on the last waste row, then knit **2 more rows** plain. Hang the **cast-on comb and claw weights** evenly.
2. **RC000 — Set counter to 000.** Thread **main yarn (T8–T9)**. Knit **2 plain rows** (carriage levers still at plain/stockinette, card on LOCK) to anchor the main yarn. End **COR**.
3. **RC002 — Engage pattern:** Set **both levers to TUCK**, **release the card** so it advances. Knit **1 row to set the first selection**, then continue.
4. **RC002 → RC060 — Honeycomb body:**
   - Knit in tuck across all 68 needles.
   - **Every 10 rows (RC010, RC020, RC030, RC040, RC050)**: pause at COL or COR and **move claw weights upward** to keep tension even and stop tuck loops dropping.
   - **Edge check:** if the side stitches pull in hard, **rehang the two end needles** with a small claw weight each every ~20 rows.
   - *Optional contrast stripe (beginner-friendly accent):* at **RC030**, knit 2 rows in a contrast worsted at the same tension, then return to main yarn. Keep levers at TUCK throughout.
5. **RC060 — Tip complete (≈15 cm).** Validation: 60 pattern rows ÷ 4 rows/cm = **15 cm** ✓.
   - **To continue into a full scarf:** simply keep knitting in tuck to your desired length, moving weights every 10 rows, then bind off as below.
6. **Bind off (RC060):** Return **both levers to plain** and knit **2 plain rows** for a stable top edge. Then **latch-tool bind off** across all 68 stitches: with COL, *transfer st 1 onto st 2 with the transfer tool, knit that needle back, and chain the loop off with the latch tool*; repeat across. This gives a stretchy, beginner-forgiving edge.

**Side finishing:** The outermost needle on each side forms the selvedge. For a tidy edge, **hang a crochet chain** up each side after blocking, or simply weave the floats. (A true slipped edge is optional and not required for tuck.)

---

## FINISHING

1. **Remove waste yarn:** Pull the **ravel cord**; the live cast-on edge releases. Either let it form the bottom edge of the tip or pick up and chain it off with the latch tool for a finished hem.
2. **Weave tails:** Thread the tapestry needle and weave all tails into the back of the tuck cells (loops hide tails well).
3. **Steam & block:** Pin the tip flat to **15 cm wide × 15 cm tall**. **Steam gently** (hover the iron, do not press flat — pressing crushes the honeycomb cells). Let dry fully pinned.
   - Unlike lace, tuck should **not** be hung with heavy weights to "open" it — that flattens the texture. Block flat instead to preserve the puffed honeycomb cells.
4. **Optional fringe:** Cut 20 cm strands of main yarn, fold in half, and use the latch tool to pull a folded loop through each bottom-edge cell; pull tails through the loop to knot. Trim even.

---

## ABBREVIATIONS

| Abbr. | Meaning |
|-------|---------|
| RC | Row counter |
| COL / COR | Carriage on left / Carriage on right |
| T | Tension dial setting |
| B position | Needle in working/upper position |
| Tuck (△) | Carriage lever setting that collects a loop instead of knitting |
| Part button | Carriage button engaging part/empty-needle knitting (OUT here) |
| Russell levers | Needle-selection levers on the carriage |
| Ravel cord | Smooth cord that releases the waste-yarn cast-on |
| Cast-on comb | Weighted comb hung under the first rows |
| Claw weight | Small hanging weight for even tension |

---

**Quick validation recap:** 68 sts ÷ 2-st repeat = 34 repeats ✓ · 15 cm × 4.5 sts/cm ≈ 68 sts ✓ · 60 rows ÷ 4 rows/cm = 15 cm ✓ · No lace carriage required (tuck pattern) ✓.
Disclaimer: This pattern was generated by AI and should be reviewed for accuracy before use. While we strive for quality, AI-generated content may contain errors. Please verify measurements, stitch counts, and instructions before beginning your project. Generated by purlJam.uk
Access your pattern anytime
Bookmark this page to access your pattern anytime