Type
Crochet
Difficulty
intermediate
Category
shawl
AI Thinking Process
Planning
Verification
Pattern
Linden Trellis Shawl
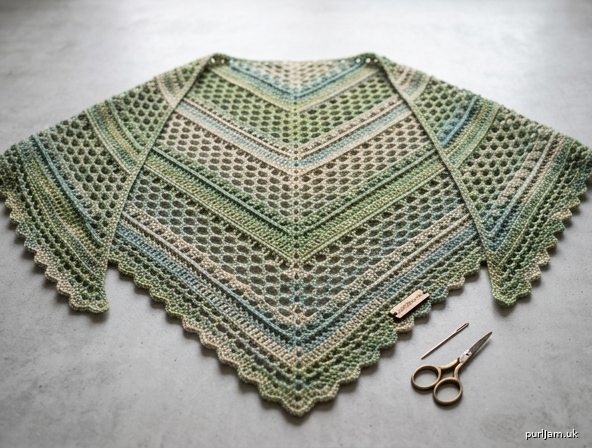
A one-piece triangular lace shawl, worked from the center top down to a deep point. There are no seams. An open trellis of double crochet and chain spaces is crossed by cluster bands and picot rows, all on the right side. A scalloped picot border is worked directly onto the three edges. The lace looks bunched on the hook. The drape, the open trellis, and the finished size appear only after blocking. Do not skip blocking.
Skill level: Advanced Construction: One piece, top down, from a center ring
Finished measurements (after blocking, including border)
These are the pinning targets.
- Wingspan (lower edge, tip to tip): 62 inches (157.5 cm)
- Center depth (apex to center of lower edge): 31 inches (79 cm)
- Each front edge: 44 inches (112 cm)
Body only, before the border, blocked to gauge: 60 inches (152.5 cm) wide and 30 inches (76 cm) deep. Each front edge of the body is about 42.5 inches (108 cm). The border adds about 1 inch (2.5 cm).
              apex (start)
             /            \
            /    spine     \
           /        |       \
          /         |        \
         tip -------+------- tip
              62 in wingspan
              depth 31 in
Yarn
Worsted weight (CYC 4), wool or wool blend. Wool blocks and holds the lace open. A wool/acrylic blend is acceptable. A long-color-repeat gradient may be used with no special handling; join a new skein at the end of a row.
- Amount used: approximately 900 yards (823 m)
- Purchase: 1000 yards (915 m), to cover the gauge section and the border
- Typical put-up: 5 skeins of 200 yards (183 m), or 5 skeins of 220 yards (201 m)
A smooth or lightly heathered yarn shows the trellis. A very fuzzy yarn will hide the picots and the chain spaces.
Hook
- US J/10 (6 mm), or size needed to obtain gauge
- Optional: US I/9 (5.5 mm) for the border only, if you want a firmer edge. Stitch counts do not change.
Notions
- Stitch marker (removable)
- Tapestry needle
- Rustproof pins (about 80) and blocking mats
- Row counter (strongly recommended)
- Optional: blocking wires are not ideal on the scalloped edge; pin each scallop instead
Gauge
12 dc and 6 rows = 4 inches (10 cm) over the lace pattern, after blocking.
Count double crochet only. A cluster counts as 1 dc. Chain spaces and picots are not counted, but the chain spaces are included in the width. If you count chains as stitches, the shawl will come out too narrow.
Gauge check on the shawl itself: After Row 12, block lightly. The lower edge should measure 16 inches (40.5 cm) across (48 dc ÷ 3 = 16 ✓) and the center spine should measure 8 inches (20.5 cm) from the ring (12 × 2/3 = 8 ✓). If the piece is too small, use a larger hook. If it is too large, use a smaller hook. Rip back and correct gauge before continuing. This shawl is one size; gauge is the size.
Abbreviations (US)
- ch: chain
- dc: double crochet
- sc: single crochet
- sl st: slip stitch
- sp: space
- st(s): stitch(es)
- cl: 2-dc cluster (counts as 1 dc)
- picot: ch 3, sl st in 3rd ch from hook (not a counted stitch)
- RS: right side
- WS: wrong side
- rep: repeat
US crochet terms throughout. Do not convert to UK terms: a US dc is a UK treble.
Special stitches
2-dc cluster (cl): Yarn over, insert hook in indicated stitch, yarn over, pull up a loop, yarn over, pull through 2 loops, yarn over, insert hook in the same stitch, yarn over, pull up a loop, yarn over, pull through 2 loops, yarn over, pull through the remaining 3 loops. One top. Counts as 1 dc.
Picot: Ch 3, sl st in the 3rd ch from hook.
Edge increase at the start of a row: The turning chain counts as the first dc (and as the chain space that follows it). Then work 1 dc in the first dc of the row. Those two dc are the increase.
Edge increase at the end of a row: Work 1 dc in the last dc, ch the number required for that row, and work 1 dc in the same last dc.
Notes
- Read the whole pattern before you begin. The border math is written for the 45-row shawl.
- Odd-numbered rows are RS. Even-numbered rows are WS. Pin a marker on the RS of Row 1.
- Stitch count = number of dc, and each cluster counts as 1 dc. At the end of Row n you must have 4 × n dc.
- The turning chain counts as 1 dc. Do not work an extra dc into the turning chain at the start of the next row. The “first dc” after you turn is the last real dc you made.
- The last dc of a row is the top of the previous turning chain. Work the end increase into that top. If you miss it, you will be 2 dc short.
- Work into the tops of stitches only, unless a round or row tells you to work into a space. The only body space you work into is the center spine.
- Keep a marker in the center ch-2 spine and move it up every row. On Cluster rows and Picot rows the body also uses ch-2. The spine is only the ch-2 that sits between the two dc you just worked into the previous center space. The row instructions tell you when to move the marker.
- A “dc” you work into may be a plain dc or the top of a cluster. Treat them the same.
- Left-handed crocheters: follow the fabric (end of the row, side edge, center space). Swap the words “left” and “right” if you prefer.
- Join new yarn at the end of a row. Weave ends along the edge, not through the open trellis.
Checkpoints
Measure after a light block if you are unsure. Width is the lower edge. Depth is the center spine.
| After row | Dc count | Width | Depth |
|---|---|---|---|
| 12 | 48 | 16 inches (40.5 cm) | 8 inches (20.5 cm) |
| 24 | 96 | 32 inches (81.5 cm) | 16 inches (40.5 cm) |
| 36 | 144 | 48 inches (122 cm) | 24 inches (61 cm) |
| 45 | 180 | 60 inches (152.5 cm) | 30 inches (76 cm) |
These four widths are exact at gauge: dc count ÷ 3 = inches. Depths of Rows 12, 24, and 36 are exact: rows × 2/3 = inches. Row 45 is 180 ÷ 3 = 60 inches wide and 45 × 2/3 = 30 inches deep (4 × 45 = 180 dc ✓).
If a row does not equal 4 times its row number, stop. Check the turning chain, both edge increases, both dc in the center space, and that each cluster was counted once.
Instructions
Foundation
Make a magic ring. (Alternate start: ch 4, sl st in the first ch to form a ring.)
Row 1 (RS): Ch 4 (counts as dc, ch 1), dc in ring, ch 2, dc in ring, ch 1, dc in ring. Turn. Place a marker in the center ch-2 sp.
(4 dc, 1 center ch-2 sp. 4 × 1 = 4 ✓)
The row reads: dc, ch 1, dc, ch 2, dc, ch 1, dc. Two dc sit on each side of the spine.
Lace sequence
Work the next 4 rows 10 times (shawl Rows 2–41). The first time through, Row 2 is Rest Mesh.
Do not work an 11th repeat. After the 10th Picot Openwork row you will be on Row 41, and you will move to the Closing Band.
Rest Mesh (WS in this sequence)
Ch 4 (counts as dc, ch 1), dc in first dc, *ch 1, dc in next dc; rep across, working the last rep into the dc immediately before the center ch-2 sp*, ch 1, dc in center ch-2 sp, ch 2, move marker to this ch-2, dc in same sp, ch 1, dc in next dc, *ch 1, dc in next dc; rep across, working the last rep into the last dc (top of the turning chain)*, ch 1, dc in same last dc. Turn.
On Row 2 there is only one dc to work before the center on each side. That is correct. (Row 2: 8 dc. 4 × 2 = 8 ✓)
Cluster Band (RS in this sequence)
Ch 5 (counts as dc, ch 2), dc in first dc, *ch 2, cl in next dc; rep across until the next dc is the dc immediately before the center ch-2 sp*, ch 2, dc in the dc before the center sp, ch 2, dc in center ch-2 sp, ch 2, move marker to this ch-2, dc in same sp, ch 2, dc in next dc, *ch 2, cl in next dc; rep across until the next dc is the last dc of the row*, ch 2, dc in last dc (top of the turning chain), ch 2, dc in same last dc. Turn.
The first and last two dc of each side, and both dc worked into the center space, are plain dc. Every other body stitch on the side is a cluster. Each cluster counts as 1 dc.
First Cluster Band is shawl Row 3. (12 dc. 4 × 3 = 12 ✓. 6 dc on each side of the spine ✓)
Picot Openwork (RS in this sequence)
Ch 5 (counts as dc, ch 2 — this is dc #1 of the first side; do not picot it), dc in first dc (dc #2), *ch 2, dc in next dc, and if this dc’s number on the current side is a multiple of 4, work a picot; rep across, working a dc (and a picot if its number is a multiple of 4) into the dc immediately before the center sp*, ch 2, dc in center ch-2 sp (do not picot this dc), ch 2, move marker to this ch-2, dc in same sp (this is dc #1 of the second side; do not picot it), ch 2, dc in next dc (dc #2 of the second side), *ch 2, dc in next dc, picot if this dc’s number on this side is a multiple of 4; rep across, working the last rep into the last dc*, ch 2, dc in same last dc. Turn.
Count each side separately. Begin again at 1 on the second side. Never picot a dc that was worked into the center space.
Row 5 check (first Picot Openwork row): 20 dc (4 × 5 = 20 ✓), 10 dc on each side. Picot after dc #4 and dc #8 on each side. 4 picots in the row. No picot on dc #10 of either side.
Closing Band
Work once, after Row 41 (the 10th Picot Openwork row). This band ends with a plain mesh row so the border has an even base. The two mesh rows at the end are intentional.
Row 42 (WS): Rest Mesh. (168 dc. 4 × 42 = 168 ✓)
Row 43 (RS): Cluster Band. (172 dc. 4 × 43 = 172 ✓)
Row 44 (WS): Rest Mesh. (176 dc. 4 × 44 = 176 ✓)
Row 45 (RS): Final Mesh — work Rest Mesh once more. Do not fasten off. Do not turn. (180 dc. 4 × 45 = 180 ✓. 90 dc on each side of the spine, 180 ÷ 2 = 90 ✓)
The body, blocked to gauge, is 60 inches (152.5 cm) wide and 30 inches (76 cm) deep.
Border
The border is worked in the round with RS facing, starting at the end of Row 45. You are at the lower-left corner, at the top of the last dc.
Work side stitches into the row-ends (the sides of the turning chains and edge stitches). Work bottom stitches into the tops of the 180 dc. Do not also work into the ch-1 spaces of Row 45. Do not work a side stitch and a bottom stitch into the same loop; the corner ch-2 spaces bridge that turn.
Border Round 1 (RS): Ch 1.
Up the left side, from Row 45 toward Row 1: [3 sc in each of the next 14 row-ends, 2 sc in the next row-end] 3 times. (45 row-ends; (14 × 3 + 2) × 3 = 132 sc ✓)
Apex: Ch 2 over the starting ring (or into the small space at the base of Row 1 if the ring has closed). This is the apex corner space. Do not add sc here.
Down the right side, from Row 1 toward Row 45, mirrored so the same rows are eased: 2 sc in the first row-end, [3 sc in each of the next 14 row-ends, 2 sc in the next row-end] 2 times, 3 sc in each of the next 14 row-ends. (1 + 15 + 15 + 14 = 45 row-ends ✓. 2 + (14 × 3 + 2) × 2 + 14 × 3 = 2 + 88 + 42 = 132 sc ✓)
Lower-right corner: Ch 2.
Bottom edge: Sc in each of the 180 dc of Row 45, including the first dc (top of the Row 45 turning chain) and the last dc. Skip the chain spaces. (180 sc ✓)
Lower-left corner: Ch 2, sl st in the first sc to join.
You now have 132 sc on each side, 180 sc on the bottom, and 3 corner ch-2 spaces (apex and two tips). The corner chains are not part of the 132 or the 180.
Border Round 2 (shells): The shell repeat uses 6 sc: shell in the next sc, skip 2 sc, sc in the next sc, skip 2 sc. Each side holds 22 shells (132 ÷ 6 = 22 ✓). The bottom holds 30 shells (180 ÷ 6 = 30 ✓).
Skip the first 2 foundation sc after a corner on purpose; the shell sits in the first sc of the edge, and the repeat ends by skipping the last 2 sc before the next corner. Both tips match. This is not a missed stitch.
Sl st in the first sc is already done. Ch 3 (counts as dc), dc in the same sc, ch 2, 2 dc in the same sc (first shell made), skip 2 sc, sc in next sc, skip 2 sc, * (2 dc, ch 2, 2 dc) in next sc, skip 2 sc, sc in next sc, skip 2 sc; rep from * 20 more times across the left side. (22 shells on the left side ✓)
(Dc, ch 2, dc) in the apex ch-2 sp.
* (2 dc, ch 2, 2 dc) in next sc, skip 2 sc, sc in next sc, skip 2 sc; rep from * 22 times across the right side. (22 shells ✓)
(3 dc, ch 3, 3 dc) in the lower-right ch-2 sp.
* (2 dc, ch 2, 2 dc) in next sc, skip 2 sc, sc in next sc, skip 2 sc; rep from * 30 times across the bottom. (30 shells ✓)
(3 dc, ch 3, 3 dc) in the lower-left ch-2 sp. Sl st in the top of the beginning ch-3 to join.
Border Round 3 (picot scallops): Ch 1, sc in the same dc, sc in the next dc, (sc, picot, sc) in the shell ch-2 sp, sc in each of the next 2 dc, sc in the next sc (the sc between shells), *sc in each of the next 2 dc, (sc, picot, sc) in the next shell ch-2 sp, sc in each of the next 2 dc, sc in the next sc; rep from * across the left side until the apex fan is next.
Apex: Sc in the next dc, (sc, picot, sc) in the apex ch-2 sp, sc in the next dc.
Continue the shell picot repeat across the right side (22 shells) until the lower-right fan is next.
Lower-right tip: Sc in each of the next 3 dc, (2 sc, picot, 2 sc) in the ch-3 sp, sc in each of the next 3 dc.
Continue the shell picot repeat across the bottom (30 shells) until the lower-left fan is next.
Lower-left tip: Sc in each of the next 3 dc, (2 sc, picot, 2 sc) in the ch-3 sp, sc in each of the next 3 dc.
Sl st in the first sc. Fasten off.
Finishing
Weave in ends along the edge or through the wrong side of a cluster band. Do not weave across open chain spaces. Leave a short tail to trim after blocking, in case the block shifts an end.
Blocking (required for drape)
The shawl will not look like the measurements, and it will not drape, until it is blocked. Pin to the finished measurements, not to the unblocked fabric.
- Weave in ends first.
- Soak the shawl in lukewarm water with a little wool wash for 20 minutes. Do not agitate, and do not twist.
- Press water out. Roll the shawl in a towel and press. Do not wring.
- Lay it RS up on blocking mats. Pin the apex. Pin the two lower tips 62 inches (157.5 cm) apart. Pin the center of the lower edge 31 inches (79 cm) down from the apex, on a straight line with the spine.
- Pin every picot scallop outward so the edge is smooth and each picot opens. Ease the two front edges to about 44 inches (112 cm) each. The two halves should match.
- Check that the center spine is a straight line from apex to the center pin, and that the lower edge is not bowed.
- Optional for wool: hover a steam iron about 1 inch (2.5 cm) above the fabric. Do not touch the yarn. Do not steam acrylic unless the yarn label allows it. Heat can flatten acrylic permanently.
- Dry completely before you unpin. Allow 24 hours, longer in a damp room.
- Trim any remaining tails.
Reblock after washing. Store flat or rolled, not on a hanger, so the tips do not stretch.
Custom length
The written border fits Row 45. For a longer or shorter shawl, add or remove Lace sequences in groups of 3 (12 rows) before the Closing Band, so the final row number stays a multiple of 3. Then the final dc count (4 × row number) still divides by 6, and the bottom shell repeat still fits.
Each extra group of 3 Lace sequences (12 rows) adds 48 dc, which is 16 inches (40.5 cm) of wingspan, and 8 inches (20.5 cm) of depth, at gauge. One Lace sequence alone (4 rows) adds 16 dc: 5⅓ inches (13.5 cm) of wingspan and 2⅔ inches (6.8 cm) of depth. Do not add a single sequence unless you are willing to rewrite the shell spacing.
For a custom row count, pick up side stitches at about 3 sc per row-end, then add or remove a few sc so each side is a multiple of 6. Keep the corner ch-2 spaces outside that count. The bottom is always 1 sc in each final-row dc.
Care
Hand wash cool, press in a towel, and lay flat to dry. Pin again if you want the lace fully open. Do not machine dry.
Stitch pattern at a glance
| Shawl rows | Side | Row |
|---|---|---|
| 1 | RS | Foundation |
| 2, 6, 10 … 38, and 42, 44 | WS | Rest Mesh (ch-1) |
| 3, 7, 11 … 39, and 43 | RS | Cluster Band (ch-2) |
| 5, 9, 13 … 41 | RS | Picot Openwork (ch-2) |
| 45 | RS | Final Mesh (ch-1), then border |
Rows 2–41 are the Lace sequence, 10 times. Rows 42–45 are the Closing Band, once.
Disclaimer: This pattern was generated by AI and should be reviewed for accuracy before use. While we strive for quality, AI-generated content may contain errors. Please verify measurements, stitch counts, charts, and instructions before beginning your project. Generated by purlJam.uk
Love this pattern?
Save this pattern to your free PurlJam libraryAccess your pattern anytime
Bookmark this page to access your pattern anytime