Type
Crochet
Difficulty
intermediate
Category
bag
AI Thinking Process
Planning
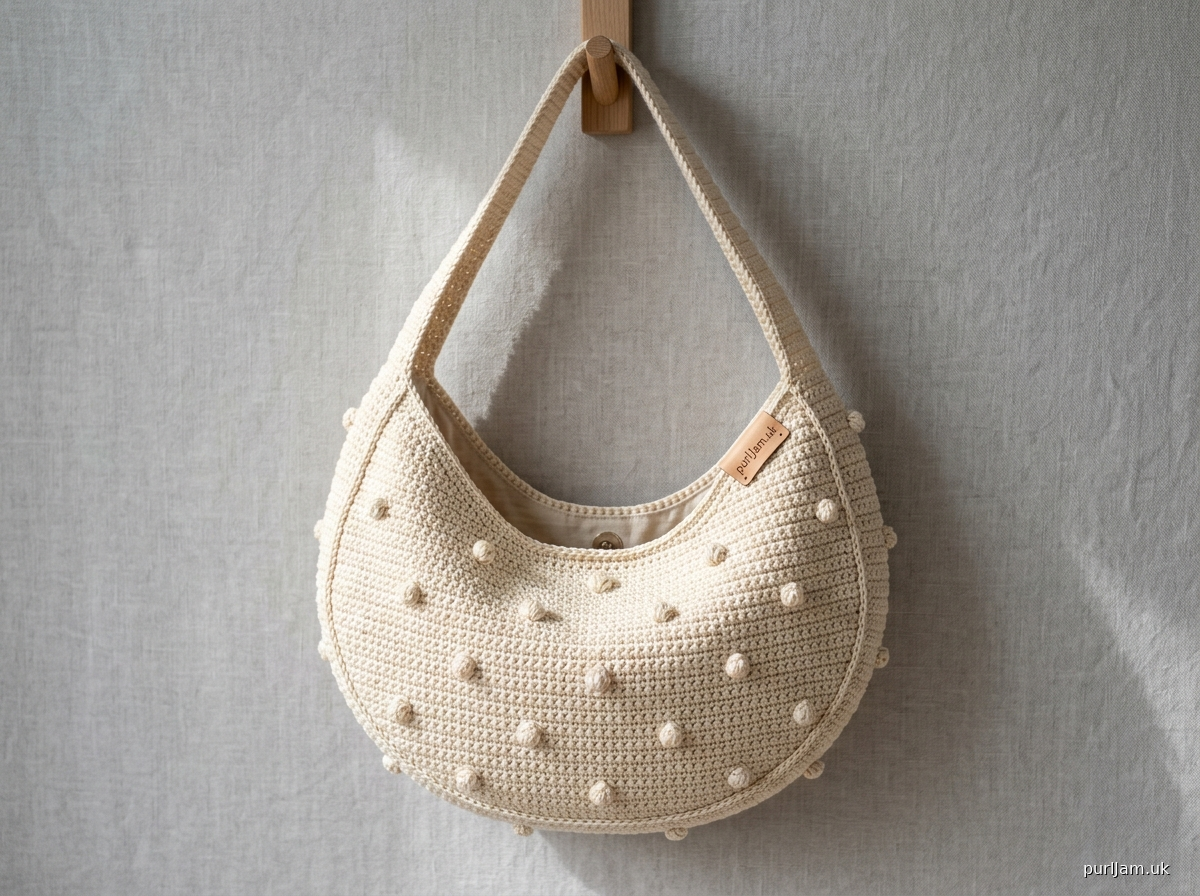
1. **Design Strategy**: Crescent/moon-shaped hobo bag worked flat then seamed, featuring small bobble stitch texture for visual interest. Built-in strap is created by continuing the top edge into a long band that loops over to form an integrated shoulder strap—no separate handles needed.
2. **Construction Plan**: Worked flat in two crescent-shaped panels (increased then decreased along bottom curve) seamed together; top edge extended into integrated strap band.
3. **Quality Assurance**:
- Bobble placement on WS rows can confuse beginners — mark RS clearly.
- Crescent shape requires controlled increases/decreases — use stitch markers.
- Strap must be reinforced (slip stitch border) to prevent stretching under load.
4. **Final Calculations**: Gauge 14 sc x 16 rows = 4" with worsted + H/5.0mm hook. Finished bag: ~13" wide x 8" tall at center (moon crescent), strap ~22" drop. Foundation chain: 30 sts, increasing to 46 sts at widest point.
Verification
1. **Completeness**: Materials, gauge, abbreviations, stitch guide, instructions, finishing, schematic notes — all included.
2. **Consistency**: 14 sc/4" × 13" width = ~46 sts at widest ✓. Bobble row spacing every 4 rows allows beginner success.
3. **Constraints**: Moon/crescent shape ✓, built-in strap ✓, small bobble stitch ✓, beginner-friendly (only sc + bobble) ✓, US terms ✓.
4. **Safety**: Stitch counts verified at each shaping row; bobble count (5-dc bobble) standard.
Pattern
# Luna Bobble Hobo Bag
### A Crescent Moon-Style Shoulder Bag with Integrated Strap

**Designer Note:** This dreamy little hobo bag takes inspiration from the classic "moon bag" silhouette — a soft crescent shape that nestles comfortably under your arm. Scattered small bobbles give it gentle texture, and the strap is worked as one continuous piece with the body, so there's no fiddly handle attachment. Perfect for a confident beginner ready to try their first textured stitch!

---

## SKILL LEVEL
**Beginner (Advanced Beginner friendly)** — If you can chain, single crochet, and follow a stitch count, you can make this bag. The bobble stitch is introduced gently and used sparingly.

---

## FINISHED MEASUREMENTS
- **Width (widest point, tip to tip):** 13 inches (33 cm)
- **Height (center, top to bottom curve):** 8 inches (20.5 cm)
- **Strap drop (from top of bag to shoulder):** approximately 11 inches (28 cm)
- **Total strap loop circumference:** approximately 22 inches (56 cm)

---

## MATERIALS

### Yarn
- **Worsted weight (Medium #4) cotton or cotton blend yarn**
- Approximately **220–250 yards (200–230 m)** total
- Suggested: a smooth, mercerized cotton for stitch definition
- Sample shown in a soft cream — any solid color shows bobbles best

### Hook
- **US H/8 (5.0 mm) crochet hook**

### Notions
- Tapestry/yarn needle for weaving in ends
- 2 stitch markers (one for RS, one for shaping point)
- Scissors
- Optional: fabric lining (about ¼ yard) and sewing needle/thread
- Optional: magnetic snap closure

---

## GAUGE
**14 sc × 16 rows = 4 inches (10 cm)** in single crochet
Gauge is not critical for fit but will affect finished size and yarn usage. Take a moment to check — your future self will thank you.

---

## ABBREVIATIONS (US TERMS)
- **ch** — chain
- **sc** — single crochet
- **sl st** — slip stitch
- **st(s)** — stitch(es)
- **sk** — skip
- **inc** — increase (2 sc in same st)
- **dec** — decrease (sc2tog: single crochet 2 stitches together)
- **RS / WS** — right side / wrong side
- **MB** — make bobble (see Stitch Guide)
- **rep** — repeat

---

## STITCH GUIDE

### Small Bobble (MB)
In indicated stitch: [yarn over, insert hook, yarn over and pull up a loop, yarn over and pull through 2 loops] **4 times** in the same stitch (5 loops on hook), yarn over and pull through all 5 loops on hook. Push bobble to the RS of the work with your finger as you complete it.

*Tip: Bobbles are made on WS rows so they "pop" to the RS (the public side).*

### Single Crochet 2 Together (sc2tog)
Insert hook in next st, yarn over, pull up a loop (2 loops on hook). Insert hook in next st, yarn over, pull up a loop (3 loops on hook). Yarn over, pull through all 3 loops.

---

## CONSTRUCTION NOTES

This bag is worked in **two identical flat panels** in a crescent (moon) shape. Each panel begins with a foundation chain at the **top edge** of the bag, increases outward to form the curved belly of the moon, then decreases back in. After both panels are made, they are joined around the curved bottom with a slip-stitch seam, leaving the top open.

The **integrated strap** is worked directly off the top corners of the joined panels in a continuous band that loops up and over — no sewing handles required.

Place a stitch marker on the RS of Row 1 to keep track of which side faces you.

---

## PATTERN

### PANEL (make 2)

**Foundation:** Ch 31.

**Row 1 (RS):** Sc in 2nd ch from hook and in each ch across. *(30 sc)*
> *Check: 30 chains used + 1 turning ch = 31 total ✓*

Place a marker in any st on this row to mark the RS.

**Row 2 (WS):** Ch 1, turn. Sc in first st, inc in next st, sc to last 2 sts, inc in next st, sc in last st. *(32 sc)*

**Row 3 (RS):** Ch 1, turn. Sc in first st, inc in next st, sc to last 2 sts, inc in next st, sc in last st. *(34 sc)*

**Row 4 (WS — Bobble Row):** Ch 1, turn. Sc in first st, inc in next st, sc in next 3 sts, **MB in next st, sc in next 3 sts**; rep from ** across to last 5 sts, sc in next 2 sts, inc in next st, sc in last 2 sts. *(36 sts; approximately 6 bobbles)*

**Row 5 (RS):** Ch 1, turn. Sc in first st, inc in next st, sc to last 2 sts, inc in next st, sc in last st. *(38 sc)*

**Row 6 (WS):** Ch 1, turn. Sc in first st, inc in next st, sc to last 2 sts, inc in next st, sc in last st. *(40 sc)*

**Row 7 (RS):** Ch 1, turn. Sc in first st, inc in next st, sc to last 2 sts, inc in next st, sc in last st. *(42 sc)*

**Row 8 (WS — Bobble Row):** Ch 1, turn. Sc in first 3 sts, **MB, sc in next 3 sts**; rep from ** across, ending with sc in last 3 sts. *(42 sts; approximately 9 bobbles)*

**Row 9 (RS):** Ch 1, turn. Sc in first st, inc in next st, sc to last 2 sts, inc in next st, sc in last st. *(44 sc)*

**Row 10 (WS):** Ch 1, turn. Sc in first st, inc in next st, sc to last 2 sts, inc in next st, sc in last st. *(46 sc)*

> *Widest point reached: 46 sts. Math check: started 30 + (8 rows × 2 inc) = 46 ✓*

**Row 11 (RS):** Ch 1, turn. Sc across. *(46 sc)*

**Row 12 (WS — Bobble Row):** Ch 1, turn. Sc in first 3 sts, **MB, sc in next 3 sts**; rep from ** across, ending with sc in last 3 sts. *(46 sts; approximately 10 bobbles)*

**Now begin decreasing to shape the second half of the crescent:**

**Row 13 (RS):** Ch 1, turn. Sc in first st, sc2tog, sc to last 3 sts, sc2tog, sc in last st. *(44 sc)*

**Row 14 (WS):** Rep Row 13. *(42 sc)*

**Row 15 (RS):** Rep Row 13. *(40 sc)*

**Row 16 (WS — Bobble Row):** Ch 1, turn. Sc in first st, sc2tog, sc in next 2 sts, **MB, sc in next 3 sts**; rep from ** across to last 5 sts, sc in next 2 sts, sc2tog, sc in last st. *(38 sts)*

**Row 17 (RS):** Rep Row 13. *(36 sc)*

**Row 18 (WS):** Rep Row 13. *(34 sc)*

**Row 19 (RS):** Rep Row 13. *(32 sc)*

**Row 20 (WS — Bobble Row):** Ch 1, turn. Sc in first st, sc2tog, sc in next 2 sts, **MB, sc in next 3 sts**; rep from ** across to last 5 sts, sc in next 2 sts, sc2tog, sc in last st. *(30 sts)*

> *Final count: 30 sts — symmetrical to foundation row ✓*

Fasten off Panel 1, leaving a long tail (about 24 inches / 60 cm) for seaming.
Repeat all rows for Panel 2; do **not** fasten off Panel 2 — you will continue into the strap.

---

### JOINING THE PANELS

1. Lay both panels with **RS facing each other** (WS out), aligning the curved bottom edges (Rows 2–20, the long sides).
2. Using the long tail from Panel 1 and a tapestry needle (or pick up with the hook), **slip stitch** through both layers along the entire curved bottom edge, from one top corner to the other.
3. The **top edges (Row 20 of each panel)** remain open — this is the bag's opening.
4. Turn the bag right side out.

> *Sanity check: Both top edges are 30 sts each — they should align perfectly. ✓*

---

### INTEGRATED SHOULDER STRAP

With Panel 2 still attached to your working yarn (or rejoin yarn at a top corner of the bag with RS facing):

**Setup Row:** Ch 1. Sc evenly across the top edge of Panel 2 (30 sts), then sc 2 more sts into the side corner (where the panels meet) to round the corner cleanly. *(32 sc)*

**Strap Rows 1–4:** Ch 1, turn. Sc in each st across. *(32 sc each row)*

**Begin Strap Tapering:**

**Strap Row 5:** Ch 1, turn. Sc2tog, sc to last 2 sts, sc2tog. *(30 sc)*

**Strap Rows 6–7:** Ch 1, turn. Sc across. *(30 sc)*

**Strap Row 8:** Ch 1, turn. Sc2tog, sc to last 2 sts, sc2tog. *(28 sc)*

**Continue Strap (even rows):** Ch 1, turn. Sc across. Repeat until the strap measures **18 inches (46 cm)** from the top of the bag.

> *This length wraps up and over to the opposite side. Adjust here for personal shoulder fit — try it on as you go!*

**Strap Final Row:** Ch 1, turn. Sc across (28 sc).

Fasten off, leaving a **30-inch (76 cm) tail** for attaching to the opposite side.

---

### ATTACHING THE STRAP TO THE OPPOSITE TOP EDGE

1. Bring the free end of the strap across to the **top edge of Panel 1** (the other side of the bag opening).
2. Center the 28-st end of the strap along the 30-st top edge of Panel 1 (there will be 1 st of overhang on each side — that's fine).
3. With the tapestry needle and the long tail, **whipstitch or slip-stitch** the end of the strap firmly to the top edge of Panel 1, making sure the strap is **not twisted**.
4. Reinforce by going around the seam **twice** for durability — this is the most stressed area of the bag.

---

### EDGING (Optional but Recommended)

For a clean, reinforced top opening and strap edge:

**Join yarn at any point along the bag opening with RS facing.**
Ch 1, sc evenly around the entire top opening (skipping over the strap join — work behind it). Join with sl st to first sc. Fasten off.

Repeat along both long edges of the strap for a polished finish that prevents stretching.

---

## FINISHING

1. Weave in all ends securely with a tapestry needle. Cotton can be slippery — weave in at least 2 inches in two directions.
2. Gently steam-block the bag, smoothing the crescent shape. Do **not** flatten the bobbles — pat them back into shape after blocking.
3. **Optional lining:** Trace the panel shape onto fabric (add ½" seam allowance), sew a lining bag, and hand-stitch inside the top opening. Lining is highly recommended for daily use.
4. **Optional closure:** Sew a magnetic snap to the inside-center of the top opening.

---

## SCHEMATIC NOTES

```
        ╭─────── 13" ───────╮
        ╱                     ╲       ← Top opening (30 sts each side)
       ╱   ●   ●   ●   ●   ●   ╲
      │  ●  bobbles scattered ●  │    8" height at center
       ╲   ●   ●   ●   ●   ●   ╱
        ╲___________________╱        ← Crescent (moon) bottom curve

              ╭──────╮
              │ STRAP│  ← integrated, loops from one top corner
              │      │     over the shoulder to the other corner
              ╰──────╯
```

---

## CARE INSTRUCTIONS
Hand wash in cool water with mild detergent. Reshape while damp and lay flat to dry. Do not wring — gently press water out with a towel.

---

**Congratulations!** You've just made a structured, textured handbag with a built-in strap — a real wardrobe staple. Tag your finished Luna Bobble Hobo so other makers can be inspired. Happy crocheting! 🌙
Disclaimer: This pattern was generated by AI and should be reviewed for accuracy before use. While we strive for quality, AI-generated content may contain errors. Please verify measurements, stitch counts, and instructions before beginning your project. Generated by purlJam.uk
Access your pattern anytime
Bookmark this page to access your pattern anytime