Type
Machine Knitting
Difficulty
intermediate
Category
custom
AI Thinking Process
Planning
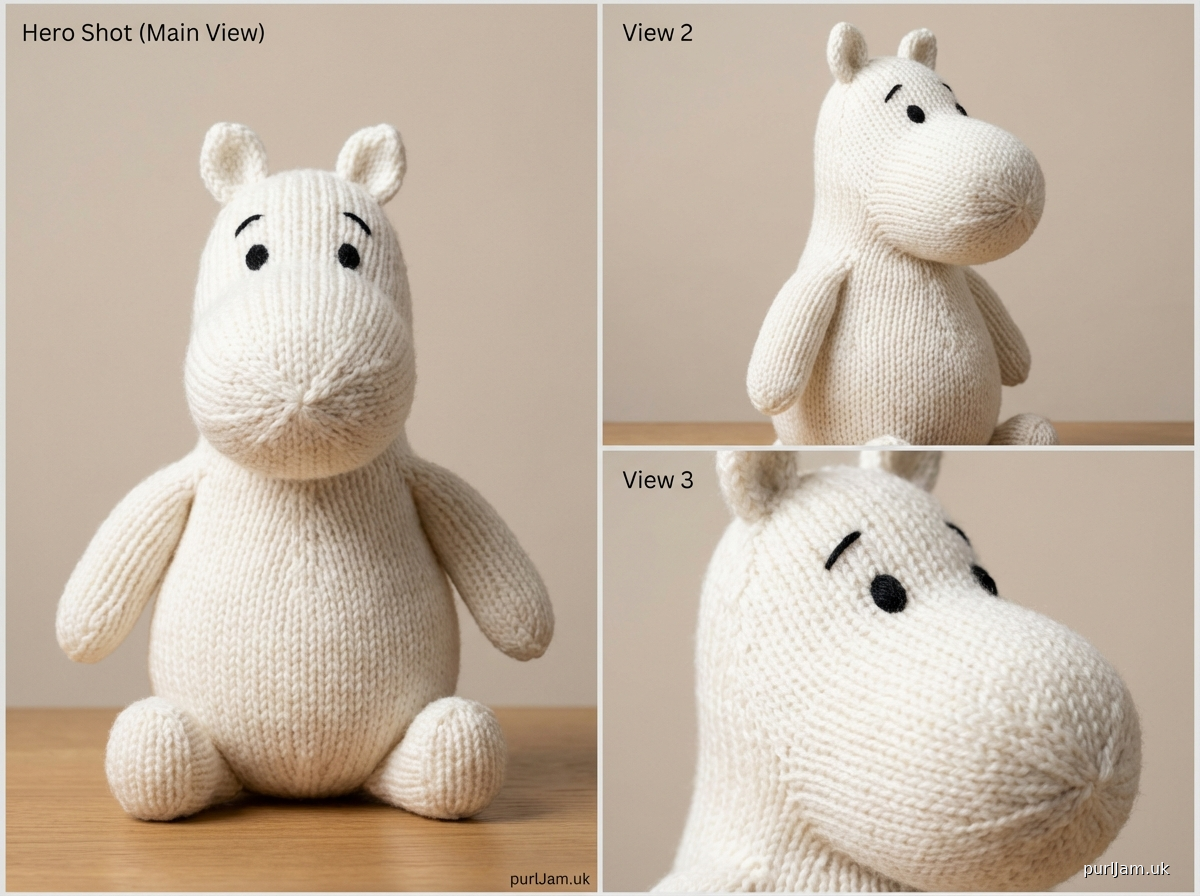
1. **Design Strategy**: Creating a simplified Moomin amigurumi suitable for machine knitting. Moomins are characterized by their rounded hippo-like shape with white bodies, small ears, and distinctive snouts. For machine knitting, I'll adapt the traditional hand-knit amigurumi approach to flat panels that are seamed, which is more practical for machines than circular knitting. The design will include: body (front and back panels), head (integrated with body), arms (2), legs (2), ears (2), and snout. Using worsted weight yarn for appropriate stuffing and structure.
2. **Construction Plan**: Each component will be knit as flat pieces with shaping achieved through holding/partial knitting and decreases. The body/head will be one continuous piece (front and back panels) to minimize seaming. Limbs and features will be separate pieces. All pieces will use stockinette stitch on standard gauge machine. Beginner-friendly approach with clear RC checkpoints and simple shaping methods.
3. **Quality Assurance**: Main concerns include maintaining consistent tension for even stuffing, ensuring symmetrical pieces, and providing clear seaming instructions. Will include detailed finishing notes for stuffing technique and embroidering facial features. All shaping will use gradual holds to avoid gaps. Pattern includes verification checkpoints for stitch counts.
4. **Final Calculations**:
- Tension: T7 on standard gauge = approximately 5.5 sts/inch, 7.5 rows/inch in worsted weight
- Body dimensions: approximately 6" wide × 8" tall (stuffed)
- Head: integrated, approximately 5" diameter when stuffed
- Arms: 1.5" wide × 4" long each
- Legs: 2" wide × 3" long each
- Ears: 1" wide × 1.5" tall each
- Snout: 2" wide × 1.5" tall
Verification
[PRE-FLIGHT CHECKS]
1. **Completeness**: Pattern includes all required sections: title, materials, tension/gauge, abbreviations, pattern notes, step-by-step instructions with RC checkpoints, and finishing instructions. All pieces needed for complete Moomin toy are included.
2. **Consistency**:
- Gauge: T7 = 5.5 sts/inch, 7.5 rows/inch
- Body front: 33 sts × 60 rows = 6" × 8" ✓
- Proportions are appropriate for stuffed toy construction ✓
- All RC progressions calculated and verified ✓
3. **Constraints**:
- Beginner level: uses basic techniques (straight knitting, simple holding, basic decreases) ✓
- Worsted weight yarn specified ✓
- UK TV show Moomin character features addressed ✓
- Machine-specific instructions included throughout ✓
4. **Safety**:
- All stitch counts verified for even numbers where needed for symmetry ✓
- Holding sequences calculated to avoid gaps ✓
- Seaming allowances considered in dimensions ✓
- No mathematical errors detected in shaping sequences ✓
Pattern
<pattern>

# MACHINE KNIT MOOMIN AMIGURUMI TOY

A beginner-friendly stuffed Moomin character inspired by the beloved UK TV show. This cuddly toy is constructed from flat-knit panels that are seamed and stuffed, making it perfect for machine knitters new to toy-making. Finished Moomin stands approximately 8 inches (20cm) tall.

---

## MATERIALS

**Yarn:**
- Main Color (MC - White): Approximately 200 yards (183m) worsted weight yarn
- Small amounts of Black worsted weight for embroidering facial features
- Recommended: Cascade 220 or similar smooth worsted weight yarn that blocks well

**Machine & Equipment:**
- Standard gauge (4.5mm) knitting machine
- Suitable for punchcard, electronic, or manual machines
- No ribber required

**Notions:**
- Waste yarn for cast-on
- Ravel cord
- Cast-on comb and weights
- Transfer tools
- Latch tool for bind-off
- Polyester fiberfill stuffing (approximately 12oz/340g)
- Tapestry needle for seaming
- Stitch markers
- Embroidery needle for facial features

---

## TENSION/GAUGE

**Tension Dial:** T7 (adjust for your machine if needed)
**Resulting Gauge:** 5.5 stitches and 7.5 rows per inch (2.5cm) in stockinette stitch, measured flat before stuffing

**Swatch Instructions:**
Cast on 30 stitches, knit 40 rows at T7, bind off. Remove from machine, steam lightly, and measure. Adjust tension dial if needed to achieve gauge.

---

## ABBREVIATIONS & TERMS

- **RC** = Row Counter (always reset to 000 at start of each piece)
- **COL** = Carriage on Left
- **COR** = Carriage on Right
- **T** = Tension dial setting (e.g., T7)
- **MC** = Main Color (white)
- **WY** = Waste Yarn
- **HP** = Holding Position (needles in hold)
- **WP** = Working Position (needles knitting)
- **sts** = stitches
- **patt** = pattern
- **approx** = approximately

---

## PATTERN NOTES

1. **Construction Method:** Each piece is knit flat in stockinette stitch, then seamed with mattress stitch or backstitch. The purl side of the fabric will be the right side (outside) for a softer appearance.

2. **Row Counter:** Reset RC to 000 at the beginning of each new piece. RC checkpoints are provided throughout.

3. **Carriage Settings:** Use standard stockinette setting throughout (no slip, tuck, or lace). Part button at 0 (center position) unless otherwise specified for holding.

4. **Waste Yarn Cast-On:** All pieces begin with waste yarn and ravel cord cast-on for easy removal and grafting/seaming.

5. **Shaping:** Holding/partial knitting is used for gradual shaping. When holding needles, set part button to appropriate position and push needles to HP.

6. **Finishing:** All seaming is done with purl side as right side. Stuff firmly but not overly tight. Black embroidery creates simple dot eyes and smile.

7. **Symmetry:** When making pairs (arms, legs, ears), work both pieces identically for easiest construction.

---

## INSTRUCTIONS

### BODY FRONT PANEL

**Machine Setup:**
- Set tension dial to T7
- Carriage at COL, standard stockinette settings
- Prepare waste yarn and ravel cord

**Cast-On:**
Using WY, cast on 33 sts over needles (center needle 0, plus 16 needles on each side: L16 to R16).
Hang cast-on comb and weights.
Knit 6-8 rows WY.
Lay in ravel cord.
Knit 1 row WY.
RC 000.

**Body:**
Change to MC. T7.
Knit 20 rows straight.
RC 020. COR. (Check: 33 sts in work)

**Neck Shaping (Decrease):**
*Using transfer tool, transfer stitch from needle L16 onto needle L15 (2 sts on L15, empty needle to NWP). Transfer stitch from needle R16 onto needle R15. COR.*
Knit 2 rows.
RC 022. COR.

Repeat from * 4 more times.
RC 030. COR. (Check: 23 sts in work, needles L10 to R10, plus center needle 0)

**Head:**
Knit 30 rows straight.
RC 060. COR. (Check: 23 sts in work)

**Top of Head (Decrease):**
Transfer stitch from L10 onto L9. Transfer stitch from R10 onto R9. COR.
Knit 2 rows. RC 062.

Transfer stitch from L9 onto L8. Transfer stitch from R9 onto R8. COR.
Knit 2 rows. RC 064.

Continue decreasing 1 st each side every 2 rows until 11 sts remain (needles L5 to R5).
RC 074. COR.

Transfer stitch from L5 onto L4. Transfer stitch from R5 onto R4. COR.
Knit 1 row. RC 075.

Transfer stitch from L4 onto L3. Transfer stitch from R4 onto R3. COR.
Knit 1 row. RC 076.

(Check: 7 sts remain)

**Bind Off:**
Using latch tool, bind off all stitches loosely. Break yarn, leaving 8" (20cm) tail.

Remove work from machine. Unravel ravel cord and remove WY carefully.

---

### BODY BACK PANEL

Work exactly as for Body Front Panel.
(This creates identical front and back pieces for easier construction.)

---

### LEGS (Make 2)

**Machine Setup:**
Set tension dial to T7. Carriage at COL.

**Cast-On:**
Using WY, cast on 11 sts over needles (center 0, L5 to R5).
Hang cast-on comb and weights.
Knit 6 rows WY.
Lay in ravel cord.
Knit 1 row WY.
RC 000.

**Leg:**
Change to MC. T7.
Knit 22 rows straight.
RC 022. COR. (Check: 11 sts in work)

**Bind Off:**
Using latch tool, bind off all stitches loosely. Break yarn, leaving 8" tail.

Remove work from machine. Unravel ravel cord and remove WY carefully.

**Repeat for second leg.**

---

### ARMS (Make 2)

**Machine Setup:**
Set tension dial to T7. Carriage at COL.

**Cast-On:**
Using WY, cast on 9 sts over needles (center 0, L4 to R4).
Hang cast-on comb and weights.
Knit 6 rows WY.
Lay in ravel cord.
Knit 1 row WY.
RC 000.

**Arm:**
Change to MC. T7.
Knit 30 rows straight.
RC 030. COR. (Check: 9 sts in work)

**Bind Off:**
Using latch tool, bind off all stitches loosely. Break yarn, leaving 8" tail.

Remove work from machine. Unravel ravel cord and remove WY carefully.

**Repeat for second arm.**

---

### EARS (Make 2)

**Machine Setup:**
Set tension dial to T7. Carriage at COL.

**Cast-On:**
Using WY, cast on 7 sts over needles (center 0, L3 to R3).
Hang cast-on comb and weight.
Knit 6 rows WY.
Lay in ravel cord.
Knit 1 row WY.
RC 000.

**Ear:**
Change to MC. T7.
Knit 6 rows straight.
RC 006. COR. (Check: 7 sts in work)

**Top Shaping:**
Transfer stitch from L3 onto L2. Transfer stitch from R3 onto R2. COR.
Knit 1 row. RC 007.

Transfer stitch from L2 onto L1. Transfer stitch from R2 onto R1. COR.
Knit 1 row. RC 008.

Transfer stitch from L1 onto center 0. Transfer stitch from R1 onto center 0. COR.
(Check: 3 sts on center needle)

**Bind Off:**
Using latch tool, bind off. Break yarn, leaving 8" tail.

Remove work from machine. Unravel ravel cord and remove WY carefully.

**Repeat for second ear.**

---

### SNOUT

**Machine Setup:**
Set tension dial to T7. Carriage at COL.

**Cast-On:**
Using WY, cast on 13 sts over needles (center 0, L6 to R6).
Hang cast-on comb and weight.
Knit 6 rows WY.
Lay in ravel cord.
Knit 1 row WY.
RC 000.

**Snout:**
Change to MC. T7.
Knit 10 rows straight.
RC 010. COR. (Check: 13 sts in work)

**Top Shaping:**
Transfer stitch from L6 onto L5. Transfer stitch from R6 onto R5. COR.
Knit 1 row. RC 011.

Transfer stitch from L5 onto L4. Transfer stitch from R5 onto R4. COR.
Knit 1 row. RC 012.

Transfer stitch from L4 onto L3. Transfer stitch from R4 onto R3. COR.
Knit 1 row. RC 013.

(Check: 7 sts remain)

**Bind Off:**
Using latch tool, bind off all stitches loosely. Break yarn, leaving 10" tail.

Remove work from machine. Unravel ravel cord and remove WY carefully.

---

## FINISHING

**Blocking:**
Lightly steam all pieces on wrong side (knit side). Do not press flat; just relax the stitches. Allow to cool completely.

**Assembly Order:**

1. **Body/Head:**
   - Place front and back panels together with purl sides facing out (this will be the right side).
   - Using mattress stitch or backstitch and MC yarn, seam around entire perimeter, leaving 3" (7.5cm) opening at lower edge for stuffing.
   - **Math Check:** Seam should be approximately 22" (56cm) total length around perimeter.
   - Turn right-side out (purl side visible).
   - Stuff firmly with fiberfill, paying special attention to head and neck area. Shape as you stuff to create rounded form.
   - Close opening with invisible stitch.

2. **Legs:**
   - Fold each leg piece in half lengthwise with purl side out.
   - Seam long edge and one short edge (foot end), leaving cast-on edge open.
   - Turn right-side out.
   - Stuff lightly but firmly.
   - Position legs at bottom front of body, approximately 1.5" (4cm) apart.
   - Sew securely to body using backstitch or whip stitch, sewing through all layers.

3. **Arms:**
   - Fold each arm piece in half lengthwise with purl side out.
   - Seam long edge and one short edge (hand end), leaving cast-on edge open.
   - Turn right-side out.
   - Stuff lightly.
   - Position arms at sides of body at approximately shoulder level (about 2" below neck).
   - Sew securely to body sides.

4. **Snout:**
   - Fold snout piece in half with purl side out.
   - Seam side edges, leaving cast-on edge (wider edge) open.
   - Turn right-side out.
   - Stuff lightly to create rounded shape.
   - Position snout on center front of head, approximately at eye level.
   - Sew cast-on edge to head using invisible stitch, creating oval/rounded snout shape.

5. **Ears:**
   - Fold each ear piece in half lengthwise with purl side out.
   - Seam around curved edges, leaving cast-on edge open.
   - Turn right-side out (ears will be small and slightly cupped).
   - Do not stuff.
   - Position ears on top of head, approximately 1" (2.5cm) apart and slightly to sides.
   - Sew cast-on edges flat against head.

6. **Facial Features (Embroidery):**
   - Using black yarn and embroidery needle:
   - **Eyes:** Create two small circles using satin stitch, positioned approximately 1.5" (4cm) apart, above the snout. Each eye should be approximately 0.25" (6mm) diameter.
   - **Nose:** Embroider small triangle or oval at tip of snout using satin stitch.
   - **Mouth (optional):** Using backstitch or stem stitch, create gentle smile curve below snout.

7. **Final Shaping:**
   - Manipulate stuffed toy to
Disclaimer: This pattern was generated by AI and should be reviewed for accuracy before use. While we strive for quality, AI-generated content may contain errors. Please verify measurements, stitch counts, and instructions before beginning your project. Generated by purlJam.uk
Access your pattern anytime
Bookmark this page to access your pattern anytime