Type
Crochet
Difficulty
intermediate
Category
amigurumi
AI Thinking Process
Planning
Verification
Pattern
Melody Doll
Advanced Amigurumi Pattern (US Terms)
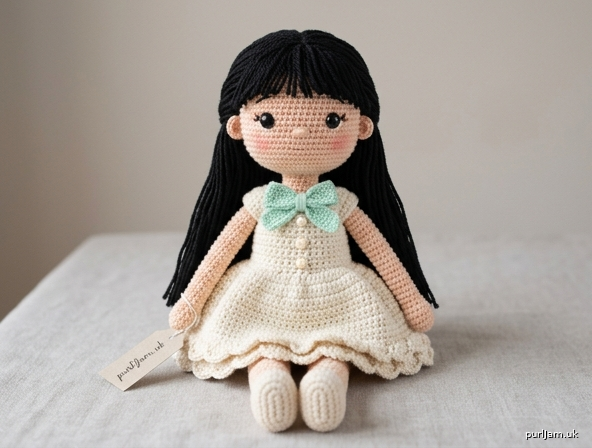
A sweet princess-inspired doll with a round skin-tone face, black safety eyes, rosy cheeks, tiny ears, and long black hair. She wears a cream dress with a mint bow, small front buttons, and a softly ruffled hem. Slim arms and long little legs are stuffed to hold their shape.
Skill level: Advanced. Requires tight even gauge, invisible decreases, color change, a separate ruffled skirt, latch-hook hair, facial embroidery, and multi-piece assembly.
Finished size: About 10" (25 cm) tall with legs extended; about 6½" (16.5 cm) seated. Size varies with gauge and stuffing.
Materials
Yarn: Worsted weight (4); acrylic or cotton-blend recommended for stitch definition.
| Color | Amount | Used for |
|---|---|---|
| Skin tone (peach/beige) | 80 yd (73 m) | Head, ears, neck, arms, legs |
| Black | 100 yd (91 m) | Hair cap and hair strands |
| Cream | 90 yd (82 m) | Body/dress and skirt |
| Mint green | 15 yd (14 m) | Chest bow |
| Light pink | 5 yd (5 m) | Cheeks |
| Dark brown or black (scraps) | — | Mouth, optional lashes |
Other:
- Crochet hook US E-4 (3.5 mm), or one size smaller than the yarn label so fabric is dense
- 1 pair 8 mm black safety eyes
- Polyester fiberfill
- Yarn needle
- Stitch marker
- Pins
- Scissors
- 3 small buttons, ¼" (6 mm), cream or pearl (optional; embroider if the doll is for a young child)
- Optional: pink craft blush or pastel for cheeks
- Optional: latch hook or small crochet hook for hair
Gauge
5 sc and 5 rnds = 1" (2.5 cm) in single crochet worked tightly in the round.
Work a 12-rnd sphere (6 sc in MR, increase to 36, then a few even rnds) and measure. Fabric must be dense enough that stuffing does not show. Change hook size to match gauge; a looser gauge makes a larger, gappier doll.
Abbreviations (US)
- MR — magic ring (adjustable ring)
- ch — chain
- sc — single crochet
- hdc — half double crochet
- dc — double crochet
- inc — increase (2 sc in the same stitch)
- dec — invisible decrease (see Special Stitches)
- sl st — slip stitch
- st(s) — stitch(es)
- rnd(s) — round(s)
- FLO / BLO — front loop only / back loop only
- sk — skip
- FO — fasten off
- [ ] — stitch count at end of round
- ( ) × n — work the stitches in parentheses n times
Special Stitches
Invisible decrease (dec): Insert hook under the front loop only of the next st, then under the front loop only of the following st (2 loops on hook besides the working loop). Yarn over, pull through both front loops, yarn over, pull through both loops on hook. One stitch decreased.
Shell (skirt ruffle): 4 dc in the same stitch.
Color change: On the last stitch before the new color, stop when 2 loops remain on the hook. Yarn over with the new color and pull through both loops. Drop the old color; weave in later.
Pattern Notes
- Work in a continuous spiral unless the instructions say to join. Do not slip-stitch to join and do not chain at the start of a round.
- Place a stitch marker in the first stitch of every round and move it up as you go.
- Keep stitches tight and even. Amigurumi fabric should stand up on its own before stuffing.
- Stuff as you go, especially before openings get small. Firm stuffing in the head and body; light to moderate stuffing in the arms and upper legs.
- Numbers in parentheses after a round are running stitch-count checks. If your count does not match, stop and fix that round before continuing.
- When sewing, use matching yarn and a whip stitch or ladder stitch. Pin every piece first.
- This original pattern is for personal, non-commercial use.
Head
With skin tone. Work tightly. Leave the neck open at 18 sts for a strong join to the body.
Rnd 1: 6 sc in MR. [6] Rnd 2: Inc in each st around. [12] (6 increases → 6 + 6 = 12 ✓) Rnd 3: (Sc, inc) around. [18] (6 increases → 12 + 6 = 18 ✓) Rnd 4: (2 sc, inc) around. [24] (6 increases → 18 + 6 = 24 ✓) Rnd 5: (3 sc, inc) around. [30] (6 increases → 24 + 6 = 30 ✓) Rnd 6: (4 sc, inc) around. [36] (6 increases → 30 + 6 = 36 ✓) Rnds 7–12: Sc in each st around. [36] (6 even rounds)
Place eyes now: Insert 8 mm safety eyes between Rnds 10 and 11, with 6 stitches visible between the posts. Check that the face looks even before pressing the washers on firmly. Do not close the head until the eyes are locked.
Rnd 13: (4 sc, dec) around. [30] (6 decreases → 36 − 6 = 30 ✓) Rnd 14: (3 sc, dec) around. [24] (6 decreases → 30 − 6 = 24 ✓) Rnd 15: (2 sc, dec) around. [18] (6 decreases → 24 − 6 = 18 ✓)
Stuff the head firmly, pushing fill into the cheeks so the sphere stays round. Add extra stuffing behind the eyes. FO, leaving a 12" (30 cm) tail. Do not close the 18-st opening.
Ears (make 2)
With skin tone.
Rnd 1: 6 sc in MR. [6] Rnd 2: (Sc, inc) around. [9] (3 increases → 6 + 3 = 9 ✓) Rnd 3: Sc in each st around. [9]
FO, leaving an 8" (20 cm) tail. Do not stuff. Flatten each ear into a small oval about ½" (1.3 cm) tall.
Cheeks (make 2)
With light pink.
Rnd 1: 6 sc in MR, sl st in first sc to join. [6]
FO, leaving a 6" (15 cm) tail. These are flat discs; do not stuff.
Hair Cap
With black. This is a snug beanie that covers the crown and is the base for the long hair.
Rnd 1: 6 sc in MR. [6] Rnd 2: Inc in each st around. [12] (6 + 6 = 12 ✓) Rnd 3: (Sc, inc) around. [18] (12 + 6 = 18 ✓) Rnd 4: (2 sc, inc) around. [24] (18 + 6 = 24 ✓) Rnd 5: (3 sc, inc) around. [30] (24 + 6 = 30 ✓) Rnd 6: (4 sc, inc) around. [36] (30 + 6 = 36 ✓) Rnds 7–11: Sc in each st around. [36] (5 even rounds)
FO, leaving an 18" (46 cm) tail for sewing.
Body (dress bodice)
The body is the cream dress. The last two rounds change to skin tone for a short neck.
With cream, starting at the bottom.
Rnd 1: 6 sc in MR. [6] Rnd 2: Inc in each st around. [12] (6 + 6 = 12 ✓) Rnd 3: (Sc, inc) around. [18] (12 + 6 = 18 ✓) Rnd 4: (2 sc, inc) around. [24] (18 + 6 = 24 ✓) Rnd 5: (3 sc, inc) around. [30] (24 + 6 = 30 ✓) Rnd 6: (4 sc, inc) around. [36] (30 + 6 = 36 ✓) Rnds 7–12: Sc in each st around. [36] (6 even rounds — hips; the skirt will sit on Rnd 12)
Rnd 13: (4 sc, dec) around. [30] (36 − 6 = 30 ✓) Rnds 14–20: Sc in each st around. [30] (7 even rounds — bodice) Rnd 21: (3 sc, dec) around. [24] (30 − 6 = 24 ✓)
Change to skin tone on the last yarn-over of Rnd 21.
Rnd 22: (2 sc, dec) around. [18] (24 − 6 = 18 ✓) Rnd 23: Sc in each st around. [18]
Stuff the body very firmly, especially the hips and chest, so the dress keeps its shape. FO, leaving a 12" (30 cm) tail. Leave the 18-st neck open.
Arms (make 2)
With skin tone. Slim tubes, stuffed lightly.
Rnd 1: 6 sc in MR. [6] Rnd 2: (2 sc, inc) around. [8] (2 increases → 6 + 2 = 8 ✓) Rnds 3–16: Sc in each st around. [8] (14 even rounds)
Stuff Rnds 1–12 lightly; leave Rnds 13–16 empty so the shoulder sews flat. FO, leaving a 10" (25 cm) tail. Flatten the open edge (4 sts against 4 sts).
Legs (make 2)
With skin tone. Shaped foot, then a long even tube.
Rnd 1: 6 sc in MR. [6] Rnd 2: Inc in each st around. [12] (6 + 6 = 12 ✓) Rnd 3: (Sc, inc) around. [18] (12 + 6 = 18 ✓) Rnd 4: Sc in each st around. [18] (sole of foot) Rnd 5: 5 sc, (dec) 4 times, 5 sc. [14] (4 decreases → 18 − 4 = 14 ✓) Rnd 6: 5 sc, (dec) 2 times, 5 sc. [12] (2 decreases → 14 − 2 = 12 ✓) Rnds 7–22: Sc in each st around. [12] (16 even rounds — long leg)
Stuff the foot firmly so it holds a little shoe shape. Stuff Rnds 7–20 moderately; leave Rnds 21–22 lightly filled so the hip sews neatly. FO, leaving a 12" (30 cm) tail.
Skirt (ruffled hem)
With cream. Worked in joined rounds so the hem stays even. The 36-st top matches Body Rnd 12.
Rnd 1: Ch 36, sl st in first ch to join, being careful not to twist. Sc in each ch around, sl st in first sc. [36] Rnd 2: Ch 1, (sc, inc) around, sl st in first sc. [54] (18 increases → 36 + 18 = 54 ✓) Rnd 3: Ch 1, (2 sc, inc) around, sl st in first sc. [72] (18 increases → 54 + 18 = 72 ✓) Rnd 4: Ch 1, sc in each st around, sl st in first sc. [72] Rnd 5: Ch 1, (3 sc, inc) around, sl st in first sc. [90] (18 increases → 72 + 18 = 90 ✓) Rnd 6: Ch 1, sc in each st around, sl st in first sc. [90] Rnd 7 (ruffle): Ch 2 (does not count as a st), *sk 1 st, 4 dc in next st; rep from * around, sl st in first dc to join. [45 shells] (90 sts ÷ 2 = 45 shells ✓)
FO, leaving a 20" (51 cm) tail if you will sew the waist, or weave in if you prefer to whip-stitch with a separate length. The ruffle should hang softly, not stand stiff.
Mint Bow
With mint green.
Row 1: Ch 11, hdc in 3rd ch from hook and in each ch across. [9 hdc] Rows 2–3: Ch 2, turn, hdc in each st across. [9 hdc]
FO, leaving a 14" (36 cm) tail. Pinch the rectangle tightly at the center to form a bow. Wrap the tail around the center 8–10 times and fasten at the back. Do not cut the remaining tail; it sews the bow to the chest.
Optional tails: Ch 14, sl st in 2nd ch from hook and in each ch across. Fold in half and sew behind the wrapped center so two short tails hang down.
Optional Crocheted Buttons (make 3)
Use these instead of sewn buttons for a child-safe doll.
With cream or mint: 6 sc in MR, sl st in first sc. [6] FO, leaving a tail to sew.
Face Details
Do this before attaching the hair cap, while the head is easy to hold.
Ears: Pin one ear on each side of the head, centered over Rnds 9–12, with the top of the ear in line with the eyes. The ears sit slightly toward the back of the side, not on the cheeks. Whip-stitch around the flattened edge.
Cheeks: Pin the pink discs on Rnds 12–13, just outside and slightly below each eye. Sew around the edge with pink yarn. If you prefer a softer blush, skip the discs and brush a tiny amount of pink pastel or craft blush in the same spot; set with a light mist of water and let dry.
Mouth: With dark brown or black yarn, embroider a small shallow smile over Rnds 13–14, centered under the eyes. Use 3–4 small backstitches, no wider than 3 sts. Optional: one tiny vertical stitch at the center for a gentle pout.
Optional lashes: Two or three short straight stitches at the outer top of each safety eye.
Weave in all face ends securely on the inside of the neck opening.
Hair
Sew the cap
Pin the hair cap on the head like a beanie:
- Front edge sits on about Head Rnd 8 (roughly 2 rnds above the eyes), leaving a small forehead.
- Back edge reaches the neck.
- Sides sit just above the ears, or barely cover the top of each ear.
Using the long black tail, whip-stitch the cap rim to the head all the way around. Take a few extra stitches through the crown so the cap cannot shift.
Cut the strands
- Long hair: Cut 90 strands of black yarn, each 16" (41 cm). Folded in half, each strand hangs about 8" (20 cm) — long enough to frame the face and fall down the back.
- Bangs: Cut 18 strands, each 5" (13 cm). Folded, they hang about 2½" (6.5 cm); trim after attaching.
Latch-hook attachment
Work with 2 strands held together for full hair.
- Fold two long strands in half. Insert the hook under a stitch of the cap and under the matching head stitch beneath it (this locks the hair so it cannot be pulled out of the cap alone).
- Catch the folded loop, pull it through, then pull the cut ends through the loop and tighten (cow hitch / latch-hook knot).
- Cover the back and sides of the cap in concentric rows, about 1 st apart. Leave the very front hairline for bangs.
- Attach bangs the same way across the front edge, using the shorter strands, with a slightly closer spacing so the forehead is framed.
When all strands are on, steam lightly from a distance (do not rest an iron on acrylic). Trim bangs to just above the eyes. Trim the long hair so it is even, leaving it long down the back. You may gather a few front strands forward to frame the cheeks.
Assembly
Pin every piece and check proportions from the front and both sides before sewing. Use matching yarn.
1. Legs to body. Seat the doll so the closed bottom (Body Rnds 1–4) rests on the table. Pin the legs to the lower front of the body, centered on Rnds 4–8, about 2 sts apart at the inner thighs, angled slightly forward and out. This seated pose is stable and keeps her from rolling. Whip-stitch around each 12-st opening, adding a pinch of stuffing if the hip looks dented.
2. Skirt. Slide the skirt over the legs and up to Body Rnd 12 (the last 36-st round). The waist of the skirt matches those 36 stitches (36 = 36 ✓). Pin evenly. Whip-stitch Rnd 1 of the skirt to Body Rnd 12. The ruffled Rnd 7 should hang over the hips and the top of the legs, hiding the leg seams.
3. Arms. Pin the flattened arms at the sides of Body Rnds 19–21 (shoulder line, just below the color change). They should hang close to the body. Whip-stitch the 8-st opening through both layers.
4. Head to body. Add a last bit of stuffing at the neck so the head does not wobble. Match the 18-st head opening to the 18-st body neck (18 = 18 ✓), with the face looking forward. Whip-stitch twice around. If the neck looks thin, take a few extra stitches through the first round of the head to snug it down.
5. Bow and buttons. Sew the mint bow to the center of the cream bodice at about Body Rnds 16–18 (upper chest). Below the bow, sew three buttons (or crocheted button discs) in a vertical line, about ½" (1.3 cm) apart, down the front of Rnds 17–21.
6. Final stuffing check. Squeeze the head, body, and legs. Add stuffing through a tiny gap if any part feels collapsed, then close the gap.
Finishing
- Weave in every remaining tail on the inside or under the skirt.
- Smooth the ruffle with your fingers so the shells lie in one direction.
- Arrange the hair around the ears and over the shoulders. A single tiny stitch behind each ear can tack a face-framing lock in place if needed.
- Optional: a light pass of steam to relax the skirt and hair. Keep the iron off the yarn.
Safety
- This doll is not a toy for children under 3 years. It has safety-eye posts, yarn hair, and optional buttons — all choking or pulling hazards.
- For any child, use safety eyes (never round buttons on the face), embroider the mouth, and sew every limb and the hair cap so they cannot be tugged off. Test with a firm pull.
- If the doll is for a baby or toddler, embroider the eyes, skip sewn buttons (use the crocheted discs or French-knot “buttons”), and consider substituting a crocheted hair cap without loose strands.
Size note
At the stated gauge, the head is about 2¼" (5.7 cm) across (36 sts ÷ 5 sc per inch ≈ 7.2" / 18 cm circumference). The body is about 4½" (11.5 cm) tall and the legs about 4½" (11.5 cm) long. Together they finish near 10" (25 cm). DK yarn and a 2.75–3.0 mm hook will make a smaller doll; bulky yarn is not recommended, because the facial features and ruffle will look heavy.
Care
Spot-clean with cool water and mild soap. Do not machine-wash if you used safety eyes or craft blush. Reshape and air-dry. Comb the yarn hair with your fingers, not a brush.
Stitch-count recap
| Piece | Key counts |
|---|---|
| Head | 6–12–18–24–30–36; even at 36; decrease to 18 (open neck) |
| Body | 6–12–18–24–30–36; even at 36; 30 bodice; neck 18 |
| Arms | 6 → 8; 14 even rnds |
| Legs | 6–12–18; shape to 14 then 12; 16 even rnds |
| Skirt | 36–54–72–90; 45 shells |
| Hair cap | Same 6-point sphere to 36, then 5 even rnds |
Enjoy your Melody doll — a tiny handmade princess in a cream ruffled dress, with long black hair and a mint bow at her heart.
Disclaimer: This pattern was generated by AI and should be reviewed for accuracy before use. While we strive for quality, AI-generated content may contain errors. Please verify measurements, stitch counts, charts, and instructions before beginning your project. Generated by purlJam.uk
Love this pattern?
Save this pattern to your free PurlJam libraryAccess your pattern anytime
Bookmark this page to access your pattern anytime