Type
Crochet
Difficulty
beginner
Category
amigurumi
AI Thinking Process
Planning
Verification
Pattern
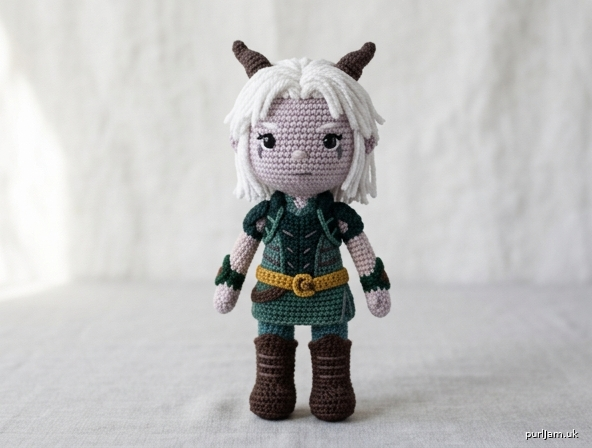
Rayla Doll (The Dragon Prince) – Beginner Crochet Pattern
Simple Shapes Amigurumi • Worsted Weight • Approx. 7–8 inches (18–20 cm) tall
A beginner-friendly crocheted doll of Rayla using only basic spheres, cylinders, and simple embroidery. Perfect first character project.
Materials
- Yarn (worsted weight / category 4):
- Color A (skin): pale lavender, light gray, or very pale blue-gray – approx. 50 yd
- Color B (hair): white or off-white – approx. 30 yd
- Color C (horns & boots): dark brown or black – approx. 15 yd
- Color D (tunic/armor): dark teal, forest green, or charcoal – approx. 40 yd
- Color E (accents): gold or mustard (belt/buckles) – small amount
- Black and white embroidery floss or scrap yarn (eyes, mouth, details)
- Hook: US E-4 (3.5 mm) — go down a size from yarn label for tight fabric
- Fiberfill stuffing
- Yarn needle
- Stitch marker
- Optional: 6–8 mm safety eyes (or embroider), small piece of felt for armor plates, pins for assembly
- Scissors
Abbreviations (US Terms)
- mr = magic ring
- ch = chain
- sc = single crochet
- inc = increase (2 sc in same st)
- dec = invisible decrease (sc2tog through front loops)
- sl st = slip stitch
- st(s) = stitch(es)
- rnd(s) = round(s)
- FO = fasten off
- [ ] = total stitches at end of round
- ( ) × n = repeat instructions in parentheses n times
Work in continuous spiral unless noted. Do not join rounds. Mark first st of each rnd with stitch marker and move up each rnd. Stuff firmly as you go.
Gauge
5 sc × 5 rnds = 1" (2.5 cm) in sc, worked tightly. Exact gauge is not critical but fabric should be dense so stuffing does not show.
Finished Size
Approx. 7–8" (18–20 cm) tall when made with worsted yarn and E-4 hook.
Pattern Pieces
Head (Color A – skin)
Make 1.
- Rnd 1: 6 sc in mr [6]
- Rnd 2: inc in each st around [12]
- Rnd 3: (sc, inc) around [18]
- Rnd 4: (2 sc, inc) around [24]
- Rnds 5–10: sc around [24] (6 rnds)
- Insert safety eyes between Rnds 7–8, approx. 5 sts apart (or embroider later).
- Rnd 11: (2 sc, dec) around [18]
- Stuff head firmly.
- Rnd 12: (sc, dec) around [12]
- Rnd 13: dec around [6]
- FO, leaving long tail. Thread tail through front loops of remaining 6 sts and pull tight to close. Weave in end.
Body (Color D – tunic, switch to Color A for neck if desired)
Make 1.
- Rnd 1: 6 sc in mr [6]
- Rnd 2: inc in each st [12]
- Rnd 3: (sc, inc) around [18]
- Rnd 4: (2 sc, inc) around [24]
- Rnd 5: (3 sc, inc) around [30]
- Rnds 6–12: sc around [30] (7 rnds) — this is the torso/tunic section
- Rnd 13: (3 sc, dec) around [24]
- Rnd 14: sc around [24]
- Stuff body firmly.
- Rnd 15: (2 sc, dec) around [18]
- Rnd 16: (sc, dec) around [12]
- Rnd 17: sc around [12] (neck)
- FO, leaving long tail for sewing to head. Stuff neck lightly.
Arms (Color A)
Make 2.
- Rnd 1: 6 sc in mr [6]
- Rnd 2: inc in each st [12]
- Rnds 3–10: sc around [12] (8 rnds)
- Lightly stuff (do not overstuff so arms stay posable).
- Flatten opening and sc across through both layers (6 sc) to close, or FO and sew closed. Leave long tail for sewing.
Optional Color D cuff: On last 2 rnds work in Color D for short sleeves.
Legs (start Color C for boots, switch to Color A)
Make 2.
- Rnd 1: 6 sc in mr with Color C [6]
- Rnd 2: inc in each st [12]
- Rnds 3–5: sc around [12] (boot)
- Switch to Color A.
- Rnds 6–12: sc around [12] (7 rnds)
- Lightly stuff.
- FO, leaving long tail. Flatten top and sew closed or leave open to sew directly to body.
Horns (Color C)
Make 2.
- Rnd 1: 4 sc in mr [4]
- Rnd 2: (sc, inc) around [6]
- Rnds 3–5: sc around [6]
- Rnd 6: (2 sc, inc) around [8]
- Rnds 7–8: sc around [8]
- FO, leaving long tail. Do not stuff (or stuff very lightly at base only). Shape into gentle curve with fingers.
Hair Cap (Color B)
Make 1 (simple beanie-style base for white hair).
- Rnd 1: 6 sc in mr [6]
- Rnd 2: inc in each st [12]
- Rnd 3: (sc, inc) around [18]
- Rnd 4: (2 sc, inc) around [24]
- Rnds 5–8: sc around [24]
- FO, leaving long tail for sewing. This sits on top/back of head like a skullcap.
Optional Hair Strands / Bangs (Color B)
Make several short lengths:
- Ch 8–12, sl st in 2nd ch from hook and each ch across. FO.
- Or cut 6–8" lengths of yarn and latch-hook / sew onto hair cap for a shaggy white look (Rayla’s short, spiky white hair).
Assembly Order
- Head to Body: Sew head securely onto neck opening of body, matching stitches. Add extra stuffing at neck join if needed for a firm connection.
- Legs: Pin legs to bottom of body (Rnd 1–2 area), slightly angled forward. Sew firmly.
- Arms: Pin arms to sides of body at approx. Rnd 14–15 (shoulder height). Sew in place. Angle slightly forward for a natural pose.
- Hair: Sew hair cap onto head, covering top and back, leaving forehead open. Attach bangs/strands at front and sides for Rayla’s signature short white hair. Trim as needed.
- Horns: Pin horns to top of head (through hair cap), slightly curved backward and spaced about 4–5 sts apart. Sew securely at base.
- Face:
- Eyes: If not using safety eyes, embroider simple ovals or dots with black yarn between Rnds 7–8.
- Add small white highlight stitch on each eye.
- Eyebrows: short straight stitches in dark gray/black, slightly angled.
- Nose: tiny vertical stitch or French knot in Color A (one shade darker if possible).
- Mouth: small curved or straight stitch in darker yarn.
- Outfit Details (embroidery or surface slip stitch):
- Belt: surface sl st or embroider a band of Color E around waist (approx. Rnd 8–9 of body).
- Armor accents: small straight stitches or felt triangles on chest/shoulders in darker teal or gray.
- Boots: already worked in Color C; add a couple of horizontal stitches for cuff detail if desired.
- Weave in all ends securely. Shape the doll gently with your hands.
Finishing Tips
- Work stitches tightly so stuffing does not show through.
- Pin every piece before sewing — placement makes the character recognizable.
- For a more “Rayla” look: keep hair short and slightly messy, horns curved back, and posture upright.
- Optional keychain: attach a jump ring and keychain finding to the top of the head after assembly.
- Spot clean only; do not machine wash.
Size Adjustments
- Larger doll: add 1–2 extra increase rounds on head/body and extra even rounds on limbs (bulky yarn also works).
- Smaller/keychain: stop head at 18 sts, body at 18–24 sts, use DK yarn and smaller hook.
Enjoy your Moonshadow elf companion! This pattern uses only the basic shapes from the simple-toys template (sphere head, cylinder body/limbs/horns) so it stays fully beginner-friendly while capturing Rayla’s silhouette.
Disclaimer: This pattern was generated by AI and should be reviewed for accuracy before use. While we strive for quality, AI-generated content may contain errors. Please verify measurements, stitch counts, charts, and instructions before beginning your project. Generated by purlJam.uk
Love this pattern?
Save this pattern to your free PurlJam libraryAccess your pattern anytime
Bookmark this page to access your pattern anytime