Type
Crochet
Difficulty
intermediate
Category
custom
AI Thinking Process
Planning
Verification
Pattern
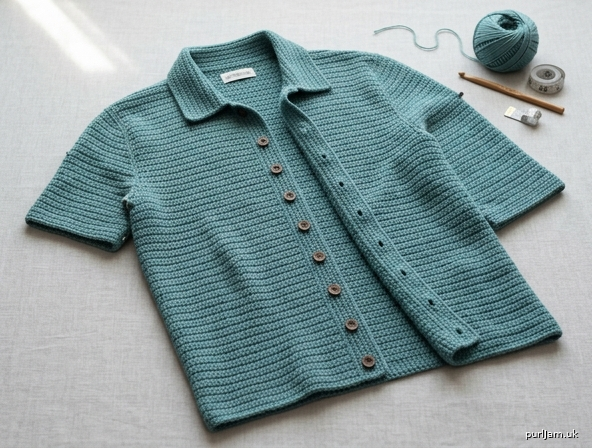
Men's Button-Front Camp Shirt (Short Sleeve) — Size L
A relaxed, classic short-sleeve button-up shirt for men, made entirely from simple rectangles and trapezoids using half double crochet (hdc) for the body and single crochet (sc) for the sturdy button bands and collar. A great first "garment" project — no curved armholes, no complex shaping, just straight seams and one simple step-shaped neckline.
SIZE
Men's Large
- To fit chest: 42–44"
- Finished chest (buttoned): 46" (2–3" positive ease, relaxed fit)
(This pattern is written for size L only. To resize, recalculate stitch/row counts from the gauge swatch below.)
FINISHED MEASUREMENTS
- Chest (buttoned): 46"
- Length, shoulder to hem: 29"
- Sleeve length (underarm to cuff): 8.5"
- Armhole depth: 9.5"
- Collar height: 1.5"
MATERIALS
- Yarn: Worsted weight (#4 Medium), approx. 2,100 yards / 1,920 m total. A cotton or cotton-blend worsted is recommended for shirt-like drape and structure (e.g., 8 skeins of ~250 yd/230 m each).
- Hook: US H-8 / 5 mm (and a spare hook one size smaller if you find your buttonhole rows loose)
- 7 buttons, ¾" (20 mm) diameter
- Yarn/tapestry needle
- Removable stitch markers (at least 6)
- Measuring tape
GAUGE
13 sts x 10 rows = 4" x 4" (10 cm x 10 cm) in hdc, worked flat. Swatch: Ch 18, hdc in 3rd ch from hook and each ch across (16 sts). Work even until piece measures 4" tall. Measure the center 4" — adjust hook size up or down until gauge matches. Gauge is essential — this garment relies on straight seams, so accuracy here determines fit.
ABBREVIATIONS (US terms)
- ch = chain
- hdc = half double crochet
- hdc2tog = half double crochet 2 together (decrease)
- sc = single crochet
- sl st = slip stitch
- st(s) = stitch(es)
- sk = skip
- sp = space
- rep = repeat
- RS/WS = right side/wrong side
- approx = approximately
- ( ) = work instructions into same st/sp
- [ ] = repeat instructions the stated number of times
PATTERN NOTES
- Turning chain convention: Throughout the hdc pieces, ch 2 at the start of a row does NOT count as a stitch. Work your first hdc into the first actual stitch, and work your final hdc of the row into the top of the previous row's ch-2. This keeps stitch counts stable — always double-check the count in parentheses.
- For sc rows (bands/collar), the turning ch-1 also does not count as a stitch.
- Foundation chains: chain (number of sts + 2); the first hdc is worked into the 3rd ch from hook.
- Pieces are worked flat, in rows, from the bottom up.
- Stitch counts are given at the end of every shaped row; unshaped sections state the count once and note "work even."
SPECIAL STITCH
hdc2tog: Yarn over, insert hook into next st, yarn over, pull up a loop (3 loops on hook — do this twice total in the next 2 sts, so you'll have 5 loops on hook), yarn over and pull through all 5 loops. Decreases 1 stitch.
BACK PANEL (make 1)
Ch 77.
Row 1 (RS): Hdc in 3rd ch from hook and in each ch across. (75 sts)
Rows 2–72: Ch 2 (does not count as st), hdc in each st across, ending with hdc in top of turning ch-2. (75 sts each row)
- At the end of Row 48, place a removable stitch marker at each side edge — this marks the top of the side seam / start of the armhole opening.
- Continue even through Row 72. Piece should measure approx. 28.8" (≈29") from foundation edge.
Divide for shoulders (Row 72 already complete): Fasten off. Working across the 75 sts of Row 72:
- Sts 1–25 = Right Shoulder
- Sts 26–50 = Back Neck (leave unworked/unseamed — 25 sts)
- Sts 51–75 = Left Shoulder
No additional rows are needed — shoulders are seamed directly using these stitch ranges during finishing.
RIGHT FRONT (make 1) — this piece gets the buttonhole band
Ch 36.
Row 1 (RS): Hdc in 3rd ch from hook and in each ch across. (34 sts)
- The last stitch of this row is the Center Front edge.
- The first stitch of this row is the Side Seam (armhole) edge. Turn.
Rows 2–66: Ch 2, hdc across. (34 sts each row)
- At the end of Row 48, place a marker at the side seam edge (armhole start point).
- Continue even to Row 66. (Piece measures approx. 26.4" from foundation edge.)
Shape Neck (shaping happens at the Center Front edge only):
- Row 67 (RS — Center Front edge is at the END of this row): Hdc across until 3 sts remain, turn, leaving remaining 3 sts unworked. (31 sts)
- Row 68 (WS): Ch 2, hdc across. (31 sts, work even)
- Row 69 (RS): Hdc across until 3 sts remain, turn, leaving remaining 3 sts unworked. (28 sts)
- Row 70 (WS): Work even. (28 sts)
- Row 71 (RS): Hdc across until 3 sts remain, turn, leaving remaining 3 sts unworked. (25 sts) ✓ matches Back shoulder count
- Row 72 (WS): Work even. (25 sts) Fasten off.
LEFT FRONT (make 1) — mirror image, plain button band
Ch 36.
Row 1 (RS): Hdc in 3rd ch from hook and in each ch across. (34 sts)
- The first stitch of this row is the Center Front edge.
- The last stitch of this row is the Side Seam (armhole) edge. Turn.
Rows 2–66: Ch 2, hdc across. (34 sts each row)
- At the end of Row 48, place a marker at the side seam edge.
- Continue even to Row 66.
Shape Neck (shaping at Center Front edge, which is now at the START of RS rows):
- Row 67 (RS): Sl st across first 3 sts, ch 2 (does not count as st), hdc in each remaining st across. (31 sts)
- Row 68 (WS): Work even. (31 sts)
- Row 69 (RS): Sl st across first 3 sts, ch 2, hdc across. (28 sts)
- Row 70 (WS): Work even. (28 sts)
- Row 71 (RS): Sl st across first 3 sts, ch 2, hdc across. (25 sts)
- Row 72 (WS): Work even. (25 sts) Fasten off.
SLEEVES (make 2, identical)
Ch 64.
Row 1 (RS): Hdc in 3rd ch from hook and in each ch across. (62 sts)
Rows 2–21 (20 rows, decrease every row): Ch 2, hdc2tog (over first 2 sts), hdc across to last 2 sts, hdc2tog (over last 2 sts, including top of turning ch-2). Turn.
Repeat this decrease row 19 more times (rows 2–21, 20 decrease rows total). Track your count: Row 2: 60 sts — Row 4: 56 — Row 6: 52 — Row 8: 48 — Row 10: 44 — Row 12: 40 — Row 14: 36 — Row 16: 32 — Row 18: 28 — Row 20: 24 — Row 21: 22 sts (62 – 40 = 22 ✓)
Sleeve measures approx. 8.4" (≈8.5"). Fasten off.
Cuff edge finish: With RS facing, join yarn in foundation (cuff) edge and work 1 row of sc evenly across for a neat, sturdy edge. Fasten off.
BUTTON BANDS
Right Front Band (Buttonhole Band)
With RS facing, join yarn at the bottom (hem) corner of the Right Front's Center Front edge.
Row 1: Ch 1, work 86 sc evenly spaced up the edge to the top of the straight section (where neck shaping began). (Aim for approx. 4 sc for every 3 row-ends to keep the edge flat.) Turn. (86 sts)
Row 2 (Buttonhole row): Ch 1, sc in first 9 sts, *ch 2, sk next 2 sts, sc in next 9 sts; rep from * 6 more times (7 buttonholes total made). Turn. (86 sts, including ch-2 spaces)
Row 3: Ch 1, sc in each st across, working 2 sc into each ch-2 space to fill the buttonholes. (86 sts) Fasten off.
Left Front Band (Button Band)
With RS facing, join yarn at the bottom (hem) corner of the Left Front's Center Front edge.
Rows 1–3: Ch 1, sc 86 evenly across (matching Right Front band). (86 sts each row) Fasten off.
Buttonholes fall approx. every 3.4", starting and ending approx. 2.8" from each end of the band — a typical men's shirt spacing.
COLLAR
With RS facing, join yarn at the top of the Right Front button band.
Row 1: Ch 1, work 50 sc evenly around the neck edge as follows: 12 sts along the Right Front neck-shaping edge, 25 sts across the Back neck, 13 sts along the Left Front neck-shaping edge. Turn. (50 sts)
Rows 2–6: Ch 1, sc across. (50 sts each row) Fasten off.
Collar measures approx. 1.5" tall and can be worn open (stand collar) or folded down.
FINISHING & ASSEMBLY
- Weave in ends and lightly steam-block each piece to its finished measurements before seaming.
- Shoulder seams: With whip stitch or a sc seam, join Back sts 1–25 (Right Shoulder) to the Right Front's 25 shoulder sts. Join Back sts 51–75 (Left Shoulder) to the Left Front's 25 shoulder sts. Leave Back sts 26–50 (25 sts) unseamed — this is the back neckline.
- Side seams: Sew each Front's side edge to the Back's corresponding side edge, starting at the hem and working up to the Row 48 marker. Leave the seam open above the marker (rows 49–72, 9.5") — this is the armhole opening.
- Set in sleeves: Fold each sleeve to find the center of the 62-st top edge; match this center point to the shoulder seam. Pin the sleeve top edge into the armhole opening, easing evenly across the 9.5" gap on both front and back, and sew in place. Then sew the sleeve's side edges together (cuff to top), continuing the seam line down to meet the Row 48 body side-seam marker, so the underarm seam is continuous.
- Button bands and collar are already attached (worked directly onto the fronts/neckline) — no additional sewing needed there beyond weaving in ends.
- Sew buttons: Attach the 7 buttons to the Left Front button band, positioned directly opposite the 7 buttonholes on the Right Front.
- Weave in all remaining ends and give the shirt a final light steam-block, paying special attention to the seams and button bands so they lie flat.
Your men's size L button-front camp shirt is complete! 🧵👔
Disclaimer: This pattern was generated by AI and should be reviewed for accuracy before use. While we strive for quality, AI-generated content may contain errors. Please verify measurements, stitch counts, and instructions before beginning your project. Generated by purlJam.uk
Love this pattern?
Save this pattern to your free PurlJam libraryAccess your pattern anytime
Bookmark this page to access your pattern anytime