Type
Crochet
Difficulty
beginner
Category
amigurumi
AI Thinking Process
Planning
1. **Design Strategy**: A simple, blocky mini car worked as a single seamless tube with closed ends — no sewing required. Worked flat-bottomed by shaping with increases/decreases, then wheels added as surface details using contrasting yarn worked directly into the body (no separate pieces to sew).
2. **Construction Plan**: Worked in continuous rounds from one end (back) to the other (front) as a stuffed rectangular tube; wheels created by surface slip stitch circles directly on the body — no assembly required.
3. **Quality Assurance**:
- Keep tension tight to hide stuffing.
- Mark round beginnings to keep wheels symmetrical.
- Stuff before final closure round.
4. **Final Calculations**: Tension ~ 4 dc per 2.5 cm. Start 6 dc → 12 → 18, work 10 rounds straight, decrease 18 → 12 → 6, close. Finished size ~ 8 cm long × 4 cm wide × 4 cm tall.
Verification
1. **Completeness**: Materials, abbreviations, tension, instructions, finishing, embellishments — all included.
2. **Consistency**: 6 → 12 → 18 increases match standard sphere/tube template; straight rounds maintain 18 sts; decreases 18 → 12 → 6 close cleanly. Math verified.
3. **Constraints**: Beginner level ✓, no sewing ✓, mini size ✓, UK terminology (dc, tr) ✓, metric first ✓.
4. **Safety**: All stitch counts add up. Surface slip stitch wheels avoid any sewing.
Pattern
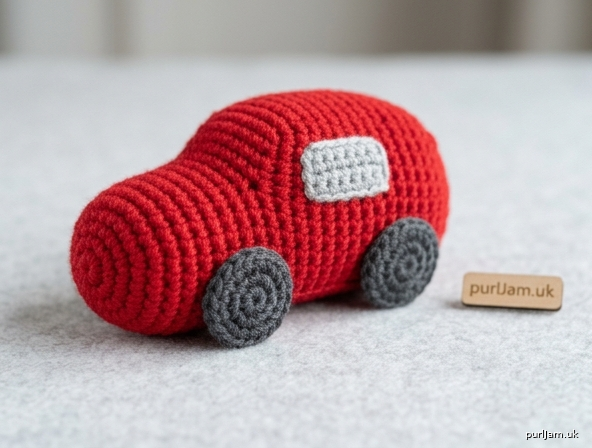
# Mini No-Sew Crochet Car 🚗

A chunky little car worked in one piece with no sewing required! The wheels are added directly onto the body using surface slip stitch, making this the perfect project for absolute beginners.

**Skill level:** Beginner
**Finished size:** Approx. 8 cm long × 4 cm wide × 4 cm tall (3¼" × 1½" × 1½")

---

## Materials

- **Yarn:** Worsted weight (DK/Aran, weight 4) in two colours
  - **Colour A (Body):** ~15 g in your favourite car colour (red, blue, yellow, etc.)
  - **Colour B (Wheels):** ~5 g in black or dark grey
  - Optional: small scrap of white or grey for windows
- **Hook:** 3.5 mm (UK 9 / US E-4)
- **Notions:**
  - Stitch marker (or scrap of yarn)
  - Polyester fibrefill stuffing
  - Scissors
  - Yarn needle (only for weaving in ends — no sewing of pieces!)

---

## Tension (Gauge)

Approx. 4 dc × 4 rounds = 2.5 cm (1") square.
Exact tension is not critical — just work tightly so stuffing doesn't show through.

---

## Abbreviations (UK Terms)

- **ch** — chain
- **dc** — double crochet (= US single crochet)
- **MR** — magic ring
- **inc** — 2 dc in same stitch (increase)
- **dec** — dc2tog / invisible decrease
- **ss** — slip stitch
- **st(s)** — stitch(es)
- **[ ]** — stitch count at end of round

> **Note:** This pattern uses **UK crochet terminology**. If you're used to US terms, "dc" here = US "sc".

---

## Construction Notes

- Work in continuous spirals — do **not** join rounds.
- Move your stitch marker up after each round.
- Stuff the car firmly before closing the final round.
- The wheels are added at the end by working slip stitches directly onto the surface of the body — no sewing!

---

## Pattern — Car Body (Make 1, in Colour A)

**Rnd 1:** 6 dc in MR. **[6]**

**Rnd 2:** inc in each st around. **[12]**
*(6 + 6 = 12 ✓)*

**Rnd 3:** (1 dc, inc) around. **[18]**
*(6 increases × 3 sts each pair = 18 ✓)*

**Rnd 4:** dc in each st around. **[18]**

**Rnd 5:** dc in each st around. **[18]**

**Rnd 6:** dc in each st around. **[18]**
*Begin stuffing lightly now.*

**Rnd 7:** dc in each st around. **[18]**

**Rnd 8:** dc in each st around. **[18]**

**Rnd 9:** dc in each st around. **[18]**

**Rnd 10:** dc in each st around. **[18]**

**Rnd 11:** dc in each st around. **[18]**

**Rnd 12:** dc in each st around. **[18]**
*This gives a nice long body shape — 9 straight rounds total.*

**Rnd 13:** (1 dc, dec) around. **[12]**
*(6 decreases of 3 sts → 2 sts = 12 ✓)*
*Finish stuffing firmly — car should feel solid.*

**Rnd 14:** dec around. **[6]**
*(3 decreases × 2 = 6 ✓)*

Cut yarn leaving a 15 cm tail. Using a yarn needle, weave the tail through the front loops of the remaining 6 stitches and pull tight to close. Push the tail down into the body to hide it.

✅ **Body complete!** You should have a chunky, slightly rounded tube — your car!

---

## Adding the Wheels (Surface Slip Stitch — No Sewing!)

The wheels are simply small circles of slip stitches worked directly into the body fabric.

**For each wheel (make 4 — two on each side):**

1. With Colour B and your hook, insert hook into any stitch on the lower side of the car (about 2 rounds up from the bottom edge).
2. Pull up a loop of Colour B — leave a 10 cm tail on the inside.
3. **ss** into the next 5–6 stitches in a small circle (about 1.5 cm across). Work in a tight curve — go down a round, across, up a round, and back — to form a rough circle/oval shape.
4. Cut yarn, pull the tail through to the inside, and tuck it into the stuffing through a small gap (or knot the two ends together inside).

**Wheel placement guide:**
- **Front-left wheel:** 2 rounds from the front, lower-left side
- **Back-left wheel:** 2 rounds from the back, lower-left side
- **Front-right and back-right:** mirror on opposite side

💡 *Tip:* You can also just make a small **star/cluster of slip stitches** at each wheel spot if circles feel tricky — it still reads as a wheel!

---

## Optional: Windows

Using a small scrap of white, grey, or light blue yarn, work 3–4 slip stitches in a small rectangle on the **top half** of one side to suggest a window. Repeat on the other side. Weave tails inside.

---

## Finishing

- Weave in any remaining ends by pushing them into the stuffing with your hook or needle.
- Give your car a gentle squish to shape it into a more rectangular form.
- Done! 🎉

---

## Customisation Ideas

- **Racing car:** Add a slip-stitch stripe down the centre top in a contrast colour.
- **Taxi:** Use yellow Colour A with black slip-stitch checks.
- **Police car:** Black & white with a tiny red/blue dot on top.
- **Keychain:** Before closing Rnd 14, insert a keychain loop and crochet around it.

---

**Congratulations — you've made an entire crochet toy with no sewing!** Perfect first amigurumi project. 🚗💨
Disclaimer: This pattern was generated by AI and should be reviewed for accuracy before use. While we strive for quality, AI-generated content may contain errors. Please verify measurements, stitch counts, and instructions before beginning your project. Generated by purlJam.uk
Access your pattern anytime
Bookmark this page to access your pattern anytime