Type
Knitting
Difficulty
beginner
Category
cardigan
Pattern
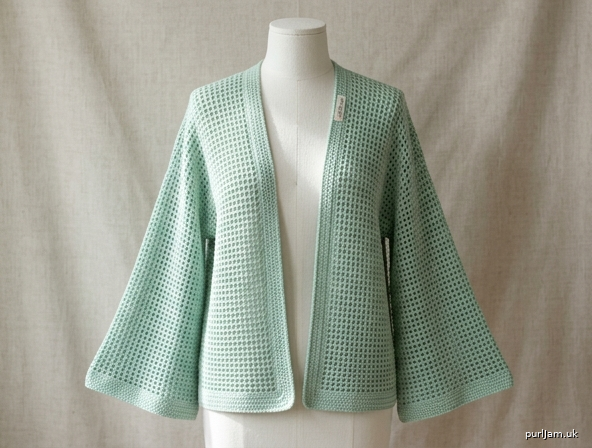
# Mint Mesh Bell-Sleeve Summer Cardigan
### A beginner-friendly open-front crochet cardigan in airy mesh

A light, breezy cardigan worked in simple mesh squares — perfect for summer layering. The T-shaped kimono construction means **no fiddly armhole or shoulder shaping**, and the pretty bell sleeves are made with a few easy increases. Worked entirely in UK crochet terms.

---

## Materials

- **Yarn:** Sport-weight (5-ply) 100% cotton, mint green
  - Approx. **900 m / 1000 m / 1100 m / 1250 m** (sizes X–S / M / L / 2XL)
  - That is roughly **5 / 6 / 6 / 7 balls** of a 50 g / 180 m ball
- **Hook:** 4.0 mm crochet hook (main fabric)
- **Spare hook:** 3.5 mm (optional, for a neater border)
- Tapestry/yarn needle for seaming
- Scissors
- Stitch markers (4–6)
- Optional: 2 buttons or a fabric tie for closure

> **Why cotton?** Cotton sport-weight gives crisp stitch definition, breathes well, and drapes nicely once blocked — ideal for an open summer mesh.

---

## Tension (Gauge)

Worked in **mesh pattern** with the 4.0 mm hook:

- **20 mesh squares = 20 cm wide**
- **14 rows = 20 cm tall**

➡️ This means **1 mesh square = 1 cm × ~1.4 cm**, which keeps the maths simple: *number of mesh squares ≈ width in cm.*

Always work a tension swatch first. If your mesh is larger, go down a hook size; if smaller, go up.

---

## Abbreviations (UK terms)

| Abbrev | Meaning |
|--------|---------|
| ch | chain |
| dc | double crochet (US sc) |
| tr | treble crochet (US dc) |
| sp | space |
| st(s) | stitch(es) |
| sl st | slip stitch |
| rep | repeat |
| RS / WS | right side / wrong side |
| beg | beginning |
| mesh | 1 tr + ch 1 = one mesh square |

> **US readers:** UK tr = US dc. UK dc = US sc.

---

## The Mesh Stitch Pattern

Each **mesh square = (1 tr, ch 1)**.

**Foundation:** ch a multiple of **2 + 5**.
**Row 1 (RS):** 1 tr in 6th ch from hook, *ch 1, skip 1 ch, 1 tr in next ch*; rep to end. Turn.
**Row 2:** ch 4 (counts as 1 tr + ch 1), skip first tr, *1 tr in next tr, ch 1*; rep across, working last tr in the 3rd of beg ch. Turn.

Repeat **Row 2** for the whole fabric. Easy and rhythmic — perfect for beginners!

---

## Sizing & Finished Measurements

Designed with a relaxed, oversized summer fit (approx. 12–18 cm positive ease).

| Size | To fit bust | Finished bust | Body length | Sleeve length | Sleeve top width | Cuff (bell) width |
|------|-------------|---------------|-------------|---------------|------------------|-------------------|
| **X** | 76–81 cm | 100 cm | 58 cm | 42 cm | 38 cm | 54 cm |
| **S** | 86–91 cm | 110 cm | 60 cm | 44 cm | 40 cm | 56 cm |
| **M** | 96–101 cm | 122 cm | 62 cm | 46 cm | 42 cm | 58 cm |
| **L** | 106–111 cm | 134 cm | 64 cm | 46 cm | 44 cm | 60 cm |
| **2XL** | 116–121 cm | 146 cm | 66 cm | 48 cm | 46 cm | 64 cm |

Instructions are written for size **X**, with sizes **S / M / L / 2XL** in brackets.

---

## Mesh Counts Per Piece

Because 1 mesh ≈ 1 cm wide, mesh counts roughly match cm widths.

| Piece | X | S | M | L | 2XL |
|-------|---|---|---|---|-----|
| **Back** width (mesh) | 50 | 55 | 61 | 67 | 73 |
| **Each Front** width (mesh) | 25 | 27 | 30 | 33 | 36 |
| **Body** length (rows) | 41 | 42 | 44 | 45 | 46 |
| **Sleeve** top width (mesh) | 38 | 40 | 42 | 44 | 46 |
| **Sleeve** cuff width (mesh) | 54 | 56 | 58 | 60 | 64 |
| **Sleeve** length (rows) | 30 | 31 | 32 | 32 | 34 |

> **Maths check (Back, size X):** 50 mesh × 1 cm = 50 cm. Back (50) + Front (25) + Front (25) = 100 cm finished bust. ✓
> **Foundation chain (Back, X):** mesh × 2 + 5 = 50 × 2 + 5 = **105 ch.** ✓

---

## PATTERN

### 1. BACK (make 1)

**Foundation:** ch **105 (115 / 127 / 139 / 151)**.
*(Formula: mesh count × 2 + 5)*

**Row 1 (RS):** 1 tr in 6th ch from hook, *ch 1, skip 1, 1 tr in next ch*; rep to end. → **50 (55 / 61 / 67 / 73) mesh.** Turn.

**Rows 2 onwards:** Work mesh Row 2 across.

Continue until back measures **58 (60 / 62 / 64 / 66) cm** = approx **41 (42 / 44 / 45 / 46) rows**. Fasten off.

---

### 2. FRONTS (make 2 — one left, one right)

**Foundation:** ch **55 (59 / 65 / 71 / 77)**.
*(mesh count 25 (27 / 30 / 33 / 36) × 2 + 5)*

**Row 1 (RS):** as Back. → **25 (27 / 30 / 33 / 36) mesh.** Turn.

Work in mesh pattern until the front matches the back length: **58 (60 / 62 / 64 / 66) cm**. Fasten off.

> **Simple V-neck option (optional, still beginner-friendly):** When the front measures **40 cm**, on every following RS row skip the last mesh (work to 1 mesh before end, turn) until 6 mesh have been removed. This gives a gentle sloped neckline. Mirror for the second front. If you prefer no shaping, simply leave the fronts as straight rectangles — the border will frame the neckline neatly.

---

### 3. BELL SLEEVES (make 2)

These are worked **top-down** (from shoulder to cuff) so the bell flares outward as you go. We begin at the narrow top and **increase gradually** to create the bell.

**Foundation (sleeve top):** ch **81 (85 / 89 / 93 / 97)**.
*(top mesh 38 (40 / 42 / 44 / 46) × 2 + 5)*

**Row 1 (RS):** as before. → **38 (40 / 42 / 44 / 46) mesh.** Turn.

**Rows 2–10:** Work straight in mesh pattern (no increases) — this forms the upper arm.

**Bell flare — increase section:**
You need to go from **38 → 54** mesh (X) = **16 extra mesh**, i.e. **8 increases on each side**, spread over the lower sleeve.

**Increase row (worked on RS rows only):**
- ch 5 at the start (counts as 1 tr + 1 added mesh), 1 tr in first tr, then continue mesh pattern as normal across.
- At the end of the row, after the last tr, ch 1, 1 tr in the same place as the last tr to add a mesh on the other side.

This adds **1 mesh at each end = 2 mesh per increase row.**

Work an increase row **every 2nd RS row** until you reach **54 (56 / 58 / 60 / 64) mesh**:
- **8 (8 / 8 / 8 / 9) increases each side.**

Then work straight until the sleeve measures **42 (44 / 46 / 46 / 48) cm** total ≈ **30 (31 / 32 / 32 / 34) rows**. Fasten off.

> **Maths check (sleeve, X):** start 38 mesh + (8 incr × 2) = 38 + 16 = **54 mesh cuff** = 54 cm bell opening. ✓
> Tip: Spread increases evenly. Mark each increase row with a stitch marker so both sleeves match.

---

## ASSEMBLY

Block all pieces gently before seaming — mesh opens up beautifully.

1. **Shoulder seams:** Lay the back flat (RS up). Place a front on each side (RS together at shoulders). Seam the outer **14 (15 / 16 / 17 / 18) mesh** of each shoulder using sl st or mattress stitch, leaving the centre open for the neck.
2. **Attach sleeves:** Find the centre of the sleeve top edge and line it up with the shoulder seam. Pin the sleeve **flat and at a right angle** to the body (T-shape — no armhole shaping). Seam in place.
3. **Side & underarm seams:** Fold the cardigan at the shoulders. Seam each side from hem up to the underarm, then continue along the underside of each sleeve down to the cuff in one line.
4. **Weave in all ends.**

---

## BORDER

A simple border frames the front opening and neckline and tidies the cuffs and hem.

**Round 1 (with 3.5 mm hook, RS facing):**
Join yarn at a bottom front corner. Work **1 dc in each tr and 1 dc in each ch-sp** evenly up the right front, around the back neck, and down the left front. Work **3 dc** into each corner. Do not turn.

**Round 2:** ch 1, work 1 dc in each dc around, 3 dc in each corner. Sl st to join.

**Optional shell edging (Round 3):** *skip 1 dc, 5 tr in next dc, skip 1 dc, 1 dc in next dc*; rep around. This gives a pretty scalloped summer finish.

**Cuffs & hem:** Work **2 rounds of dc** around each cuff and around the lower hem to neaten, if desired.

**Closure (optional):** Sew 2 buttons to the right front and use a ch-sp on the left as the buttonhole, **or** attach two 30 cm crochet-chain ties at the front for a relaxed knot closure.

---

## FINISHING

- Weave in any remaining ends.
- **Block again** lightly to open the mesh and even out the stitches. Pin to the finished measurements and allow to dry fully.

---

### Quick Reference — Finished Measurements (Size X / S / M / L / 2XL)

- **Bust:** 100 / 110 / 122 / 134 / 146 cm
- **Body length:** 58 / 60 / 62 / 64 / 66 cm
- **Sleeve length:** 42 / 44 / 46 / 46 / 48 cm
- **Bell cuff width:** 54 / 56 / 58 / 60 / 64 cm

Enjoy your breezy mint mesh cardigan — perfect over a summer dress or vest top! 🌿
Disclaimer: This pattern was generated by AI and should be reviewed for accuracy before use. While we strive for quality, AI-generated content may contain errors. Please verify measurements, stitch counts, and instructions before beginning your project. Generated by purlJam.uk
Access your pattern anytime
Bookmark this page to access your pattern anytime