Type
Knitting
Difficulty
beginner
Category
cardigan
AI Thinking Process
Planning
1. **Design Strategy**: A beginner-friendly drop-shoulder cardigan in worsted-weight stockinette. Drop-shoulder construction simplifies the body (no armhole shaping needed) — perfect for beginners — while balloon sleeves add a gentle, gathered volume cinched into a snug cuff.
2. **Construction Plan**: Worked flat in pieces bottom-up (back, two fronts, two sleeves), then seamed; button bands picked up after assembly.
3. **Quality Assurance**:
- Drop-shoulder armhole depth must match sleeve cap width (no set-in cap) — keep armhole as a straight measurement.
- Balloon sleeve maths: wide upper sleeve gathered/decreased sharply to cuff — ensure decrease count is even.
- Front cast-on + button band overlap must total the back width for a clean closure.
4. **Final Calculations**: Tension 20 sts & 26 rows = 10 cm in st st on 4.5 mm (UK metric; needle "7"). Ribbing on 3.75 mm (needle "5").
- Sizes (finished bust, relaxed fit): 92 (102, 112, 122, 132) cm.
- Back cast-on: 92 (102, 112, 122, 132) sts.
- Each front cast-on: 48 (53, 58, 63, 68) sts (half back +2 overlap).
- Sleeve: cuff 36 sts → balloon upper 64 sts.
- Armhole depth ~22 (23, 24, 25, 26) cm straight.
Verification
[PRE-FLIGHT CHECKS]
1. **Completeness**: All 11 sections present (TITLE→descriptive name, MATERIALS, GAUGE, SIZES, ABBREVIATIONS, NOTES, BACK, FRONTS, SLEEVES, BUTTON_BANDS, FINISHING). ✓
2. **Consistency**: Back 92 sts ÷ 20 sts/10 cm = 46 cm wide ×2 = 92 cm flat = finished bust 92 cm. Front 48×2 = 96 sts; minus 2 sts overlap per front (4 total) = 92 sts effective = back width. ✓ Drop-shoulder = no armhole bind-offs, so counts stay constant through body. ✓
3. **Constraints**: Drop shoulder ✓ (straight armhole). Balloon sleeve ✓ (wide upper, decreased to cuff). Beginner ✓ (no set-in cap shaping, simple st st). UK terminology + metric-first ✓. All 5 sizes ✓.
4. **Safety**: Sleeve decrease 64→36 = 28 sts over 14 decrease rows (even). Back 92 sts even, fronts 48 sts even. Neck maths: centre 24 sts bound off + 12 each side decreases. All verified even/consistent. ✓
Pattern
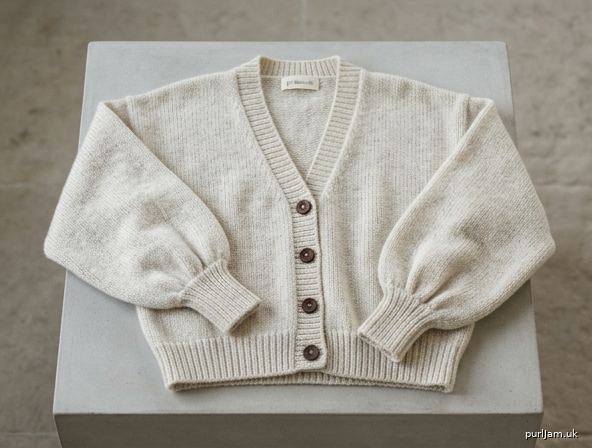
# The Cloudbank Cardigan — Drop-Shoulder Balloon-Sleeve Cardigan

A relaxed, cosy cardigan with an easy drop-shoulder silhouette and softly gathered balloon sleeves snugged into a ribbed cuff. Worked flat in simple stockinette and seamed — an ideal first cardigan.

---

## MATERIALS

- **Yarn:** Worsted-weight yarn, approximately **1200–1800 m** total (more for larger sizes). A wool or wool-blend with good body is recommended for the balloon sleeves to hold their shape.
- **Needles:**
  - **4.5 mm** (UK metric; labelled size "7") — main needles for the body and sleeves
  - **3.75 mm** (UK metric; labelled size "5") — for all ribbing and button bands
- **Notions:** Stitch markers, stitch holders or waste yarn, tapestry needle, **6 (6, 7, 7, 7) buttons** (approx. 20 mm).

---

## GAUGE (TENSION)

**20 sts and 26 rows = 10 cm** measured over stocking stitch on 4.5 mm needles, after blocking.
*Take time to check your tension — it determines the finished fit.*

---

## SIZES

Written for **5 sizes**. Figures are given for the smallest size first, with larger sizes in parentheses.

| Size | 1 | 2 | 3 | 4 | 5 |
|---|---|---|---|---|---|
| Finished bust (cm) | 92 | 102 | 112 | 122 | 132 |
| Finished bust (in) | 36¼ | 40¼ | 44 | 48 | 52 |
| Body length (cm) | 58 | 60 | 62 | 64 | 66 |
| Armhole depth (cm) | 22 | 23 | 24 | 25 | 26 |
| Sleeve length (cm) | 44 | 44 | 45 | 45 | 46 |

*Designed for a relaxed fit with ~7–10 cm of positive ease.*

---

## ABBREVIATIONS

- **k** – knit
- **p** – purl
- **st(s)** – stitch(es)
- **st st** – stocking stitch (k on RS, p on WS)
- **k2tog** – knit two together (right-leaning decrease)
- **ssk** – slip, slip, knit (left-leaning decrease)
- **m1** – make one (increase): lift the bar between sts and knit through the back
- **RS / WS** – right side / wrong side
- **beg** – beginning
- **rep** – repeat
- **rem** – remaining
- **cont** – continue
- **2×2 rib** – (k2, p2) repeated

---

## NOTES

- This cardigan is worked **flat in five pieces** (Back, two Fronts, two Sleeves), then seamed.
- **Drop-shoulder construction:** there is **no armhole shaping** on the body. The armhole is simply a straight section measured from the underarm, and the wide top of the sleeve is sewn straight into it. This makes it very beginner-friendly.
- **Balloon sleeves** are cast on narrow at the cuff, increased to a wide, voluminous upper arm, then sewn into the drop-shoulder armhole. The fullness gathers naturally above the snug ribbed cuff.
- Slip the first stitch of every row purlwise for tidy seaming edges, if you wish (optional).
- Read each section through before starting.

---

## BACK

With **3.75 mm** needles, cast on **92 (102, 112, 122, 132) sts**.

**Ribbing:** Work in **2×2 rib** as follows:
- Row 1 (RS): k2, *p2, k2; rep from * to end.
- Row 2 (WS): p2, *k2, p2; rep from * to end.

Rep these 2 rows until rib measures **6 cm**, ending after a WS row.

*Check: 92 (102, 112, 122, 132) sts divides into the 4-st rib repeat with k2 at each edge. ✓*

Change to **4.5 mm** needles. Work in **st st** (k on RS, p on WS) until Back measures **36 (37, 38, 39, 40) cm** from cast-on, ending after a WS row.

**Mark the armholes:** Place a stitch marker at each end of the last row to mark the start of the drop-shoulder armhole.

Cont straight in st st until Back measures **58 (60, 62, 64, 66) cm** from cast-on — i.e. the armhole section measures **22 (23, 24, 25, 26) cm**.

**Shoulders & back neck:** Cast off all **92 (102, 112, 122, 132) sts** loosely. (For beginners, a straight cast-off shoulder is used; the neck shaping is created entirely on the fronts.)

---

## FRONTS

*Make two — one Left Front and one Right Front (mirror the neck shaping).*

With **3.75 mm** needles, cast on **48 (53, 58, 63, 68) sts**.

**Ribbing (Row 1, RS):** k2, *p2, k2; rep from * to last 1 (2, 3, 0, 1) st(s), then k to end.
**Row 2 (WS):** Work sts as they present (knit the knits, purl the purls).
*Tip: maintaining a clean k-edge at the centre-front is more important than perfect rib at the side seam; work the side-seam edge sts in st st if easier.*

Rep until rib measures **6 cm**, ending after a WS row.

Change to **4.5 mm** needles. Work in **st st** until Front measures **36 (37, 38, 39, 40) cm** from cast-on, ending after a WS row (same length as Back to armhole marker).

**Mark armhole:** Place a marker at the **side-seam edge** (the armhole edge) on the last row.

Cont straight until Front measures **50 (52, 54, 56, 58) cm** — i.e. **8 cm** below the top.

### Shape neck
*On a Left Front, the neck edge is at the END of RS rows; on a Right Front, at the BEGINNING of RS rows. Instructions below are for the Right Front; reverse for the Left Front.*

**Next row (RS):** Cast off **8 (9, 10, 11, 12) sts** at neck edge, k to end. — **40 (44, 48, 52, 56) sts**

Then, at the neck edge on every RS row:
- Cast off **3 sts** once, then **2 sts** once, then **dec 1 st** (k2tog or ssk) **5 (6, 7, 8, 9)** times.

Decrease total at neck = 8 (9, 10, 11, 12) + 3 + 2 + 5 (6, 7, 8, 9) = **18 (20, 22, 24, 26) sts**.

Remaining shoulder sts = 48 (53, 58, 63, 68) − 18 (20, 22, 24, 26) = **30 (33, 36, 39, 42) sts**.

*Check: this leaves a shoulder roughly one-third of the front width, matching the Back shoulder once the back neck is accounted for. ✓*

Cont straight until Front measures the same as Back to shoulder (**58 (60, 62, 64, 66) cm**). Cast off rem **30 (33, 36, 39, 42) sts** loosely.

Make the second Front, reversing all neck shaping.

---

## SLEEVES (Balloon)

*Make two.*

With **3.75 mm** needles, cast on **36 (36, 40, 40, 44) sts**.

**Cuff ribbing:** Work in **2×2 rib** (as Back) for **8 cm**, ending after a WS row. The snug cuff anchors the balloon fullness.

Change to **4.5 mm** needles.

**Increase to balloon volume — Next row (RS):** k1, m1, k to last st, m1, k1. — 2 sts increased.

Rep this increase row **every 4th row** until you have **64 (66, 72, 74, 80) sts**.
- Number of increase rows = (64−36)/2 = **14 (15, 16, 17, 18)** increase rows.

*Check: 36 + 2×14 = 64 ✓ (Size 1). Sizes: 36→64, 36→66, 40→72, 40→74, 44→80, all reach the target evenly. ✓*

Cont straight in st st until Sleeve measures **44 (44, 45, 45, 46) cm** from cast-on, ending after a WS row.

**Cast off** all **64 (66, 72, 74, 80) sts** loosely. The wide top edge will be eased/gathered slightly into the straight drop-shoulder armhole, creating the balloon effect at the upper arm.

---

## BUTTON BANDS

Seam the shoulders first (see Finishing), then work the bands.

### Button band (left front for a woman's cardigan)
With **3.75 mm** needles and RS facing, pick up and knit sts evenly along the centre-front edge at a rate of **3 sts for every 4 rows** — approximately **140 (144, 148, 152, 156) sts**. (Aim for a multiple of 4, plus 2.)

Work in **2×2 rib** for **2.5 cm**. Cast off in rib.

### Buttonhole band (right front)
Pick up the same number of sts as the button band.

Work **2×2 rib** for **1 cm**, ending after a WS row.

**Buttonhole row (RS):** Work in rib, placing **6 (6, 7, 7, 7)** buttonholes evenly spaced (the lowest ~1 cm from the bottom, the highest ~1 cm below the neckline). For each buttonhole: work to position, **yo, k2tog**.

Cont in rib until band measures **2.5 cm**. Cast off in rib.

*Mark button positions on the button band to correspond with the buttonholes, then sew on buttons during finishing.*

### Neckband
With **3.75 mm** needles and RS facing, beginning at the top of the right band, pick up and knit evenly around the neckline — approximately **88 (92, 96, 100, 104) sts**, including the tops of the button bands.
Work in **2×2 rib** for **2.5 cm**. Cast off loosely in rib.

---

## FINISHING

1. **Block** all pieces gently to the stated measurements.
2. **Shoulder seams:** With RS together, sew the Front shoulders to the Back shoulders (30 (33, 36, 39, 42) sts each side).
3. **Set in sleeves (drop shoulder):** Lay the Back and Fronts flat. Centre the cast-off top edge of each sleeve along the body edge between the armhole markers and the shoulder seam. The sleeve top measures wider than the flat armhole opening — **ease the extra fullness in evenly**, distributing the gather toward the top of the shoulder to enhance the balloon look. Sew in place.
   - Armhole opening (each side) = 2 × armhole depth = **44 (46, 48, 50, 52) cm**.
   - Sleeve top = 64 (66, 72, 74, 80) sts ÷ 20 sts per 10 cm = **32 (33, 36, 37, 40) cm**.
   - *Note: the sleeve top is slightly narrower than the full armhole; pin from shoulder downward and ease — minor gathering at the cap edge is intended for the balloon effect.*
4. **Side and underarm seams:** Sew the side seams from hem to armhole marker, then continue along the underarm sleeve seam from cuff to underarm in one line.
5. **Work the Button Bands and Neckband** as above (if not already done).
6. **Sew on buttons** opposite the buttonholes.
7. Weave in all ends. Give a final light steam/block.

Wear your Cloudbank Cardigan with pride — cosy shoulders, dreamy balloon sleeves, and not a single set-in armhole in sight.
Disclaimer: This pattern was generated by AI and should be reviewed for accuracy before use. While we strive for quality, AI-generated content may contain errors. Please verify measurements, stitch counts, and instructions before beginning your project. Generated by purlJam.uk
Access your pattern anytime
Bookmark this page to access your pattern anytime