Type
Crochet
Difficulty
beginner
Category
blanket
AI Thinking Process
Planning
Verification
Pattern
MODA 2027 — Terra Lumen Granny Square Blanket
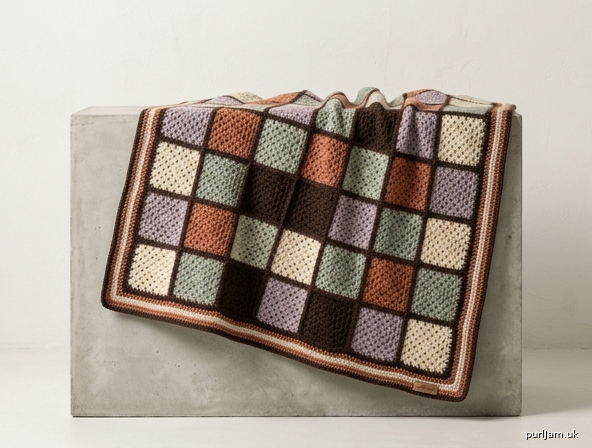
A fashion throw for 2027: mineral earth, one whisper of lilac, and the classic granny square.
Skill level: Beginner
Construction: Individual granny squares, joined, then bordered
Terminology: US crochet terms throughout
Fashion notes
Terra Lumen is a sofa-scale throw in the 2027 “warm mineral” mood — sunbaked clay, eucalyptus, bitter chocolate, and oat milk, with wisteria haze as the single fashion accent. Squares are color-blocked in five set recipes (not leftover-scrappy) so the surface reads like tiled stone. A dark chocolate “grout” join and a framed border keep the look editorial.
Drape over a low sofa or the foot of a bed. The 46" × 56" (117 × 142 cm) size is a generous lap / TV throw, not a bedspread.
Finished measurements
| Imperial | Metric | |
|---|---|---|
| One blocked square | 5" × 5" | 12.5 × 12.5 cm |
| Joined field (8 × 10 squares) | 40" × 50" | 101.5 × 127 cm |
| Border depth | 3" | 7.5 cm |
| Finished blanket | 46" × 56" | 117 × 142 cm |
Materials
Yarn: Worsted weight / medium (4). Wool, wool-blend, or a soft premium acrylic with similar gauge.
Typical put-up used for quantities below: 220 yd / 201 m per skein.
| Color | Name (2027 palette) | Yards (meters) | Skeins (220 yd) |
|---|---|---|---|
| A | Oat Milk (warm cream) | 1,100 yd (1,006 m) | 5 |
| B | Sunbaked Clay (terracotta) | 750 yd (686 m) | 4 |
| C | Eucalyptus Mist (dusted sage) | 480 yd (439 m) | 3 |
| D | Bitter Chocolate (deep espresso) | 520 yd (475 m) | 3 |
| E | Wisteria Haze (muted lilac) | 180 yd (165 m) | 1 |
Buy an extra skein of A if your gauge runs large or you add a wider border.
Hook: US H-8 / 5 mm (or size needed to obtain gauge)
Notions: Yarn needle, scissors, 4 stitch markers, blocking mats and pins (or a blocking board with a 5" grid), tape measure.
Gauge
Work a 4-round granny square in the pattern below and block it.
- Blocked square = 5" × 5" (12.5 × 12.5 cm).
- Supporting dc gauge: 13 dc × 7 dc rows = 4" × 4" (10 × 10 cm).
If your unblocked square is smaller than 4¾" (12 cm), go up to US I-9 / 5.5 mm. If it is larger than 5¼" (13.5 cm), go down to US G-6 / 4 mm. All 80 squares must be the same size after blocking.
Abbreviations (US)
| Abbr. | Meaning |
|---|---|
| beg | beginning |
| ch | chain |
| dc | double crochet |
| hdc | half double crochet |
| rep | repeat |
| rnd | round |
| RS | right side |
| sc | single crochet |
| sk | skip |
| sl st | slip stitch |
| sp(s) | space(s) |
| st(s) | stitch(es) |
| WS | wrong side |
| yo | yarn over |
Special stitch — granny cluster: 3 dc in the same space.
Pattern notes
- Squares are worked in the round, RS always facing. Do not turn.
- Ch 3 at the start of a round counts as 1 dc.
- Classic granny spacing: ch 2 at corners, ch 1 between side clusters. Do not skip the ch-1 — missing it is the usual reason a beginner square comes out small.
- Fasten off at every color change. Leave 6" (15 cm) tails and weave them in before you start the next square.
- Color changes happen at the join: finish the last sl st of the round with the new color, or fasten off and join the new color in any corner ch-2 sp.
- Blocking is not optional. Pin every square to 5" × 5" (12.5 × 12.5 cm) and let it dry fully.
- Stitch counts are given at the end of each round. Treat a mismatch as a stop-and-fix moment.
Granny square (make 80)
All five color recipes use this same 4-round square.
Begin with the Round 1 color.
Foundation (choose one):
- Chain ring (easier): Ch 4, sl st in first ch to form a ring.
- Magic ring (cleaner center): Make a magic ring.
Rnd 1: Ch 3 (counts as dc here and throughout), 2 dc in ring, ch 2, [3 dc in ring, ch 2] 3 times, sl st in top of beg ch-3 to join. Fasten off if changing color.
Counts: 4 clusters, 12 dc, 4 ch-2 sps. (4 × 3 = 12 dc ✓)
Rnd 2: Join next color in any ch-2 sp (or continue). Ch 3, (2 dc, ch 2, 3 dc) in same sp (first corner), ch 1, *(3 dc, ch 2, 3 dc) in next ch-2 sp, ch 1; rep from * 2 more times, sl st in top of beg ch-3. Fasten off if changing color.
Counts: 8 clusters, 24 dc, 4 ch-2 corners, 4 ch-1 sps. (8 × 3 = 24 dc ✓)
Rnd 3: Join next color in any ch-2 sp. Ch 3, (2 dc, ch 2, 3 dc) in same sp, ch 1, 3 dc in next ch-1 sp, ch 1, *(3 dc, ch 2, 3 dc) in next ch-2 sp, ch 1, 3 dc in next ch-1 sp, ch 1; rep from * 2 more times, sl st in top of beg ch-3. Fasten off if changing color.
Counts: 12 clusters, 36 dc. (12 × 3 = 36 dc ✓)
Per side: 1 side cluster between 2 corners.
Rnd 4: Join next color in any ch-2 sp. Ch 3, (2 dc, ch 2, 3 dc) in same sp, ch 1, [3 dc in next ch-1 sp, ch 1] twice, *(3 dc, ch 2, 3 dc) in next ch-2 sp, ch 1, [3 dc in next ch-1 sp, ch 1] twice; rep from * 2 more times, sl st in top of beg ch-3. Fasten off, leaving a 6" (15 cm) tail if you will whip-stitch, or a longer tail if you prefer to sew with the square’s own Round 4 color.
Counts: 16 clusters, 48 dc. (16 × 3 = 48 dc ✓)
Per side, from corner sp to corner sp: 4 clusters (12 dc) and 3 ch-1 sps.
Weave in all ends. Block to 5" × 5" (12.5 × 12.5 cm).
Color recipes — make 16 of each type
Each square uses four rounds, one color per round. Do not carry yarn up.
| Type | Rnd 1 | Rnd 2 | Rnd 3 | Rnd 4 | Make |
|---|---|---|---|---|---|
| 1 | D Bitter Chocolate | B Sunbaked Clay | C Eucalyptus Mist | A Oat Milk | 16 |
| 2 | B Sunbaked Clay | A Oat Milk | D Bitter Chocolate | C Eucalyptus Mist | 16 |
| 3 | C Eucalyptus Mist | D Bitter Chocolate | A Oat Milk | B Sunbaked Clay | 16 |
| 4 | E Wisteria Haze | A Oat Milk | B Sunbaked Clay | D Bitter Chocolate | 16 |
| 5 | A Oat Milk | E Wisteria Haze | C Eucalyptus Mist | B Sunbaked Clay | 16 |
Total: 16 × 5 = 80 squares ✓
Fashion layout diagram
Hold squares RS up. Row 1 is the bottom edge of the blanket (the edge that hangs toward the floor on a sofa). Work left to right.
Numbers are square types (1–5).
Row 10 (top):    3  1  4  2  5  3  1  4
Row  9:          4  2  5  3  1  4  2  5
Row  8:          2  5  3  1  4  2  5  3
Row  7:          5  3  1  4  2  5  3  1
Row  6:          1  4  2  5  3  1  4  2
Row  5:          3  1  4  2  5  3  1  4
Row  4:          4  2  5  3  1  4  2  5
Row  3:          2  5  3  1  4  2  5  3
Row  2:          5  3  1  4  2  5  3  1
Row  1 (bottom): 1  4  2  5  3  1  4  2
                 ↑                    ↑
              left                  right
Check before joining: each type appears 16 times. The 8 × 10 grid is 80 squares. (8 × 10 = 80 ✓)
Joining
Join with Color D (Bitter Chocolate) for a 2027 “stone tile + grout” line. Two methods are given. Use one.
Method A — Whip stitch (recommended for beginners)
- Arrange Row 1 in order, RS up.
- Take the first two squares. Hold them WS together (RS facing out), lining up clusters and ch-sps.
- With D and a yarn needle, whip stitch through the back loops only of matching stitches, from one corner ch-2 to the other:
- 1 stitch in the corner ch-2,
- 1 stitch in each dc,
- 1 stitch in each ch-1. Per join: 12 dc + 3 ch-1 + 2 corner contributions ≈ 17–19 stitches. Keep the tension firm but not cinched.
- Continue across Row 1 until you have a strip of 8 squares. Make 10 strips (Rows 1–10).
- Whip-stitch the strips together along the long edges, matching square seams so the grid stays square. Pin the seams first if the strips want to drift.
Joined field measures 40" × 50" (101.5 × 127 cm) after a light steam. (8 × 5" = 40"; 10 × 5" = 50" ✓)
Method B — Join-as-you-go (JAYG)
Make the first square of Row 1 through Round 4 as written.
For every later square, work Rnds 1–3 as written. On Rnd 4, join to the neighboring square(s) on the side(s) that touch:
- Work clusters as usual.
- Side join (replace a ch-1): ch 1 is replaced by sl st into the matching ch-1 sp of the finished square.
- Corner join (replace a ch-2): ch 2 is replaced by ch 1, sl st into the matching corner ch-2 sp of the finished square, ch 1.
- When a square joins on two sides (interior squares), work the first joining side, then the shared corner into both adjacent corner sps (sl st into first corner, sl st into second corner), then the second joining side.
Join order: complete Row 1 left to right, then add Row 2 left to right (each new square joins to the square on its left and the square below), and so on.
Border
Work with RS facing. Do not turn between rounds. Join each new color in any stitch; for color changes, fasten off at the end of the round.
Corner rule (all rounds after Rnd 1): place a marker in the center stitch of each 3-st corner group. On the next round, work 3 stitches in that marked stitch, then move the marker up to the new center stitch.
Rnd 1 (A — sc foundation): Join A in any blanket-corner ch-2 sp.
Ch 1, 3 sc in the same corner sp, then along each edge:
- 1 sc in each dc and 1 sc in each ch-1 sp of every square side (15 sc per square: 12 dc + 3 ch-1 = 15 ✓),
- 1 sc in each square-to-square join.
At each of the remaining 3 blanket corners: 3 sc in the corner ch-2 sp. Sl st in first sc to join.
Counts:
- Each short edge between corner groups: 8 × 15 + 7 joins = 127 sc ✓
- Each long edge between corner groups: 10 × 15 + 9 joins = 159 sc ✓
- 4 corners × 3 sc = 12
- Total: 12 + 2×127 + 2×159 = 12 + 254 + 318 = 584 sc ✓
Mark the center sc of each 3-sc corner.
Rnd 2 (D — chocolate frame): Ch 3 (counts as dc), dc in each sc around, working 3 dc in each marked corner sc. Sl st in top of beg ch-3. Fasten off D.
Count: 584 − 4 corner centers + 12 corner dc = 592 dc ✓ (net +8)
Rnd 3 (A): With A, ch 3, dc in each dc around, 3 dc in each marked corner dc. Join.
Count: 592 + 8 = 600 dc ✓
Rnd 4 (B — clay frame): With B, same as Rnd 3.
Count: 600 + 8 = 608 dc ✓
Rnd 5 (A): With A, same as Rnd 3.
Count: 608 + 8 = 616 dc ✓
Rnd 6 (A — finish): Ch 1, sc in each dc around, working 3 sc in each marked corner dc. Join with sl st to first sc. Fasten off.
Count: 616 − 4 + 12 = 624 sc ✓
Border depth is about 3" (7.5 cm). Finished blanket: 40" + 6" = 46" wide; 50" + 6" = 56" long ✓
Finishing
- Weave in every remaining tail on the WS. On the border, weave along the WS of the same-color round for at least 2" (5 cm).
- Block the finished blanket: wet-block or steam-block. Pin to 46" × 56" (117 × 142 cm), squaring the corners. Let dry completely.
- Optional: a light steam on the RS (hover the iron; do not crush acrylic) to settle the grout lines.
Schematic
        46" (117 cm)
   <-------------------->
   +--------------------+  ^
   |      BORDER 3"     |  |
   |   +------------+   |  |
   |   |  8 squares |   |  56" (142 cm)
   |   |    wide    |   |  |
   |   |  10 squares|   |  |
   |   |    long    |   |  |
   |   |  40" × 50" |   |  |
   |   +------------+   |  |
   |                    |  |
   +--------------------+  v
Each interior cell is a 5" (12.5 cm) granny square.
Care
Follow the ball-band of your yarn. For most wool-blends: hand wash cool, roll in a towel, dry flat. For acrylic: machine wash gentle, tumble low or dry flat. Re-block if the corners soften after washing.
End of pattern. © Terra Lumen 2027 — for personal use.
Disclaimer: This pattern was generated by AI and should be reviewed for accuracy before use. While we strive for quality, AI-generated content may contain errors. Please verify measurements, stitch counts, charts, and instructions before beginning your project. Generated by purlJam.uk
Love this pattern?
Save this pattern to your free PurlJam libraryAccess your pattern anytime
Bookmark this page to access your pattern anytime