Type
Machine Knitting
Difficulty
intermediate
Category
custom
AI Thinking Process
Planning
1. **Design Strategy**: A Montreal Canadiens blanket requires the iconic team colors (red, white, and blue) and ideally the "CH" logo. For a beginner pattern, I'll create a striped design with intarsia or duplicate stitch option for the logo. The blanket will be approximately 40" × 50" (lap/throw size), worked in flat panels on the main bed only. I'll use a simple stockinette base with color stripes to evoke the team's jersey design.
2. **Construction Plan**: The blanket will be worked as a single flat panel, knit from bottom to top. Using worsted weight yarn at approximately T7-8 tension for a soft, drapey fabric. Stripes will be worked in the traditional Canadiens colors with specific row counts. The logo can be added via duplicate stitch after knitting for beginner-friendliness. Cast on with waste yarn and ravel cord for a clean edge that can be finished with crochet or hemming.
3. **Quality Assurance**: Key considerations include:
- Even tension across color changes
- Proper weighting to prevent carriage jamming
- Consistent stripe pattern that's easy to follow
- Logo placement centered and proportional
- Edge finishing that won't curl excessively
- Clear RC checkpoints every major section
4. **Final Calculations**:
- Gauge: 18 sts × 25 rows = 4" (10cm) at T7
- Width: 40" × 4.5 sts/inch = 180 sts
- Length: 50" × 6.25 rows/inch = 312 rows (rounded to 310 for pattern symmetry)
- Stripe repeat calculated to distribute colors evenly
Verification
[PRE-FLIGHT CHECKS]
1. **Completeness**: Pattern includes title, materials, gauge, abbreviations, notes, complete instructions with RC checkpoints, finishing, and logo chart.
2. **Consistency**: 180 sts × 310 rows at 18 sts/25 rows per 4" = 40" × 49.6" (≈50") ✓
3. **Constraints**: Beginner-friendly with no complex shaping, clear color change instructions, optional logo application method.
4. **Safety**: All RC values sequential and verified, stripe pattern totals 310 rows, stitch count remains constant throughout.
Pattern
<pattern>
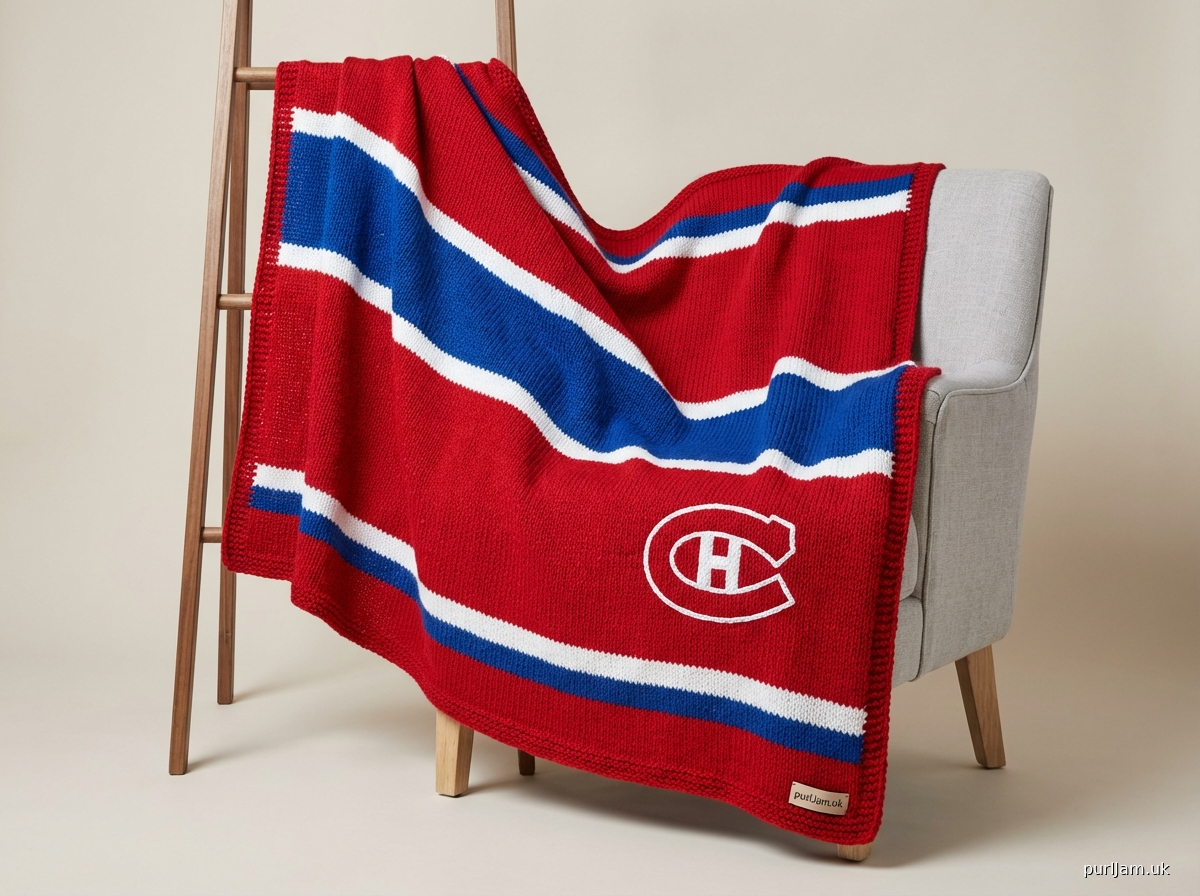
# MONTREAL CANADIENS TRIBUTE BLANKET
A classic lap blanket celebrating the iconic Montreal Canadiens hockey team. This beginner-friendly pattern features bold stripes in the team's signature red, white, and blue colors, with an optional "CH" logo that can be added after knitting using duplicate stitch. Perfect for game day, home décor, or gifting to a Habs fan!
**Finished Measurements**: 40" wide × 50" long (102cm × 127cm)
---
## MATERIALS
**Yarn**: Worsted weight (#4) acrylic or acrylic-blend yarn
- **Color A (Red)**: 850 yards (777m)
- **Color B (White)**: 450 yards (411m)
- **Color C (Royal Blue)**: 300 yards (274m)
*Recommended*: Red Heart Super Saver or similar hard-wearing worsted yarn
**Machine**: Standard gauge (4.5mm) knitting machine
- Compatible with: Brother/KnitKing, Silver Reed/Studio, Toyota punchcard or electronic machines
- Main bed only (no ribber required)
**Notions**:
- Waste yarn (contrast color, same weight)
- Ravel cord (smooth cord or thin yarn)
- Cast-on comb and weights (or multiple claw weights)
- Tapestry needle for weaving ends
- Stitch markers (optional, for logo placement)
- Latch tool or crochet hook for finishing edges
---
## GAUGE
**Tension Dial**: T7 (adjust up or down based on your machine and desired drape)
**Resulting Gauge**: 18 stitches × 25 rows = 4" × 4" (10cm × 10cm) in stockinette stitch
**IMPORTANT**: Swatch before beginning. Blankets need consistent tension. If your gauge differs, recalculate stitch/row counts or adjust tension dial.
---
## ABBREVIATIONS & MACHINE TERMS
- **RC**: Row Counter
- **COL**: Carriage on Left
- **COR**: Carriage on Right
- **T**: Tension dial setting
- **C/A, C/B, C/C**: Color A, B, or C threaded in carriage
- **WY**: Waste yarn
- **HP**: Hold Position (hold lever engaged, needles won't knit)
- **WP**: Working Position (needles in work, knitting every pass)
- **sts**: stitches
- **L/R**: Left/Right (viewing from front of machine)
---
## PATTERN NOTES
1. **Stripe Pattern**: Stripes are worked in stockinette. When changing colors, always leave 6-8" tail for weaving in. Carry unused yarns up the side (not across the work) or cut and rejoin as preferred.
2. **Color Changes**: Change color with carriage on either side. Thread new color, knit 2 rows with both yarns held together (or simply start new color). The first row may be slightly visible on the back—this is normal.
3. **Weighting**: This is a wide piece. Use cast-on comb with 4-6 evenly spaced weights initially, adding claw weights every 30-40 rows down the sides. Proper weighting prevents carriage jamming and uneven stitches.
4. **Logo Application**: The "CH" logo chart is provided for duplicate stitch embroidery after knitting. Center it approximately 100 rows from top edge. Alternatively, advanced knitters may use intarsia or Fair Isle (instructions not included in this beginner pattern).
5. **Row Counter**: Reset RC to 000 after waste yarn and ravel cord. Every instruction includes RC checkpoints.
6. **Edge Finishing**: The side edges will curl slightly (stockinette curl). Block firmly or add a simple single crochet border after binding off.
---
## INSTRUCTIONS
### SETUP & CAST-ON
1. **Machine Setup**:
- Main bed only, no ribber.
- Set carriage to knit (no slip, tuck, or hold engaged).
- Tension dial: T7 for main knitting (test on your machine).
- Thread carriage with WY (waste yarn).
2. **Bring Needles to Work**:
- From center 0, count 90 needles to the left and 90 needles to the right.
- Total needles in WP: **180 sts** (needle -90 to needle +90).
3. **Waste Yarn Cast-On**:
- With WY threaded at T10 (loose), knit 8-10 rows.
- Hang cast-on comb evenly across all 180 sts.
- Attach 4-6 weights distributed along comb (approximately 1 weight per 30-40 sts).
- **RC 000** (reset counter after waste yarn).
4. **Ravel Cord**:
- Lay a smooth ravel cord across the needle hooks (do not hang it, just rest it lightly).
- Knit 1 row at T10. The cord will be caught in the loops.
- This creates a reference line for easy waste yarn removal later.
5. **Begin Main Knitting**:
- Remove WY from carriage, thread **Color C (Royal Blue)**.
- Set tension dial to **T7**.
- Knit 2 rows at T7 to establish tension. The knitting will start to hang below the comb.
- **RC reads 002**, carriage at Right (COR).
---
### BODY OF BLANKET – STRIPE PATTERN
**Stripe Sequence** (Total 310 rows):
The blanket is divided into stripes that evoke the Canadiens' jersey. Adjust stripe widths to personal preference, but maintain the total row count for a 50" length.
**Starting Position**: RC 002, COR, **Color C (Blue)** threaded.
---
#### SECTION 1: Blue Stripe (Foundation)
- **RC 002–032**: Knit 30 rows with **C/C (Blue)** at T7.
- At RC 032, COR.
*Add claw weights to the sides of the knitting around RC 030 if fabric is not hanging evenly.*
---
#### SECTION 2: White Stripe
- **RC 032**: Change to **C/B (White)**.
- Leave 6-8" tail of Blue, thread White. Knit 2 rows holding both yarns or simply begin with White.
- **RC 032–062**: Knit 30 rows with **C/B (White)** at T7.
- At RC 062, COR.
---
#### SECTION 3: Red Stripe (Main Color)
- **RC 062**: Change to **C/A (Red)**.
- **RC 062–152**: Knit 90 rows with **C/A (Red)** at T7.
- At RC 152, COR.
*This wide red section is the main body, mimicking the dominant red of the Canadiens jersey. Check weights and tension regularly.*
---
#### SECTION 4: White Stripe
- **RC 152**: Change to **C/B (White)**.
- **RC 152–162**: Knit 10 rows with **C/B (White)** at T7.
- At RC 162, COR.
---
#### SECTION 5: Blue Stripe (Accent)
- **RC 162**: Change to **C/C (Blue)**.
- **RC 162–172**: Knit 10 rows with **C/C (Blue)** at T7.
- At RC 172, COR.
---
#### SECTION 6: White Stripe
- **RC 172**: Change to **C/B (White)**.
- **RC 172–182**: Knit 10 rows with **C/B (White)** at T7.
- At RC 182, COR.
---
#### SECTION 7: Red Stripe (Main Color)
- **RC 182**: Change to **C/A (Red)**.
- **RC 182–272**: Knit 90 rows with **C/A (Red)** at T7.
- At RC 272, COR.
*Second wide red section. This is a good time to add additional claw weights if the fabric has lengthened significantly.*
---
#### SECTION 8: White Stripe
- **RC 272**: Change to **C/B (White)**.
- **RC 272–302**: Knit 30 rows with **C/B (White)** at T7.
- At RC 302, COR.
---
#### SECTION 9: Blue Stripe (Top)
- **RC 302**: Change to **C/C (Blue)**.
- **RC 302–312**: Knit 10 rows with **C/C (Blue)** at T7.
- At RC 312, COR.
**Total Rows Knit: 310** (RC 002–312)
---
### BIND-OFF
1. **Latch Tool Chain Bind-Off** (Beginner-Friendly):
- With carriage at Right (COR), remove carriage from bed.
- Using a latch tool, start at the right edge:
- Remove first needle from work, hold loop on latch tool.
- Remove next needle, pull second loop through first loop.
- Continue across all 180 sts, chaining each stitch through the previous.
- Pull final loop tight, thread tail through and secure.
2. **Alternative: Crochet Bind-Off**:
- Use a crochet hook to chain bind-off across all stitches.
3. **Remove from Machine**:
- Gently pull knitting downward to remove from needles if any remain.
- The waste yarn and ravel cord remain at the cast-on edge.
---
### FINISHING
1. **Remove Waste Yarn**:
- At cast-on edge, locate the ravel cord.
- Gently pull the cord out, releasing the waste yarn row.
- Carefully unravel the waste yarn rows, leaving live stitches on the first main-color row.
- Using tapestry needle and matching Blue yarn, thread through the live stitches and pull snug to close edge, OR use latch tool to bind off this edge as well.
2. **Weave in Ends**:
- Thread all yarn tails (color changes, cast-on, bind-off) onto a tapestry needle.
- Weave vertically or horizontally into the back of the fabric for 2-3" to secure.
- Trim excess.
3. **Blocking**:
- Lay blanket flat on a clean surface or blocking mat.
- Lightly steam with iron on wool setting (hover 1-2" above fabric, do not press directly on acrylic).
- Or pin to dimensions (40" × 50") and spritz with water, allow to dry.
- Blocking will relax the fabric and reduce edge curling.
4. **Optional Edging**:
- To reduce stockinette curl, work 1 round of single crochet around all four edges using a crochet hook and any color yarn.
- This frames the blanket and stabilizes edges.
5. **Add Logo (Optional)**:
- See Logo Chart below.
- Using White yarn and tapestry needle, duplicate stitch the "CH" logo onto one of the large Red sections.
- Center the logo approximately 100 rows from the top edge (in Section 7).
- Logo measures approximately 30 sts wide × 38 rows tall.
---
## MONTREAL CANADIENS "CH" LOGO CHART (Duplicate Stitch)
**Instructions for Duplicate Stitch**:
Duplicate stitch is embroidery that mimics the path of a knit stitch. Thread a tapestry needle with White yarn. Working on the front (knit) side of the Red section, follow the chart below, covering each Red stitch indicated with a White duplicate stitch.
**Chart Key**:
- **□** = Background (Red), no embroidery
- **■** = Duplicate stitch with White yarn
**Logo Dimensions**: 30 sts wide × 38 rows tall
**Placement**: Center the logo horizontally (start at stitch 75 from the right edge, or 15 sts in from center) and vertically in the lower Red section (Section 7, approximately RC 220–258).
```
□□□□□□□□□□□□□□□□□□□□□□□□□□□□□□
□□□□□■■■■■■■■■■■■■■■■■■■□□□□□
□□□■■■■■■■■■■■■■■■■■■■■■■■□□□
□□■■■■■■■■■■■■■■■■■■■■■■■■■□□
□■■■■■□□□□□□□□□□□□□□□■■■■■■□
□■■■■□□□□□□□□□□□□□□□□□■■■■■□
□■■■□□□□□□□□□□□□□□□□□□□■■■■□
□■■■□□□□■■■■■■■■■■□□□□□■■■■□
□■■□□□□■■■■■■■■■■■■□□□□□■■■□
□■■□□□■■■■■■■■■■■■■■□□□□■■■□
□■■□□■■■■■□□□□□■■■■■□□□□■■■□
□■■□□■■■■□□□□□□□■■■■□□□□■■■□
□■■□□■■■□□□□□□□□□■■■□□□□■■■□
□■■□□■■■□□□□□□□□□■■■□□□□■■■□
□■■□□■■■□□□□□□□□□■■■□□□□■■■□
□■■□□■■■□□□□□□□□□■■■□□□□■■■□
□
Disclaimer: This pattern was generated by AI and should be reviewed for accuracy before use. While we strive for quality, AI-generated content may contain errors. Please verify measurements, stitch counts, and instructions before beginning your project. Generated by purlJam.uk
Access your pattern anytime
Bookmark this page to access your pattern anytime