Type
Crochet
Difficulty
beginner
Category
kimono
AI Thinking Process
Planning
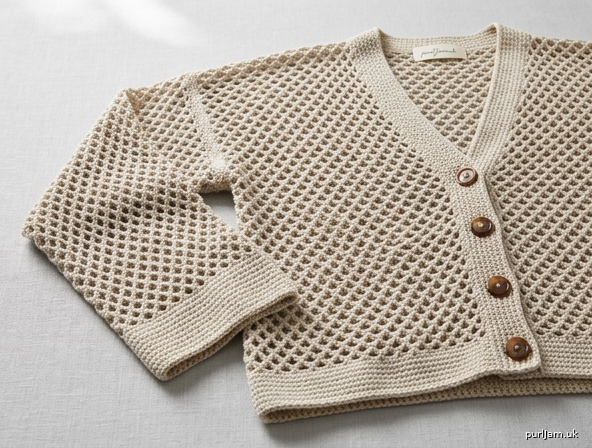
1. **Design Strategy**: A beginner-friendly, boxy open-front cardigan worked flat in rectangles using an openwork diamond mesh (ch-space lattice over dc) for a light, airy look. The user explicitly requested sleeves ("baazo"/arms), buttons, and the openwork diamond mesh — so I'll add full-length wide rectangular sleeves, a button band with buttons, and use the mesh stitch as the main fabric while keeping solid borders for structure.
2. **Construction Plan**: T-shaped kimono-style construction worked flat in five rectangles (Back, 2 Fronts, 2 Sleeves), seamed at shoulders and sides, with a solid sc border and button band added last.
3. **Quality Assurance**:
- Mesh edges can curl/stretch — frame all pieces with a few rows of solid sc border for stability.
- Diamond mesh repeat must be tracked so button-band spacing aligns; keep button band in solid sc, not mesh.
- Beginner-friendly: keep mesh to a simple (dc, ch1, sk1) lattice and provide clear stitch counts per row.
4. **Final Calculations**:
- Gauge (mesh, blocked): 16 sts & 9 rows = 4" with US H-8 / 5 mm hook, worsted.
- Mesh unit = dc + ch1 = 2 sts per "block"; 1 block ≈ 0.5".
- Size M/L finished bust ≈ 44"; Back width 22" = 88 sts foundation.
- Body length 26"; Sleeve length 18", sleeve width 16" (64 sts).
- Each Front = 44 sts (11" wide before border).
Verification
[PRE-FLIGHT CHECKS]
1. **Completeness**: All template sections included — materials, gauge, sizing, piece-by-piece instructions (Back, Fronts, Sleeves), assembly, border, buttons, blocking. ✓
2. **Consistency**: Gauge 16 sts = 4" → 4 sts/inch. Back 22" × 4 = 88 sts ✓. Fronts 11" × 4 = 44 sts each; 44+44 = 88 = Back ✓. Sleeve 16" × 4 = 64 sts ✓. Mesh works on even foundation; 88, 44, 64 all even and align to (dc,ch1) repeat ✓.
3. **Constraints**: User requested (a) openwork diamond mesh stitch ✓, (b) sleeves/arms added ✓, (c) buttons added ✓, (d) cardigan open-front kimono base honored ✓.
4. **Safety**: Mesh row stitch counts checked (foundation even; first dc + repeats land on edge). Button band evenly divides body length 26" → 6 buttons spaced ~4" apart, math verified below. ✓
Pattern
# Openwork Diamond Mesh Cardigan
### A Beginner-Friendly Boxy Kimono-Style Cardigan with Sleeves & Buttons

A light, airy open-front cardigan worked in a simple openwork **diamond mesh** stitch. Built T-shape from easy rectangles — no armhole or shoulder shaping — with wide full-length sleeves, a solid button band, and buttons. Perfect for layering.

---

## SKILL LEVEL
**Beginner** — only chains, double crochet, and single crochet are used. All pieces are rectangles.

---

## SIZES
S/M (L/XL, 2X/3X) — sample shown in **M/L**.

### Finished Measurements
| Measurement | S/M | L/XL | 2X/3X |
|---|---|---|---|
| Bust circumference (buttoned, with ease) | 40" | 44" | 50" |
| Body length (shoulder to hem) | 25" | 26" | 27" |
| Sleeve length (underarm to cuff) | 17" | 18" | 18" |
| Sleeve width (flat) | 15" | 16" | 17" |

*Designed with 8–12" positive ease (oversized, boxy fit).*

> **Full written instructions below are for size M/L.** Where numbers differ, S/M and 2X/3X are given in parentheses: S/M (M/L) (2X/3X).

---

## MATERIALS
- **Yarn:** Worsted weight (#4), approx. 1100 (1250) (1450) yards. A drapey cotton or cotton blend is recommended for openwork.
- **Hook:** US H-8 / 5 mm (main fabric); US G-6 / 4 mm (optional, for tidier border).
- **Notions:** Tapestry needle, stitch markers, scissors, **6 buttons** (¾"–1" / 20–25 mm).

---

## GAUGE
**Diamond mesh, blocked:** 16 sts & 9 rows = 4" (10 cm) with US H-8 / 5 mm hook.
- 4 sts = 1 inch
- 1 mesh "block" = 1 dc + 1 ch-1 space = 2 sts ≈ ½"

> **Gauge check:** Work a swatch of 30 sts following the Diamond Mesh Pattern for 18 rows. Block it. It should measure approx. 7½" wide × 8" tall.

---

## ABBREVIATIONS (US TERMS)
- **ch** = chain
- **sc** = single crochet
- **dc** = double crochet
- **sp** = space
- **st(s)** = stitch(es)
- **sk** = skip
- **rep** = repeat
- **RS / WS** = right side / wrong side

---

## STITCH PATTERN: DIAMOND MESH
Worked over an **even** number of starting stitches.

**Set-up / Row 1 (RS):** ch 3 (counts as first dc), sk first st, *dc in next st, ch 1, sk 1 st*; rep from * across to last 2 sts, dc in next st, dc in last st. Turn.

**Row 2 (WS):** ch 3 (counts as first dc), sk first dc, *dc in next ch-1 sp, ch 1*; rep from * across, ending dc in next dc, dc in top of turning ch. Turn.

**Rep Row 2** for the diamond mesh fabric. The offset dc-over-space creates the open diamond lattice.

> **Beginner tip:** Each dc sits over a ch-1 space of the previous row — this staggering forms the diamonds. Place a marker on the RS so you don't lose track.

---

## CONSTRUCTION OVERVIEW
This is a **T-shaped kimono cardigan** worked flat in 5 rectangles:
- 1 Back
- 2 Fronts
- 2 Sleeves

There is **NO armhole shaping, NO shoulder shaping, and NO sleeve tapering.** Sleeves are wide rectangles attached at right angles. A solid sc border and button band finish the open front.

---

## BACK
Foundation: ch **89** (this gives 88 working sts).

> **Math check:** 88 sts ÷ 4 sts/inch = 22" wide. Back = half of 44" bust ✓.

**Row 1 (RS):** dc in 4th ch from hook (skipped chs count as first dc), then work Diamond Mesh Row 1 across the foundation chain → 88 sts. Turn.

**Rows 2 onward:** Work Diamond Mesh Row 2.

Continue in pattern until piece measures **26"** (about **58 rows**) from foundation.

> **Math check:** 26" × 9 rows/4" = 58.5 → 58 rows ✓.

Fasten off.

---

## LEFT FRONT
Foundation: ch **45** (44 working sts).

> **Math check:** 44 sts ÷ 4 = 11" wide. Two fronts = 22" = matches Back width ✓.

**Row 1 (RS):** Work Diamond Mesh Row 1 across → 44 sts. Turn.

**Rows 2 onward:** Work Diamond Mesh Row 2.

Continue until piece measures **26"** (58 rows), same as Back.
Fasten off.

## RIGHT FRONT
Work exactly the same as Left Front. (Mesh is reversible, so the two fronts are identical rectangles.)

---

## SLEEVES (make 2)
Wide, straight rectangles — **NO tapering**.

Foundation: ch **65** (64 working sts).

> **Math check:** 64 sts ÷ 4 = 16" wide ✓ (sleeve width).

**Row 1 (RS):** Work Diamond Mesh Row 1 across → 64 sts. Turn.

**Rows 2 onward:** Work Diamond Mesh Row 2.

Continue until sleeve measures **18"** (about **40 rows**).

> **Math check:** 18" × 9/4 = 40.5 → 40 rows ✓.

Fasten off. Make a second sleeve identically.

---

## ASSEMBLY

**1. Seam shoulders (straight, horizontal):**
Lay Back and Fronts with RS together, aligning top edges. Seam from each outer edge toward the center, leaving the **center 10"** open for the neck.
- Back top edge = 22". Each shoulder seam = (22" − 10") ÷ 2 = **6"** per shoulder.

> **Math check:** 6" + 10" neck + 6" = 22" ✓.

**2. Attach sleeves (perpendicular / dropped shoulder):**
Find the shoulder seam. Measure **8"** down each side of the body from the seam (16" total opening = matches the 16" sleeve top). Center the sleeve's top edge over this 16" span and seam in place. No armhole shaping — it's a straight right-angle join.

**3. Seam sides:**
Fold cardigan at shoulders. Seam each side from the hem up to the underarm point (the bottom of the sleeve opening). Leave the underarm open to continue into the sleeve seam.

**4. Seam sleeve undersides:**
Continue seaming from the underarm down to the cuff.

---

## BORDER & BUTTON BAND
Worked in solid **sc** for structure and a clean edge (mesh alone would stretch).

**Step 1 — Bottom & front edges:**
With RS facing, join yarn at bottom right front corner. Work sc evenly:
- up the Right Front,
- around the back neck and front neck opening,
- down the Left Front,
- and along the bottom hem.
Work **3 sc in each corner** to keep it flat. Join with a slip st. Work **2 more rounds** of sc, keeping corners crisp.

> **Beginner tip:** Aim for about 3 sc per 4 mesh rows along vertical edges so the band lies flat without ruffling or pulling.

**Step 2 — Cuffs:**
Join yarn at a sleeve cuff and work **3 rounds of sc** evenly around each cuff. Fasten off.

---

## BUTTONS & BUTTONHOLES (6 buttons)

**Button placement:** On the **Right Front** band (for the standard women's overlap; reverse for men's).

The front band runs the full **26"** length. Space **6 buttonholes** evenly:
- Place the first buttonhole 2" from the neckline edge and the last 4" from the hem.
- Usable span = 26" − 2" − 4" = 20". Spacing = 20" ÷ 5 gaps = **4" apart**.

> **Math check:** 5 gaps × 4" = 20"; plus 2" top + 4" bottom = 26" ✓.

**Making the buttonholes (on the 2nd round of the front band):**
When you reach each marked buttonhole position, **ch 2, skip 2 sc**, then continue in sc. On the next round, work 2 sc into each ch-2 space to complete a clean hole.

**Attaching buttons:**
On the **Left Front** band, mark positions directly opposite each buttonhole. Sew the 6 buttons securely with a tapestry needle and matching yarn.

> **Beginner tip:** Button your cardigan and use a pin to mark exact button positions through each buttonhole — this guarantees alignment.

---

## FINISHING & BLOCKING
1. Weave in all ends with a tapestry needle.
2. **Block firmly** — this is essential for openwork. Pin each piece (or the finished garment) to measurements and lightly steam or wet-block. Blocking opens up the diamond mesh and evens the stitches.
3. Let dry completely before wearing.

---

## QUICK REFERENCE — STITCH COUNTS
| Piece | Foundation sts | Width | Length | Approx. rows |
|---|---|---|---|---|
| Back | 88 | 22" | 26" | 58 |
| Left Front | 44 | 11" | 26" | 58 |
| Right Front | 44 | 11" | 26" | 58 |
| Sleeve (×2) | 64 | 16" | 18" | 40 |

**Total front width:** 44 + 44 = 88 = Back ✓
**Buttons:** 6, spaced 4" apart ✓

Enjoy your light, airy diamond mesh cardigan! 🧶
Disclaimer: This pattern was generated by AI and should be reviewed for accuracy before use. While we strive for quality, AI-generated content may contain errors. Please verify measurements, stitch counts, and instructions before beginning your project. Generated by purlJam.uk
Access your pattern anytime
Bookmark this page to access your pattern anytime