Type
Crochet
Difficulty
advanced
Category
blanket
AI Thinking Process
Planning
Verification
Pattern
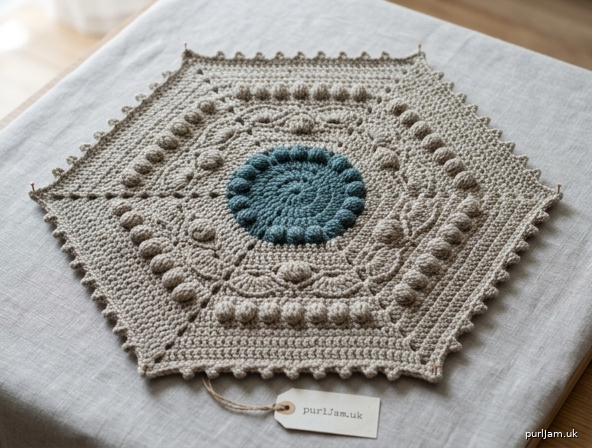
Ornate Textured Hexagon Motif
14" Point-to-Point • Beginner • Worsted Weight
A single ornate crochet hexagon featuring raised bobbles, shell texture, and picot points. Perfect as a standalone doily-style piece, coaster set (scale down), or building block for a textured blanket. All special stitches are written out in full—no charts required.
Finished Size
14 inches (35.5 cm) point to opposite point, after light wet blocking.
Side-to-side (flat to flat): approximately 12 inches (30.5 cm).
Materials
- Worsted weight yarn (category 4), approx. 100 yards (91 m) main color (MC). Optional contrasting color (CC) for Rnds 1–2 and final picots: 20 yards (18 m).
- Crochet hook: US I/9 (5.5 mm) or size needed to obtain gauge.
- Stitch markers (6, one for each corner).
- Yarn needle.
- Scissors.
- Blocking mats and rust-proof pins (essential for accurate 14" measurement and opening the texture).
Gauge
15 dc and 8 rows = 4 inches (10 cm) in double crochet, unblocked.
In pattern stitch after blocking: one full motif measures 14" point-to-point.
Make a gauge swatch: Work Rnds 1–5 of the motif, measure center to point, and adjust hook size if needed (larger hook = larger motif).
Abbreviations (US Terms)
- ch – chain
- st(s) – stitch(es)
- sl st – slip stitch
- sc – single crochet
- hdc – half double crochet
- dc – double crochet
- tr – treble crochet
- sp – space
- beg – beginning
- rep – repeat
- bobble – bobble stitch (see Special Stitches)
- shell – shell stitch (see Special Stitches)
- picot – picot (see Special Stitches)
- yo – yarn over
- MC – main color
- CC – contrasting color (optional)
Special Stitches (Beginner-Friendly Explanations)
Bobble (4-dc bobble): Yo, insert hook in indicated st, yo, pull up loop, yo, draw through 2 loops (2 loops on hook); [yo, insert hook in same st, yo, pull up loop, yo, draw through 2 loops] 3 times (5 loops on hook); yo, draw through all 5 loops. Ch 1 to close. Bobble sits on the right side.
Shell: (2 dc, ch 1, 2 dc) in indicated st or sp.
Large Shell: (3 dc, ch 2, 3 dc) in indicated st or sp.
Picot: Ch 3, sl st in 3rd ch from hook.
Standing dc (optional neat start): With slip knot on hook, yo, insert hook in indicated st, complete as regular dc.
Pattern Notes
- Motif is worked in joined rounds with right side always facing.
- Join each round with sl st to top of beginning st unless otherwise stated.
- Move stitch markers up to the ch-2 (or ch-1) corner spaces each round.
- Beginning ch-3 counts as first dc throughout.
- Keep tension even; bobbles and shells create natural density—do not pull tight.
- Color changes are optional; work entire motif in one color if preferred.
- Inline count checks appear at the end of key rounds (✓ = confirmed total).
Motif Instructions
Rnd 1 (Center, optional CC):
Make a magic ring (or ch 4 and join with sl st to form ring).
Ch 3 (counts as dc), 11 dc in ring. Join with sl st to top of beg ch-3. (12 dc)
Pull magic ring closed tightly. ✓ 12 sts.
Rnd 2:
Ch 3, dc in same st as join, 2 dc in each dc around. Join. (24 dc) ✓ 24 sts.
Rnd 3 (establish hexagon corners):
Ch 3, dc in next dc, *(dc, ch 2, dc) in next dc (corner made), dc in each of next 3 dc; rep from * 4 more times, (dc, ch 2, dc) in next dc, dc in last dc. Join.
(6 corners, 4 dc along each side between corner spaces = 30 dc + 6 ch-2 sps)
Place a marker in each ch-2 sp. ✓ 30 dc.
Rnd 4 (texture begins):
Sl st into first ch-2 sp, ch 3, (dc, ch 2, 2 dc) in same sp (beg large corner),
*bobble in next dc, dc in next dc, bobble in next dc, dc in next dc,
Large Shell in next ch-2 sp; rep from * around, ending last rep before beg corner. Join to top of beg ch-3.
(6 Large Shells, 2 bobbles + 2 dc per side)
✓ 6 corners established; sides even.
Rnd 5:
Sl st to first ch-2 corner sp, ch 3, (dc, ch 2, 2 dc) in same sp,
*dc in each of next 2 dc, dc in top of bobble, dc in next dc, dc in top of bobble, dc in each of next 2 dc,
Large Shell in next ch-2 sp; rep from * around. Join.
(Each side now has 8 dc between corner shells) ✓ sides equal.
Rnd 6 (shell texture):
Sl st to corner ch-2 sp, ch 3, (dc, ch 1, 2 dc) in same sp (beg shell corner),
*skip 1 dc, shell in next dc, skip 1 dc, shell in next dc, skip 1 dc, shell in next dc, skip 1 dc,
shell in next corner ch-2 sp; rep from * around, working final shells into remaining side sts evenly (3 shells per side + corner). Join.
Adjust by placing shells in every other st so 3 full shells sit cleanly on each side. ✓ 6 corner shells + 18 side shells.
Rnd 7:
Sl st to corner ch-1 sp, ch 3, (dc, ch 2, 2 dc) in same sp,
*sc in next ch-1 sp (between shells), shell in next ch-1 sp; rep from * across side (shells in the 3 side shell sps, sc in the valleys),
Large Shell in corner ch-1 sp; continue around. Join.
(Alternating sc and shells keeps fabric flat.) ✓ corners marked.
Rnd 8 (bobble accent round):
Sl st to corner ch-2, ch 3, (dc, ch 2, 2 dc) in same sp,
*dc in each of next 2 dc, bobble in next sc, dc in each of next 2 dc of shell, bobble in next sc, dc in each of next 2 dc of shell, bobble in next sc, dc in each of next 2 dc,
Large Shell in corner; rep from * around. Join.
(3 bobbles per side) ✓ texture raised, sides still flat.
Rnd 9:
Sl st to corner, ch 3, (2 dc, ch 2, 3 dc) in same sp (expanded corner),
*dc in each st and in each bobble top across side (work 1 dc in every st),
(3 dc, ch 2, 3 dc) in corner ch-2; rep from * around. Join.
Count: each side should have 18 dc between corner groups. ✓ 6 × 18 side dc + corner sts.
Rnd 10:
Sl st to corner ch-2, ch 3, (dc, ch 2, 2 dc) in same sp,
*skip 2 dc, shell in next dc; rep from * across side until 2 dc remain before corner, skip 2 dc,
Large Shell in corner; continue around. Join.
(Aim for 5 shells per side + corners.) ✓ even distribution.
Rnd 11 (fill and stabilize):
Sl st to corner, ch 3, (dc, ch 2, 2 dc) in same sp,
*dc in each dc and ch-1 sp across side (treat every st and space as one base),
Large Shell in corner; rep from * around. Join.
Each side now approximately 22–24 sts between corners. ✓ solid base for final round.
Rnd 12 (ornate picot edge – final size round):
Sl st to corner ch-2, ch 1, *(sc, ch 3, sc) in corner sp (picot point),
sc in each of next 3 sts, picot, sc in each of next 3 sts, picot; rep from * across each side, adjusting last few sc so picots are evenly spaced (approximately 4–5 picots per side plus the corner picot). Join with sl st to first sc. Fasten off.
✓ 6 prominent corner picots create the pointed hexagon look.
Size Check & Adjustment
Lay motif flat. Measure point-to-point (corner picot to opposite corner picot).
- If under 13.5": re-work final 1–2 rounds with a larger hook or add one extra plain dc round before Rnd 12.
- If over 14.5": use a smaller hook or tighter tension on Rnds 9–11.
After blocking (below) the motif will relax to a true 14".
Finishing
- Weave in all ends securely on the wrong side with yarn needle.
- Blocking (essential for ornate texture and exact size):
- Wet block: Soak in lukewarm water 15 minutes, gently squeeze (do not wring), roll in towel.
- Pin to blocking mats in perfect hexagon shape: measure and pin each point exactly 7" from center (14" point-to-point). Pin side edges straight.
- Allow to dry completely (overnight).
- Steam alternative: Hover steam iron above fabric; never press flat or you will crush bobbles.
- Optional simple border (if using as single piece): Join yarn in any st, ch 1, sc evenly around entire outer edge, working 3 sc in each corner picot. Join, fasten off.
Yarn Amount Note for Blanket Use
One 14" motif ≈ 100 yd. For a throw approximately 42" × 56" you will need 12 motifs (3 × 4 layout) ≈ 1,200–1,400 yd worsted plus joining and border yarn—within the template worsted range of 1,400–1,800 yd when edging is added.
Joining Methods (if making multiple for a blanket)
- Join-as-you-go (recommended): On Rnd 12, when working a side, replace the center ch of each picot with a sl st into the corresponding picot of the adjacent finished motif.
- Whip stitch: Hold wrong sides together and sew through back loops only.
- Flat slip-stitch join: With right sides up, sl st in back loops of both edges for a nearly invisible seam.
Care
Hand wash cool, lay flat to dry. Do not machine dry—heat can shrink acrylic or felt wool and flatten texture.
Enjoy your ornate hexagon! The bobbles and picots give rich texture while every step stays accessible for beginners. Happy crocheting.
Disclaimer: This pattern was generated by AI and should be reviewed for accuracy before use. While we strive for quality, AI-generated content may contain errors. Please verify measurements, stitch counts, charts, and instructions before beginning your project. Generated by purlJam.uk
Love this pattern?
Save this pattern to your free PurlJam libraryAccess your pattern anytime
Bookmark this page to access your pattern anytime