Type
Knitting
Difficulty
beginner
Category
blanket
AI Thinking Process
Planning
Verification
Pattern
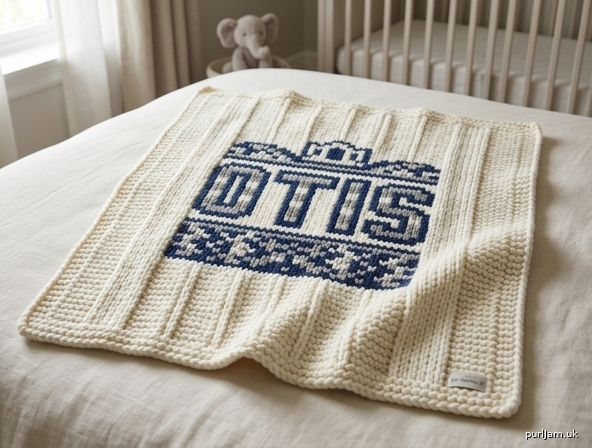
OTIS Finger-Knit Garter Baby Blanket
A soft, reversible baby blanket worked entirely with your fingers — no knitting needles. Twelve garter-style strips are joined into a classic 30 × 36 in (76 × 91.5 cm) rectangle, then the name OTIS is added in a contrasting color. Perfect as a beginner first blanket and a keepsake.
Skill level: Beginner
Techniques: 4-finger knitting, binding off, flat seaming, simple letter embroidery (or duplicate stitch)
This is a simple garter-style pattern (every row worked the same way). Letters are added after knitting so the project stays beginner-friendly.
Finished size
30 × 36 in (76 × 91.5 cm), after light blocking.
Width = 12 strips × 2½ in (6.5 cm) = 30 in (76 cm) ✓
Length = 36 in (91.5 cm) per strip ✓
Materials
Yarn: Worsted weight (CYC 4), held double throughout the blanket body.
- Main Color (MC): 2000 yd / 1830 m (about 10 skeins at 200 yd / 183 m each). Used double, this is 1000 yd / 915 m of two-strand fabric.
- Contrasting Color (CC): 100 yd / 91 m for the letters OTIS (and an optional contrast whipstitch around the edge).
Choose a machine-washable acrylic or superwash wool. Pick a high-contrast pair so the name reads clearly (for example cream with navy, or pale gray with charcoal). Exact colors are your choice.
Finger knitting uses more yarn than needle knitting, and larger hands make wider, hungrier stitches. Extra MC is wise.
Tools
- Your hands (4 fingers of the non-dominant hand act as the “needles”)
- Yarn needle (blunt tapestry needle) for joining and letters
- Scissors
- Measuring tape
- Optional: removable stitch markers or safety pins to hold strips while seaming; locking marker to clip the working yarn when you pause
No knitting needles are required.
Gauge
4-finger knitting, worsted held double
- Strip width: 4 sts = 2½ in (6.5 cm)
- Row gauge: 4 rows = 1 in (2.5 cm)
Swatch (do not skip): Cast on 4 sts and work 20 rows. Measure the strip width and the length of those 20 rows.
- If your strip is 2½ in (6.5 cm) wide, work 12 strips as written (12 × 2½ in = 30 in ✓).
- If your strip is a different width, number of strips = 30 ÷ your strip width, rounded to the nearest whole number. Example: 2 in strips → 15 strips; 3 in strips → 10 strips.
- Work every strip to 36 in (91.5 cm), not to a row count, if your row gauge differs. At the stated gauge, 36 in × 4 rows per in = 144 rows ✓.
Keep tension even and slightly snug. Finger fabric that is too loose is stretchy and can catch tiny fingers.
Abbreviations (US)
| Abbv | Meaning |
|---|---|
| MC | main color |
| CC | contrasting color |
| st(s) | stitch(es) |
| CO | cast on |
| BO | bind off |
| RS | right side (either side of garter-style fabric; pick the neater face) |
Notes
- Garter-style fabric: Every finger-knit row is worked the same way — the finger equivalent of “knit every row.” The cloth is ridged, lies flat, and is reversible.
- Held double: Pull from both ends of one skein, or use two balls together. Treat the two strands as one yarn; do not split them.
- Direction: All strips are worked the long way (4 sts wide × 36 in long) and seamed along their long edges.
- OTIS motif: Four block capital letters in CC, centered on the finished blanket. If a colourwork chart is supplied with this pattern, use it for letter shapes and still follow the placement guide below. If no chart is supplied, use the written embroidery guide. The blanket is complete either way.
- Baby safety: Weave in every tail securely. Do not add buttons, beads, or other small trims. If the joined fabric looks holey, go down to a slightly firmer finger tension on remaining strips, or hold three strands of worsted instead of two (you will need more yarn and fewer strips).
- Pausing: When you set the work down, clip a locking marker through the four live loops, or slip them onto a spare pencil, so they cannot run.
Finger-knitting school
Work on the non-dominant hand. The dominant hand weaves the yarn and lifts loops. Instructions assume a right-handed knitter (yarn in the right hand, loops on the left fingers). Reverse hands if you prefer.
Cast on (4 sts)
- Cut no yarn yet. Leave a 8 in (20 cm) tail.
- Hold your left hand in front of you, palm facing you, fingers slightly apart: index, middle, ring, pinky. (Thumb is not used.)
- Pass 1: Lay the working yarn over the index finger, under the middle finger, over the ring finger, and under the pinky.
- Pass 2: Bring the yarn around the pinky and weave back — over the ring finger, under the middle finger, over the index finger.
- You now have 1 loop on each of the 4 fingers. Repeat Pass 1 so each finger has 2 loops. This is your cast-on.
Knit a row (repeat this for the whole strip)
- Starting at the pinky and moving toward the index finger, lift the bottom loop up, over the top loop, and off the finger. Do this on all 4 fingers. Each finger now holds 1 loop. That is one row.
- Weave a new Pass 1 only (over index, under middle, over ring, under pinky) so each finger again has 2 loops.
- Repeat step 6.
Always lift bottom over top. Always travel pinky → index so the strip stays even.
The fabric will look like a thick 4-stitch ribbon with garter ridges. Gently flatten it as you go; do not twist the strip.
Bind off
When the strip measures 36 in (91.5 cm):
- Lift bottom loops over once more so 1 loop remains on each finger.
- Move the pinky loop onto the ring finger. Lift the bottom (original ring) loop over the passed loop and off. 1 loop remains on the ring finger.
- Move that loop onto the middle finger; lift bottom over top.
- Move the remaining loop onto the index finger; lift bottom over top.
- Cut yarn, leaving an 8 in (20 cm) tail. Pull the tail through the last loop and cinch closed.
Blanket
With MC held double, work 12 strips.
Each strip
- CO 4 sts (one loop per finger, then a second set of loops, as above).
- Work in garter-style finger knitting until the strip measures 36 in (91.5 cm) — about 144 rows at gauge (36 × 4 = 144 ✓).
- BO.
Make all 12 strips the same length before joining. If one is short, add rows; if one is long, the extra can be eased in during seaming or gently blocked to match.
You should have 12 pieces, each about 2½ × 36 in (6.5 × 91.5 cm). 12 × 2½ in = 30 in of width before joining ✓.
Join the strips
Garter-style fabric has no true wrong side. Choose the face you like better and call it the RS. Lay all 12 strips on a table, RS up, long edges touching, like floorboards. Align the bound-off edges at one end and the cast-on edges at the other.
Flat whipstitch (does not overlap, so width stays 30 in):
- Thread a yarn needle with a long double strand of MC (or a single strand of matching worsted if that slides more easily).
- Butt two strips together; do not overlap them.
- Working from the RS, take a small stitch under the edge loop of the left strip, then under the matching edge loop of the right strip. Repeat, keeping the seam flat and the ridges lined up.
- Join strip 1 to 2, 2 to 3, and so on through strip 12 (11 seams).
Check the joined piece: it should measure about 30 × 36 in (76 × 91.5 cm) ✓. If it is narrower than 29 in (73.5 cm), work one more strip and seam it on. If it is a little over 30 in, a light block will settle it.
Weave in all strip tails on the WS, splitting the plies of the double yarn so the ends stay put.
OTIS letters
Work the name after the blanket is seamed so the letters sit across several strips and read as one word.
Placement (written guide)
Center the word horizontally. Place it a little above the true vertical center so it is visible when the blanket is folded over a stroller or crib rail — roughly in the upper-middle third of the 36 in length. Keep a generous MC margin on all four sides (at least 4–5 in / 10–12.5 cm from each short side, and more than that from the top and bottom edges).
The four letters are simple block capitals: O T I S, in that order, left to right. Keep them the same height as each other. A comfortable size on this blanket is letters that feel large and readable from across a room, with a small gap between them so they do not crowd. Do not scale them so wide that they run into the side edges.
If a colourwork chart is supplied with this pattern: Follow the chart for the letter shapes. Use CC on a MC background. Center the charted word using the placement above. Do not work from a homemade grid; the written placement is enough without a chart.
If you are working from these words only: Embroider the letters on the RS with CC (a single strand of worsted is usually plenty; use two strands only if you want a heavier line).
On distinct finger-knit stitches, duplicate stitch (tracing existing stitches with CC) gives a knitted look. If the loops are too large or irregular for duplicate stitch, use chain stitch or backstitch on the surface instead — both are beginner embroidery stitches and sit nicely on garter ridges.
Suggested letter forms (block, not script):
- O — a closed oval or rounded rectangle with an open center. Do not fill the hole.
- T — a vertical stem with a full-width crossbar at the top only.
- I — a single vertical stem. Add short crossbars at top and bottom if you want a more “typeface” look.
- S — a serpentine block S (upper curve opening to the right, lower curve opening to the left). Keep the stroke as thick as the other letters.
Lightly mark the four letter positions with pins or a water-soluble marker before stitching. Step back and check that OTIS is level and evenly spaced, then stitch. Weave CC tails into the WS of the same letters so they cannot show through.
Optional simple edge
The selvedges of the outer strips, plus the cast-on and bind-off ends, already make a clean garter-style frame. For a bit more polish, work a contrast whipstitch in CC all the way around the outer edge, catching each edge loop once. Do not pull tight or the blanket will cup.
Finishing
- Weave in every remaining end. On a baby blanket, weave each tail in two directions, then snip close.
- Block lightly: pin the blanket to 30 × 36 in (76 × 91.5 cm) on a clean towel, mist with water, and let it dry. Do not stretch aggressively — finger knitting blooms on its own and can grow if yanked.
- Check the OTIS letters: they should lie flat. If a stitch has snagged, ease it with the yarn needle.
Care
Follow the ball band. For most washable worsted acrylics: machine wash gentle, cold, tumble dry low. For superwash wool: machine wash gentle, lay flat to dry. Pull into shape while damp. Do not iron.
Re-check embroidered letters after the first wash and snug any loose CC tails.
Disclaimer: This pattern was generated by AI and should be reviewed for accuracy before use. While we strive for quality, AI-generated content may contain errors. Please verify measurements, stitch counts, charts, and instructions before beginning your project. Generated by purlJam.uk
Love this pattern?
Save this pattern to your free PurlJam libraryAccess your pattern anytime
Bookmark this page to access your pattern anytime