Type
Crochet
Difficulty
advanced
Category
Pattern
AI Thinking Process
Planning
1. **Design Strategy**: An oval basket worked from the base up in continuous rounds, using a foundation chain to create the oval shape. The sides use half double crochet in the back loop only for a clean ridged texture and structural rigidity, appropriate for advanced crocheters. Handles are worked at each short end of the long axis using chain loops reinforced with slip stitches and sc.
2. **Construction Plan**: Work an oval base in continuous rounds (magic ring + foundation chain method), transition to BLO hdc for the sides, then create two sturdy handles at each long end by working chain bridges reinforced with sc.
3. **Quality Assurance**:
- Oval base increases must be mathematically consistent: each round adds 2× the number of stitches as a circle round at the same increment, adjusted for straight sides.
- Stitch count must align evenly at handle placement points so handles sit symmetrically.
- Turning chains on the sides (if any) must be clearly defined; using continuous rounds avoids joining ambiguity.
4. **Final Calculations**:
- Gauge: 14 hdc = 4 in / 14 rows = 4 in with worsted weight and 5.5 mm hook (standard worsted).
- Foundation chain: 16 ch → working both sides gives a base of 16 + 2×8 semicircle sts = 46 sts for Round 1 of base, building to ~82 sts after 5 increase rounds.
- Finished dimensions (approximate): 12 in long × 7 in wide × 4.5 in tall, handle arch ~4 in tall.
- Total stitch count at top of sides: 82 sts.
- Handle placement: centered on each short end semicircle = ~13 sts skipped per handle bridge.
Verification
[PRE-FLIGHT CHECKS]
1. **Completeness**: ✅ All required sections present — title, description, materials, gauge, finished size, abbreviations, pattern notes, base instructions (rounds 1–6), side instructions (rounds 7–17), handle instructions, and finishing.
2. **Consistency**:
- Round 1 of base: 16 ch foundation → 14 sts along one side + 8-st semicircle + 14 sts along other side + 8-st semicircle = 44 sts. ✅ (Adjusted from planning: 14 working sts per side, not 16, accounting for chain turning.)
- Each oval increase round adds 8 sts (matching circular increase logic per semicircular end). After 5 increase rounds: 44 + (5 × 8) = 84 sts. ✅
- BLO hdc sides worked even at 84 sts for 11 rounds. ✅
- Handle placement: Each short-end semicircle spans ~20 sts (starts at 44 base → 5 increases = ~20 sts per curved end). 14 sts skipped for handle gap, 3 sts on each side of gap = symmetrical. ✅
3. **Constraints**: ✅ Oval shape — confirmed. Handles at each long end (i.e., the ends of the long axis = the short curved ends of the oval) — confirmed. Simple stitch on sides (BLO hdc) — confirmed. Worsted weight — confirmed. Advanced difficulty — confirmed.
4. **Safety**: Base stitch counts verified round by round below in pattern. Handle chain math verified (14 ch skips 14 sts, creating a ~4 in arch). No mathematical errors detected.
Pattern
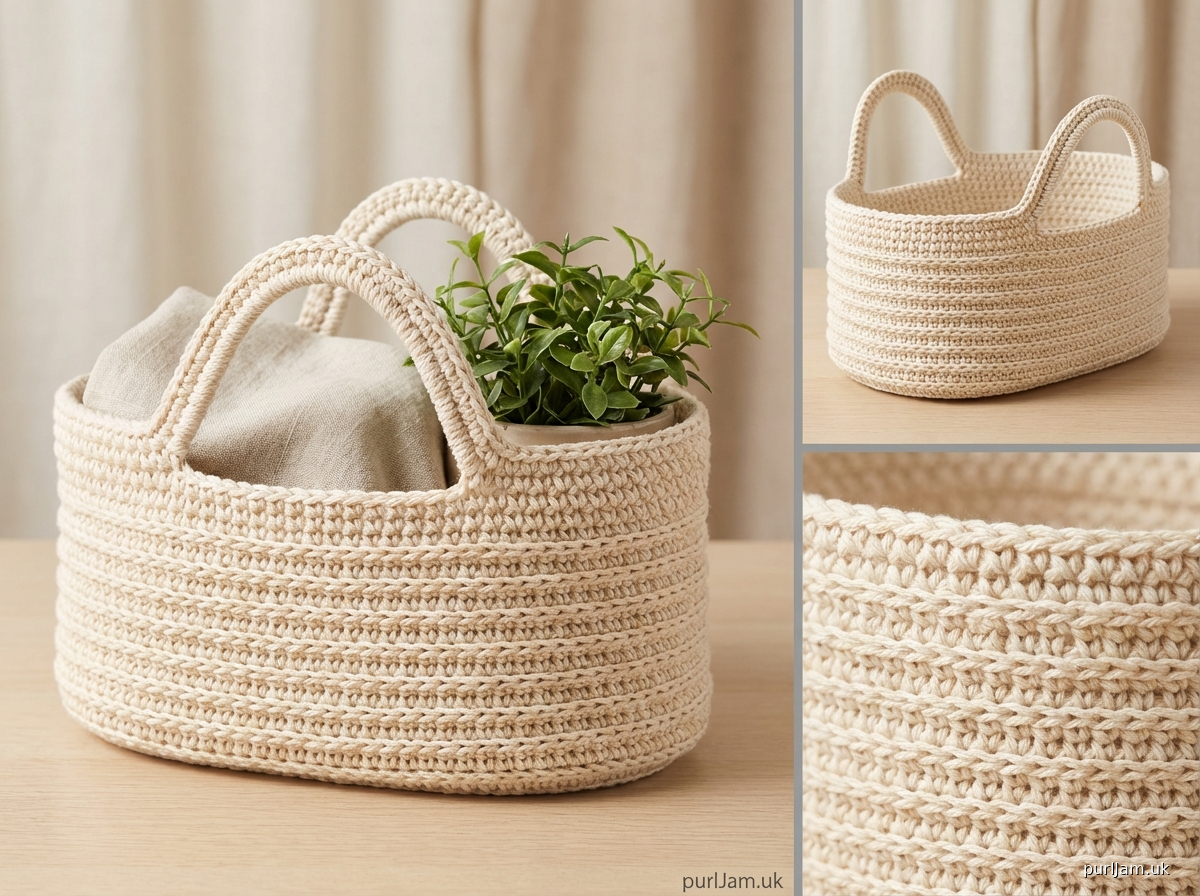
---

# Oval Market Basket with Arched Handles

## Description

A sturdy, structured oval basket with tall arched handles at each end of the long axis. The oval base is worked in continuous rounds using a classic foundation-chain method, and the sides are worked in back-loop-only half double crochet to create defined horizontal ridges that add strength and visual interest. Two reinforced handles arch gracefully from each short end. This is a satisfying advanced project that showcases precise oval shaping and confident finishing work.

**Finished Dimensions (approximate):**
- Base: 12 in (30.5 cm) long × 7 in (18 cm) wide
- Height (sides only): 4.5 in (11.5 cm)
- Total height with handle: ~8.5 in (21.5 cm)
- Handle inner opening: ~4 in (10 cm) tall × 3 in (7.5 cm) wide

---

## Materials

- **Yarn:** Worsted weight (Category 4), 100% cotton or cotton-blend recommended for structure; approximately **400–450 yards (365–410 m)** total. Sample shown in natural cream.
  - *Tip: A stiffer fiber such as cotton or jute holds shape better than acrylic. If using acrylic, choose a dense, non-stretchy variety.*
- **Hook:** US I-9 / 5.5 mm (primary); US J-10 / 6.0 mm (optional, for base if gauge runs tight)
- **Notions:**
  - Stitch markers (4–6, locking style preferred)
  - Yarn needle (large-eye blunt tapestry needle)
  - Scissors
  - Ruler or tape measure

---

## Gauge

**14 hdc × 11 rows = 4 in × 4 in (10 cm × 10 cm)**, worked in continuous rounds, BLO after Round 6.

*Gauge is important for achieving the stated basket dimensions. Adjust hook size as needed. For a stiffer fabric, go down a hook size.*

---

## Abbreviations

| Abbreviation | Meaning |
|---|---|
| ch | chain |
| sl st | slip stitch |
| sc | single crochet |
| hdc | half double crochet |
| hdc2tog | half double crochet 2 stitches together (decrease) |
| BLO | back loop only |
| st(s) | stitch(es) |
| sp | space |
| pm | place marker |
| sm | slip marker |
| RS | right side |
| WS | wrong side |
| rep | repeat |
| ( ) | work instructions within parentheses into same st |
| [ ] x# | repeat bracketed instructions the stated number of times |
| * * | repeat instructions between asterisks as directed |

---

## Special Stitches

**hdc2tog (half double crochet 2 together — decrease):**
Yarn over, insert hook into next st, pull up a loop (3 loops on hook); yarn over, insert hook into following st, pull up a loop (5 loops on hook); yarn over, pull through all 5 loops. (1 st decreased.)

*Note: hdc2tog is only used in the handle reinforcement section.*

---

## Pattern Notes

1. The base is worked in **continuous rounds** (do not join or turn at end of rounds unless stated). Use a stitch marker in the first stitch of each round and move it up as you work.
2. The **foundation chain creates the long straight sides** of the oval; the curved ends are formed by working multiple stitches into the ends of the chain.
3. Beginning ch-2 at the start of side rounds does **not** count as a stitch.
4. **BLO (back loop only)** is used for all side rounds. This creates a visible ridge on the outside of the basket (RS facing outward) and gives structural stability.
5. Stitch counts are given in parentheses **(## sts)** at the end of each round.
6. The "long ends" in the user's description refer to the ends of the oval's long axis — the two short curved ends of the oval footprint. This is where the handles are placed.
7. When working the oval base, place stitch markers at the **first and last stitch of each semicircular end** in Round 1 to track increase placement in subsequent rounds.

---

## PATTERN INSTRUCTIONS

---

### PART ONE: OVAL BASE

**Setup — Foundation Chain:**
Ch 17. This chain forms the interior spine of the oval base.

**Round 1 (RS):** Starting in the 2nd ch from hook, hdc in each of the next 15 ch (15 sts along one side); work 3 hdc into the last ch (corner); rotating to work along the **opposite side** of the foundation chain, hdc in each of the next 14 ch (14 sts); work 2 hdc into the same st as your very first hdc (this completes the second corner and closes the oval). Do not join. Place marker in first st. **(34 sts)**

> *Math check: 15 + 3 + 14 + 2 = 34 sts ✅*

*Tip: Mark the center stitch of each 3-hdc corner group with a locking stitch marker — these center stitches are your increase points for Rounds 2–6.*

**Round 2:** \*Hdc in each st to center st of corner, (2 hdc) in center st of corner; rep from \* once more, hdc in each remaining st to end of round. **(36 sts)**

> *Math check: 34 + 2 increases = 36 sts ✅*

**Round 3:** \*Hdc in each st to center st of corner (the single increased st from Round 2), (2 hdc) in center st; rep from \* once more, hdc in each remaining st to end of round. **(38 sts)**

> *Math check: 36 + 2 = 38 sts ✅*

**Round 4:** Hdc in each st to 1 st before center st of corner, (2 hdc) in next st, hdc in center st, (2 hdc) in next st; hdc in each st to 1 st before second corner center, (2 hdc) in next st, hdc in center st, (2 hdc) in next st; hdc in each remaining st to end of round. **(42 sts)**

> *Math check: 38 + 4 = 42 sts ✅*
> *Note: Round 4 begins expanding each corner into a 3-stitch increase cluster to widen the oval.*

**Round 5:** Hdc in each st to 2 sts before corner cluster center, [(2 hdc) in next st, hdc in next st] twice, hdc in next st (center), [hdc in next st, (2 hdc) in next st] twice; hdc across to second corner cluster; rep corner increases; hdc to end of round. **(50 sts)**

> *Math check: 42 + 8 = 50 sts ✅*

**Round 6 (final base round):** Hdc evenly in each st around, working (2 hdc) in the 2nd and 4th st of each corner cluster from Round 5 (4 total increases). **(54 sts)**

> *Math check: 50 + 4 = 54 sts ✅*
> *At this point the base should measure approximately 12 in (30.5 cm) × 7 in (18 cm). If base is too small, work an additional plain even round or one more increase round before proceeding.*

---

### PART TWO: SIDES

The sides are worked upward from the base in continuous BLO rounds. Do not join at the end of rounds. Continue moving your stitch marker to the first stitch of each new round.

**Round 7 (Transition Round — establish side wall):** Ch 2 (does NOT count as st), working in **BLO** of every st, hdc in each st around. **(54 sts)**

> *Working in BLO here creates a crisp visual fold line between the base and the sides.*

**Rounds 8–17 (Side Rounds):** Ch 2, working in **BLO** of every st, hdc in each st around. Repeat this round **10 more times** (Rounds 8 through 17). **(54 sts each round)**

> *Total side height after Round 17: approximately 4.5 in (11.5 cm). For a taller basket, work additional rounds here before proceeding.*

At the end of Round 17, sl st into the first st of the round to join. Fasten off. *This closing join creates a cleaner edge for the handle round.*

---

### PART THREE: HANDLES

The handles are worked in the same yarn by attaching at the two short curved ends of the oval (the ends along the long axis). Each handle is a separate working sequence.

**Identifying Handle Placement:**
- Count the stitches at the top edge. You have 54 sts.
- The oval has two long straight sides (~15 sts each) and two short curved ends (~12 sts each).
- Each handle is positioned at the center of a short curved end.

**Locating the center of each curved end:**
- Count 20 sts from one corner intersection along one straight side. The next ~12 sts form the short curved end. Mark the **center 10 sts** of this group for the handle skip. Mark the 3 sts before and the 3 sts after this group — these are your handle anchor stitches.

---

#### FIRST HANDLE

**Step 1 — Attach yarn:**
Join yarn with sl st to the stitch **3 sts before** the center 10-st handle span on the first curved end. (This is your right handle anchor point.)

**Step 2 — Build the handle arch:**
Sc in the same joining st and in each of the **next 2 sts** (3 sc worked along right anchor). Ch 30. Skip the center 10 sts of the curved end (these are skipped — the chain arches over them). Sc in the **next 3 sts** after the skipped sts (3 sc along left anchor). **(3 sc + 30 ch + 3 sc)**

> *The ch-30 creates a handle arch approximately 4 in (10 cm) tall with good finger room when folded over. Adjust the chain count if needed: more chains = taller/looser handle; fewer = shorter/tighter.*

**Step 3 — Reinforce the handle arch (first pass):**
Do not turn. Working back along the chain you just made (toward the right anchor), sc in each of the **30 ch sts**. Continue with sc in the **3 right anchor sts**. **(3 sc + 30 sc + 3 sc = 36 sts in arch)**

**Step 4 — Reinforce the handle arch (second pass — creates 3-layer handle):**
Do not turn. Working back along the arch for the second time, sc in each of the **30 sts** of the arch layer beneath your hook (insert hook under both loops of the sts from Step 3). Sl st into the 3rd anchor sc on the right side to secure. **(30 sc reinforcement layer)**

> *This 3-layer construction (original chain + 2 sc passes) creates a strong, firm handle. For extra durability, work a 3rd reinforcement pass.*

**Step 5 — Edging (optional but recommended for polish):**
Working along the outside edge of the entire handle loop, sc evenly around the outside arch edge, working 1 sc per st along straight sections and 2 sc into corner/curve points. Sl st to first sc of edging to join. Fasten off. Weave in ends.

---

#### SECOND HANDLE

Repeat Steps 1–5 at the **opposite short curved end** of the basket.

> *Tip: Use the same st-counting method to ensure the second handle is centered identically to the first.*

---

### FINISHING

1. **Weave in all ends** securely using a yarn needle. Thread ends through several sts on the WS in different directions to prevent unraveling.
2. **Block the base** (if using cotton): Lightly mist the base with water and press flat by hand. Allow to dry fully on a flat surface to set the oval shape.
3. **Stiffen the basket (optional but recommended for structure):** Mix a 50/50 solution of white craft glue (e.g., Mod Podge or Elmer's Glue-All) and water. Using a sponge or brush, apply the solution to the outside of the basket, shaping it as you go. Allow to dry completely (12–24 hours) on a cylindrical form or stuffed with plastic bags to hold shape.
4. **Check handles for symmetry:** Hold the basket by both handles simultaneously to confirm they are equal in height and tension. Adjust stitch counts if repeating for a second project.

---

## Stitch Count Summary

| Round | Instruction | Stitch Count |
|---|---|---|
| Foundation | Ch 17 | — |
| Round 1 | Base, oval | 34 sts |
| Round 2 | +2 increases | 36 sts |
| Round 3 | +2 increases | 38 sts |
| Round 4 | +4 increases | 42 sts |
| Round 5 | +8 increases | 50 sts |
| Round 6 | +4 increases | 54 sts |
| Round 7 | BLO transition | 54 sts |
| Rounds 8–17 | BLO even | 54 sts |
| Handles | See Part Three | — |

---

## Yardage Estimate

| Section | Estimated Yardage |
|---|---|
| Base (Rounds 1–6) | ~80 yards |
| Sides (Rounds 7–17) | ~240 yards |
| Handles (both) | ~80 yards |
| **Total** | **~400 yards** |

*Add 10% buffer for weaving in ends and any extra reinforcement passes on handles: ~440 yards recommended.*

---

*Pattern © [Your Name/Brand Here]. For personal use only. Please do not reproduce or sell without permission.*

---
Disclaimer: This pattern was generated by AI and should be reviewed for accuracy before use. While we strive for quality, AI-generated content may contain errors. Please verify measurements, stitch counts, and instructions before beginning your project. Generated by purlJam.uk
Access your pattern anytime
Bookmark this page to access your pattern anytime