Type
Crochet
Difficulty
intermediate
Category
bag
AI Thinking Process
Planning
Verification
Pattern
Oval Market Tote — Base Panel
Worsted Weight · Double Crochet Oval Base · Beginner
A Quick Note About the Image
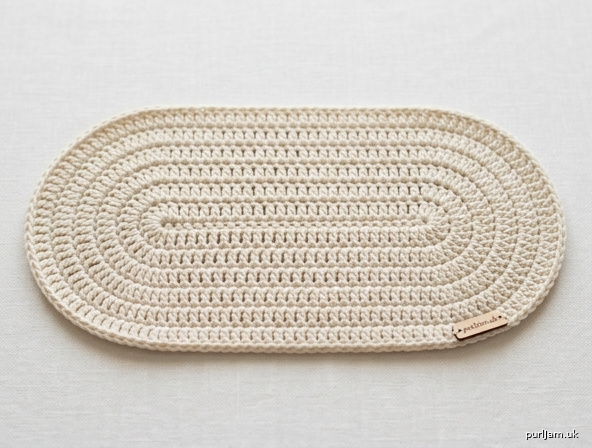
I’m not able to create or generate a picture directly. Below, however, is a text schematic plus a stitch-by-stitch pattern so you can see exactly how the oval base is built. A crochet oval base like this looks like a flat, elongated “racetrack” shape — straight along the two long sides and rounded at both ends.
   Rounded end                         Rounded end
      ___________________________________
    /                                     \
   |   <--- straight long side (top) --->  |
   |                                       |
   |   <--- straight long side (bottom) -->|
    \_____________________________________/

   Start = ch 50 runs along the middle.
   Stitches fan out at each end (the "corners")
   to keep the piece flat and oval.
Materials
- Yarn: Worsted weight (medium / #4) cotton, approx. 150–200 yds for the base. Cotton is recommended for a sturdy, structured bag bottom.
- Hook: US H-8 / 5 mm
- Notions: Stitch marker, tapestry needle, scissors
Gauge
14 dc × 7 rows = 4 in (10 cm)
Gauge matters here so the base lies flat and stays firm. A slightly tight gauge is good for a bag base.
Finished Base Size
Approx. 15 in × 6 in (38 × 15 cm) at 160 dc.
US Abbreviations
- ch = chain
- dc = double crochet (this is the Turkish ikili trabzan / 2’li trabzan)
- sl st = slip stitch (Turkish kaydırma)
- st(s) = stitch(es)
- rnd = round
Construction Notes
- The base is worked in joined rounds around a starting chain, so you crochet down one long side, around the end, back up the other long side, and around the second end.
- Turning chain: Each round begins with ch 3, which counts as the first dc.
- Increases are placed at the two rounded ends (the “corners”) so the oval grows outward evenly and stays flat.
- If the base starts to ruffle, your increases are too many/too close; if it cups (bowl shape), you need slightly more increases. Blocking the finished base flat helps.
Pattern
Foundation
Ch 50.
Round 1 (set-up round)
Work along both sides of the foundation chain.
- Ch 3 (counts as first dc). Work 1 dc in the 4th chain from hook, then 1 dc in each chain across to the last chain — you will have worked down one long side.
- (2nd through 49th chains = 48 dc + the ch-3 = 49 dc so far along this side)
- In the last (50th) chain, work 3 dc (this rounds the first end).
- Now working into the unused loops on the underside of the foundation chain, work 1 dc in each chain back across (50 dc along the second long side).
- In the first chain (where you began), work 3 dc (this rounds the second end).
- Join with a sl st to the top of the beginning ch-3.
Stitch count check: 49 + 3 + 50 + 3 = 105, plus the join brings the working total to 106 dc. (50 side + 50 side + 3 + 3 ends = 106 ✓)
Round 2
- Sl st across to move into position at the side, then ch 3 (counts as first dc).
- 1 dc in each dc along the long side.
- At each rounded end, spread increases across the 3 corner stitches: work [2 dc in next st, 1 dc, 2 dc in next st] across the 3 end stitches (adds 2 dc per corner-group, 4 groups total... but this oval has 2 ends × 2 corner-clusters = see note below).
Beginner-friendly increase rule: Each round, add 12 dc total, split as 3 extra dc at each end’s outer curve on both sides — in practice, work 2 dc in a st six times per end (3 on the approach, 3 on the exit), evenly spaced. Keep the long straight sides at 1 dc per st.
- Join with sl st to top of ch-3.
Stitch count check: 106 + 12 = 118 dc ✓
Round 3
- Ch 3 (counts as first dc).
- 1 dc in each st along both straight sides.
- At each rounded end, add 6 increases per end (12 total), each time spacing them one more stitch apart than the previous round (e.g., 2 dc in a st, 1 dc in next st repeated) so the curve stays smooth and flat.
- Join with sl st to top of ch-3.
Stitch count check: 118 + 12 = 130 dc ✓
Round 4
- Ch 3 (counts as first dc).
- 1 dc in each st along the straight sides.
- At each rounded end, add 6 increases per end (12 total), spacing them one stitch farther apart than in Round 3.
- Join with sl st to top of ch-3.
Stitch count check: 130 + 12 = 142 dc ✓
Round 5
- Ch 3 (counts as first dc).
- 1 dc in each st along the straight sides.
- At each rounded end, add 6 increases per end (12 total), again spacing farther apart.
- Join with sl st to top of ch-3.
Stitch count check: 142 + 12 = 154 dc ✓
Round 6 (final base round — reach 160)
Only a small partial increase is needed to hit exactly 160.
- Ch 3 (counts as first dc).
- 1 dc in each st along both straight sides.
- At each rounded end, add 3 increases per end (6 total) — work 2 dc in a st three times per end, evenly spaced across the curve.
- Join with sl st to top of ch-3.
Stitch count check: 154 + 6 = 160 dc ✓ 🎉
The oval base is now complete at 160 dc.
Finishing
- Fasten off if the base is your stopping point, or continue directly upward for the bag body.
- Weave in all ends with a tapestry needle.
- Block the base flat: lightly dampen and pin into a smooth oval, then let dry. Cotton holds its shape beautifully once blocked and gives you a firm, professional-looking bottom.
Ready to Build the Bag Body (optional next step)
To turn this into the market tote:
- After reaching 160 dc, do not increase further — work even in dc (or switch to a mesh/openwork pattern) to build the sides straight up.
- For a stretchy market-bag look, work a simple mesh: ch 2, skip 1 st, dc in next st, repeated around, for as many rounds as you like.
- Add sturdy handles at the top by leaving gaps or attaching reinforced strap loops.
Congratulations — you’ve made a flat, sturdy oval base perfect for a market tote!
Disclaimer: This pattern was generated by AI and should be reviewed for accuracy before use. While we strive for quality, AI-generated content may contain errors. Please verify measurements, stitch counts, and instructions before beginning your project. Generated by purlJam.uk
Love this pattern?
Save this pattern to your free PurlJam libraryAccess your pattern anytime
Bookmark this page to access your pattern anytime