Type
Crochet
Difficulty
beginner
Category
blanket
AI Thinking Process
Planning
Verification
Pattern
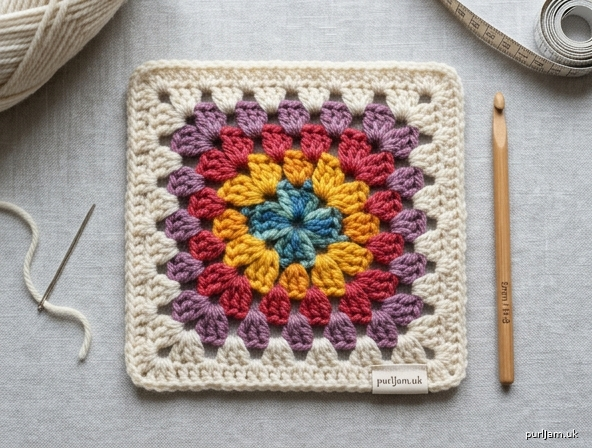
Paired-Cluster Granny Square Blanket
A traditional throw of 10 cm granny squares. Each square is worked in closed clusters, with a pair of clusters in every corner. Squares are joined with whip stitch or join-as-you-go. An optional border echoes the paired-cluster corners.
Skill level: Intermediate
Terminology: UK crochet terms throughout. (UK tr = US dc; UK dc = US sc; UK htr = US hdc; UK dtr = US tr.)
Finished measurements
One square (blocked): 10 × 10 cm (4 × 4 in)
Blanket, 10 × 12 squares, before border: 100 × 120 cm (39½ × 47¼ in)
Blanket with optional border: 110 × 130 cm (43¼ × 51¼ in)
Materials
- Yarn: Worsted weight (aran), approximately 2200 m (2405 yds) total.
- Allow about 16–18 m per square (120 squares ≈ 2000 m) plus 200 m for joining and the optional border.
- Example: 11 balls of 100 g / 200 m.
- Colour plan A (recommended): mixed contrast colours for Rounds 1–4 of each square, plus a main colour (MC) for Round 5, joining, and border (about 1400 m contrast + 800 m MC).
- Colour plan B: each square in one solid colour; join and border in MC or in matching colours.
- Hook: 5 mm crochet hook (UK 6 / US H-8), or size needed to obtain tension
- Tapestry needle
- Scissors
- Tape measure
- Blocking board and rust-proof pins
Tension (gauge)
One blocked square measures 10 × 10 cm (4 × 4 in) after 5 rounds.
Work a trial square and block it. If the square is smaller than 10 cm, change to a 5.5 mm hook. If larger, change to a 4.5 mm hook. Do not skip blocking — cluster corners pull in until they are pinned out.
Abbreviations
| Abbr. | Meaning |
|---|---|
| beg | beginning |
| ch | chain |
| cl | 3-treble cluster (see Special stitches) |
| cm | centimetre(s) |
| dc | double crochet (US sc) |
| in | inch(es) |
| MC | main colour |
| rep | repeat |
| rnd | round |
| RS | right side |
| sl st | slip stitch |
| sp(s) | space(s) |
| st(s) | stitch(es) |
| tr | treble (US dc) |
| WS | wrong side |
| yrh | yarn round hook |
| *…; rep from * | work the instructions after * as directed |
Special stitches
3-treble cluster (cl): (Yrh, insert hook in indicated st or sp, yrh, pull up a loop, yrh, draw through 2 loops) 3 times (4 loops on hook), yrh, draw through all 4 loops on hook.
Beginning cluster (beg cl): Ch 3, (yrh, insert hook in same sp, yrh, pull up a loop, yrh, draw through 2 loops) twice (3 loops on hook), yrh, draw through all 3 loops on hook.
The beg cl counts as one cluster.
Pattern notes
- Work with RS facing unless a joining method says otherwise.
- Join each round with a sl st in the top of the beg cl, unless using join-as-you-go on Round 5.
- After joining a round, slip-stitch into the next corner space to start the following round (do not work into the body of the first cluster).
- All clusters, except those in the starting ring, are worked into chain spaces, not into the chain stitches themselves.
- Corner instruction (cl, ch 2, cl) is the paired-cluster corner; keep that ch 2 consistent so the pairs remain distinct.
- Weave in ends as you go if you are changing colour; cluster squares have many short tails.
Square
Make 120.
Foundation: Make a magic ring.
(Alternative: ch 4, sl st in first ch to form a ring.)
Round 1: Beg cl in ring, ch 3, (cl in ring, ch 3) 3 times, sl st in top of beg cl.
4 clusters, 4 ch-3 sps. (4 clusters ✓)
Pull the magic ring closed.
Round 2: Sl st into first ch-3 sp, (beg cl, ch 2, cl) in same sp, ch 3, *(cl, ch 2, cl) in next ch-3 sp, ch 3; rep from * twice more, sl st in top of beg cl.
8 clusters in 4 corner pairs, 4 ch-2 corner sps, 4 ch-3 sps. (4 pairs × 2 = 8 clusters ✓)
Round 3: Sl st into first ch-2 corner sp, (beg cl, ch 2, cl) in same sp, ch 3, cl in next ch-3 sp, ch 3, *(cl, ch 2, cl) in next ch-2 corner sp, ch 3, cl in next ch-3 sp, ch 3; rep from * twice more, sl st in top of beg cl.
8 corner clusters + 4 side clusters = 12 clusters ✓. 4 ch-2 corner sps, 8 ch-3 sps (2 per side).
Round 4: Sl st into first ch-2 corner sp, (beg cl, ch 2, cl) in same sp, ch 3, (cl in next ch-3 sp, ch 3) twice, *(cl, ch 2, cl) in next ch-2 corner sp, ch 3, (cl in next ch-3 sp, ch 3) twice; rep from * twice more, sl st in top of beg cl.
8 corner clusters + 8 side clusters = 16 clusters ✓. 4 ch-2 corner sps, 12 ch-3 sps (3 per side).
Round 5 (worked plain if you will whip-stitch; see Join-as-you-go if using that method): Sl st into first ch-2 corner sp, (beg cl, ch 2, cl) in same sp, ch 3, (cl in next ch-3 sp, ch 3) 3 times, *(cl, ch 2, cl) in next ch-2 corner sp, ch 3, (cl in next ch-3 sp, ch 3) 3 times; rep from * twice more, sl st in top of beg cl. Fasten off.
8 corner clusters + 12 side clusters = 20 clusters ✓. 4 ch-2 corner sps, 16 ch-3 sps (4 per side).
Square checkpoint: Each side reads as a corner cluster, four ch-3 spaces with three side clusters between them, and a corner cluster. Four sides match. Block to 10 × 10 cm (4 × 4 in).
Making the squares
Work 120 squares. For Colour plan A, change to MC at the start of Round 5 (join MC in any corner ch-2 space and work the beg cl). For Colour plan B, work all five rounds in the square’s colour.
Suggested layout: 10 squares wide × 12 squares long. Arrange on a flat surface before joining. A random mix of colours reads as a classic scrap granny; repeating a stripe of the same colour across each row gives a calmer throw.
Joining
Use one of the following methods.
Method 1: Whip stitch (squares completed through Round 5)
- Block every square to 10 × 10 cm (4 × 4 in).
- Weave in remaining ends.
- Arrange 12 rows of 10 squares, RS up, with paired-cluster corners aligned.
- With MC (or matching yarn) and a tapestry needle, place two neighbouring squares WS together. Whip-stitch through the back loops only of corresponding stitches along the shared edge: one stitch in each cluster, two or three stitches across each ch-3, and two stitches in each corner ch-2 so the paired corners sit flat.
- Join squares into strips of 10, then join the 12 strips along their long edges.
- Keep seam tension even — a tight seam will shrink the 100 × 120 cm (39½ × 47¼ in) fabric.
Method 2: Join-as-you-go (on Round 5)
Work the first square of the blanket through Round 5 exactly as written and fasten off.
Every later square is joined on Round 5 to the square(s) already in place. Hold the new square against the completed square(s), RS facing you.
Joining one side (next square in the same row, or the first square of a new row joining only to the square below):
Work Round 5 as written until you reach the side (or sides) that must be joined. On a joining side:
- Side spaces: instead of ch 3 between clusters, work ch 1, sl st in the corresponding ch-3 sp of the adjacent square, ch 1, then work the next cluster in the new square.
- Corner on a joining side: instead of (cl, ch 2, cl), work (cl, ch 1, sl st in the adjacent square’s corner ch-2 sp, ch 1, cl).
Continue any unjoined sides with the usual ch 3 and (cl, ch 2, cl) corners. Join and fasten off.
Joining two sides (a square that has neighbours on the left and below):
Work Round 5, joining the first side as above. At the corner where three squares already meet:
- Work cl in the new square’s corner sp, ch 1, sl st in the existing three-square corner join, ch 1, cl in the same new corner sp.
Then join the second side in the same way as a single-side join. Complete remaining sides without joining.
Alignment check: Each new side cluster should sit opposite a ch-3 of the neighbouring square, and each paired corner should sit in the same corner space. If a pair lands on a side space, undo that side of Round 5 and match the spaces again.
Optional border
Adds about 5 cm (2 in) on each side. With RS facing, join MC in any outer corner ch-2 sp of the assembled blanket.
Border round 1: Ch 1 (does not count as a st), *(1 dc, ch 2, 1 dc) in corner ch-2 sp, 1 dc in each cluster, 2 dc in each ch-3 sp, and 1 dc in each join between squares; rep from * along all four sides, working the (1 dc, ch 2, 1 dc) corner in each of the four blanket corners. Sl st in first dc.
Border round 2 (paired-cluster echo): Sl st into corner ch-2 sp, (beg cl, ch 2, cl) in same sp, ch 2, skip 2 dc, *cl in next dc, ch 2, skip 2 dc; rep from * to next blanket corner, adjusting by skipping 1 dc or 3 dc once per side if needed so a corner pair lands in the corner ch-2, then work (cl, ch 2, cl) in that corner ch-2, ch 2, skip 2 dc; continue in this way around. Sl st in top of beg cl.
Each blanket corner is a pair of clusters (cl, ch 2, cl) ✓.
Border round 3: Ch 1, 1 dc in each cluster, 2 dc in each ch-2 sp along the sides, and (1 dc, ch 2, 1 dc) in each corner ch-2. Sl st in first dc. Fasten off.
If a side of Round 2 is slightly short or long, skip one fewer or one more dc on that side only — never skip a corner pair.
Finishing
Weave in all remaining ends on the WS.
Block the finished blanket to 100 × 120 cm (39½ × 47¼ in) without border, or 110 × 130 cm (43¼ × 51¼ in) with border. Pin out each outer paired-cluster corner so the edge is square. Wet-block (soak in lukewarm water, press out water in a towel, pin to measurements, dry flat) unless the yarn ball-band requires steam blocking only.
Care
Follow the ball-band for the yarn you used. Acrylic may be machine-washed on a gentle cycle and laid flat to dry. Wool and wool blends should be washed by hand in cool water and dried flat.
Stitch-count summary (one square)
| Round | Corner pairs | Side clusters (all 4 sides) | Total clusters | Corner sps | Side sps |
|---|---|---|---|---|---|
| 1 | — (single cl at each corner) | 0 | 4 | 4 ch-3 | — |
| 2 | 4 | 0 | 8 | 4 ch-2 | 4 ch-3 |
| 3 | 4 | 4 | 12 | 4 ch-2 | 8 ch-3 |
| 4 | 4 | 8 | 16 | 4 ch-2 | 12 ch-3 |
| 5 | 4 | 12 | 20 | 4 ch-2 | 16 ch-3 |
Round 1: 4 ✓ · Round 2: 8 ✓ · Round 3: 8 + 4 = 12 ✓ · Round 4: 8 + 8 = 16 ✓ · Round 5: 8 + 12 = 20 ✓
Blanket: 10 × 12 = 120 squares ✓ · 10 × 10 cm = 100 cm wide ✓ · 12 × 10 cm = 120 cm long ✓ · Border +5 cm each side → 110 × 130 cm ✓
Disclaimer: This pattern was generated by AI and should be reviewed for accuracy before use. While we strive for quality, AI-generated content may contain errors. Please verify measurements, stitch counts, charts, and instructions before beginning your project. Generated by purlJam.uk
Love this pattern?
Save this pattern to your free PurlJam libraryAccess your pattern anytime
Bookmark this page to access your pattern anytime