Type
Crochet
Difficulty
intermediate
Category
bag
AI Thinking Process
Planning
Verification
Pattern
ريماس Pencil Case
Advanced Crochet Pattern (US Terms)
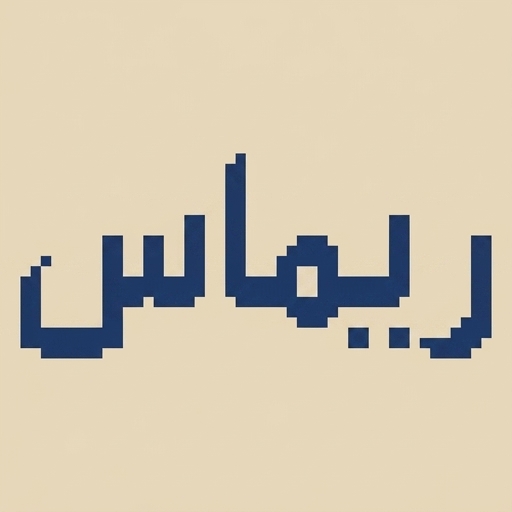
A compact, sturdy pencil case worked in worsted-weight cotton from the bottom up in half double crochet. The body is fixed at 42 hdc around. The name ريماس is added from the separate attached stitch chart using tapestry/colorwork hdc. Finished with a zipper closure and optional wrist strap.
Sizes
One size: approx. 5¼" wide × 3½–4" tall (13.5 cm × 9–10 cm) lying flat, after zipper insertion.
Yarn
Worsted weight (category 4) cotton or cotton-blend recommended for structure and stitch definition.
- Main Color (MC): 80–100 yd (75–90 m)
- Contrast Color (CC) for name: 20–30 yd (18–28 m) Sample used 100% cotton worsted.
Hook & Notions
- US G/6 (4.0 mm) or size needed to obtain gauge
- Yarn needle
- Stitch marker
- 7–8" (18–20 cm) zipper to match MC
- Sewing needle and matching thread for zipper
- Optional: 1 small swivel clasp or D-ring for wrist strap
Gauge
16 hdc × 12 rows = 4" (10 cm) in hdc worked in the round, blocked. Take time to check gauge. Adjust hook size if necessary so the 42-st circumference measures approximately 10½" (26.5 cm) around (5¼" / 13.5 cm flat).
Abbreviations (US)
- ch: chain
- hdc: half double crochet
- sc: single crochet
- sl st: slip stitch
- st(s): stitch(es)
- MC: main color
- CC: contrast color
- PM: place marker
- rep: repeat
- rnd(s): round(s)
- BLO: back loop only
- RS: right side
- WS: wrong side
Special Stitches & Techniques
- Tapestry / Intarsia hdc: Carry the unused color loosely along the WS (inside) of the work and work over it when possible to avoid long floats. Change color in the last yarn-over of the stitch before the new color.
- Invisible join (optional): For a cleaner seam, finish last st of rnd, remove hook, insert hook under both loops of first st from back to front, pull loop through, ch 1 to begin next rnd if turning, or continue in continuous spiral.
- Zipper insertion: Hand-sew with backstitch or whipstitch for control.
Construction Notes
- Worked bottom-up in rounds.
- Base is an elongated oval that reaches exactly 42 hdc.
- Body is worked even at 42 hdc.
- The name chart is centered on the front.
- Arabic name ريماس reads right-to-left; follow the attached chart exactly for letter orientation and spacing.
- Keep 42 sts constant on every body round (including chart rounds).
Attached Stitch Chart
Use the separate attached chart panel supplied with this pattern for the visual grid of the name ريماس.
The chart appears as a standalone panel immediately after the written pattern (or in the accompanying chart file/image).
How to read the chart (crochet):
- Each square = 1 hdc.
- Work chart rounds in the same direction as the body (typically right-to-left on RS if working in joined turned rounds, or continuously if spiral). Confirm your personal round direction and mark the start of the round.
- Because the name is Arabic, the chart is already drawn for correct right-to-left visual reading when the piece is viewed from the RS. Do not flip or mirror unless the chart key explicitly instructs you to do so.
- Color key: open/light squares = MC; filled/dark squares = CC (or as labeled on the attached chart).
- Begin the chart after the base and any plain body rounds indicated below so the name sits roughly centered vertically on the finished case front.
- Chart width is designed to fit inside the 42-st circumference with plain MC sts on either side for centering. Count the chart stitches and place the first CC st so the design is centered:
(42 – chart width) ÷ 2 = number of MC sts before the chart begins on each chart round.
Example: if chart is 28 sts wide → (42 – 28) = 14 → 7 MC sts each side. - Maintain exactly 42 sts on every round. Do not add or skip stitches inside the chart.
- Carry CC only across the chart width plus 1–2 sts; cut and restart or use bobbins/intarsia for cleaner inside if preferred. Weave floats every 3–4 sts if carrying.
- After the final chart round, break CC and continue with MC only.
Pattern Instructions
Base
With MC, ch 13.
Rnd 1: Hdc in 2nd ch from hook and in each ch across to last ch, 3 hdc in last ch; rotate to work along opposite side of foundation ch, hdc in each ch across, 2 hdc in last ch (same ch as first hdc). Join with sl st to first hdc (or begin spiral and PM). (26 hdc)
Rnd 2: Ch 1 (does not count as st here and throughout if using joined rnds), 2 hdc in first st, hdc in next 10 sts, 2 hdc in each of next 3 sts, hdc in next 10 sts, 2 hdc in each of last 2 sts. Join. (32 hdc)
Rnd 3: Ch 1, 2 hdc in first st, hdc in next 11 sts, [2 hdc in next st, hdc in next st] 3 times, hdc in next 10 sts, [2 hdc in next st, hdc in next st] 2 times. Join. (38 hdc)
Rnd 4: Ch 1, 2 hdc in first st, hdc in next 12 sts, [2 hdc in next st, hdc in next 2 sts] 3 times, hdc in next 9 sts, [2 hdc in next st, hdc in next 2 sts] 2 times, hdc in last st. Join. (44 hdc)
Rnd 5 (decrease to exact 42): Ch 1, hdc in first 20 sts, hdc2tog, hdc in next 20 sts, hdc2tog. Join. (42 hdc)
(Inline check: 44 – 2 = 42 ✓)
Base should now measure approx. 5¼" (13.5 cm) long × 2½" (6.5 cm) wide. Adjust last rnd if needed to hit exactly 42 sts while keeping an even oval.
Body
Work even in hdc on 42 sts.
Rnds 6–8 (or desired plain rounds before chart): Ch 1, hdc in each st around. Join. (42 hdc)
Place a marker on the st that will be the center front if desired.
Chart Rounds:
Work the attached ريماس chart centered on the 42-st round using tapestry hdc (MC background, CC for letters).
- On each chart round: hdc in MC across the calculated side stitches, work chart stitches changing to CC as indicated, then finish the round in MC.
- Keep total = 42 hdc every round.
- Work the number of rounds shown on the attached chart.
(Inline check: side MC + chart width + side MC = 42 ✓)
After chart is complete, break CC and weave in ends on WS.
Plain Body Rounds after chart: Continue with MC only.
Rnds X–Y: Ch 1, hdc in each st around. Join. (42 hdc)
Work until total body height from top of base is approximately 3½–4" (9–10 cm), or desired finished height before zipper. Typical total body rounds after base: 12–16 depending on gauge and chart height.
Final Body Rnd (optional firm edge): Ch 1, hdc BLO in each st around. Join. (42 hdc)
Fasten off MC, leaving a long tail only if you will crochet the zipper in; otherwise weave in.
Top Edge & Zipper Preparation
With RS facing, join MC at side “seam” if desired.
Work 1 rnd sc evenly around (42 sc) for a stable zipper edge. Join, fasten off. Weave in all ends securely on WS. Block lightly if needed to even the fabric and open the chart stitches.
Zipper
Pin zipper face-down to WS of top edge so zipper teeth sit just above the sc edge (or centered in the opening).
Using sewing needle and thread, backstitch or whipstitch zipper tape firmly to the sc rnd on both sides. Check that the case opens and closes smoothly and that the 42-st circumference is not gathered or stretched. Reinforce ends of zipper with extra stitches.
Optional Wrist Strap / Handle
With MC, ch 41.
Row 1: Hdc in 2nd ch from hook and each ch across. (40 hdc)
Rows 2–3: Ch 1, turn, hdc in each st across.
Fasten off. Fold short ends and sew securely to one short end of the case (or attach via D-ring/swivel clasp sewn to the case corner) to form a wrist loop. Alternatively make a shorter 6–8" tab handle.
Finishing
Weave in any remaining ends.
Turn RS out.
Insert pencils/pens and test zipper.
Optional: line with fabric for extra polish (hand-stitch lining to zipper tape).
Stitch Count Summary (Critical Checks)
- Base final rnd: 42 hdc ✓
- Every body & chart rnd: 42 hdc ✓
- Chart integration: (42 – chart width) even split left/right ✓
- Gauge: 42 sts ≈ 10½" circumference ≈ 5¼" flat width ✓
Design Notes for Advanced Crocheters
- Continuous spiral can be used instead of joined rnds; keep marker moving and be careful with chart alignment.
- For sharper letter definition, work chart in sc instead of hdc (adjust row gauge and total height accordingly) while keeping 42 sts.
- If the attached chart contains tall Arabic letterforms, add extra plain rnds above/below so the name sits in the optical center.
- Reinforce zipper ends with a few extra sc or fabric glue if the case will see heavy daily use.
Enjoy your personalized ريماس pencil case!
Disclaimer: This pattern was generated by AI and should be reviewed for accuracy before use. While we strive for quality, AI-generated content may contain errors. Please verify measurements, stitch counts, charts, and instructions before beginning your project. Generated by purlJam.uk
Love this pattern?
Save this pattern to your free PurlJam libraryAccess your pattern anytime
Bookmark this page to access your pattern anytime