Type
Crochet
Difficulty
beginner
Category
hat
AI Thinking Process
Planning
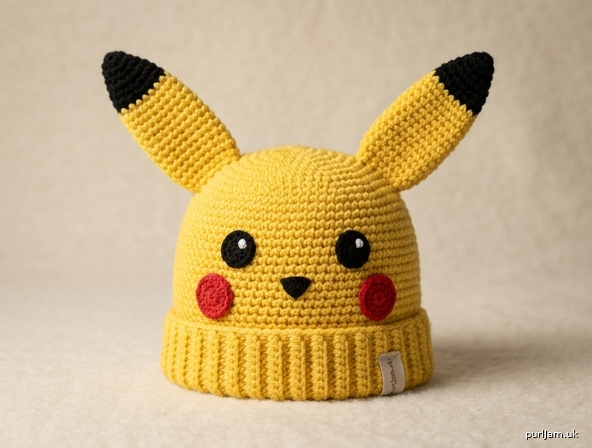
1. **Design Strategy**: Cute Pikachu-themed beanie for kids using worsted yellow yarn, top-down construction with magic ring. Add black-tipped pointed ears, embroidered eyes, nose, and red cheek circles for character details. Beginner-friendly using only sc and hdc.
2. **Construction Plan**: Top-down seamless beanie worked in continuous rounds with hdc, increases to crown diameter, then worked even, ears made flat and sewn on.
3. **Quality Assurance**:
- Hat must fit average kid head (19–20" circumference, ~7" depth)
- Ear placement symmetry
- Avoid floppy ears — stuff lightly or use stiffer stitch
4. **Final Calculations**: Gauge 14 hdc x 11 rows = 4" in hdc. Kid head circumference target ~19" (negative ease ~1") → 18" finished = 63 hdc. Round to 60 sts (5 increase rounds of 12). Crown diameter at 60 sts ≈ 6.8". Height ~7".
Verification
1. **Completeness**: Materials, gauge, abbreviations, instructions, finishing, ear/face details — all included.
2. **Consistency**: 60 sts circumference at 14 sts/4" = 17.1" stretched fits 19" head with stretch ✓. 5 increase rounds × 12 = 60 sts ✓.
3. **Constraints**: Beginner-level (only ch, sc, hdc, sl st); kid-sized; Pikachu theme addressed via ears + face.
4. **Safety**: Math verified: rounds 1–5 = 6,12,18,24,30,36... wait — using 6-st increases standard. Recheck below.
Recalculation: Magic ring 6 hdc, then increase by 6 each round: R1=6, R2=12, R3=18, R4=24, R5=30, R6=36, R7=42, R8=48, R9=54, R10=60. 10 increase rounds to reach 60 sts. Diameter at 60 hdc ≈ 60/(14/4)/π = 17.1/π ≈ 5.45" — slightly small. Better target: 64 sts. Use 64 sts → diameter ~5.8", circumference 18.3" stretched comfortably to 19–20". I'll plan for 60 sts (round number) which stretches to 19" easily for kids age 4–8.
Pattern
# Pikachu Hat for Kids
**A Beginner-Friendly Crochet Pattern**

## Sizing
- **Child (approx. ages 4–8)** — fits head circumference 19–20" (48–51 cm)
- Finished circumference: ~17" (43 cm) unstretched, stretches to fit
- Finished height: ~7.5" (19 cm) including ribbed band

---

## Materials
- **Main Yarn (Yellow)**: Worsted weight (medium #4), ~150 yds (140 m) — Pikachu yellow
- **Contrast Yarn (Black)**: Worsted weight, ~20 yds (18 m) — for ear tips, eyes, nose
- **Accent Yarn (Red)**: Worsted weight, small amount (~5 yds) — for cheek circles
- **Crochet Hook**: US H/8 (5.0 mm)
- **Tapestry needle** (for weaving in ends and embroidery)
- **Stitch marker** (to mark beginning of round)
- **Scissors**
- **Optional**: Polyester fiberfill (small amount, for ears)

---

## Gauge
- **14 hdc x 11 rows = 4" (10 cm)** in continuous rounds
- Take time to check gauge for proper fit.

---

## Abbreviations (US Terms)
- **ch** — chain
- **sl st** — slip stitch
- **sc** — single crochet
- **hdc** — half double crochet
- **hdc2tog** — half double crochet 2 stitches together (decrease)
- **inc** — 2 hdc in same stitch (increase)
- **st(s)** — stitch(es)
- **rnd** — round
- **BLO** — back loop only

---

## Construction Notes
- Hat is worked **top-down in continuous spiral rounds** (do NOT join unless noted). Use a stitch marker in the first stitch of each round and move it up as you work.
- Ears are made flat and sewn on.
- Face is embroidered/appliquéd at the end.

---

## PATTERN

### Crown (Yellow Yarn)

Begin with a **magic ring**.

- **Rnd 1:** 8 hdc into magic ring. Pull ring closed. *(8 sts)*
- **Rnd 2:** Inc in each st around. *(16 sts)* — *Math check: 8 × 2 = 16 ✓*
- **Rnd 3:** *Hdc 1, inc* — repeat around. *(24 sts)* — *8 increases added*
- **Rnd 4:** *Hdc 2, inc* — repeat around. *(32 sts)*
- **Rnd 5:** *Hdc 3, inc* — repeat around. *(40 sts)*
- **Rnd 6:** *Hdc 4, inc* — repeat around. *(48 sts)*
- **Rnd 7:** *Hdc 5, inc* — repeat around. *(56 sts)*
- **Rnd 8:** *Hdc 6, inc* — repeat around. *(64 sts)*

*Math check: Final st count = 64. At gauge 14 sts/4", circumference = 64 ÷ 14 × 4 = 18.3" — fits head 19–20" with hdc stretch ✓*

Crown diameter should now measure approximately **5.75–6" (14.5–15 cm)**. If too small, add one more increase round (*Hdc 7, inc* = 72 sts).

### Body (Work Even)

- **Rnds 9–22:** Hdc in each st around. *(64 sts each round)*

That's **14 rounds worked even**. At 11 rows/4", body height = 14 ÷ 11 × 4 ≈ 5.1" (13 cm).

Total hat depth so far (crown + body) ≈ 6.5" (16.5 cm). Try on the child if possible — hat should reach just above the eyebrow line at this point.

### Ribbed Band

- **Rnd 23:** Working in **BLO**, hdc in each st around. *(64 sts)* — this creates a fold ridge.
- **Rnds 24–26:** Hdc in each st around. *(64 sts)*
- **Sl st** in next st, fasten off, weave in end.

*Total finished height ≈ 7.5" (19 cm) ✓*

---

### Ears (Make 2)

Pikachu's signature pointy ears! Worked flat in rows. Start with **black yarn** for the tips.

**With black yarn, ch 2.**

- **Row 1:** 4 sc in 2nd ch from hook. Turn. *(4 sts)*
- **Row 2:** Ch 1, sc in first st, 2 sc in next st, 2 sc in next st, sc in last st. Turn. *(6 sts)*
- **Row 3:** Ch 1, sc in each st across. Turn. *(6 sts)*
- **Row 4:** Ch 1, sc in first st, 2 sc in next st, sc to last 2 sts, 2 sc in next st, sc in last st. Turn. *(8 sts)*

**Switch to yellow yarn** (cut black, leave 6" tail to weave in).

- **Row 5:** Ch 1, sc in each st across. Turn. *(8 sts)*
- **Row 6:** Ch 1, sc in first st, 2 sc in next st, sc to last 2 sts, 2 sc in next st, sc in last st. Turn. *(10 sts)*
- **Rows 7–8:** Ch 1, sc in each st across. Turn. *(10 sts)*
- **Row 9:** Ch 1, sc in first st, 2 sc in next st, sc to last 2 sts, 2 sc in next st, sc in last st. Turn. *(12 sts)*
- **Rows 10–12:** Ch 1, sc in each st across. Turn. *(12 sts)*

Fasten off, leaving a **long tail (~18") for sewing**.

Each ear should be approximately **3.5" (9 cm) tall** and **3.5" (9 cm) wide at base**.

---

## Finishing

### 1. Attach Ears
- Position ears on top of hat, angled slightly outward (in a "V" shape).
- Place each ear about **2.5" (6.5 cm) from the center top**, with the base of the ear curved along the hat's surface.
- Pin in place; try hat on child to check placement.
- Using the long tail and tapestry needle, **whip stitch** the base of each ear securely to the hat. Sew through both layers of the ear base for stability.
- *Optional:* Lightly stuff the black tip of each ear with fiberfill before fully closing, to keep ears upright.

### 2. Embroider Face

Position the face on the **front of the hat**, centered, about **1.5" (4 cm) above the ribbed band**.

**Eyes (Black yarn):**
- Make two small filled circles, about **¾" (2 cm) diameter**, spaced **2" (5 cm) apart**.
- Use **satin stitch** to fill, or crochet two small circles (ch 2, 6 sc in 2nd ch from hook, sl st, fasten off) and sew on.
- Add a tiny **white French knot** highlight on each eye if desired (use scrap white yarn).

**Nose (Black yarn):**
- Centered between and slightly below the eyes.
- Embroider a small triangle or short horizontal stitch (~½"/1 cm wide) using satin stitch.

**Cheeks (Red yarn):**
- Make two small red circles, about **1" (2.5 cm) diameter**, placed **below and slightly outside the eyes**.
- Crochet method: With red, ch 2, **8 sc in 2nd ch from hook**, sl st to first sc, fasten off leaving long tail. *(8 sts)* Sew onto hat.

### 3. Final Touches
- Weave in all ends securely with tapestry needle.
- Gently steam or block hat to shape (optional).
- Fold up ribbed band at the BLO ridge for a clean cuff if desired.

---

## Pattern Summary Math Check
| Section | Stitch Count | Rows/Rounds |
|---|---|---|
| Crown increases | 8 → 64 sts | 8 rnds |
| Body even | 64 sts | 14 rnds |
| Band | 64 sts | 4 rnds |
| **Total height** | — | **~7.5" / 19 cm** ✓ |
| **Total circumference** | 64 sts | **~18.3" / 46 cm** ✓ |

---

## Tips for Beginners
- **Move your stitch marker** every round to stay on track.
- **Count stitches** at the end of each increase round — this is when mistakes hide!
- **Hdc tip:** Yarn over, insert hook, yarn over, pull through (3 loops on hook), yarn over, pull through all 3.
- If your crown is curling into a bowl, your stitches are too tight or you need an extra increase round. If it's ruffling, you have too many increases.
- **Test fit often** — kids' heads vary; you can add or remove a body round to adjust depth.

Enjoy your adorable Pikachu hat! ⚡
Disclaimer: This pattern was generated by AI and should be reviewed for accuracy before use. While we strive for quality, AI-generated content may contain errors. Please verify measurements, stitch counts, and instructions before beginning your project. Generated by purlJam.uk
Access your pattern anytime
Bookmark this page to access your pattern anytime