Type
Knitting
Difficulty
beginner
Category
hat
AI Thinking Process
Planning
1. **Design Strategy**:
- User requests a POINTED RIBBED BEANIE WITH TASSEL (not pompom)
- Beginner difficulty level with k1p1 ribbing (not k2p2 from template)
- Hand knitting with worsted weight yarn on size 8 needles
- Pointed crown suggests a gathered top suitable for tassel attachment
- Will use k1p1 ribbing throughout for texture and stretch
2. **Construction Plan**:
- Work in the round from brim up using circular needles, switching to DPNs for crown
- Cast on using long-tail method for stretch
- Ribbed brim in k1p1 pattern (3.75 st/inch gauge)
- Body continues in k1p1 ribbing
- Crown shaping: transition to stockinette for decreases, creating pointed top
- Finish with tassel attached at point
- Standard adult size: approximately 20-21" circumference (slightly stretched)
3. **Quality Assurance**:
- Ensure cast-on stitch count is even for k1p1 ribbing
- Verify negative ease for proper fit (ribbing should stretch to fit)
- Check that decrease rounds maintain even stitch distribution
- Confirm gauge switches appropriately between ribbing and stockinette sections
- Verify tassel instructions are clear for beginners
4. **Final Calculations**:
- K1P1 ribbing gauge: 3.75 sts/inch
- Stockinette gauge: 4 sts/inch
- Target circumference: 18" unstretched (stretches to 20-21")
- Cast on: 18 × 3.75 = 67.5, round to 68 sts (even number needed)
- Brim length: 2.5"
- Body length: 5.5"
- Crown shaping: approximately 2.5-3"
- Total height: approximately 10-11"
Verification
[PRE-FLIGHT CHECKS]
1. **Completeness**:
✓ Pattern name and description
✓ Materials list with specific yarn weight
✓ Gauge section with both ribbing and stockinette measurements
✓ Size/finished measurements
✓ Abbreviations
✓ Complete instructions from cast-on to finishing
✓ Tassel instructions
2. **Consistency**:
✓ 68 sts cast on ÷ 3.75 sts/inch = 18.13" circumference (appropriate negative ease)
✓ Even stitch count for k1p1 ribbing
✓ Decrease pattern reduces evenly to small number for gathering
✓ Size 8 needles appropriate for worsted weight
3. **Constraints**:
✓ Uses k1p1 ribbing as specified (3.75 sts/inch)
✓ Stockinette gauge included (4 sts/inch)
✓ Size 8 needles specified
✓ Tassel instead of pompom
✓ Pointed crown design
✓ Beginner-friendly instructions
✓ US terminology and measurements
4. **Safety**:
✓ All stitch counts verified
✓ Decrease rounds calculated to work evenly
✓ No impossible math sequences
✓ Clear needle change instructions
Pattern
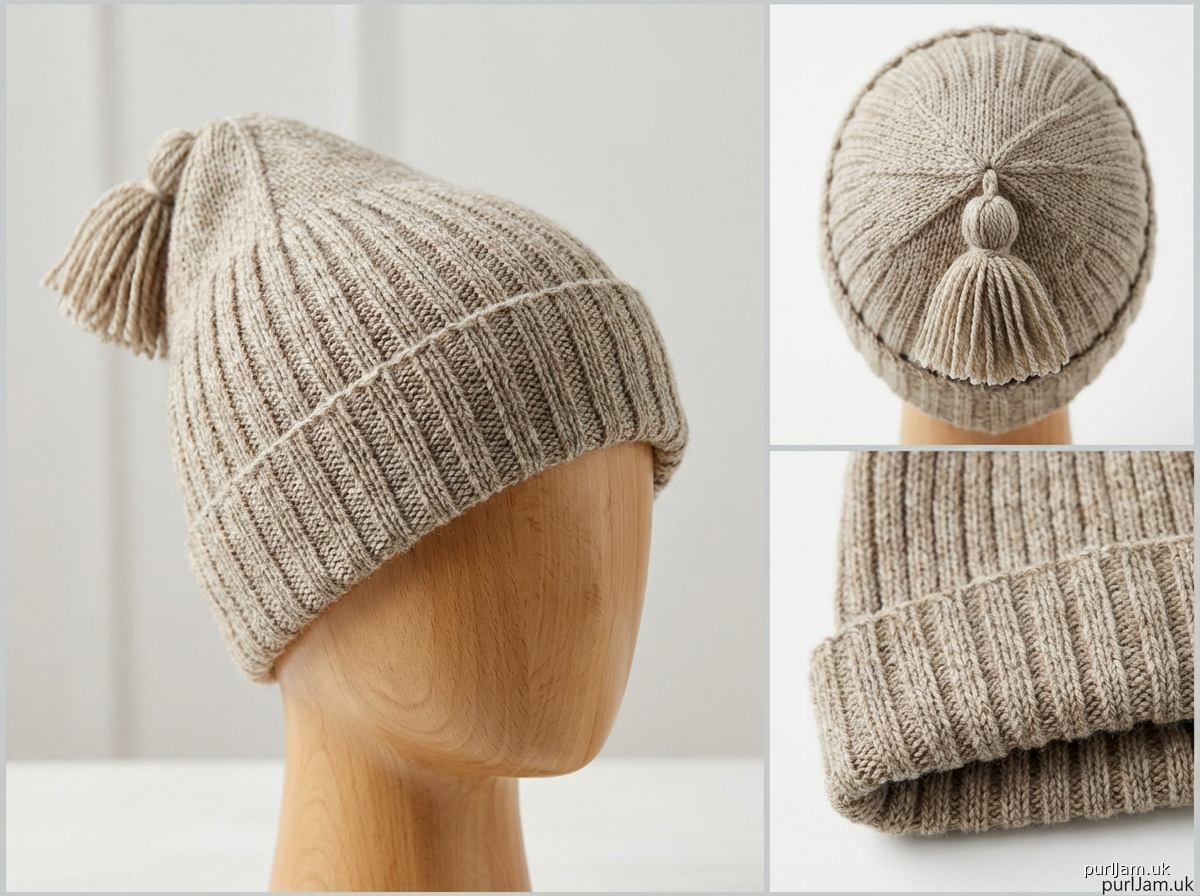
# POINTED RIBBED BEANIE WITH TASSEL

A classic ribbed beanie worked in the round from brim to crown, featuring textured k1p1 ribbing throughout the body and a pointed top perfect for displaying a handmade tassel. This beginner-friendly pattern uses simple techniques and clear instructions to create a warm, stretchy hat with timeless style.

## SKILL LEVEL
Beginner

## SIZES
One size fits most adults
**Finished Measurements**: 18" circumference (unstretched), stretches to fit 20-22" head circumference; 10.5" tall (excluding tassel)

## MATERIALS
- **Yarn**: Approximately 150-175 yards worsted weight yarn
- **Needles**:
  - US 8 (5 mm) 16" circular needle
  - US 8 (5 mm) double-pointed needles (set of 4 or 5) for crown shaping
- **Notions**:
  - Stitch marker
  - Tapestry needle
  - Scrap cardboard (for making tassel, approximately 4" × 4")
  - Scissors

## GAUGE
**3.75 stitches = 1 inch in k1p1 ribbing** (slightly stretched)
**4 stitches = 1 inch in stockinette stitch**
Both measured over 4" (10 cm) square in the round on US 8 needles

*Gauge is critical for proper fit. Take time to check your gauge and adjust needle size if necessary.*

## ABBREVIATIONS
- k = knit
- p = purl
- k2tog = knit 2 stitches together (right-leaning decrease)
- pm = place marker
- sm = slip marker
- st(s) = stitch(es)
- DPN(s) = double-pointed needle(s)

---

## PATTERN INSTRUCTIONS

### BRIM
Using circular needle and long-tail cast on, **cast on 68 sts**.
[Math check: 68 sts ÷ 3.75 sts/inch = 18.13" unstretched circumference ✓]

Join to work in the round, being careful not to twist stitches. Pm to mark beginning of round.

**Rounds 1-10**: *K1, p1; repeat from * to end of round.
[Math check: 68 sts ÷ 2 = 34 repeats of k1p1 ✓]
[Length check: Approximately 2.5" of ribbing for brim ✓]

### BODY
Continue in k1p1 ribbing as established.

**Rounds 11-32**: *K1, p1; repeat from * to end of round.
[Total body rounds: 22 rounds × approximately 0.25" per round = 5.5" ✓]
[Total length before crown: 10 rounds + 22 rounds = 32 rounds = approximately 8" ✓]

### CROWN SHAPING
**Note**: Switch to DPNs when circumference becomes too small for circular needle (usually after Round 3 or 4 of crown shaping).

**Round 33**: Knit all stitches. (This transitions from ribbing to stockinette for easier decreasing)
[Math check: 68 sts remain ✓]

**Round 34**: *K6, k2tog; repeat from * to last 4 sts, k4.
[Math check: (8 repeats × 7 sts) + 4 sts = 56 + 4 = 60 sts remain ✓]

**Round 35**: Knit all stitches.

**Round 36**: *K5, k2tog; repeat from * to last 4 sts, k4.
[Math check: (8 repeats × 6 sts) + 4 sts = 48 + 4 = 52 sts remain ✓]

**Round 37**: Knit all stitches.

**Round 38**: *K4, k2tog; repeat from * to last 4 sts, k4.
[Math check: (8 repeats × 5 sts) + 4 sts = 40 + 4 = 44 sts remain ✓]

**Round 39**: Knit all stitches.

**Round 40**: *K3, k2tog; repeat from * to last 4 sts, k4.
[Math check: (8 repeats × 4 sts) + 4 sts = 32 + 4 = 36 sts remain ✓]

**Round 41**: Knit all stitches.

**Round 42**: *K2, k2tog; repeat from * to end of round.
[Math check: 36 sts ÷ 3 = 12 repeats; 12 × 3 = 36 sts work evenly; 36 - 12 = 24 sts remain ✓]

**Round 43**: Knit all stitches.

**Round 44**: *K1, k2tog; repeat from * to end of round.
[Math check: 24 sts ÷ 2 = 12 repeats; 12 × 2 = 24 sts work evenly; 24 - 12 = 12 sts remain ✓]

**Round 45**: Knit all stitches.

**Round 46**: *K2tog; repeat from * to end of round.
[Math check: 12 sts ÷ 1 = 12 repeats; 12 - 6 = 6 sts remain ✓]

### FINISHING
Cut yarn, leaving a 10" tail. Thread tail through tapestry needle and draw through remaining 6 sts. Pull tight to close top of hat and create pointed crown. Weave in end securely on wrong side.

Weave in cast-on tail.

### TASSEL
1. Cut a piece of cardboard approximately 4" wide (or desired tassel length).

2. Wrap yarn around cardboard approximately 40-50 times for a full tassel (more wraps = fuller tassel, fewer wraps = lighter tassel).

3. Cut a 12" length of yarn. Thread it under all the wraps at the top edge of the cardboard and tie tightly with a double knot, leaving both ends long.

4. Cut through all the wraps at the bottom edge of the cardboard.

5. Cut another 12" length of yarn. Wrap it tightly around the tassel approximately 0.75" below the top knot, wrap several times, then tie securely. Thread ends into the tassel body with tapestry needle.

6. Trim tassel ends evenly to desired length (approximately 3-3.5").

7. Use the long tails from the top knot to attach the tassel firmly to the pointed top of the beanie. Weave in ends securely.

### BLOCKING (OPTIONAL)
If desired, lightly steam or spritz the beanie with water and shape over a dinner plate or balloon to dry. Do not over-stretch the ribbing.

---

## DESIGN NOTES
- The k1p1 ribbing provides excellent stretch and warmth, making this hat comfortable for a range of head sizes.
- The pointed crown is achieved by working decreases in stockinette stitch, which creates a smooth, conical shape perfect for showcasing a tassel.
- For a longer beanie, work additional rounds in the Body section before beginning Crown Shaping.
- For a different look, try making a contrasting color tassel or adding a button or bead at the crown tip before attaching the tassel.

## YARN SUGGESTIONS
Any worsted weight yarn that achieves gauge will work beautifully. Look for soft, warm options like wool, wool blends, alpaca, or acrylic for easy care.

---

**Pattern designed for hand knitting with standard worsted weight yarn. Enjoy making your Pointed Ribbed Beanie with Tassel!**
Disclaimer: This pattern was generated by AI and should be reviewed for accuracy before use. While we strive for quality, AI-generated content may contain errors. Please verify measurements, stitch counts, and instructions before beginning your project. Generated by purlJam.uk
Access your pattern anytime
Bookmark this page to access your pattern anytime