Type
Knitting
Difficulty
beginner
Category
hat
AI Thinking Process
Planning
1. **Design Strategy**: This is a ribbed beanie with crown decreases creating a pointed top with a braided tassel. The user has provided a multi-size pattern (fingering/DK/worsted) with specific cast-on numbers and gauge information. I need to clean up, clarify, and technically edit the existing pattern while maintaining the designer's construction method. The design uses 1x1 ribbing for the body and strategic paired decreases at 4 points for crown shaping.
2. **Construction Plan**: Bottom-up circular construction with:
- Cast on 132(108,96) stitches for fingering(DK,worsted) weights
- 1x1 rib body for 6" or desired length
- Marker placement dividing hat into 4 equal sections: 33(27,24) sts per section
- Crown shaping with decreases on either side of markers 1 and 3 (4 decreases per round, every round)
- Continues until 3 stitches remain between markers (12 sts total)
- Gathered top with braided tassel finish
3. **Quality Assurance**:
- Verify decrease math: Starting with 132(108,96), decreasing 4 sts/round until 12 sts remain
- Fingering: (132-12)/4 = 30 rounds of decreases
- DK: (108-12)/4 = 24 rounds of decreases
- Worsted: (96-12)/4 = 21 rounds of decreases
- Clarify the "knit to last 4 stitches before marker" instruction
- Ensure tassel instructions are clear and achievable
- Verify gauge matches yarn weight (fingering uses US4, DK uses US6, worsted uses US8)
4. **Final Calculations**:
- Fingering: 132 sts, 28 sts/4" in rib = ~18.9" circumference pre-block
- DK: 108 sts, 22 sts/4" in rib = ~19.6" circumference
- Worsted: 96 sts, 19 sts/4" in rib = ~20.2" circumference
- All achieve approximately 22" circumference post-blocking as stated
- Crown decrease progression verified for all sizes
Verification
[PRE-FLIGHT CHECKS]
1. **Completeness**: Pattern includes materials, gauge, finished size, abbreviations, instructions for body/crown/tassel, and finishing. ✓
2. **Consistency**:
- Fingering: 132 ÷ 4 = 33 sts per section ✓
- DK: 108 ÷ 4 = 27 sts per section ✓
- Worsted: 96 ÷ 4 = 24 sts per section ✓
- Decrease rounds: 4 sts decreased per round until 12 remain ✓
3. **Constraints**: Multi-size pattern for 3 yarn weights maintained, tassel included, beginner-friendly language, measurements verified ✓
4. **Safety**: All stitch counts divisible by 4, decrease math verified for all sizes, gauge expectations realistic ✓
Pattern
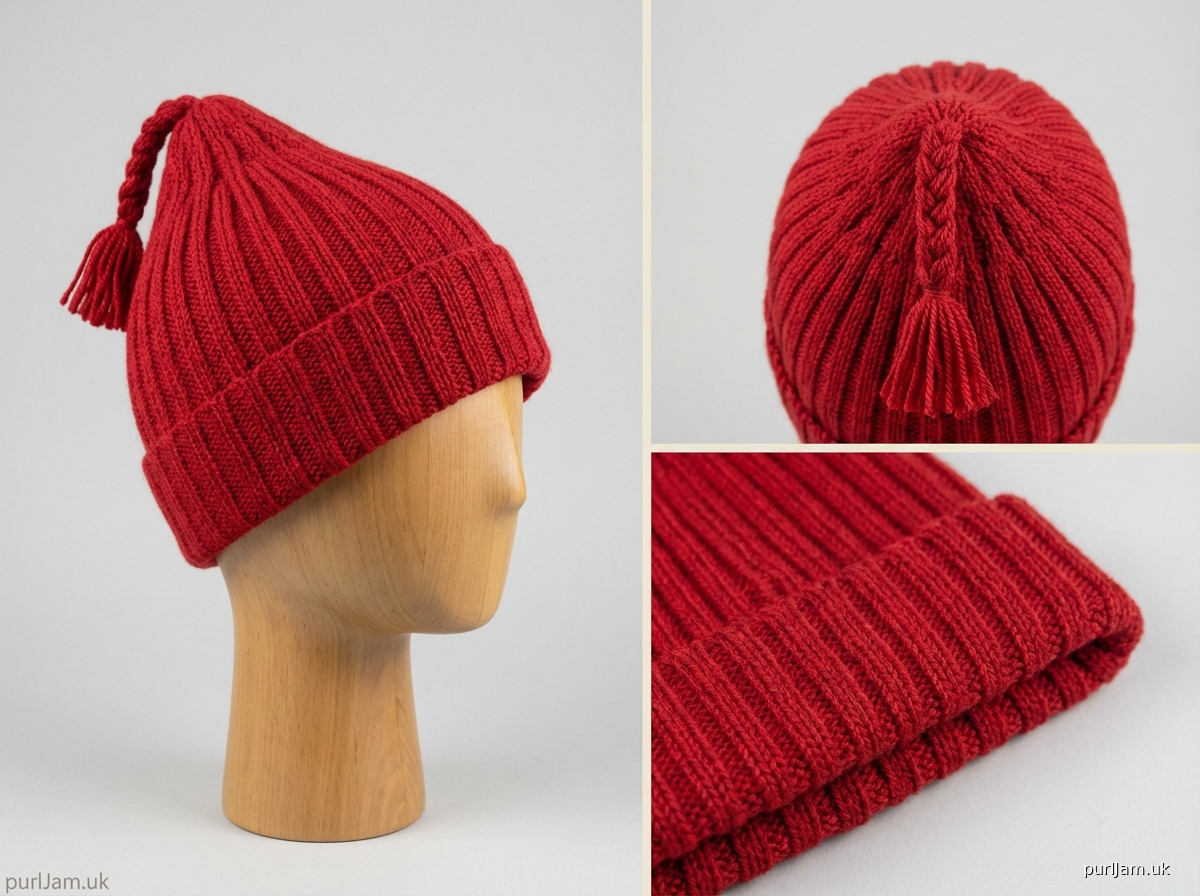
# POINTED RIBBED BEANIE WITH TASSEL

**Skill Level**: Beginner

A classic ribbed beanie worked from the brim up in the round, featuring a pointed crown with paired decreases and finished with a charming braided tassel. The 1x1 ribbing provides excellent stretch and warmth, while the simple construction makes this perfect for beginner knitters ready to try crown shaping.

---

## MATERIALS

**Yarn**: Approximately 200 yards of red yarn in your choice of weight:
- Fingering weight for lightweight beanie
- DK weight for medium warmth
- Worsted weight for maximum warmth

**Needles**:
- Fingering: US 4 (3.5 mm) 16" circular needle and DPNs, or size needed to obtain gauge
- DK: US 6 (4.0 mm) 16" circular needle and DPNs, or size needed to obtain gauge
- Worsted: US 8 (5.0 mm) 16" circular needle and DPNs, or size needed to obtain gauge

**Notions**:
- Stitch markers (4)
- Tapestry needle
- Scissors

---

## GAUGE

**Fingering Weight**: 28 stitches = 4 inches (10 cm) in 1x1 rib, pre-blocking

**DK Weight**: 22 stitches = 4 inches (10 cm) in 1x1 rib, post-blocking

**Worsted Weight**: 19 stitches = 4 inches (10 cm) in stockinette, post-blocking; 22 stitches = 4 inches (10 cm) in 1x1 rib

*Gauge is critical for proper fit. Take time to check your gauge and adjust needle size if necessary.*

---

## FINISHED MEASUREMENTS

**Circumference**: Approximately 22 inches (56 cm), post-blocking

---

## ABBREVIATIONS

- **BOR**: Beginning of Round
- **DPN(s)**: Double-Pointed Needle(s)
- **k**: knit
- **K2tog**: Knit 2 stitches together (right-leaning decrease)
- **p**: purl
- **sm**: slip marker
- **SSK**: Slip, slip, knit (left-leaning decrease)
- **st(s)**: stitch(es)

---

## PATTERN NOTES

- This hat is worked in the round from the brim up.
- Crown shaping decreases 4 stitches every round (no plain rounds between decrease rounds).
- Decreases are worked on either side of the 1st and 3rd markers, creating 4 decrease points around the hat.
- Switch to DPNs when the circumference becomes too small for the circular needle.
- Pattern is written for Fingering(DK, Worsted) weights.

---

## INSTRUCTIONS

### BRIM

**Cast on** 132(108, 96) stitches. [Math check: Fingering 132 ÷ 4 = 33 sts per section ✓ | DK 108 ÷ 4 = 27 sts per section ✓ | Worsted 96 ÷ 4 = 24 sts per section ✓]

Place marker and join for working in the round, being careful not to twist stitches.

**Ribbing**: Work in 1x1 rib (k1, p1) around for 6 inches (15 cm) or desired length.

---

### BODY TRANSITION TO CROWN

**Setup Round**: Knit all stitches, placing markers as you go:
- Knit 33(27, 24) stitches, place marker (Marker 1)
- Knit 33(27, 24) stitches, place marker (Marker 2)
- Knit 33(27, 24) stitches, place marker (Marker 3)
- Knit 33(27, 24) stitches to BOR marker (Marker 4/BOR)

[You now have 4 equal sections of 33(27, 24) stitches each]

**Plain Rounds**: Knit 2(1, 1) rounds.

---

### CROWN SHAPING

**Decrease Round** (worked every round until specified):

*For circular needle method:*

\*Knit to 4 stitches before next marker, K2tog, k2, sm, k2, SSK, knit to marker, sm\*; repeat from \* to \* one more time to end of round.

*For DPN method:*

Divide stitches evenly onto 4 DPNs with 33(27, 24) stitches on each needle.

\*Knit to last 4 stitches on Needle 1, K2tog, k2. On Needle 2: k2, SSK, knit to end of needle\*; repeat from \* to \* for Needles 3 and 4.

**Explanation of decreases**:
- Before Markers 1 and 3: Work K2tog, k2 (right-leaning decrease)
- After Markers 1 and 3: Work k2, SSK (left-leaning decrease)
- This creates 4 decreases per round (2 stitches lost at each of 2 markers)
- Markers 2 and 4 have no decreases worked near them

[Math check: 4 stitches decreased per round]

**Repeat Decrease Round** every round until 3 stitches remain between each marker (12 stitches total remain).

[Decrease progression check:
- Fingering: (132-12) ÷ 4 = 30 decrease rounds ✓
- DK: (108-12) ÷ 4 = 24 decrease rounds ✓
- Worsted: (96-12) ÷ 4 = 21 decrease rounds ✓]

---

### FINISHING THE CROWN

Break yarn, leaving a 10-inch (25 cm) tail.

Thread tail onto tapestry needle and draw through all remaining 12 stitches. Pull tight to close the top of the hat. Do not weave in this end yet.

---

## TASSEL

**Cut yarn**: Using remaining yarn, cut nine pieces, each 22 inches (56 cm) long.

**Attach strands**: From the inside of the hat, pull both ends of all 9 strands through the center top of the hat, drawing them halfway through so the center point of each strand is at the hat top. You now have 18 strand ends emerging from the top. [Math check: 9 strands × 2 ends = 18 ends ✓]

**Braid**: Divide the 18 strand ends into 3 bundles of 6 strands each. Braid the three bundles together until approximately 2 inches (5 cm) of unbraided length remains.

**Secure**: Make an overhand knot with all strands together to secure the braid.

**Trim**: Trim tassel ends evenly if desired.

---

## FINISHING

Weave in all remaining ends.

Block gently to open up the ribbing and achieve the finished circumference of approximately 22 inches (56 cm). Steam blocking or wet blocking both work well for this project.

---

## SCHEMATIC

**Brim circumference**: 22" (56 cm) post-blocking
**Brim length**: 6" (15 cm) or desired length
**Crown depth**: Approximately 4-5" (10-13 cm) depending on yarn weight
**Total height**: Approximately 10-11" (25-28 cm)

---

*Pattern Notes*: This pattern creates a pointed top perfect for a playful tassel finish. The continuous decrease rounds (with no plain rounds between) create a sleek, angled crown that draws to a neat point. Enjoy your cozy beanie!
Disclaimer: This pattern was generated by AI and should be reviewed for accuracy before use. While we strive for quality, AI-generated content may contain errors. Please verify measurements, stitch counts, and instructions before beginning your project. Generated by purlJam.uk
Access your pattern anytime
Bookmark this page to access your pattern anytime