Type
Crochet
Difficulty
intermediate
Category
basket
AI Thinking Process
Planning
Verification
Pattern
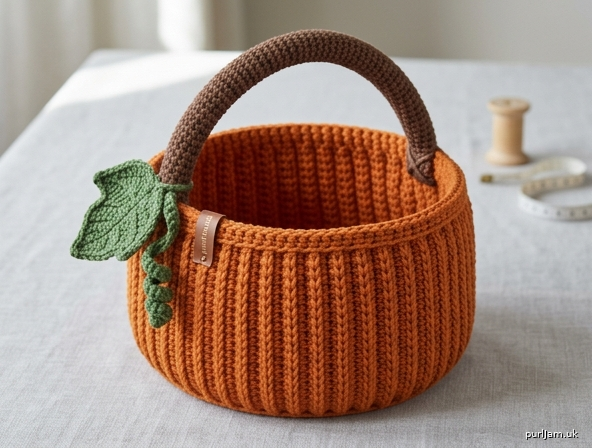
Pumpkin Basket (Cestino Zucca)
A sturdy, ribbed pumpkin basket worked in continuous rounds from the bottom up. The round base is increased until flat, a back-loop round turns the corner, and the sides are worked even in back loops only so the unused front loops stack into pumpkin segments. A brown tubular stem is sewn on as a handle, with a green leaf and curly tendril.
Skill level: Intermediate
Skills used: Magic ring, working in continuous rounds, back loop only, even-sided basket construction, simple sewn assembly.
Finished measurements
Measured after a firm block of the base; height is the basket sides, not including the handle.
| Size | Base diameter | Height (sides) | Circumference | Handle length (tube) |
|---|---|---|---|---|
| Small | 6 in (15 cm) | 4 in (10 cm) | ~19 in (48 cm) | 12 in (30.5 cm) |
| Medium | 8 in (20.5 cm) | 5½ in (14 cm) | ~25 in (63.5 cm) | 14 in (35.5 cm) |
| Large | 10 in (25.5 cm) | 6½ in (16.5 cm) | ~31 in (79 cm) | 16 in (40.5 cm) |
Instructions are written for Small (Medium, Large).
Materials
Yarn: Worsted weight (CYC 4) cotton (or cotton blend). Cotton is strongly recommended — acrylic will not hold a basket shape as well.
- MC Pumpkin orange: 150 (220, 320) yd / 137 (201, 293) m
- CC1 Brown (stem/handle): 30 (40, 50) yd / 27 (37, 46) m
- CC2 Leaf green: 15 (20, 25) yd / 14 (18, 23) m
Hook: US G/6 (4.0 mm), or a hook 1–2 sizes smaller than the yarn label, to produce a dense fabric.
Notions:
- Stitch marker
- Tapestry needle
- Small amount of polyester stuffing (or yarn scraps) for the stem handle
- Optional: clothesline or piping cord to work over for extra rigidity
- Optional: fabric stiffener spray
Gauge
18 sc and 20 rnds = 4 × 4 in (10 × 10 cm) in single crochet, worked in the round, with US G/6 (4.0 mm).
Work a 5 in (12.5 cm) swatch in the round (magic ring, increase as for the base through Rnd 8, then a few even rnds), then measure the inner 4 in (10 cm).
This gauge is for a tight basket fabric. If you have fewer stitches than 18 sc in 4 in (10 cm), go down a hook size. A slightly tight gauge is better than a loose one — the basket must stand on its own when empty.
Abbreviations (US)
- BLO — back loop only
- CC1, CC2 — contrast colors 1 and 2
- ch — chain
- dc — double crochet
- hdc — half double crochet
- inc — increase (2 sc in the same stitch)
- MC — main color
- MR — magic ring
- rep — repeat
- rnd(s) — round(s)
- sc — single crochet
- sc2tog — single crochet 2 together
- sl st — slip stitch
- st(s) — stitch(es)
- tr — treble crochet
Pattern notes
- US crochet terms throughout. Imperial measurements are given first, with metric in parentheses.
- The body is worked in continuous spirals. Do not join and do not turn at the end of a round unless instructed. Place a marker in the first stitch of every round and move it up as you go.
- Increase rate is fixed: 6 single-crochet increases, evenly spaced, every base round. Fewer increases cup the base; more ruffle it.
- Stitch count at the end of base Rnd n is always 6 × n. Example: Rnd 5 = 30 sc (6 × 5 = 30 ✓).
- After the base, one BLO round creates the 90-degree fold between floor and wall. Do not skip it.
- All remaining side rounds are also worked BLO. This is what forms the pumpkin ribs. Do not return to both loops until the final edging round.
- Side stitch count must equal the last base-round count on every round: 90 (120, 150). Count every few rounds.
- Do not use double crochet for the sides — it is too floppy for a basket.
- Optional: work the base and the first 2–3 side rounds over clothesline or piping cord for extra stiffness.
Basket body
Base (worked flat, both loops)
With MC and US G/6 (4.0 mm), make a magic ring.
Rnd 1: 6 sc in ring. Pull tail to close. (6 sc)
Rnd 2: Inc in each st around. (12 sc)
(6 increases → 6 + 6 = 12 ✓)
Rnd 3: *Sc 1, inc; rep from * around. (18 sc)
(6 increases → 12 + 6 = 18 ✓)
Rnd 4: *Sc 2, inc; rep from * around. (24 sc)
(6 increases → 18 + 6 = 24 ✓)
Rnd 5: *Sc 3, inc; rep from * around. (30 sc)
(6 increases → 24 + 6 = 30 ✓)
Rnd 6: *Sc 4, inc; rep from * around. (36 sc)
Rnd 7: *Sc 5, inc; rep from * around. (42 sc)
Rnd 8: *Sc 6, inc; rep from * around. (48 sc)
Rnd 9: *Sc 7, inc; rep from * around. (54 sc)
Rnd 10: *Sc 8, inc; rep from * around. (60 sc)
(6 × 10 = 60 ✓)
Continue in the same way, working 1 additional sc between increases each round (always 6 increases per round), through:
Rnd 15 (20, 25): *Sc 13 (18, 23), inc; rep from * around.
90 (120, 150) sc
(6 × 15 = 90 ✓; 6 × 20 = 120 ✓; 6 × 25 = 150 ✓)
Check: Base should measure about 6 (8, 10) in / 15 (20.5, 25.5) cm across and lie flat.
- If the circle cups (bowl-shaped), your stitches are taller than the gauge or the increases bunched; redistribute the 6 increases so they do not stack, and block the base under a book.
- If the circle ruffles, your stitches are wider than the gauge; go down a hook size rather than skipping increases.
Do not fasten off.
Base-to-sides transition (do not skip)
This round is the structural fold. The unused front loops form a sharp ridge around the footprint of the pumpkin.
Next rnd: Sc in BLO of each st around.
90 (120, 150) sc
Sides (pumpkin ribs)
Work even. No increases, no decreases. Continue in BLO so the ribs run straight up the pumpkin.
Next 20 (28, 32) rnds: Sc in BLO of each st around.
90 (120, 150) sc every round
Check: Height from the fold ridge should measure about 4 (5½, 6½) in / 10 (14, 16.5) cm. Add or subtract even BLO rounds if you want a squatter or taller pumpkin; stitch count does not change.
Edging rnd: Sc in both loops of each st around.
90 (120, 150) sc
This both-loop round locks the last row of ribs and gives a firm rim for the handle.
Optional polished rim: Do not fasten off. Work 1 rnd of reverse single crochet (crab stitch) in both loops: working from left to right, sc in each st around. Sl st to first crab st.
Fasten off. Weave in MC ends.
Stem handle
The handle is a lightly stuffed tube, like a pumpkin stem, sewn to opposite sides of the rim.
With CC1 (brown), make a magic ring.
Rnd 1: 8 (10, 12) sc in ring. Pull tail to close.
8 (10, 12) sc
Rnd 2: Sc in each st around.
8 (10, 12) sc
Repeat Rnd 2 until the tube measures 12 (14, 16) in / 30.5 (35.5, 40.5) cm. Stuff lightly with polyester fiberfill or yarn scraps as you go — firm enough to hold a curve, not so full that it kinks. Do not overstuff the last 1 in (2.5 cm) at each end (those ends are sewn flat).
Fasten off, leaving a 24 in (61 cm) tail for sewing.
Leaf (make 1 for Small and Medium, 2 for Large)
With CC2 (green), ch 12.
Work around both sides of the foundation chain:
Sc in 2nd ch from hook, hdc in next ch, dc in next 2 ch, tr in next 3 ch, dc in next 2 ch, hdc in next ch, 3 sc in last ch (tip);
working along the opposite side of the foundation chain, hdc in next ch, dc in next 2 ch, tr in next 3 ch, dc in next 2 ch, hdc in next ch, sc in last ch.
Sl st to first sc. Fasten off, leaving an 18 in (46 cm) tail.
The leaf is about 3 in (7.5 cm) long.
Tendril (make 1 for Small and Medium, 2 for Large)
With CC2, ch 20 (24, 28).
2 sc in 2nd ch from hook and in each ch across. The strip will coil on itself.
Fasten off, leaving a 12 in (30.5 cm) tail. Gently stretch the coil into a spiral.
Finishing
-
Block the base. Dampen the basket (spray bottle is enough). Press the base flat under a heavy book, with the sides standing, until dry. This sets the 90-degree fold.
-
Mark handle positions. Fold the basket in half so the rim forms two equal arcs. Place a marker at each fold on the rim — the two points are opposite. Each attachment sits on the rim and spans about 1 in (2.5 cm) of stitches.
-
Sew the stem handle. Flatten each unstuffed end of the tube. Using the long brown tail and a tapestry needle, sew one end to the inside of the rim at the first marker, stitching through both loops of the edging round and through the handle several times. Repeat at the opposite marker with the other end. The handle should arch over the opening like a pail handle.
Reinforce each join: add a second pass of whip stitch, then a few extra stitches through the BLO ribs just below the rim so the handle cannot pull the edge out of shape. Handles take the whole load of the basket — do not skimp here.
-
Attach leaf and tendril. Sew the leaf at one handle join, sitting on the outside of the rim so it reads as foliage at the stem. Tack the tendril next to the leaf, letting the coil hang. For Large, place one leaf and tendril at each handle join.
-
Optional segment lines. With a length of MC (or a slightly darker orange), surface slip stitch 8 vertical lines from the base-fold ridge up to the rim, spacing them evenly around [every 11–12 sts on Small (90 ÷ 8 = 11.25), every 15 sts on Medium (120 ÷ 8 = 15 ✓), every 18–19 sts on Large (150 ÷ 8 = 18.75)]. This deepens the pumpkin sections.
-
Optional stiffener. Spray the empty basket with fabric stiffener and reshape. Let dry fully.
-
Weave in every remaining end securely on the wrong side.
Structural notes (read before you start)
- Yarn: Cotton, jute, or a cotton/linen blend. T-shirt yarn and rope also work but are thicker than this worsted pattern and will grow the basket; do not substitute them without swatching and resizing.
- Hook: One to two sizes smaller than the ball band. Dense fabric is the whole point.
- Cord (optional): Lay clothesline or piping cord along the stitches and crochet over it for the base and the first 3 side rounds. Stop the cord before the handle zone so sewing is not fighting the core.
- The finished basket should stand empty without collapsing. If it slumps, the fabric is too loose — go down a hook size and/or add stiffener.
Care
Cotton baskets: hand wash cold, reshape, dry standing. Re-block the base if needed. Do not machine-dry; heat kills the structure.
Disclaimer: This pattern was generated by AI and should be reviewed for accuracy before use. While we strive for quality, AI-generated content may contain errors. Please verify measurements, stitch counts, charts, and instructions before beginning your project. Generated by purlJam.uk
Love this pattern?
Save this pattern to your free PurlJam libraryAccess your pattern anytime
Bookmark this page to access your pattern anytime