Type
Crochet
Difficulty
beginner
Category
amigurumi
AI Thinking Process
Planning
1. **Design Strategy**: Create a beginner-friendly potted orchid plant using simple shapes — a pot (cylinder/cone), three flat flowers (5-petal motifs), buds, and a stem with leaves. Purple flowers, green stem/leaves, terracotta pot.
2. **Construction Plan**: Work pot in the round bottom-up, make stem as long cylinder, flowers as flat 5-petal motifs sewn to stem, leaves as flat shapes — all sewn together.
3. **Quality Assurance**:
- Stem must be stiff enough to stand (use pipe cleaner or stuff firmly)
- Flower petals need to lie flat — work loosely
- Pot base must be flat for stability
4. **Final Calculations**: Tension 18 dc x 20 rounds = 10cm. Pot: 6→12→18→24 sts, ~6cm tall. Stem: 6-st tube, ~15cm. Flowers: 5 petals from 5-st centre ring. Total height ~22cm.
Verification
1. **Completeness**: Materials, tension, abbreviations, pattern instructions, assembly, finishing — all included.
2. **Consistency**: Pot stitch counts verified (6→12→18→24, even rounds, base flat). Flower petals = 5, matches centre ring.
3. **Constraints**: UK terminology (dc, tr, htr), metric first, purple orchid, beginner level — confirmed.
4. **Safety**: All increase rounds verified; pot diameter ~7cm appropriate for stability.
Pattern
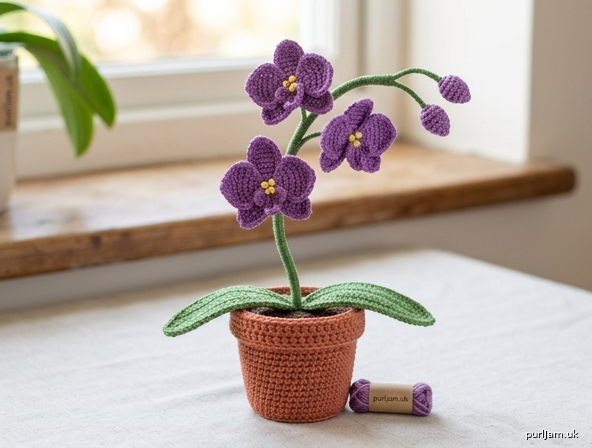
# Purple Orchid Plant – Crochet Pattern

A charming little potted orchid in soft purple, perfect for a windowsill or desk. This beginner-friendly pattern uses only basic stitches and simple shapes — no complicated shaping required! Makes a lovely gift that never needs watering.

**Finished size:** Approximately 22 cm (8½") tall, pot 7 cm (2¾") diameter
**Skill level:** Beginner

---

## Materials

- **Yarn (DK/worsted weight, aran):**
  - Purple – approx. 20 g (for flowers and buds)
  - Green – approx. 25 g (for stem and leaves)
  - Terracotta or brown – approx. 20 g (for pot)
  - Small amount of yellow (for flower centres)
- **Hook:** 3.5 mm (UK 9 / US E-4)
- **Yarn needle** for sewing in ends and assembly
- **Stitch marker** (to mark beginning of rounds)
- **Toy stuffing** (polyester fibrefill)
- **Pipe cleaner or floral wire** – approx. 18 cm (optional but recommended, to make stem bendable)
- **Small piece of cardboard** (optional, for pot base stability)

---

## Tension (Gauge)

18 dc × 20 rounds = 10 cm (4") working in the round.
Exact tension is not critical for this project — just work tightly enough that the stuffing doesn't show through.

---

## Abbreviations (UK Terms)

- **ch** – chain
- **dc** – double crochet (= US single crochet)
- **htr** – half treble crochet (= US half double crochet)
- **tr** – treble crochet (= US double crochet)
- **dtr** – double treble (= US treble)
- **sl st** – slip stitch
- **st(s)** – stitch(es)
- **inc** – increase (2 dc in same st)
- **dec** – decrease (dc2tog, invisible decrease preferred)
- **MR** – magic ring
- **rnd** – round
- **[ ]** – stitch count at end of round
- **( ) x N** – repeat instructions in brackets N times

*Note: This pattern uses UK crochet terminology throughout.*

---

## Pattern Instructions

### 1. The Pot (make 1, in terracotta yarn)

Worked in continuous spirals — place stitch marker and move up each round.

- **Rnd 1:** 6 dc in MR. **[6]**
- **Rnd 2:** inc in each st around. **[12]** ✓ (6 × 2 = 12)
- **Rnd 3:** (dc, inc) x 6. **[18]** ✓ (6 + 6 = 18)
- **Rnd 4:** (2 dc, inc) x 6. **[24]** ✓ (12 + 6 = 24 — this completes the flat base)
- **Rnd 5:** working in **back loops only**, dc in each st around. **[24]** *(creates a crisp edge at the bottom of the pot)*
- **Rnds 6–10:** dc in each st around. **[24]** *(5 plain rounds — pot sides)*
- **Rnd 11:** working in **front loops only**, dc in each st around. **[24]** *(creates the rim of the pot)*
- **Rnd 12:** working in remaining back loops of Rnd 11, dc in each st around. **[24]**
- Sl st to next st, fasten off and weave in ends.

*Optional: Cut a small cardboard circle (~6 cm) and place inside the base before assembly for added stability.*

---

### 2. The Stem (make 1, in green yarn)

- **Rnd 1:** 6 dc in MR. **[6]**
- **Rnds 2–30:** dc in each st around. **[6]** *(29 plain rounds — approximately 15 cm long)*
- Fasten off, leaving a long tail (~25 cm) for sewing.

**Stuffing the stem:** Insert a pipe cleaner or floral wire down the centre, then lightly stuff around it. This allows the stem to bend gracefully and stand upright. If not using wire, stuff firmly.

---

### 3. The Flowers (make 3, in purple yarn)

Each flower has 5 petals worked from a small centre ring.

- **Rnd 1:** 5 dc in MR, pull tight. Do **not** join — work petals one at a time. **[5]**
- **Petal 1:** In next st: (ch 3, 2 tr, 2 dtr, 2 tr, ch 3, sl st in same st). *Petal made.*
- **Petals 2–5:** Repeat petal instructions in each of the next 4 sts. **[5 petals]** ✓
- Sl st to first st of round, fasten off leaving a 20 cm tail.

**Flower centre:** With yellow yarn, embroider 3–4 small French knots or straight stitches in the centre of each flower.

---

### 4. The Buds (make 2, in purple yarn)

Small teardrop shapes for unopened flower buds.

- **Rnd 1:** 4 dc in MR. **[4]**
- **Rnd 2:** inc in each st around. **[8]** ✓ (4 × 2 = 8)
- **Rnds 3–4:** dc in each st around. **[8]**
- **Rnd 5:** (2 dc, dec) x 2. **[6]** ✓ (4 + 2 = 6)
- Stuff lightly with a tiny piece of fibrefill.
- **Rnd 6:** (dc, dec) x 2. **[4]** ✓
- Fasten off, leaving a 15 cm tail. Pull tail through remaining stitches to close.

---

### 5. The Leaves (make 2, in green yarn)

Worked flat, in rows, around a starting chain.

- **Foundation:** Ch 11.
- **Row 1:** Starting in 2nd ch from hook: dc, htr, tr, tr, tr, tr, tr, htr, dc, **3 dc in last ch** (working around the tip), then continuing along the opposite side of the chain: dc, htr, tr, tr, tr, tr, tr, htr, dc. Sl st to first dc. **[23 sts total]** ✓ (10 + 3 + 10 = 23)
- Fasten off, leaving a 20 cm tail for sewing.

*The leaves should be flat and pointed at one end, rounded at the other.*

---

## Assembly

1. **Prepare the pot:** Stuff the pot firmly with fibrefill, leaving the top 1 cm unstuffed. Optionally, push a small cardboard disc to the bottom for stability.

2. **Attach the stem to the pot:** Push the bottom of the stem into the centre of the pot's stuffing. Using the green yarn tail, sew the base of the stem securely to the pot stuffing/rim with several stitches. Make sure it stands upright — bend slightly if using wire.

3. **Attach the leaves:** Position the two leaves at the base of the stem, on opposite sides, resting on top of the pot. Sew in place using the green tails, slightly curling them for a natural look.

4. **Attach the flowers and buds:**
   - Sew the **2 buds** near the top of the stem (the highest point) — these represent unopened flowers.
   - Sew the **3 flowers** spaced down the upper third of the stem, slightly staggered for a natural cascading look (typical of orchid flower spikes).
   - Use the purple tails to secure each flower firmly to the stem.

5. **Final touches:** Gently bend the stem into a graceful curve if you've used wire. Fluff out the petals and arrange the leaves.

6. **Weave in all remaining ends.**

---

## Tips for Success

- **Work tightly** when crocheting the pot and stem so the stuffing doesn't peek through.
- **Use an invisible decrease** (insert hook through front loops only of next 2 sts, yarn over and pull through both, then yarn over and pull through both loops) for smoother shaping on the buds.
- **Block the flowers** lightly by spritzing with water and pressing flat — this helps the petals lie open and look more realistic.
- **Colour variations:** Try white, pink, or yellow flowers for different orchid varieties. Add a contrasting tip to the petals for a "Phalaenopsis" look using a tiny amount of darker purple embroidery.

---

Enjoy your everlasting orchid! 🌸
Disclaimer: This pattern was generated by AI and should be reviewed for accuracy before use. While we strive for quality, AI-generated content may contain errors. Please verify measurements, stitch counts, and instructions before beginning your project. Generated by purlJam.uk
Access your pattern anytime
Bookmark this page to access your pattern anytime