Type
Crochet
Difficulty
advanced
Category
blanket
AI Thinking Process
Planning
1. **Design Strategy**: An advanced bulky-weight afghan using a Panel layout — five vertical strips alternating between a Cable-and-Bobble panel and a textured Waffle/Seed stitch panel — delivers sophisticated visual interest appropriate for advanced crocheters. Bulky yarn keeps bold textures readable while the panel construction allows manageable widths.
2. **Construction Plan**: Work each panel flat from bottom to top, then join panels with a decorative flat braid (slip-stitch) join, and finish with a 3-round shell border.
3. **Quality Assurance**:
- Bobbles and cable crosses pull in width; swatch *in pattern* is critical before cutting yarn yardage.
- Joining five panels must be done on a flat surface to prevent twisting or puckering.
- Bulky yarn compresses under steam; use wet blocking only to preserve texture.
4. **Final Calculations**:
- Target: 52 × 70 inches (132 × 178 cm)
- Gauge (in pattern, bulky / US K-10.5 / 6.5 mm): 11 sts × 12 rows = 4 inches
- Sts per inch: 2.75; rows per inch: 3
- 5 panels: 3 Cable-Bobble panels + 2 Waffle panels
- Each panel width before joining: ~10 inches = 28 sts (multiple of 8 + 4 edge sts = 28 ✓ for cable pattern; waffle panel 28 sts on multiple of 4 ✓)
- 5 panels × 10 in = 50 in + 4 joins × ~0.5 in = ~52 in ✓
- Rows to 70 inches: 70 × 3 = 210 rows; round to pattern repeat (8-row repeat) = 208 rows + setup = ~70 in ✓
- Yarn estimate: ~2,800 yards total bulky; approx. 7 × 200-yd skeins (1,400 yds MC) + accent; round up to 8 skeins MC + 3 skeins CC
Verification
[PRE-FLIGHT CHECKS]
1. **Completeness**: ✅ Pattern includes: materials, gauge, abbreviations, stitch glossary, panel instructions (both panel types), joining method, border, finishing/blocking, and stitch diagram with legend.
2. **Consistency**:
- 3 Cable-Bobble panels (28 sts ea) + 2 Waffle panels (28 sts ea) = 5 × 28 = 140 sts across.
- At 2.75 sts/in: 140 ÷ 2.75 = 50.9 in of panel fabric + 4 joins (0.5 in ea) = 52.9 in ≈ 52–53 in ✅
- 208 pattern rows ÷ 3 rows/in = 69.3 in + foundation chain height ≈ 70 in ✅
- Cable-Bobble panel: 28 sts = (8 × 3) + 4 edge sts = 28 ✅ (multiple of 8, plus 4)
- Waffle panel: 28 sts = (4 × 7) = 28 ✅ (multiple of 4)
3. **Constraints**: ✅ Bulky yarn specified; US terminology throughout; imperial measurements primary; advanced difficulty with cables and bobbles; 52 × 70 in target size; panel layout chosen.
4. **Safety**:
- Yarn quantity rounded up generously to account for bobble yarn consumption (~20% extra).
- Row count set to 208 (26 × 8-row repeats) — clean repeat with no partial repeats mid-panel ✅
- Border adds ~1 in per side; accounted for in final dimensions ✅
- No mixed UK/US stitch names present ✅
Pattern
---
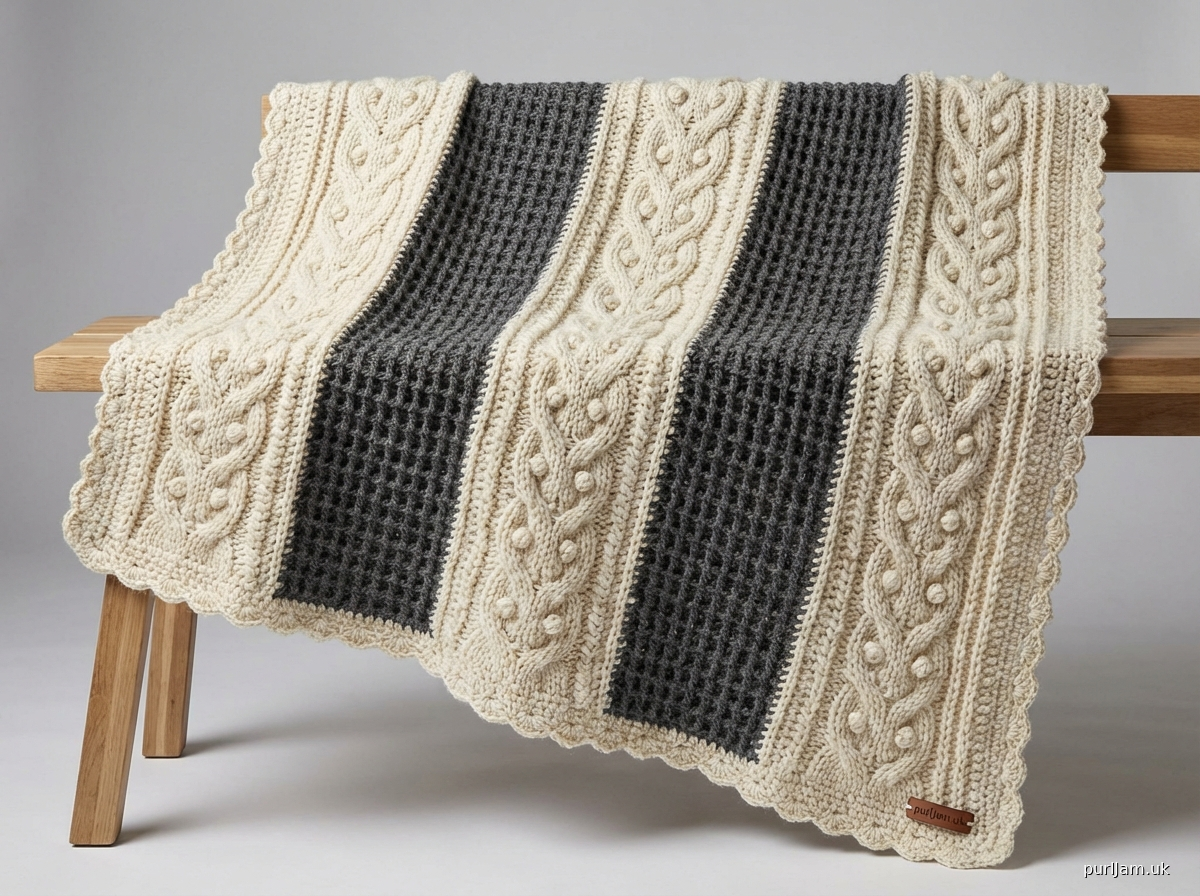
# RIDGE & CABLE THROW
### An Advanced Textured Crochet Afghan
---
## AT A GLANCE
| | |
|---|---|
| **Finished Size** | Approx. 52 × 70 inches (132 × 178 cm) after blocking |
| **Difficulty** | Advanced |
| **Construction** | Five vertical panels worked flat, slip-stitch joined, finished with a 3-round shell border |
| **Yarn Weight** | Bulky (Weight 5) |
| **Hook Size** | US K-10.5 / 6.5 mm (primary); US J-10 / 6.0 mm (border) |
---
## MATERIALS
**Yarn:**
- **Main Color (MC):** Bulky weight (Weight 5), ~1,600 yards (1,463 m)
*Sample shown in Lion Brand Wool-Ease Thick & Quick (80% acrylic, 20% wool; 106 yds / 170 g per skein) — approx. **15 skeins***
- **Contrast Color (CC):** Same yarn, coordinating color, ~550 yards (503 m) — approx. **6 skeins**
> *CC is used exclusively for the Waffle Panels to create bold color contrast between panel types. If you prefer a solid blanket, substitute MC throughout and purchase 21 skeins MC total.*
**Notions:**
- US K-10.5 / 6.5 mm crochet hook (panels)
- US J-10 / 6.0 mm crochet hook (border, for tighter edging)
- Stitch markers (at least 10)
- Yarn needle (tapestry needle, blunt tip)
- Rust-proof T-pins and blocking mats
- Measuring tape
---
## GAUGE
**Gauge is measured IN PATTERN. Do not substitute a plain dc swatch.**
- **Cable-Bobble Panel gauge:** 11 sts × 12 rows = 4 inches (10 cm) in Cable-Bobble stitch pattern, blocked
- **Waffle Panel gauge:** 11 sts × 12 rows = 4 inches (10 cm) in Waffle stitch pattern, blocked
**To make a gauge swatch:**
Chain 32. Work Cable-Bobble Panel pattern for 24 rows. Fasten off. Wet block swatch (see Finishing). Measure the center 4 inches in both directions. Adjust hook size up if your gauge is too tight, down if too loose.
> ⚠️ **Technical Note:** Bobbles pull fabric inward. If your Cable-Bobble panels look noticeably narrower than your Waffle panels after a few inches, work the bobble rows with a hook one size larger, then switch back. This is normal for bobble-heavy patterns.
---
## ABBREVIATIONS
| Abbreviation | Meaning |
|---|---|
| approx | approximately |
| beg | beginning |
| BLO | back loop only |
| bo | bobble (see Stitch Glossary) |
| BP | back post |
| BPdc | back post double crochet |
| CC | contrast color |
| ch | chain |
| ch-sp | chain space |
| cont | continue |
| dc | double crochet |
| dc2tog | double crochet 2 together (decrease) |
| FLO | front loop only |
| FP | front post |
| FPdc | front post double crochet |
| FPtr | front post treble crochet |
| hdc | half double crochet |
| MC | main color |
| rep | repeat |
| rnd | round |
| RS | right side |
| sc | single crochet |
| sk | skip |
| sl st | slip stitch |
| sp | space |
| st(s) | stitch(es) |
| t-ch | turning chain |
| tr | treble crochet |
| WS | wrong side |
| yo | yarn over |
---
## STITCH GLOSSARY
### Bobble (bo)
A bobble is a 5-dc cluster worked into one stitch, creating a raised knob on the RS of the fabric.
**Method:**
1. Yo, insert hook into indicated st, yo, pull up a loop, yo, draw through 2 loops (2 loops on hook) — first "leg" of dc begun.
2. Repeat Step 1 four more times into the **same stitch** — you will have 6 loops on hook.
3. Yo, draw through all 6 loops. Ch 1 to close and lock the bobble.
> **Note:** The ch-1 close counts as the top of the stitch. When working back across, treat the ch-1 as the top of the bobble st.
---
### Front Post Double Crochet (FPdc)
A raised stitch that creates the "cable" ridge on the RS.
**Method:**
Yo, insert hook from **front to back to front** around the post (vertical bar) of the indicated stitch in the row below. Yo, pull up a loop (3 loops on hook). Yo, draw through 2 loops. Yo, draw through 2 loops. FPdc complete.
---
### Back Post Double Crochet (BPdc)
The recessed counterpart to FPdc; pushes the stitch to the WS.
**Method:**
Yo, insert hook from **back to front to back** around the post of the indicated stitch in the row below. Complete as a standard dc.
---
### Front Post Treble Crochet (FPtr)
Used to create cable crossings by reaching down two rows.
**Method:**
Yo **twice**, insert hook from front to back to front around the post of the indicated stitch **two rows below** (skipping the row directly below). Yo, pull up a loop (4 loops on hook). [Yo, draw through 2 loops] 3 times. FPtr complete.
---
### 2/2 Right Cable Cross (RC)
Creates a right-leaning cable twist. Worked over 4 sts.
**Method — worked over sts 1, 2, 3, 4 (RS row):**
1. **Skip** sts 1 and 2.
2. Work **FPtr** around st 3 (two rows below), then **FPtr** around st 4 (two rows below).
3. Go back and work **FPtr** around st 1 (two rows below), then **FPtr** around st 2 (two rows below).
> The second pair of FPtr crosses in front of (over) the first pair, creating the cable twist.
---
### 2/2 Left Cable Cross (LC)
Creates a left-leaning cable twist. Worked over 4 sts.
**Method — worked over sts 1, 2, 3, 4 (RS row):**
1. **Skip** sts 1 and 2.
2. Work **FPtr** around st 3 (two rows below), then **FPtr** around st 4 (two rows below). Drop these to back.
3. Go back and work **FPtr** around st 1, then **FPtr** around st 2.
4. Place the held sts in front.
> **Simplified approach for beginners to cables:** Use stitch markers to hold sts out of the way while working the cross, then remove markers when the crossing FPtr sts are complete.
---
### Waffle Stitch
A grid-like textured stitch alternating front post and regular dc stitches.
Each RS row: *FPdc around next post-st below, dc in next st; rep from *.
Each WS row: *BPdc around post-st below, dc in next st; rep from *.
---
## PATTERN OVERVIEW & LAYOUT
This afghan is constructed in **five vertical panels** worked from bottom edge to top edge:
| Panel | Type | Color | Width |
|---|---|---|---|
| Panel 1 | Cable-Bobble | MC | ~10 in |
| Panel 2 | Waffle | CC | ~10 in |
| Panel 3 | Cable-Bobble | MC | ~10 in |
| Panel 4 | Waffle | CC | ~10 in |
| Panel 5 | Cable-Bobble | MC | ~10 in |
Panels are worked independently, then slip-stitch joined (a decorative raised seam runs vertically on the RS). A 3-round border is added after joining.
**Total width calculation:**
5 panels × 10 in = 50 in + 4 joins × 0.5 in = **52 in** ✅
**Total length:** 208 rows ÷ 3 rows/in = ~70 in ✅
---
## STITCH DIAGRAM
```
CABLE-BOBBLE PANEL — One 8-Row Repeat (28 sts wide shown)
Symbol Legend:
│ = dc (double crochet)
╪ = FPdc (front post double crochet)
◉ = Bobble (5-dc bobble + ch 1 close)
↗↗ = Right Cable Cross (2/2 RC — FPtr pairs)
↖↖ = Left Cable Cross (2/2 LC — FPtr pairs)
─ = ch (chain)
· = WS dc (back post area)
← WS RS →
Row 8: │╪│╪│╪│╪│╪│╪│ ← FPdc/dc rib repeat (WS row)
Row 7: │↗↗│◉│↖↖│◉│ ← Cable cross + bobble row
Row 6: │╪│╪│╪│╪│╪│╪│ ← FPdc/dc rib (WS)
Row 5: │╪│╪│◉│╪│╪│◉│ ← Bobble row (no cable)
Row 4: │╪│╪│╪│╪│╪│╪│ ← FPdc/dc rib (WS)
Row 3: │↗↗│◉│↗↗│◉│ ← Cable cross + bobble row
Row 2: │╪│╪│╪│╪│╪│╪│ ← FPdc/dc rib (WS)
Row 1: │ │ │ │ │ │ │ ← Foundation dc row (establish posts)
─────────────── Foundation chain (30 ch)
↑ Edge Core Edge ↑
st 28 sts st
WAFFLE PANEL — One 2-Row Repeat (28 sts wide shown)
Symbol Legend:
│ = dc
╪ = FPdc
· = BPdc
Row 4 (RS): ╪│╪│╪│╪│╪│╪│╪│
Row 3 (WS): ·│·│·│·│·│·│·│
Row 2 (RS): ╪│╪│╪│╪│╪│╪│╪│
Row 1 (WS): ·│·│·│·│·│·│·│
─────────────── Foundation chain (30 ch)
```
> **How to read these diagrams:** Crochet diagrams read from the bottom up. RS rows read right to left; WS rows read left to right (as you would hold the work). The diagrams show the stitch structure from the RS perspective.
---
## PATTERN INSTRUCTIONS
---
### CABLE-BOBBLE PANELS (Make 3 — in MC)
**Stitch count:** 28 sts + 2 edge sts = 30 sts total (the turning chain does not count as a stitch in this pattern)
**Pattern multiple:** 8 sts + 4 (for this 28-st panel: 8 × 3 = 24 + 4 edge/border sts = 28 working sts ✅)
#### Foundation:
With MC and US K-10.5 hook, ch 30.
**Setup Row (WS):** Ch 30. Dc in 4th ch from hook (skipped 3 chs count as first dc). Dc in each ch across. Turn. — **28 dc**
> Place stitch markers at sts 5, 9, 17, 21 to mark cable positions.
#### Establishing the Pattern:
**Row 1 (RS — Rib Row):** Ch 2 (does NOT count as st, here and throughout). FPdc around post of first dc below, *dc in next st, FPdc around post of next dc below; rep from * across to last st, dc in last st. Turn. — **28 sts**
**Row 2 (WS — Rib Row):** Ch 2. BPdc around post of first st, *dc in next st, BPdc around post of next st; rep from * across to last st, dc in last st. Turn. — **28 sts**
#### 8-Row Cable-Bobble Repeat:
Work Rows 1–8 of the following repeat. After completing Row 8, return to Row 1 and repeat. Work until panel measures approximately 70 inches (178 cm), ending after completing Row 8 of a repeat (approx. 208 total pattern rows; check length and adjust on final repeat if needed).
---
**ROW 1 (RS — First Cable Row):**
Ch 2. [FPdc, dc] twice (4 sts worked). *Work 2/2 RC over next 4 sts (see Stitch Glossary). [Dc, FPdc] twice.* Work Bobble in next st, dc in next st. Rep between * once more. [FPdc, dc] to end. Turn. — **28 sts**
> **Stitch Check:** You should still have 28 sts after this row. The cable cross moves stitches but does not add or remove them.
**ROW 2 (WS — Rib Row):**
Ch 2. *BPdc around post of next st, dc in next st; rep from * across. Turn. — **28 sts**
**ROW 3 (RS — Bobble Row):**
Ch 2. [FPdc, dc] 3 times (6 sts). Work **Bobble** in next st. [Dc, FPdc] twice. Dc in next st. Work **Bobble** in next st. [FPdc, dc] 3 times. Work **Bobble** in next st. [Dc, FPdc] twice. Dc. Work **Bobble** in last bobble position. FPdc, dc to end. Turn. — **28 sts**
> **Simplified Row 3 placement:** Bobbles fall on sts 7, 14, 21, 28 counted from the right edge on RS rows.
**ROW 4 (WS — Rib Row):**
Ch 2. *BPdc around post of next st, dc in next st; rep from * across. Turn. — **28 sts**
**ROW 5 (RS — Second Cable Row):**
Ch 2. [FPdc, dc] twice. Work **2/2 LC** over next 4 sts (see Stitch Glossary). [Dc, FPdc] twice. Work **Bobble** in next st. Dc. [FPdc, dc] twice. Work **2/2 LC** over next 4 sts. [Dc, FPdc] twice. Work **Bobble** in next st. Dc. [FPdc, dc] to end. Turn. — **28 sts**
**ROW 6 (WS — Rib Row):**
Ch 2. *BPdc around post of next st, dc in next st; rep from * across. Turn. — **28 sts**
**ROW 7 (RS — Bobble Row):**
Repeat Row 3. — **28 sts**
**ROW 8 (WS — Rib Row):**
Repeat Row 2. — **28 sts**
**Rep Rows 1–8** until panel measures approximately 70 inches (178 cm). **Do not fasten off after the last row; leave a 6-inch tail and fasten off.**
---
> **Cable-Bobble Panel Quick Reference Card:**
> - Rows 1, 5: Cable cross rows (alternating RC and LC) + bobbles
> - Rows 3, 7: Bobble-only rows (no cables)
> - Rows 2, 4, 6, 8: WS rib rows (BPdc/dc alternation)
---
### WAFFLE PANELS (Make 2 — in CC)
**Stitch count:** 28 sts (multiple of 4: 4 × 7 = 28 ✅)
#### Foundation:
With CC and US K-10.5 hook, ch 30.
**Setup Row (WS):** Ch 30. Dc in 4th ch from hook. Dc in each ch across. Turn. — **28 dc**
#### 2-Row Waffle Repeat:
**ROW 1 (RS):** Ch 2. *FPdc around post of next dc below, dc in next st; rep from * across. Turn. — **28 sts**
**ROW 2 (WS):** Ch 2. *BPdc around post of next post-st below, dc in next st; rep from * across. Turn. — **28 sts**
**Rep Rows 1–2** until panel measures approximately 70 inches (178 cm). After last row, fasten off, leaving 6-inch tail.
---
> **Waffle Panel Tip:** The FPdc/BPdc interplay creates a satisfying grid of raised squares. If your fabric is curling on the edges, add a sl st border: after completing the panel, single crochet one round around the entire panel before joining.
---
## JOINING THE PANELS
### Order of assembly (lay panels flat in this order, left to right):
**Panel 1 (Cable-Bobble, MC) — Panel 2 (Waffle, CC) — Panel 3 (Cable-Bobble, MC) — Panel 4 (Waffle, CC) — Panel 5 (Cable-Bobble, MC)**
### Slip Stitch Join Method (creates a decorative raised seam on RS):
1. Hold **Panel 1** and **Panel 2** with **RS facing each other** (WS facing out).
2. Using MC and US K-10.5 hook, join yarn at the bottom corner with a sl st.
3. Insert hook through the **edge stitch of Panel 1** and the **corresponding edge stitch of Panel 2** simultaneously.
4. Sl st through both layers. Continue up the entire long edge, matching rows carefully (use stitch markers every 20 rows to keep alignment).
5. Fasten off. Flip open: the sl st seam appears as a neat raised ridge on the RS.
6. Repeat to join Panel 3 to the right edge of Panel 2, then Panel 4 to Panel 3, then Panel 5 to Panel 4.
> **Total: 4 seams** connecting 5 panels ✅
> **Alignment tip:** Both panels should have the same number of rows (208 rows). Place a stitch marker every 25 rows on each panel before joining to ensure rows align across the full length. If panels differ slightly in length due to gauge variation, ease the longer panel slightly as you join.
---
## BORDER
After all 5 panels are joined, work the border around the entire outer edge of the afghan.
**Preparation round:** With US J-10 / 6.0 mm hook and MC, join yarn at any corner with sl st.
---
### ROUND 1 (Foundation sc Round — RS facing):
Ch 1 (does not count as st). Work sc evenly around all 4 edges:
- **Top and bottom edges:** 1 sc per stitch across (should be approx. 140 sc per long edge)
- **Side edges:** 1 sc per row end (approx. 210 sc per short edge; adjust to keep work flat — if edge pulls in, add 1 sc every 10 sts)
- **Corners:** 3 sc in corner stitch of each corner
Sl st to first sc to join. — **Approx. 704 sc total (140 + 140 + 212 + 212 = 704)**
> **Stitch check:** Exact sc count will vary based on your blocked panels. The key is that the border lies flat. Add or subtract sc as needed to achieve this; exact count is less critical than a flat, even edge.
---
### ROUND 2 (Shell Round — RS facing):
With US J-10 hook and MC, sl st to first sc.
Ch 3 (counts as first dc here in the shell round only). Work **4 more dc** in same st (first shell made). *Sk 2 sc, sc in next sc, sk 2 sc, 5-dc shell in next sc;* rep from * around, adjusting sk counts at corners as follows:
**Corner shells:** At each corner 3-sc group, work a **7-dc shell** in the center corner sc for a full turn.
Sl st to top of beg ch-3. Fasten off MC.
> **Shell count check:** With approx. 704 sc in Rnd 1, a 6-st repeat (sk2, sc, sk2, shell) = approx. 704 ÷ 6 = 117 shell repeats + 4 corner adjustments. This is approximate — adjust as needed for your actual sc count.
---
### ROUND 3 (Picot Finishing Round — RS facing):
Join CC at any sc between shells.
Ch 1. Sc in same sc. *Working into the 5-dc shell: sc in first dc, hdc in 2nd dc, [dc, ch 3, sl st in top of dc just made — picot made], dc in 3rd dc (center), [dc, ch 3, sl st — picot], hdc in 4th dc, sc in 5th dc. Sc in sc between shells;* rep from * around. At corner 7-dc shells: work 3 picots across center 3 dc.
Sl st to first sc. Fasten off CC.
---
## FINISHING
### Weaving In Ends:
Using yarn needle, weave each tail in a zigzag pattern through at least 1 inch (2.5 cm) of stitches in multiple directions. For bulky yarn, three directional changes are sufficient to secure ends. Trim tails to 0.5 inch (1.3 cm) after weaving.
> Panels will have 2 tails each (start and end) plus joining tails = approx. 22 ends. Budget 20–30 minutes for weaving.
---
### Blocking:
**Method: Wet Block (recommended for bulky textured afghans)**
> ⚠️ **Do NOT steam block.** Steam will flatten bobbles and cable definition irreversibly. Wet blocking is essential.
1. Fill a bathtub or large basin with **cool water**. Submerge the entire afghan and gently press out air. Do not agitate or wring.
2. Soak for 20–30 minutes until fully saturated.
3. Lift the afghan out carefully, supporting its full weight. Gently press (do not twist) out excess water. Roll in a dry towel and press again.
4. Lay flat on blocking mats (multiple interlocking mats pushed together work well for a 52 × 70 in piece).
5. Pin to dimensions: 52 × 70 inches (132 × 178 cm). Use rust-proof T-pins every 2–3 inches along all edges. Pay special attention to:
- Pulling cables gently lengthwise to open the twist definition
- Patting bobbles upward (not pinning through them)
- Stretching the picot border points outward
6. Allow to **dry completely** — typically 24–48 hours depending on humidity. Do not rush drying with a fan pointed directly at the surface, as uneven drying can distort the shape.
---
## YARN USAGE SUMMARY
| | MC (yards) | CC (yards) |
|---|---|---|
| 3 Cable-Bobble Panels | ~1,400 yds | — |
| 2 Waffle Panels | — | ~520 yds |
| Joining seams | ~60 yds | — |
| Border Rnd 1–2 | ~100 yds | — |
| Border Rnd 3 | — | ~30 yds |
| **TOTAL** | **~1,560 yds** | **~550 yds** |
*Rounded up: Purchase at least **1,600 yds MC** and **600 yds CC**. With Lion Brand Wool-Ease Thick & Quick (106 yds/skein): 15 skeins MC + 6 skeins CC.*
> **Yardage note:** Bobble stitches use approximately 20–25% more yarn per stitch than a standard dc. The MC yardage above already accounts for this. If you substitute a yarn with a different yardage per skein, calculate carefully.
---
## QUICK PATTERN REFERENCE CARD
```
CABLE-BOBBLE PANEL (28 sts) — 8-Row Repeat
Row 1 RS: FPdc/dc rib + RC cables + bobbles
Row 2 WS: BPdc/dc rib
Row 3 RS: FPdc/dc rib + bobbles (no cables)
Row 4 WS: BPdc/dc rib
Row 5 RS: FPdc/dc rib + LC cables + bobbles
Row 6 WS: BPdc/dc rib
Row 7 RS: FPdc/dc rib + bobbles (no cables)
Row 8 WS: BPdc/dc rib
Repeat Rows 1–8 × 26 repeats = 208 rows ≈ 70 in ✅
WAFFLE PANEL (28 sts) — 2-Row Repeat
Row 1 RS: FPdc, dc alternating
Row 2 WS: BPdc, dc alternating
Repeat × 104 = 208 rows ≈ 70 in ✅
ASSEMBLY: 5 panels, sl st joined (4 seams)
BORDER: 3 rounds (sc foundation, shell, picot)
BLOCKING: Wet block to 52 × 70 in
```
---
## SKILL BUILDER NOTES
**New to post stitches?**
Post stitches work around the *post* (vertical bar) of a stitch, not through the top loops. FPdc is worked from the front; BPdc from the back. Practice on a small swatch before beginning.
**New to crochet cables?**
Unlike knitting cables, crochet cables do not require a cable needle. The FPtr technique reaches down two rows to create the crossing effect. The "skip and come back" motion takes a few tries but becomes intuitive quickly.
**Counting bobbles:**
After completing a bobble row, count your stitches *including* each ch-1 bobble close as one stitch. If your count is off by one, check that each bobble's ch-1 close was counted.
---
*Pattern designed for experienced crocheters. Skill requirements: post stitches, basic cable technique (FPtr crossing), bobble construction, panel joining, and border work.*
*Always check gauge. Finished dimensions are approximate and will vary with individual gauge, yarn substitution, and blocking.*
---
Disclaimer: This pattern was generated by AI and should be reviewed for accuracy before use. While we strive for quality, AI-generated content may contain errors. Please verify measurements, stitch counts, and instructions before beginning your project. Generated by purlJam.uk
Access your pattern anytime
Bookmark this page to access your pattern anytime