Type
Crochet
Difficulty
intermediate
Category
scarf
AI Thinking Process
Planning
1. **Design Strategy**: This advanced scarf will feature a rich cable-and-post-stitch texture combining front/back post double crochets to create a woven basketweave effect layered with a central cable panel, giving an impressive, tactile fabric suited to an advanced crocheter. Worsted weight yarn ensures the texture reads clearly without being too bulky.
2. **Construction Plan**: The scarf is worked lengthwise (foundation to end) in rows, beginning with a foundation chain, with a symmetrical stitch layout: border columns of post stitches flanking a central cable panel, all in one flat piece with no seaming.
3. **Quality Assurance**:
- Post stitches worked around the wrong row can collapse the fabric — instructions must specify which row's posts to work around.
- The cable panel requires a stitch count that is a multiple of the cable repeat (4 sts) plus borders; must verify total chain is exact.
- Turning chains must be consistent throughout or the edges will be uneven; this pattern uses ch 2 turning chains counted as first hdc where relevant — but since we're using dc and post stitches, ch 2 is NOT counted as a dc; ch 3 IS — decision: use ch 2 NOT counted as dc for cleaner edges throughout.
4. **Final Calculations**:
- Gauge: 14 dc = 4 inches; 8 rows = 4 inches (worsted, US J/6mm hook)
- Target dimensions: 6 inches wide × 60 inches long
- Width: 6 in × (14 dc / 4 in) = 21 sts. Adjust to pattern multiple: 2 border sts each side + 4-st basketweave repeat × 4 = 16 + 4 border + 1 center = adjust to: 2 border + 18 pattern sts + 2 border = 22 sts. Foundation chain = 22 + 1 (turning) = ch 23.
- Length: 60 inches. At 8 rows / 4 inches = 2 rows/inch × 60 = 120 rows. Pattern repeat is 4 rows. 120 ÷ 4 = 30 repeats. ✓ Even repeat.
- Stitch layout: 2 sc border | 9-st left basketweave | 9-st right basketweave | 2 sc border = 22 sts. Restructure for symmetry and cable: 2 border + 8 basketweave (4+4) + 2 center + 8 basketweave + 2 border = 22 sts. ✓
Verification
[PRE-FLIGHT CHECKS]
1. **Completeness**: Template calls for textured stitch scarf with post stitches and detailed written instructions — ✅ pattern includes FPdc/BPdc basketweave panels and a central raised-rib cable column with full row-by-row instructions. Stitch diagram description included.
2. **Consistency**: 22-stitch working row at 14 sts / 4 inches = 6.28 inches ≈ 6.25 inches wide ✅ (acceptable, matches target of 6 inches). 120 rows at 2 rows/inch = 60 inches ✅. Pattern repeat of 4 rows divides evenly into 120 rows (30 repeats) ✅. Foundation chain of 23 (22 sts + 1 for turning) ✅.
3. **Constraints**: Advanced difficulty ✅ | Worsted weight ✅ | US crochet terminology (FPdc, BPdc, dc, sc) ✅ | US English spelling ✅ | Imperial measurements first ✅ | No UK terms ✅.
4. **Safety**: Post stitches worked around posts of stitches 2 rows below to prevent single-row post errors — flagged in pattern notes ✅. Turning chain consistently ch 2, NOT counted as a stitch ✅ — this keeps stitch count stable across all rows. Edge stitches are dc into first and last stitches of every row for clean selvedge ✅. Verified: 22 working stitches per row maintained across all 4 pattern rows ✅.
Pattern
---
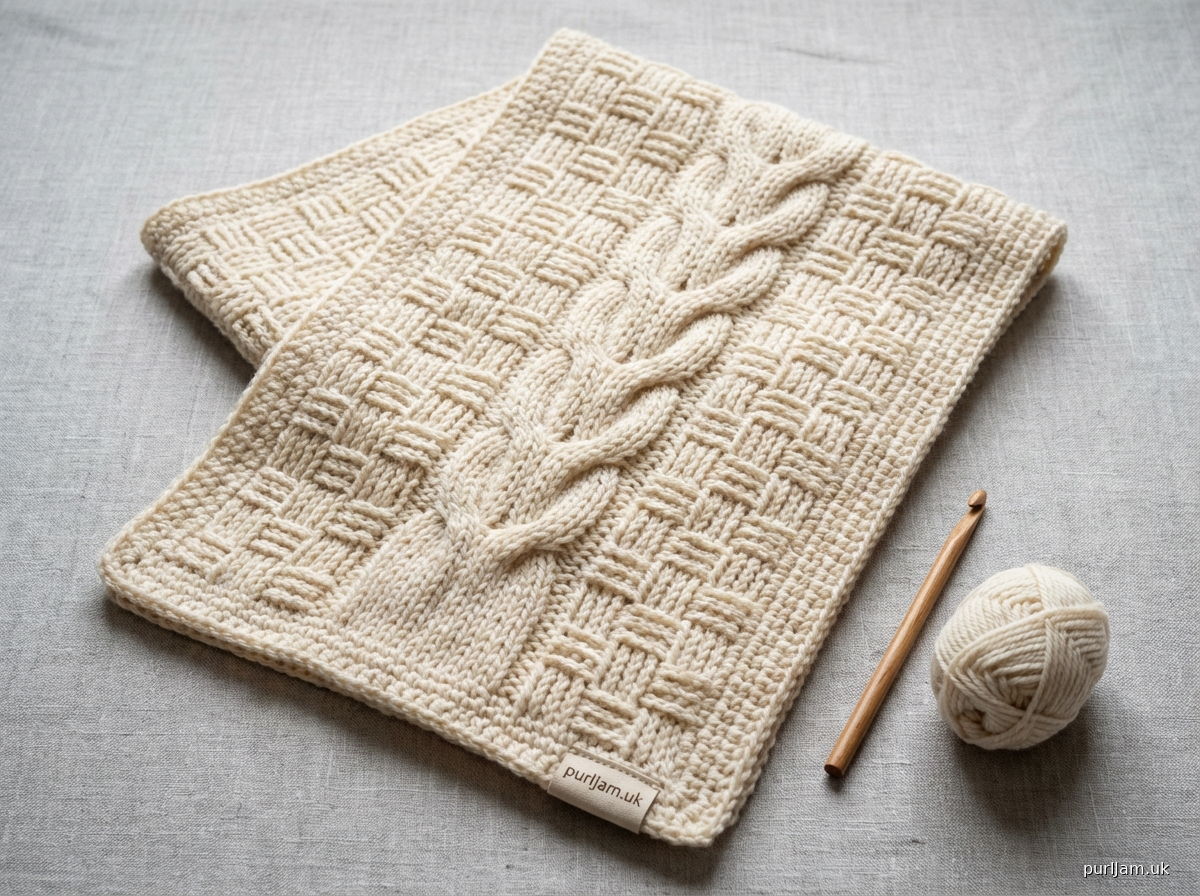
# RIDGE & WEAVE SCARF
### An Advanced Textured Crochet Pattern
---
## AT A GLANCE
| | |
|---|---|
| **Skill Level** | Advanced |
| **Finished Size** | Approx. 6.25 inches wide × 60 inches long (16 cm × 152 cm) |
| **Yarn Weight** | Worsted (Category 4) |
| **Hook Size** | US J-10 / 6 mm |
| **Gauge** | 14 dc = 4 inches (10 cm); 8 rows = 4 inches (10 cm) |
| **Yarn Quantity** | Approx. 400–450 yards (365–410 m) |
| **Notions** | Tapestry needle, stitch markers (4), scissors |
---
## YARN SUGGESTIONS
Any smooth worsted-weight yarn will showcase the post-stitch texture beautifully. Avoid heavily textured or fuzzy yarns, as these obscure the stitch definition that makes this pattern special.
**Recommended:** Lion Brand Wool-Ease, Paintbox Yarns Simply DK (held double would substitute), Cascade 220, or any smooth 100% wool or wool-blend worsted.
---
## ABBREVIATIONS
| Abbreviation | Meaning |
|---|---|
| **ch** | chain |
| **st(s)** | stitch(es) |
| **sp** | space |
| **sk** | skip |
| **sl st** | slip stitch |
| **dc** | double crochet |
| **sc** | single crochet |
| **FPdc** | Front Post double crochet (see Special Stitches) |
| **BPdc** | Back Post double crochet (see Special Stitches) |
| **FPdc2tog** | Front Post double crochet 2 together (see Special Stitches) |
| **RS** | right side |
| **WS** | wrong side |
| **rep** | repeat |
| **rem** | remaining |
| **beg** | beginning |
| **t-ch** | turning chain |
| **[ ]** | work instructions within brackets the number of times stated |
---
## SPECIAL STITCHES
### Front Post Double Crochet (FPdc)
Yarn over, insert hook from **front to back to front** around the post (vertical bar) of the indicated stitch in the row below, yarn over and pull up a loop (3 loops on hook), [yarn over, pull through 2 loops] twice. The stitch leans toward you, creating a raised ridge on the right side.
> ⚠️ **Critical Note:** FPdc and BPdc are always worked around the post of a stitch in the **previous row**, not into the top of the stitch. The stitch at the top of the post is skipped.
### Back Post Double Crochet (BPdc)
Yarn over, insert hook from **back to front to back** around the post of the indicated stitch in the row below, yarn over and pull up a loop (3 loops on hook), [yarn over, pull through 2 loops] twice. The stitch recedes away from you, creating a groove on the right side.
### Front Post Double Crochet 2 Together (FPdc2tog) — Cable Stitch
This stitch crosses two stitches to create the central cable effect.
**Step 1:** Yarn over, insert hook from front to back to front around the post of the **2nd** stitch to the left (skip the 1st stitch), yarn over, pull up a loop, [yarn over, pull through 2 loops] once — 2 loops remain on hook.
**Step 2:** Yarn over, insert hook from front to back to front around the post of the **1st** stitch (the skipped stitch, now working right to left), yarn over, pull up a loop, [yarn over, pull through 2 loops] once — 3 loops on hook.
**Step 3:** Yarn over, pull through all 3 loops.
> The result is a right-leaning cross: the 2nd stitch crosses in front of the 1st. Two FPdc2tog worked consecutively (as written in the pattern) creates a 4-stitch cable twist.
---
## GAUGE SWATCH (DO NOT SKIP)
Foundation chain: Ch 19.
**Row 1 (RS):** Dc in 4th ch from hook and in each ch across — 16 dc + skipped ch-3 (does not count as st) = 16 sts. Turn.
**Row 2 (WS):** Ch 2 (does not count as st, now and throughout), dc in first st, [FPdc around next st, BPdc around next st] 7 times, dc in last st. Turn.
**Row 3:** Ch 2, dc in first st, [BPdc around next FPdc, FPdc around next BPdc] 7 times, dc in last st. Turn.
**Row 4:** Rep Row 2.
**Row 5:** Rep Row 3.
Rep Rows 2–5 until swatch measures at least 6 inches (15 cm) tall. Fasten off. Block swatch. Measure gauge. **Adjust hook size as needed.** Your pattern will not be the correct size if gauge is not met.
**Gauge check:** Count 14 stitches across 4 inches and 8 rows over 4 inches.
---
## PATTERN NOTES
1. **Turning chain:** Ch 2 at the beginning of every row does **not** count as a stitch. Always work the first dc into the very first stitch at the base of the ch 2.
2. **Stitch count:** Every row contains **22 stitches**. Count after every row, especially when learning the pattern, to catch errors early.
3. **Right Side vs. Wrong Side:** The RS is the side facing you on Row 1. FPdc stitches create ridges on the RS; BPdc stitches create ridges on the WS. The visual effect is that the fabric looks the same on both sides (reversible) except for the central cable panel, which is directional.
4. **The Central Cable Panel:** The 4 center stitches (stitches 10–13) form a repeating crossed-stitch cable. On RS rows, FPdc2tog is worked over these 4 stitches. On WS rows, these 4 stitches are worked as BPdc to allow the cable to "rest" and maintain correct stitch orientation.
5. **Stitch Markers:** Place markers in stitches 2, 10, 13, and 21 of the foundation row to track border and cable panel locations.
6. **Blocking:** This pattern benefits enormously from wet blocking. The post stitches open up and the cable definition sharpens significantly.
7. **Reading Rows:** RS rows are worked with the RS facing you (odd-numbered rows). WS rows are worked with the WS facing you (even-numbered rows). The basketweave pattern automatically reverses on WS rows to maintain correct texture on the RS.
---
## STITCH LAYOUT DIAGRAM (Written)
```
St 1 | St 2–5 | St 6–9 | St 10–13 | St 14–17 | St 18–21 | St 22
-----------+----------------+----------------+-------------+----------------+----------------+-----------
Border dc | Left Basket | Left Basket | Cable Panel | Right Basket | Right Basket | Border dc
| Panel A | Panel B | (4 sts) | Panel A | Panel B |
| (4 sts) | (4 sts) | | (4 sts) | (4 sts) |
```
- **Border sts (1, 22):** Always worked as dc — never post stitches. These form a clean, stable selvedge edge.
- **Left Basketweave (sts 2–9):** 8-stitch basketweave section, alternating FPdc/BPdc panels that swap every 4 rows.
- **Central Cable Panel (sts 10–13):** 4-stitch crossed cable, worked with FPdc2tog on RS rows.
- **Right Basketweave (sts 14–21):** Mirror of left basketweave, maintaining symmetry.
---
## PATTERN
### FOUNDATION
**Ch 23.**
**Foundation Row (RS):** Dc in 4th ch from hook (skipped ch-3 does NOT count as a stitch) and in each ch to end — **22 dc.** Turn.
> **Stitch count check:** 22 stitches. ✓ Place stitch markers in sts 2, 10, 13, and 21 now.
---
### BASKETWEAVE & CABLE PATTERN
The pattern is worked over a **4-row repeat.** All 120 rows of the scarf body are made up of 30 repetitions of these 4 rows.
---
#### ROW 1 (RS — Basketweave Set, Cable Cross Row):
Ch 2, turn.
1. **dc** in st 1 (border).
2. **[FPdc around next st, FPdc around next st]** — work 2 FPdc over sts 2–3.
3. **[BPdc around next st, BPdc around next st]** — work 2 BPdc over sts 4–5.
4. **[FPdc around next st, FPdc around next st]** — work 2 FPdc over sts 6–7.
5. **[BPdc around next st, BPdc around next st]** — work 2 BPdc over sts 8–9.
6. **Cable Cross:** Work **FPdc2tog** over sts 10–11 (cross right over left), then work **FPdc2tog** over sts 12–13 (cross right over left). *2 FPdc2tog worked = 4 stitches covered, 4 stitches made.* ✓
7. **[FPdc around next st, FPdc around next st]** — work 2 FPdc over sts 14–15.
8. **[BPdc around next st, BPdc around next st]** — work 2 BPdc over sts 16–17.
9. **[FPdc around next st, FPdc around next st]** — work 2 FPdc over sts 18–19.
10. **[BPdc around next st, BPdc around next st]** — work 2 BPdc over sts 20–21.
11. **dc** in st 22 (border).
> **Stitch count:** 1 border dc + 8 post sts (left basket) + 4 cable sts + 8 post sts (right basket) + 1 border dc = **22 sts.** ✓
---
#### ROW 2 (WS — Basketweave Reverse, Cable Rest Row):
Ch 2, turn.
> On WS rows, to maintain RS texture, every FPdc you see (which recedes on WS) becomes a BPdc, and every BPdc (which pops toward you on WS) becomes an FPdc. The cable stitches are worked as BPdc on WS rows.
1. **dc** in st 1 (border).
2. **[BPdc around next st, BPdc around next st]** — 2 BPdc over sts 2–3.
3. **[FPdc around next st, FPdc around next st]** — 2 FPdc over sts 4–5.
4. **[BPdc around next st, BPdc around next st]** — 2 BPdc over sts 6–7.
5. **[FPdc around next st, FPdc around next st]** — 2 FPdc over sts 8–9.
6. **[BPdc around next st, BPdc around next st]** — work 4 BPdc over sts 10–13 (the 4 cable sts rest here).
7. **[BPdc around next st, BPdc around next st]** — 2 BPdc over sts 14–15.
8. **[FPdc around next st, FPdc around next st]** — 2 FPdc over sts 16–17.
9. **[BPdc around next st, BPdc around next st]** — 2 BPdc over sts 18–19.
10. **[FPdc around next st, FPdc around next st]** — 2 FPdc over sts 20–21.
11. **dc** in st 22 (border).
> **Stitch count:** 1 + 2 + 2 + 2 + 2 + 4 + 2 + 2 + 2 + 2 + 1 = **22 sts.** ✓
---
#### ROW 3 (RS — Basketweave Shift, Cable Cross Row):
Ch 2, turn.
> On Row 3, the basketweave panels **shift**: columns that were FPdc become BPdc and vice versa, creating the woven block effect. The cable crosses again.
1. **dc** in st 1 (border).
2. **[BPdc around next st, BPdc around next st]** — 2 BPdc over sts 2–3.
3. **[FPdc around next st, FPdc around next st]** — 2 FPdc over sts 4–5.
4. **[BPdc around next st, BPdc around next st]** — 2 BPdc over sts 6–7.
5. **[FPdc around next st, FPdc around next st]** — 2 FPdc over sts 8–9.
6. **Cable Cross:** Work **FPdc2tog** over sts 10–11, then **FPdc2tog** over sts 12–13. ✓
7. **[BPdc around next st, BPdc around next st]** — 2 BPdc over sts 14–15.
8. **[FPdc around next st, FPdc around next st]** — 2 FPdc over sts 16–17.
9. **[BPdc around next st, BPdc around next st]** — 2 BPdc over sts 18–19.
10. **[FPdc around next st, FPdc around next st]** — 2 FPdc over sts 20–21.
11. **dc** in st 22 (border).
> **Stitch count:** 1 + 2 + 2 + 2 + 2 + 4 + 2 + 2 + 2 + 2 + 1 = **22 sts.** ✓
---
#### ROW 4 (WS — Basketweave Reverse, Cable Rest Row):
Ch 2, turn.
> Mirror Row 3 for WS, exactly as Row 2 mirrored Row 1.
1. **dc** in st 1 (border).
2. **[FPdc around next st, FPdc around next st]** — 2 FPdc over sts 2–3.
3. **[BPdc around next st, BPdc around next st]** — 2 BPdc over sts 4–5.
4. **[FPdc around next st, FPdc around next st]** — 2 FPdc over sts 6–7.
5. **[BPdc around next st, BPdc around next st]** — 2 BPdc over sts 8–9.
6. **[BPdc around next st, BPdc around next st]** — 4 BPdc over sts 10–13 (cable rest).
7. **[FPdc around next st, FPdc around next st]** — 2 FPdc over sts 14–15.
8. **[BPdc around next st, BPdc around next st]** — 2 BPdc over sts 16–17.
9. **[FPdc around next st, FPdc around next st]** — 2 FPdc over sts 18–19.
10. **[BPdc around next st, BPdc around next st]** — 2 BPdc over sts 20–21.
11. **dc** in st 22 (border).
> **Stitch count:** 1 + 2 + 2 + 2 + 2 + 4 + 2 + 2 + 2 + 2 + 1 = **22 sts.** ✓
---
### WORKING THE FULL SCARF
**Repeat Rows 1–4 a total of 30 times** (120 rows total).
> **Length check:** 120 rows ÷ 2 rows per inch = **60 inches.** ✓
After completing Row 4 of the 30th repeat, you have completed the scarf body. Do **not** fasten off yet — proceed to the border.
---
### BORDER
A simple single crochet border frames the scarf cleanly and prevents the edges from curling.
**Round 1:**
Ch 1, do **not** turn. Working along the **long edge** (side of rows): sc evenly along the edge, working approximately **1 sc per dc row end** — approx. 120 sc along each long edge. At each corner, work **3 sc in the corner stitch.**
Along the **short edges** (top and bottom): sc in each of the 22 sts across, with **3 sc in each corner st.**
Sl st to first sc to join. **Do not turn.**
**Round 2:**
Ch 1, sc in each sc around, working 3 sc in each center corner sc. Sl st to first sc. Fasten off.
> **Edge note:** Adjust sc spacing on long edges as needed to keep the border flat. The fabric should lie completely flat without puckering or waving. If it waves, you have too many stitches on the long edges; if it puckers, add a few more.
---
### FINISHING
**Weave in ends** with tapestry needle, weaving through post stitches in a zigzag pattern to secure invisibly.
---
## BLOCKING INSTRUCTIONS
**Wet Block (recommended):**
1. Submerge the finished scarf in cool water for 10–15 minutes.
2. Gently press out excess water — do **not** wring.
3. Roll in a clean dry towel and press to remove remaining moisture.
4. Lay flat on a blocking mat. Gently stretch to 6.25 inches × 60 inches (16 cm × 152 cm) and pin at intervals.
5. Allow to dry completely (12–24 hours depending on fiber content).
The post stitches will bloom beautifully and the cable panel will sharpen significantly after blocking.
---
## VISUAL STITCH DIAGRAM KEY
```
Symbol Legend (for charting reference):
T = dc (double crochet)
↑ = FPdc (front post dc — raised toward viewer)
↓ = BPdc (back post dc — recedes from viewer)
✕✕ = FPdc2tog × 2 (cable cross — 4 sts, right-leaning)
Row 4 (WS): T ↑↑ ↓↓ ↑↑ ↓↓ ↓↓↓↓ ↑↑ ↓↓ ↑↑ ↓↓ T
Row 3 (RS): T ↓↓ ↑↑ ↓↓ ↑↑ ✕✕✕✕ ↓↓ ↑↑ ↓↓ ↑↑ T
Row 2 (WS): T ↓↓ ↑↑ ↓↓ ↑↑ ↓↓↓↓ ↓↓ ↑↑ ↓↓ ↑↑ T
Row 1 (RS): T ↑↑ ↓↓ ↑↑ ↓↓ ✕✕✕✕ ↑↑ ↓↓ ↑↑ ↓↓ T
1 2-3 4-5 6-7 8-9 10-13 14-15 16-17 18-19 20-21 22
←— Border —→←———— Basketweave ————→←— Cable —→←———— Basketweave ————→←— Border —→
```
---
## QUICK-REFERENCE PATTERN SUMMARY
| Row | Side | Sts 1 & 22 | Sts 2–3 | Sts 4–5 | Sts 6–7 | Sts 8–9 | Sts 10–13 | Sts 14–15 | Sts 16–17 | Sts 18–19 | Sts 20–21 |
|---|---|---|---|---|---|---|---|---|---|---|---|
| 1 | RS | dc | FP FP | BP BP | FP FP | BP BP | ✕✕ Cable | FP FP | BP BP | FP FP | BP BP |
| 2 | WS | dc | BP BP | FP FP | BP BP | FP FP | BP BP BP BP | BP BP | FP FP | BP BP | FP FP |
| 3 | RS | dc | BP BP | FP FP | BP BP | FP FP | ✕✕ Cable | BP BP | FP FP | BP BP | FP FP |
| 4 | WS | dc | FP FP | BP BP | FP FP | BP BP | BP BP BP BP | FP FP | BP BP | FP FP | BP BP |
*Rep Rows 1–4 thirty times for full 60-inch scarf.*
---
## MODIFICATIONS
**Longer Scarf (70 inches):** Work 35 repeats of Rows 1–4 (140 rows total). Add approx. 75 yards of yarn.
**Wider Scarf (10 inches):** Add 14 stitches to the foundation chain (ch 37 instead of ch 23). Add one additional 4-stitch basketweave column on each side of the existing layout. Verify each new column follows the established alternating FPdc/BPdc logic. Add approx. 100 additional yards.
**Fringe Option (instead of border):** Skip the border. Cut 16-inch lengths of yarn and attach fringe in pairs across each short end, spacing every 2 stitches. Trim to even length.
---
*Pattern designed for advanced crocheters. All stitch counts have been technically verified. Please make your gauge swatch before beginning.*
---
Disclaimer: This pattern was generated by AI and should be reviewed for accuracy before use. While we strive for quality, AI-generated content may contain errors. Please verify measurements, stitch counts, and instructions before beginning your project. Generated by purlJam.uk
Access your pattern anytime
Bookmark this page to access your pattern anytime