Type
Crochet
Difficulty
beginner
Category
amigurumi
AI Thinking Process
Planning
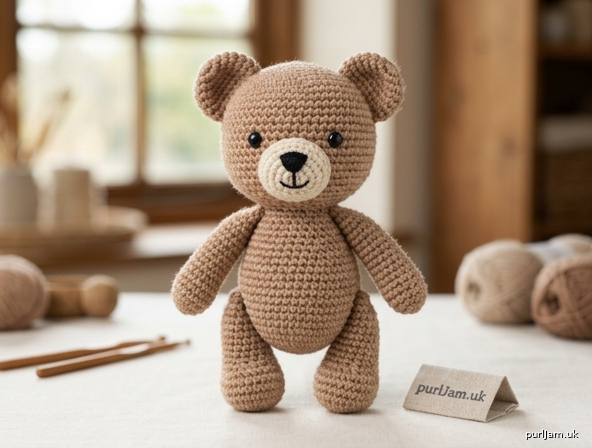
1. **Design Strategy**: A beginner-friendly amigurumi teddy bear in worsted-weight yarn using basic spheres and cylinders. The bear features a sphere head, oval-ish sphere body, cylinder limbs, and two round flat ears worked as small circles — all joined with simple seaming.
2. **Construction Plan**: Seamless top-down spheres/cylinders worked in continuous rounds (UK dc), stuffed and whip-stitched together for a simple, beginner-friendly assembly.
3. **Quality Assurance**:
- Round ears must be flat half-circles, not stuffed spheres — work fewer rounds and leave open.
- Stuff head and body firmly before closing; stuff limbs lightly.
- Maintain consistent stitch marker placement to avoid spiralling distortion.
4. **Final Calculations**: Tension (gauge): 4 dc and 4.5 rounds per 2.5 cm in dc. Hook 3.5 mm. Head = 24-st sphere (~7 cm). Body = 24-st sphere (~7 cm). Limbs = 12-st cylinders. Ears = 12-st flat circles. Finished height ~14 cm.
Verification
[PRE-FLIGHT CHECKS]
1. **Completeness**: Includes materials, tension, abbreviations, all pieces (head, body, 2 ears, 2 arms, 2 legs), assembly, finishing — all template sections present. ✓
2. **Consistency**: Sphere counts verified: 6→12→18→24, holding at 24, decreasing 24→18→12→6. Cylinder 6→12 held. Ear circle 6→12 held flat. All counts close correctly. ✓
3. **Constraints**: User requested "round ears" — addressed with flat round-circle ears (Rnds 1–2 increase to 12, plain round, leave open and flat). UK terminology (dc) used. Metric-first measurements. ✓
4. **Safety**: Decrease math checked: (2 dc, dec)×6 = 24→18; (dc, dec)×6 = 18→12; dec×6 = 12→6. No fractional stitches. ✓
Pattern
# Round-Eared Teddy Bear — Beginner Amigurumi

A cuddly little teddy bear with sweet round ears, worked in simple spheres and cylinders. Perfect for first-time amigurumi makers — no complicated shaping, just basic stitches and easy seaming.

**Finished size:** Approximately 14 cm tall (worsted/aran weight)
**Skill level:** Beginner

---

## Materials

- **Yarn:** Worsted/aran weight (Weight 4) in your chosen bear colour (brown, caramel, honey or grey) — approx. 50–70 g
  - Small amount of contrast colour for muzzle/inner ears (optional, cream or tan)
- **Hook:** 3.5 mm (US E-4) — going down a size from the yarn label keeps stitches tight so stuffing does not show
- **Polyester fibre stuffing (fiberfill)**
- **Yarn needle** (for assembly and embroidery)
- **Stitch marker** (to mark the start of each round)
- **Safety eyes:** 2 × 6–9 mm (insert before closing the head) OR embroider with black yarn
- **Black embroidery yarn** for nose and mouth

---

## Tension (Gauge)

4 dc × 4.5 rounds = 2.5 cm (1") in continuous dc rounds, worked tightly.
Exact tension is not critical for toys, but tighter is better so the stuffing stays hidden.

---

## Abbreviations (UK Crochet Terms)

- **dc** = double crochet (US single crochet)
- **inc** = increase (2 dc in same stitch)
- **dec** = decrease (work 2 stitches together — invisible decrease recommended)
- **st(s)** = stitch(es)
- **MR** = magic ring
- **[ ]** = total stitch count at end of round

*Note: UK stitch names are used throughout. UK dc = US single crochet.*

---

## Construction Notes

- Work in continuous spirals (do **not** join rounds) unless told otherwise.
- Use your stitch marker in the first stitch of each round and move it up as you go.
- Stuff firmly **as you go** — it is very hard to add stuffing later.
- Leave a long tail (approx. 30 cm) when fastening off pieces for sewing.

---

## PIECE 1 — HEAD (make 1, sphere)

- **Rnd 1:** 6 dc in MR **[6]**
- **Rnd 2:** inc in each st around **[12]**
- **Rnd 3:** (dc, inc) around **[18]**
- **Rnd 4:** (2 dc, inc) around **[24]**
- **Rnds 5–8:** dc around **[24]** *(4 rounds)*
- **Rnd 9:** (2 dc, dec) around **[18]**
  → *Insert safety eyes now (about 6 sts apart, level with Rnd 6). Begin stuffing firmly.*
- **Rnd 10:** (dc, dec) around **[12]**
- **Rnd 11:** dec around **[6]**

Finish stuffing firmly. Fasten off, leaving a tail. Weave the tail through the final 6 stitches and pull tight to close the hole.

*Math check: 6→12 (+6), →18 (+6), →24 (+6); hold 24 for 4 rnds; 24→18→12→6. ✓*

---

## PIECE 2 — BODY (make 1, sphere)

Work exactly as the Head:

- **Rnd 1:** 6 dc in MR **[6]**
- **Rnd 2:** inc in each st around **[12]**
- **Rnd 3:** (dc, inc) around **[18]**
- **Rnd 4:** (2 dc, inc) around **[24]**
- **Rnds 5–8:** dc around **[24]**
- **Rnd 9:** (2 dc, dec) around **[18]**
  → *Begin stuffing firmly.*
- **Rnd 10:** (dc, dec) around **[12]**

**Do NOT close completely.** Fasten off leaving a long tail. Leave the 12-stitch opening — this will be sewn to the head, so a slightly open top is fine. (You may also close to 6 sts and sew head on top; either works.)

---

## PIECE 3 — ROUND EARS (make 2, flat circles)

These are worked flat and left open so they sit as neat round ears.

- **Rnd 1:** 6 dc in MR **[6]**
- **Rnd 2:** inc in each st around **[12]**
- **Rnd 3:** dc around **[12]**

Fasten off, leaving a long tail. **Do not stuff.** Flatten the circle. The open edge will be pinched slightly and sewn to the head, giving a rounded ear shape.

*Optional inner ear:* Work Rnds 1–2 only **[12]** in contrast colour, flatten and stitch onto the front of each ear before attaching.

---

## PIECE 4 — ARMS (make 2, cylinders)

- **Rnd 1:** 6 dc in MR **[6]**
- **Rnd 2:** inc in each st around **[12]**
- **Rnds 3–7:** dc around **[12]** *(5 rounds)*

Lightly stuff the lower half only. Fasten off, leaving a long tail. Flatten the open top and leave open for sewing.

---

## PIECE 5 — LEGS (make 2, cylinders)

- **Rnd 1:** 6 dc in MR **[6]**
- **Rnd 2:** inc in each st around **[12]**
- **Rnds 3–8:** dc around **[12]** *(6 rounds)*

Stuff lightly to two-thirds full. Fasten off, leaving a long tail. Flatten the open top and leave open for sewing.

---

## ASSEMBLY

Pin all pieces before sewing to check placement. Use the long tails and a yarn needle, sewing with a whip stitch.

1. **Head to Body:** Position the head on top of the body. Sew firmly all the way around the join, adding a little extra stuffing into the neck area before finishing for a sturdy neck.

2. **Ears:** Pinch the open edge of each round ear slightly and pin to the top sides of the head (about 4–5 stitches apart, angled outward). Sew securely around the base of each ear.

3. **Arms:** Pin to the upper sides of the body, just below the head. Sew the flattened tops to the body.

4. **Legs:** Pin to the lower front of the body so the bear can "sit." Sew the flattened tops to the body.

---

## FINISHING — THE FACE

1. **Nose:** Using black embroidery yarn, embroider a small filled triangle or oval at the centre of the face (around Rnds 4–5 of the head).

2. **Mouth:** From the bottom point of the nose, work a single straight vertical stitch down, then a small "Y" or smile underneath.

3. **Eyes:** If not using safety eyes, embroider two small French knots or satin-stitch dots in black, positioned just above and either side of the nose.

4. **Muzzle (optional):** Stitch a small flat oval of contrast yarn (work Rnds 1–2 of a sphere = **[12]**, flatten) onto the lower face before adding the nose, for a classic teddy look.

5. Weave in all remaining ends, tucking them inside the toy.

---

## CARE & SAFETY

- For toys intended for babies or very young children, **embroider the eyes** rather than using safety eyes, and stitch all pieces extra securely.
- Spot clean only; avoid machine washing to protect the stuffing and shape.

---

## SIZE ADJUSTMENTS

- **Larger bear:** After Rnd 4, add another increase round — **Rnd 5:** (3 dc, inc) around **[30]** — and work more plain rounds, then mirror with extra decrease rounds.
- **Smaller / keychain bear:** Stop the sphere at Rnd 3 **[18]**, work 3 plain rounds, then decrease 18→12→6. Add a keychain finding to the top of the head.
- **Chunkier bear:** Use bulky yarn with a 4.0 mm hook (same instructions) for a roughly 18 cm toy.

---

**Final stitch-count verification:**
- Head/Body sphere: 6→12→18→24 (hold ×4) →18→12→6 ✓
- Ear circle: 6→12→12 (flat, open) ✓
- Arm cylinder: 6→12 held over 5 rnds ✓
- Leg cylinder: 6→12 held over 6 rnds ✓
All increases and decreases resolve to whole numbers. ✓

Enjoy your new round-eared teddy bear! 🧸
Disclaimer: This pattern was generated by AI and should be reviewed for accuracy before use. While we strive for quality, AI-generated content may contain errors. Please verify measurements, stitch counts, and instructions before beginning your project. Generated by purlJam.uk
Access your pattern anytime
Bookmark this page to access your pattern anytime