Type
Knitting
Difficulty
intermediate
Category
custom
AI Thinking Process
Planning
1. **Design Strategy**: A rustic, sturdy tote knitted in worsted-weight wool with garter-stitch borders and a textured owl motif worked in simple knit/purl bobbles and cables-free relief, keeping it beginner-friendly. The owl "eyes" are created with stuffed knit circles or buttons appliquéd on.
2. **Construction Plan**: Worked flat in two identical panels (front/back) from the bottom up, plus a base and side gussets, then seamed; straps knitted as flat strips.
3. **Quality Assurance**:
- Keep owl motif simple (purl-bump texture + button eyes) so beginners succeed.
- Ensure seamed dimensions match (panels + gussets consistent).
- Reinforce strap join to bear weight.
4. **Final Calculations**: Tension 18 sts × 24 rows = 10 cm in st st (worsted, 5 mm needles). Tote panel width 30 cm → 18 × 3 = 54 sts. Height 30 cm → 24 × 3 = 72 rows. Base 30 cm × 10 cm → 54 sts, 24 rows. Gusset 10 cm wide → 18 sts. Straps 60 cm long, 5 cm wide → 9 sts × 144 rows.
Verification
[PRE-FLIGHT CHECKS]
1. **Completeness**: Title, materials, tension, size, abbreviations, notes, instructions, finishing — all present. ✓
2. **Consistency**: 54 sts ÷ 18 sts/10cm = 30 cm width ✓; 72 rows ÷ 24 rows/10cm = 30 cm height ✓; base 54 sts × 24 rows = 30 × 10 cm ✓; gusset 18 sts = 10 cm ✓.
3. **Constraints**: Rustic owl tote, beginner, worsted, UK terminology/metric-first — all addressed. ✓
4. **Safety**: Strap math 144 rows ÷ 24 = 60 cm ✓; double-strand reinforcement noted. ✓
Pattern
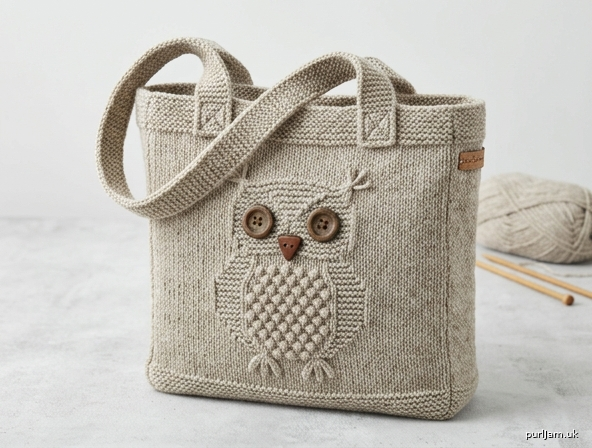
# Rustic Owl Carry Tote

A charming, sturdy carry tote worked in cosy worsted-weight wool. A gentle purl-bump owl peers out from the front, finished with button eyes for that warm, rustic feel. Knitted flat in simple panels and seamed together, this is an ideal confidence-building project for adventurous beginners.

**Finished Dimensions (approximate):**
- Width: 30 cm (12 in)
- Height: 30 cm (12 in)
- Depth (gusset): 10 cm (4 in)
- Strap length: 60 cm (24 in)

---

## Materials

- **Yarn:** Worsted-weight (Aran-ish) wool or wool-blend yarn in a rustic heathered colour (e.g. oatmeal, moss, or grey).
  - Main Colour (MC): approximately 280–320 m (300–350 yds) — roughly 2 × 100 g balls.
  - Small amount of contrast yarn optional for owl detailing (not essential).
- **Needles:** 5 mm (UK 6 / US 8) straight or circular needles.
- **Notions:**
  - 2 × large buttons (2.5–3 cm) for owl eyes.
  - 1 × smaller triangular button or a few stitches of contrast yarn for the beak.
  - Tapestry/darning needle.
  - Sewing thread to match buttons.
  - Optional: fabric for lining (30 × 70 cm) and 2 firm interfacing strips for straps.

---

## Tension (Gauge)

18 sts and 24 rows = 10 cm (4 in) over stocking stitch (st st) on 5 mm needles.

*Tension is important here for a firm, hard-wearing fabric. If your fabric feels loose and floppy, go down a needle size (4.5 mm) — a denser fabric holds its shape better as a bag.*

---

## Size

One size (see Finished Dimensions above).

---

## Abbreviations (UK)

- **k** – knit
- **p** – purl
- **st(s)** – stitch(es)
- **st st** – stocking stitch (k on RS, p on WS)
- **g st** – garter stitch (k every row)
- **RS** – right side
- **WS** – wrong side
- **k2tog** – knit two stitches together (decrease)
- **ssk** – slip, slip, knit (decrease)
- **rep** – repeat
- **beg** – beginning

---

## Pattern Notes

- The tote is worked entirely **flat** in five pieces: **Front panel**, **Back panel**, **Base**, two **Side gussets**, and two **Straps**. Everything is seamed at the end.
- The owl is created using **purl bumps on a stocking-stitch background** (a textured "reverse" motif) plus **button eyes** sewn on during finishing — no colourwork required.
- All panels begin and end with a few rows/stitches of garter stitch to give firm, non-curling edges.
- Slip the first stitch of every row purlwise (optional) for tidier seaming edges, or simply knit/purl as written.
- **Lining is optional but recommended** for a tote that will carry weight.

---

## Instructions

### Front Panel (make 1)

Cast on **54 sts** in MC.

**Bottom border:**
- Rows 1–6: K every row (g st). *(6 rows)*

**Body set-up:**
- Row 7 (RS): K.
- Row 8 (WS): K3, p48, k3. *(maintaining 3-st g st borders each side)*

Repeat Rows 7–8 until panel measures **10 cm (4 in)** from cast-on, ending with a WS row. *(approximately 24 rows total; 24 ÷ 24 rows per 10 cm = 10 cm ✓)*

#### Owl Motif (worked over centre 24 sts)

The owl is formed by purl bumps on the RS. The motif sits in the centre: with 54 sts and a 24-st motif, there are (54 − 24) ÷ 2 = **15 sts** on each side of the motif.

On the following motif rows, work the borders/sides as established (k3 border, then st st) and work the centre 24 sts as charted in words below. "P on RS" = a purl bump showing on the right side.

- **Owl Row 1 (RS):** K3, k12, **p2, k6, p2, k6, p2, k4** *(centre 24 sts)*, k12, k3.
  - Wait — let us state the motif cleanly. Across the centre 24 sts work: **p2, k20, p2** to outline the owl body sides.

For clarity, work the centre 24-st owl panel as follows over 20 rows (RS rows are odd):

- **Motif Rows 1, 3, 5 (RS):** p2, k20, p2. *(body outline)*
- **Motif Rows 7, 9 (RS):** p2, k4, p2, k8, p2, k4, p2. *(begin eye sockets)*
- **Motif Rows 11, 13 (RS):** p2, k4, p2, k8, p2, k4, p2. *(continue eye sockets)*
- **Motif Rows 15, 17 (RS):** p2, k20, p2. *(below eyes)*
- **Motif Rows 19 (RS):** p2, k9, p2, k9, p2. *(suggest beak centre)*
- **All WS rows (2, 4, 6 … 20):** Work centre 24 sts as: k the purl bumps and p the knit sts to keep the motif raised, i.e. mirror — simplest: **k2, p20, k2** on body rows, and on eye-socket rows **k2, p4, k2, p8, k2, p4, k2**.

*(Don't worry about perfection — the rustic look thrives on a slightly irregular, hand-textured owl. The button eyes added in finishing define the face.)*

**Continue plain body after motif:**

Once the motif is complete, return to plain body:
- RS rows: K.
- WS rows: K3, p48, k3.

Continue until the whole panel measures **30 cm (12 in)** from cast-on, ending with a WS row. *(72 rows total; 72 ÷ 24 = 30 cm ✓)*

**Top border:**
- K 6 rows (g st).
- Cast off all 54 sts knitwise.

---

### Back Panel (make 1)

Work exactly as the Front Panel **but omit the owl motif** — simply continue the plain body (RS: k all; WS: k3, p48, k3) from Row 7 until the panel measures 30 cm, then work the 6-row top border and cast off. *(54 sts, 72 rows — matches Front ✓)*

---

### Base (make 1)

The base is 30 cm long × 10 cm wide.

Cast on **54 sts** in MC. *(54 sts = 30 cm ✓)*

- K every row (g st) for **24 rows**. *(24 ÷ 24 = 10 cm ✓)*

Cast off all 54 sts. Garter stitch gives the base extra firmness and grip.

---

### Side Gussets (make 2)

Each gusset is 10 cm wide × 30 cm tall.

Cast on **18 sts** in MC. *(18 sts = 10 cm ✓)*

- K every row (g st) until piece measures **30 cm (12 in)** — approximately **72 rows**. *(72 ÷ 24 = 30 cm ✓)*

Cast off all 18 sts.

---

### Straps (make 2)

Each strap is 5 cm wide × 60 cm long.

Cast on **9 sts** in MC. *(9 sts ÷ 18 sts per 10 cm = 5 cm ✓)*

- K every row (g st) until strap measures **60 cm (24 in)** — approximately **144 rows**. *(144 ÷ 24 = 60 cm ✓)*

Cast off all 9 sts.

*Tip: For extra strength, hold two strands of yarn together for the straps, or fold each strap lengthways and seam for a doubled, sturdy handle.*

---

## Finishing

1. **Block all pieces** to the stated measurements. Pin out and steam or wet-block lightly so edges lie flat.

2. **Attach the base.** With WS together (seams will be on the inside) and using mattress stitch or whip stitch, sew the cast-on edge of the Front panel to one long (54-st) edge of the Base. Repeat to join the Back panel to the opposite long edge of the Base.

3. **Insert the gussets.** Sew each Side gusset between the Front and Back panels: one long edge of the gusset to the side edge of the Front, the other long edge to the side edge of the Back. Sew the short (cast-on) edge of each gusset to the short (10-st) ends of the Base. This forms the boxy tote shape with a flat bottom.

4. **Attach straps.** Position strap ends on the inside top edge of the Front panel, roughly 8 cm in from each side seam (leaving about 14 cm between the strap ends: 30 − 8 − 8 = 14 cm ✓). Sew down firmly, reinforcing with a square-and-cross stitch pattern through several layers. Repeat for the Back panel with the second strap.

5. **Add the owl eyes.** Sew the two large buttons onto the eye sockets of the owl motif, spacing them to sit just above centre. Add the small triangular button (or a few horizontal stitches in contrast yarn) between and just below the eyes for the beak. Optionally embroider two small straight stitches above each eye for "ear tufts" to enhance the rustic owl character.

6. **Optional lining.** Cut lining fabric to fit the inner dimensions plus a 1 cm seam allowance, sew into a box shape, and hand-stitch into the top edge of the tote for added durability and a neat finish.

7. **Weave in all ends** securely and trim.

---

**Congratulations — your Rustic Owl Carry Tote is complete!** Sturdy, characterful, and ready to carry your knitting, books, or market finds.
Disclaimer: This pattern was generated by AI and should be reviewed for accuracy before use. While we strive for quality, AI-generated content may contain errors. Please verify measurements, stitch counts, and instructions before beginning your project. Generated by purlJam.uk
Access your pattern anytime
Bookmark this page to access your pattern anytime