Type
Crochet
Difficulty
intermediate
Category
bag
AI Thinking Process
Planning
Verification
Pattern
Scrunch Bag
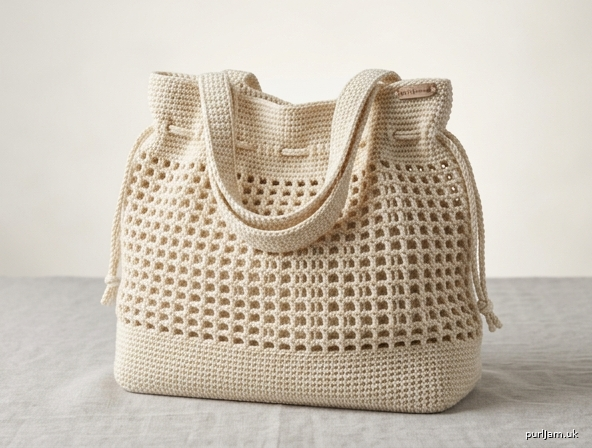
Mesh Market Tote with Gathered Collar
A roomy, stretchy market tote that scrunches down to a compact, gathered silhouette. Worked from a sturdy rectangular base up into an open dc mesh body, then finished with a ribbed collar and a casing for a drawstring or elastic. Expand it for the farmers’ market; cinch it for everyday carry.
Skill level: Intermediate
Finished measurements
One size.
- Base: 11" wide × 5" deep (28 × 12.5 cm)
- Circumference: 35" (89 cm), unstretched
- Height: about 17½" (44.5 cm) unstretched, including collar; scrunches to about 11–13" (28–33 cm)
- Handles: 20" × 1½" (51 × 3.8 cm) each, before sewing; about 8" (20.5 cm) drop once attached
Mesh stretches in use. Measurements are unstretched.
Yarn
Worsted weight (medium / category 4), 100% cotton recommended for strength, stitch definition, and washability.
- Yardage: 600 yd / 550 m
- Shown idea: solid color, or contrast the base/handles with the mesh
Do not substitute a drapey acrylic if you want the base to stand; cotton or a cotton blend is best.
Hook & notions
- US H/8 (5 mm), or size needed to obtain gauge (a firm fabric is better than a loose one for a bag)
- 4 stitch markers (corners) plus 1 unique marker for beginning of round
- Tapestry needle
- Optional: 24" (61 cm) of ¼" (6 mm) round elastic for auto-scrunch
- Optional: fabric for lining (mesh is open; lining is recommended if you will carry small objects)
Gauge
Worked firmly in sc:
16 sc and 18 rows = 4" (10 cm)
Mesh, unstretched:
8 (dc, ch-1) groups and 7 rnds = 4" (10 cm)
Check both. If your sc swatch is larger than 4", go down a hook size so the base stays dense.
Abbreviations (US)
| Abbrev. | Meaning |
|---|---|
| beg | beginning |
| blo | back loop only |
| ch | chain |
| dc | double crochet |
| hdc | half double crochet |
| pm | place marker |
| rep | repeat |
| rnd(s) | round(s) |
| RS | right side |
| sc | single crochet |
| sk | skip |
| sl st | slip stitch |
| sp(s) | space(s) |
| st(s) | stitch(es) |
| WS | wrong side |
Pattern notes
- US crochet terminology throughout.
- The base is worked flat in turned rows. The rest of the bag is worked in the round, RS facing, without turning.
- Solid rounds (sc and hdc blo) are worked in a spiral. Move the beginning-of-round marker up each rnd; do not join unless instructed.
- Mesh rounds are joined. The ch 4 at the start of a mesh rnd counts as 1 dc + ch 1.
- Ch 1 at the start of a sc row does not count as a stitch.
- Keep the 140-st count after the base is joined in the round. That count never changes.
- Work firmly. Loose mesh looks pretty but will grow more than intended when the bag is full.
- Do not wet-block or stretch-block the mesh if you want maximum scrunch. You may steam the base lightly so it lies flat.
Bag
Base (worked flat)
With H/8 (5 mm), ch 45.
Row 1 (RS): Sc in 2nd ch from hook and in each ch across, turn. (44 sc ✓)
Rows 2–22: Ch 1, sc in each sc across, turn. (44 sc)
22 rows at 18 rows = 4" → 22 / 18 × 4" = 4.9" ≈ 5" depth ✓ 44 sc at 16 sc = 4" → 44 / 16 × 4" = 11" width ✓
Do not fasten off.
Base edging & solid walls (worked in the round)
Turn so RS is facing (you will be working into Row 22).
Rnd 1 (setup): Ch 1, 3 sc in first st (first corner — pm in center sc of these 3), sc in next 42 sc, 3 sc in last st of the row (second corner — pm in center sc), work 22 sc evenly along the row-ends of the first short side (1 sc in each row-end), 3 sc in the first remaining loop of the foundation ch (third corner — pm in center sc), sc in next 42 remaining loops of the foundation ch, 3 sc in the last remaining loop (fourth corner — pm in center sc), work 22 sc evenly along the remaining short side, do not join. Pm in first sc of the rnd with a unique marker to mark beg of rnd. (3 + 42 + 3 + 22 + 3 + 42 + 3 + 22 = 140 sc ✓)
The extra stitches in each corner let the base sit flat, then the sides stand up once you stop increasing.
Rnds 2–5: Sc in each st around. (140 sc)
Move the beg marker each rnd. Remove the four corner markers after Rnd 2.
5 sc rnds at 18 rnds = 4" → 5 / 18 × 4" ≈ 1.1" of solid wall ✓
Mesh body
Begin joined mesh. Each (dc, ch 1) group sits over 2 sc.
Mesh Rnd 1: Sl st in next st to level the spiral if needed, ch 4 (counts as dc + ch 1), sk next sc, *dc in next sc, ch 1, sk next sc; rep from * around, sl st in 3rd ch of beg ch-4. (70 dc, 70 ch-1 sps ✓) (70 × 2 = 140 positions ✓)
Mesh Rnds 2–24: Sl st into the first ch-1 sp, ch 4 (counts as dc + ch 1), *dc in next ch-1 sp, ch 1; rep from * around, sl st in 3rd ch of beg ch-4. (70 dc, 70 ch-1 sps)
Work dc into the ch-1 spaces, not into the dc stitches, so the mesh stacks.
24 mesh rnds at 7 rnds = 4" → 24 / 7 × 4" ≈ 13.7" of mesh ✓ 70 groups at 8 groups = 4" → 70 / 8 × 4" = 35" circumference, matching 140 sc ✓
Scrunch collar
Transition rnd: Ch 1, sc in each dc and in each ch-1 sp around, do not join. Pm for beg of rnd. (70 dc + 70 sps = 140 sc ✓)
Ribbed collar, Rnds 1–6: Hdc blo in each st around. (140 hdc)
Do not join; keep the spiral. The blo ridges are the scrunch texture and will gather when the casing is drawn.
6 hdc rnds are about 1¾" (4.5 cm).
Casing & top edge
Eyelet rnd (casing): *Sc in next 2 sts, ch 2, sk next 2 sts; rep from * around, do not join. (35 sc-pairs, 35 ch-2 sps ✓) (35 × 4 = 140 ✓)
Top edging, Rnds 1–3: Sc in each sc and 2 sc in each ch-2 sp around. (35 × 2 sc on the sc-pairs + 35 × 2 sc in the sps = 140 sc ✓)
At the end of Top edging Rnd 3, sl st in next sc, fasten off, and weave in the end.
Total height ≈ 1.1" walls + 13.7" mesh + 0.2" transition + 1.7" collar + 0.2" eyelets + 0.7" top ≈ 17.6" unstretched ✓
Handles (make 2)
Work firmly. For extra-sturdy handles, hold two strands of the same yarn together and use the same hook (the strip will be thicker and slightly wider; that is fine).
Ch 7.
Row 1: Sc in 2nd ch from hook and in each ch across, turn. (6 sc ✓) 6 sc at 16 sc = 4" → 6 / 16 × 4" = 1.5" width ✓
Rows 2–90: Ch 1, sc in each sc across, turn. (6 sc)
90 rows at 18 rows = 4" → 90 / 18 × 4" = 20" length ✓
Edging (optional but recommended): Do not turn at the end of Row 90. Ch 1, rotate, and sc around the entire outer edge of the strip, working 1 sc in each row-end on the long sides, 1 sc in each st on the short ends, and 3 sc in each corner. Join with sl st to first sc, fasten off, leaving a 24" (61 cm) tail for sewing.
Drawstring (optional — omit if using elastic)
Ch 121.
Row 1: Sl st in 2nd ch from hook and in each ch across. Fasten off. (120 sl sts)
120 sts at 16 sts = 4" → 120 / 16 × 4" = 30" (76 cm) ✓
Tie an overhand knot at each end, or add a small tassel.
Finishing
1. Handles. On the top edging, find the two long sides of the bag (they sit above the 11" edges of the base). On each long side, pin one handle as follows:
- Place each end of the handle on the inside of the top band, overlapping the band by 2" (5 cm).
- Leave about 5" (12.5 cm) of top edge between the two inner corners of the same handle.
- The two handles sit opposite each other.
With the long tail (or matching yarn), sew each 2" overlap through both handle and band, going around the rectangle of the overlap twice. Reinforce the upper corners of each join — these take the load. Free handle length = 20" − 2" − 2" = 16" (40.5 cm); drop ≈ 8" (20.5 cm) ✓
2. Scrunch the collar — choose one:
- Drawstring: Starting at one short side, weave the cord through the ch-2 eyelets all the way around. Pull to gather. Tie loosely so you can open the bag.
- Elastic (auto-scrunch): Cut 22" (56 cm) of ¼" round elastic. Weave it through the eyelets, overlap the ends by 1" (2.5 cm), and sew the overlap firmly. The collar will stay gathered; stretch the opening to load the bag.
3. Weave in remaining ends. Steam the base only, if needed. Do not stretch the mesh.
4. Optional lining. Cut fabric ½" (1.3 cm) larger than the base, plus a tube the height of the finished bag and ½" larger than the circumference. Sew, insert WS together, and whipstitch the lining to the inside of the top edging, below the eyelets, so the casing still works.
How to wear it
Leave the mesh unscrunched for full market capacity. Draw the cord (or let the elastic gather the collar) and push the mesh body up toward the ribbed collar so the bag collapses into a short, slouchy scrunch. The open mesh will also stretch sideways when the bag is full — that stretch is intended.
Quick stitch-count checkpoint
| Location | Count |
|---|---|
| Base rows | 44 sc |
| Rnd 1 around base | 140 sc |
| Solid walls Rnds 2–5 | 140 sc |
| Each mesh rnd | 70 dc + 70 ch-1 |
| Collar | 140 hdc blo |
| Eyelet rnd | 35 ch-2 sps |
| Top edging | 140 sc |
| Each handle | 6 sc × 90 rows |
Disclaimer: This pattern was generated by AI and should be reviewed for accuracy before use. While we strive for quality, AI-generated content may contain errors. Please verify measurements, stitch counts, charts, and instructions before beginning your project. Generated by purlJam.uk
Love this pattern?
Save this pattern to your free PurlJam libraryAccess your pattern anytime
Bookmark this page to access your pattern anytime