Type
Crochet
Difficulty
intermediate
Category
bag
AI Thinking Process
Planning
Verification
Pattern
White Structured Scrunch Bag
Bolso scrunch blanco con asa regulable
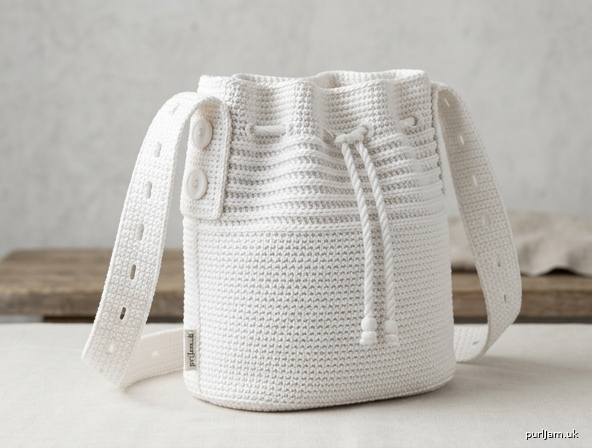
A firm, white everyday bag that stands on its own. Dense single crochet and a removable stiffened base keep the silhouette from collapsing when the bag is loaded. The upper wall is worked in back-loop ribbing and finished with a drawstring so the top can scrunch. A long strap with buttonholes adjusts from a short handbag handle to a crossbody length.
Skill level: Intermediate
Finished measurements
Measured flat, before cinching, after light steam.
- Base: 10¾" long × 4½" wide (27.5 × 11.5 cm)
- Circumference: 27½" (70 cm)
- Height: 9" (23 cm) uncinched; about 7" (18 cm) with the drawstring pulled
- Strap: 2" wide × 48" long (5 × 122 cm), usable length between tabs about 22–46" (56–117 cm)
Materials
Yarn: Worsted weight (category 4) cotton, white. Cotton is required for structure; acrylic will sag.
- 650 yd / 595 m (about 12 oz / 340 g)
- Suggested: Lion Brand 24/7 Cotton, WeCrochet Dishie, or similar mercerized or tightly twisted worsted cotton in White / Blanco
Hook: US 7 / 4.5 mm, or size needed to obtain a firm gauge. Optional US G-6 / 4 mm for a denser strap.
Notions:
- 4 stitch markers
- Tapestry needle
- 2 buttons, ⅞–1" (22–25 mm)
- Optional but strongly recommended: plastic canvas, ultra-firm stabilizer, or stiff felt, 10½ × 4¼" (27 × 11 cm), for the base insert
- Optional lining: ½ yd (0.5 m) cotton fabric and sewing needle
- Optional hardware version: two 1½" (38 mm) D-rings and one 1½" (38 mm) strap slider
Gauge
16 sc × 18 rnds = 4" × 4" (10 × 10 cm) in sc, worked in the round, with US 7 / 4.5 mm.
Swatch should feel stiff, not drapey. If the fabric is soft or holey, go down a hook size. Gauge is more important here than in a garment — it is what keeps the bag from losing its shape.
Abbreviations (US terms / términos en español)
Instructions use US crochet terms. Spanish names are listed here for reference.
| US | Spanish | ES abbr. |
|---|---|---|
| ch | cadeneta | cad |
| sl st | punto deslizado (punto raso) | pd |
| sc | punto bajo | pb |
| hdc | medio punto alto | mpa |
| dc | punto alto | pa |
| sc2tog | 2 puntos bajos juntos (disminución) | dism |
| inc | aumento (2 sc in same st) | aum |
| blo | hebra de atrás / lazada trasera | hda |
| flo | hebra de adelante | hde |
| sk | saltar | — |
| yo | hebra / lazada | hbr |
| st(s) | punto(s) | pto(s) |
| rnd | vuelta | vta |
| RS | derecho | dcho |
| WS | revés | rev |
| SM / PM | marcador / colocar marcador | mar |
| FO | cortar y asegurar la hebra | cerrar |
| reverse sc (crab st) | punto de cangrejo (punto bajo invertido) | pcang |
| WS / WS join | unir por el revés | — |
Pattern notes
- The bag is worked in a spiral (do not join or turn unless stated). Place a marker in the first stitch of every round and move it up.
- Do not substitute a mesh or filet body. Mesh stretches and the bag will slump.
- Keep tension even and snug, especially on the oval increases.
- The oval stays flat because all extra stitches sit at the two rounded ends. The long sides stay at 25 sc.
- The scrunch is decorative and functional: BLO ribbing plus a drawstring. The lower walls stay in both-loop sc so they do not collapse.
- Weave in ends as you go; cotton tails can peek through white fabric.
Bag
Oval base (fondo ovalado)
With US 7 / 4.5 mm and white yarn, ch 27.
Rnd 1 (Vuelta 1): Sc (pb) in 2nd ch from hook and in next 24 ch (25 sc), 3 sc in last ch, rotate to work along the unused loops of the foundation, sc in next 25 loops, 3 sc in the first ch (the unused loop of the beginning chain). Do not join. 56 sc (25 + 3 + 25 + 3 = 56 ✓).
Place a marker in the center stitch of each 3-sc group (the two tips of the oval).
Rnd 2: Sc in next 25 sts, (2 sc in next st) 3 times, sc in next 25 sts, (2 sc in next st) 3 times. 62 sc (+6 → 56 + 6 = 62 ✓).
Rnd 3: Sc in next 25 sts, (2 sc in next st, sc in next st) 3 times, sc in next 25 sts, (2 sc in next st, sc in next st) 3 times. 68 sc (+6 → 62 + 6 = 68 ✓).
Rnd 4: Sc in next 25 sts, (2 sc in next st, sc in next 2 sts) 3 times, sc in next 25 sts, (2 sc in next st, sc in next 2 sts) 3 times. 74 sc (+6 → 68 + 6 = 74 ✓).
Rnd 5: Sc in next 25 sts, (2 sc in next st, sc in next 3 sts) 3 times, sc in next 25 sts, (2 sc in next st, sc in next 3 sts) 3 times. 80 sc (+6 → 74 + 6 = 80 ✓).
Rnd 6: Sc in next 25 sts, (2 sc in next st, sc in next 4 sts) 3 times, sc in next 25 sts, (2 sc in next st, sc in next 4 sts) 3 times. 86 sc (+6 → 80 + 6 = 86 ✓).
Rnd 7: Sc in next 25 sts, (2 sc in next st, sc in next 5 sts) 3 times, sc in next 25 sts, (2 sc in next st, sc in next 5 sts) 3 times. 92 sc (+6 → 86 + 6 = 92 ✓).
Rnd 8: Sc in next 25 sts, (2 sc in next st, sc in next 6 sts) 3 times, sc in next 25 sts, (2 sc in next st, sc in next 6 sts) 3 times. 98 sc (+6 → 92 + 6 = 98 ✓).
Rnd 9: Sc in next 25 sts, (2 sc in next st, sc in next 7 sts) 3 times, sc in next 25 sts, (2 sc in next st, sc in next 7 sts) 3 times. 104 sc (+6 → 98 + 6 = 104 ✓).
Rnd 10: Sc in next 25 sts, (2 sc in next st, sc in next 8 sts) 3 times, sc in next 25 sts, (2 sc in next st, sc in next 8 sts) 3 times. 110 sc (+6 → 104 + 6 = 110 ✓).
The oval should lie flat at about 10¾" × 4½" (27.5 × 11.5 cm). If the center domes, the increases are too few or the tension is tight; if it ruffles, the tension is loose. Do not fasten off.
Structured walls (paredes)
Work in both loops unless stated. Count remains 110 sc every round.
Rnds 11–12: Sc blo around. (These two rounds form a sharp crease so the bag sits on its base.)
Rnds 13–34: Sc around. (22 rnds → 22 / 18 × 4" = 4⅞" / 12.5 cm of smooth wall ✓)
Scrunch zone (zona scrunch)
Rnds 35–46: Sc blo around. (12 rnds → 12 / 18 × 4" = 2⅔" / 6.5 cm of horizontal rib that gathers when the drawstring is pulled ✓)
Total wall height from the base crease: 2 + 22 + 12 = 36 rnds → 36 / 18 × 4" = 8" (20.5 cm) ✓.
Eyelets and collar (ojales y borde)
Rnd 47 (eyelet rnd / vuelta de ojales): *Sc in next 4 sts, ch 1, sk 1; rep from * around. (22 repeats → 22 × 5 = 110 ✓). You now have 22 ch-1 eyelets.
Rnds 48–51: Sc in each sc and in each ch-1 sp around. 110 sc.
Rnd 52: Reverse sc (crab stitch / punto de cangrejo) in each st around. Sl st in first reverse sc. Fasten off. Weave in end.
Base insert (plantilla rígida)
The insert is what stops the bag from collapsing when you put things in it. Do not skip it.
Crochet cover (make 2): Work Rnds 1–9 of the Oval Base only. Fasten off after Rnd 9 (104 sc). Each piece is slightly smaller than the bag floor so it drops in cleanly.
Cut plastic canvas, stiff felt, or extra-firm stabilizer ¼" (6 mm) smaller than the crochet ovals on all sides.
Sandwich the stiffener between the two crochet ovals, WS together. Whipstitch (costura invisible / punto sobrehilado) around the edge, enclosing the stiffener. Drop the insert into the bag. It is removable for washing.
Strap tabs (lengüetas)
Make 2.
Ch 9.
Row 1: Sc in 2nd ch from hook and in each ch across, turn. 8 sc.
Rows 2–12: Ch 1, sc in each st across, turn. 8 sc.
Fasten off, leaving a 24" (60 cm) tail.
Fold each tab in half (6 rows showing). Pin one folded tab over each rounded end of the bag, centered on the short sides, with the fold at the crab-stitch edge and the cut ends extending 2" (5 cm) down the outside. Using the tail, sew through all layers (both halves of the tab and the bag wall) with a box of backstitch plus an X in the center. This join carries the whole weight of the bag — sew it firmly.
Sew both buttons stacked or side by side on the left tab (wearer’s left when the bag faces you). The right tab is the sewn-on end of the strap.
Adjustable strap (asa regulable)
The strap is worked in turned rows for a firm, non-rolling band. Use US 7 / 4.5 mm, or US G-6 / 4 mm if you want it extra dense.
Ch 9.
Row 1: Sc in 2nd ch from hook and in each ch across, turn. 8 sc (8 sts ÷ 4 sc per inch = 2" / 5 cm ✓).
Row 2: Ch 1, sc in each st across, turn.
Repeat Row 2 until the piece measures 22" (56 cm).
Buttonhole row (hilera de ojal): Ch 1, sc in first 2 sts, ch 4, sk 4, sc in last 2 sts, turn. (2 + 4 + 2 = 8 ✓).
Next row: Ch 1, sc in first 2 sts, 4 sc in ch-4 sp, sc in last 2 sts, turn. 8 sc.
Work 10 rows even in sc.
Repeat the last 12 rows (1 buttonhole row + 1 closing row + 10 even rows) 9 more times — 10 buttonholes total. Spacing is about 2½" (6.5 cm) between holes.
Work even in sc until the strap measures 48" (122 cm). Fasten off, leaving a 24" (60 cm) tail.
Attach: With the tail, sew the starting end of the strap (the end without buttonholes) to the right tab, through all layers, using the same box-and-X stitching as the tabs. To wear:
- Handbag: Button a hole near the middle of the strap to the left-tab buttons (short loop).
- Crossbody: Button a hole near the free end (long loop).
Trim the unused tail of the strap so it does not dangle, or tuck it through the tab.
Drawstring (cordón)
Twisted cord (recommended) or chain cord.
Twisted cord: Cut 4 strands, each 4 yd (3.7 m) long. Fold in half, anchor the fold, twist tightly until the cord doubles on itself, then knot both ends. Finished length about 55" (140 cm).
Chain cord: Ch 180, sl st in 2nd ch from hook and in each ch across. Fasten off.
Starting at one side tab, weave the cord through the 22 eyelets, skipping none. Knot or bead each end. Pull both ends to scrunch the top; the BLO ribbing collapses into soft gathers while the lower sc walls and the insert keep the body in shape.
Optional hardware strap
If you prefer metal hardware instead of buttons: sew a D-ring to each tab. Make the same 8-sc strap 50" (127 cm) long with no buttonholes. Thread one end through a slider, through the left D-ring, back through the slider, then through the right D-ring, and stitch the end down. This also adjusts from handbag to crossbody.
Optional lining
A cotton lining adds structure and hides the insert. Cut two rectangles 12" × 10" (30.5 × 25.5 cm) and two ovals matching the insert. Sew side and bottom seams with a ½" (1.3 cm) seam allowance, leaving the top open. Fold ½" to the WS at the upper edge and hand-sew the lining just below the eyelet round, catching only the inner loops so the stitches do not show on the white exterior.
Finishing
- Weave in every remaining end on the WS.
- Steam the bag lightly from the WS. Do not stretch the walls — you want them short and firm.
- Insert the stiffened base.
- Thread the drawstring.
- Button the strap to the length you need.
Care
Machine wash cold in a mesh bag, remove the base insert first. Lay flat to dry. Recheck the insert after drying so the floor stays crisp. Do not tumble dry.
Stitch counts at a glance
| Section | Rounds / rows | Stitches |
|---|---|---|
| Base Rnd 1 | 1 | 56 |
| Base Rnds 2–10 | 9 | 62, 68, 74, 80, 86, 92, 98, 104, 110 |
| Walls + scrunch + collar | Rnds 11–52 | 110 even (Rnd 47: 88 sc + 22 ch-1) |
| Tabs | 12 rows × 2 | 8 sc |
| Strap | to 48" | 8 sc, 10 buttonholes |
Disclaimer: This pattern was generated by AI and should be reviewed for accuracy before use. While we strive for quality, AI-generated content may contain errors. Please verify measurements, stitch counts, charts, and instructions before beginning your project. Generated by purlJam.uk
Love this pattern?
Save this pattern to your free PurlJam libraryAccess your pattern anytime
Bookmark this page to access your pattern anytime