Type
Knitting
Difficulty
beginner
Category
socks
AI Thinking Process
Planning
Verification
Pattern
Shark Bite Socks
Beginner cuff-down worsted socks (make 2)
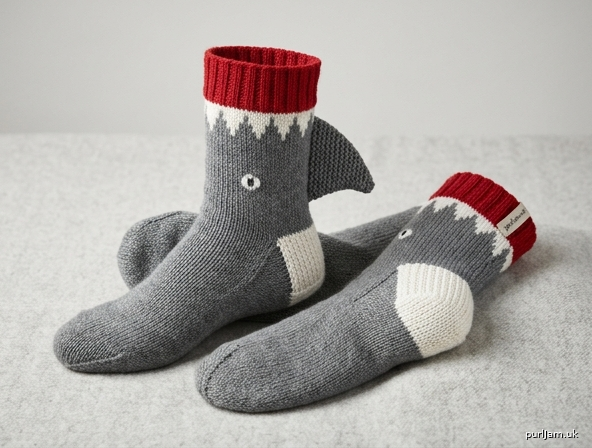
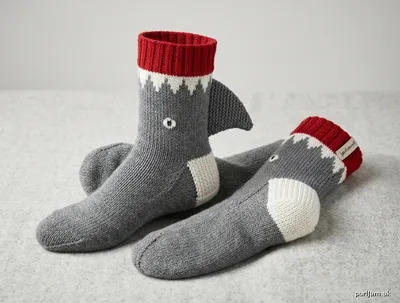
Cartoon shark house socks: a red mouth at the cuff, white teeth, gray body, white belly-heel, and a dorsal fin on the calf. Worked cuff-down with a traditional heel flap so you can try them on as you go.
Difficulty: Beginner (first-sock friendly; the shark details are finishing, not complex knitting)
Sizes
S (M, L)
Instructions are written for Small with Medium and Large in parentheses. When only one number is given, it applies to all sizes.
| Small | Medium | Large | |
|---|---|---|---|
| To fit foot circumference | 8–8½" (20.5–21.5 cm) | 9–9½" (23–24 cm) | 10–10½" (25.5–26.5 cm) |
| Finished sock circumference | 7¼" (18.5 cm) | 8" (20.5 cm) | 8¾" (22 cm) |
| To fit foot length (adjustable) | 8–9" (20.5–23 cm) | 9–10" (23–25.5 cm) | 10–11½" (25.5–29 cm) |
| Leg length, including cuff (adjustable) | 6" (15 cm) | 6½" (16.5 cm) | 7" (18 cm) |
Socks are meant to fit with about 10% negative ease. Choose the size closest to (or slightly smaller than) the ball of the foot.
This pattern makes a pair. Complete both socks the same way.
Materials
Yarn: Worsted weight (CYC 4), wool or wool-blend preferred for stretch and warmth (superwash is fine). Acrylic is acceptable for kids’ socks.
- MC (shark gray): 130 (150, 175) yd / 119 (137, 160) m
- CC1 (white): 35 (45, 55) yd / 32 (41, 50) m — teeth, heel, eye whites
- CC2 (red or dark pink): 25 (30, 35) yd / 23 (27, 32) m — inside of mouth
- CC3 (black): 5 yd / 5 m — eyes and gills
One 100 g skein of gray plus small amounts of white, red, and black is typical. Sample-style yarns: Cascade 220, Knit Picks Wool of the Andes, Lion Brand Wool-Ease.
Needles: US 6 / 4 mm, or size needed to get gauge:
- Set of 4 or 5 double-pointed needles (DPNs), or
- One 32–40" (80–100 cm) circular needle for magic loop
Notions: Stitch markers, tapestry needle, scissors, spare needle or stitch holder. Optional: row counter; non-slip fabric paint or suede dots for the soles if wearing as slippers.
Gauge
20 stitches and 28 rounds = 4" (10 cm) in stockinette stitch in the round, after blocking.
Check gauge. Too loose, and the socks will slouch and wear out; too tight, and they will not fit. Change needle size until you match this gauge.
Abbreviations (US)
BO bind off
BOR beginning of round
CC contrasting color
CO cast on
k knit
k2tog knit 2 stitches together (right-leaning decrease)
MC main color
p purl
p2tog purl 2 stitches together
pm place marker
rep repeat
rnd(s) round(s)
RS right side
sl slip stitch purlwise unless stated otherwise
sm slip marker
ssk slip 1 knitwise, slip 1 knitwise, knit those 2 sts together through the back loop (left-leaning decrease)
st(s) stitch(es)
WS wrong side
wyib with yarn in back
wyif with yarn in front
Notes
- Worked in the round from the cuff (mouth) down to the toe (tail).
- The white heel is the shark’s belly patch. The dorsal fin is knit flat and sewn to the back of the leg. Eyes and gills are embroidered — no buttons or beads (safer for children).
- Try on as you go. Cuff-down construction lets you check the cuff, leg, and foot length on the needle.
- Keep the working yarn at the back when slipping stitches on RS rows.
- Join a new color at the BOR, leaving a 6" (15 cm) tail to weave in later.
- Stitch counts appear in bold at every change. Inline checks use ✓.
Needles: DPNs or magic loop
DPNs (3 working needles to start): After casting on, divide stitches as follows so the heel is already on Needle 1:
- Needle 1 (back of leg / heel): 18 (20, 22) sts
- Needle 2 (instep): 9 (10, 11) sts
- Needle 3 (instep): 9 (10, 11) sts
18+9+9 = 36 ✓ · 20+10+10 = 40 ✓ · 22+11+11 = 44 ✓
Work with a 4th (empty) needle. The BOR is the start of Needle 1.
Magic loop: Divide in half — 18 (20, 22) sts on the back needle (heel) and 18 (20, 22) sts on the front needle (instep). BOR is the start of the back needle.
Pattern
Cuff — the mouth
With CC2 (red) and US 6 / 4 mm needles, cast on 36 (40, 44) stitches loosely. A long-tail cast-on onto a needle one size larger, then switching back to US 6, keeps the edge stretchy enough to pass over the heel.
Join to work in the round, being careful not to twist. Place a marker for BOR.
Rib rnd: *K2, p2; rep from * to end of rnd.
Work rib until cuff measures 1½" (4 cm) from the cast-on edge.
Cut CC2, leaving a tail.
Teeth
Join CC1 (white) and MC (gray). You will use both colors on the next two rounds. Drop the color you are not knitting with and pick up the other; keep unused yarn loosely at the back (floats of only 1–3 stitches). Do not pull tight or the cuff will cinch.
Tooth rnds 1–2: *K3 with CC1, k1 with MC; rep from * to end of rnd.
(4-st repeat: 36÷4 = 9 teeth ✓ · 40÷4 = 10 teeth ✓ · 44÷4 = 11 teeth ✓)
Cut CC1. From here the leg is all MC.
Leg — the body
With MC (gray) only, knit every round (stockinette in the round).
Work until the piece measures 6 (6½, 7)" / 15 (16.5, 18) cm from the cast-on edge, or desired leg length. A little extra gray looks good on a shark.
Stitch count remains 36 (40, 44).
Heel flap — the white belly
The heel is worked flat, back and forth, on the back-of-leg stitches only. The instep stitches rest.
Join CC1 (white). Leave MC attached (you will return to it after the heel) or cut MC and rejoin later.
Set-up: Work across the 18 (20, 22) heel stitches (Needle 1 / back needle). Turn.
Place the remaining 18 (20, 22) instep stitches on a holder or leave them on the spare needles.
Row 1 (RS): *Sl 1 wyib, k1; rep from * to end of heel sts.
Row 2 (WS): Sl 1 wyif, purl to end.
Rep Rows 1–2 until you have worked 18 (20, 22) rows in total, ending after a WS row. The slipped-stitch fabric is denser and wears better under the heel.
You will have 9 (10, 11) chain-like slipped stitches along each vertical edge of the flap — these are what you pick up for the gusset.
Heel stitches still 18 (20, 22).
Heel turn
Short rows cup the heel. You will see a small gap where you turned on the previous row; that gap is your landmark.
Row 1 (RS): Sl 1, k10 (11, 12), ssk, k1, turn. Unworked stitches remain on the left needle.
Row 2 (WS): Sl 1, p5, p2tog, p1, turn.
Row 3: Sl 1, knit to 1 stitch before the gap, ssk (the stitch before the gap together with the stitch after the gap), k1, turn.
Row 4: Sl 1, purl to 1 stitch before the gap, p2tog, p1, turn.
Rep Rows 3–4 until every heel stitch has been worked. On the very last RS or WS row you may not have a stitch left to k1 or p1 after the decrease — just work the decrease and that row is done.
12 (12, 14) heel stitches remain
(18 − 6 = 12 ✓ · 20 − 8 = 12 ✓ · 22 − 8 = 14 ✓)
Do not turn after the last WS row. Cut CC1.
Gusset
Rejoin MC (gray). You will now pick up stitches along both sides of the heel flap and return to knitting in the round.
Set-up round:
- Knit across the 12 (12, 14) heel stitches.
- Pick up and knit 9 (10, 11) stitches along the left side of the heel flap — one in each slipped chain. If a small hole appears at the corner where the flap meets the instep, pick up 1 extra stitch in that hole and knit it together with the next picked-up stitch so the count stays 9 (10, 11).
- Pm (instep marker). Knit across the 18 (20, 22) held instep stitches. Pm (second instep marker).
- Pick up and knit 9 (10, 11) stitches along the right side of the heel flap, using the same corner trick if needed.
- Knit to BOR (center of the heel).
48 (52, 58) sts on the needles
(12+9+9+18 = 48 ✓ · 12+10+10+20 = 52 ✓ · 14+11+11+22 = 58 ✓)
Rearrange if you like:
- DPNs: Needle 1 — first half of sole + first gusset; Needles 2 and 3 — instep; Needle 4 — second gusset + rest of sole.
- Magic loop: Instep between the two markers on the front needle; heel + both gussets on the back needle.
Decrease round: Knit to 3 sts before the first instep marker, k2tog, k1, sm, knit instep to next marker, sm, k1, ssk, knit to end of rnd. 2 sts decreased.
Even round: Knit all sts, slipping markers.
Rep the last 2 rounds 5 (5, 6) more times — 6 (6, 7) decrease rounds in total.
(6×2 = 12 sts decreased, 48−12 = 36 ✓ · 6×2 = 12, 52−12 = 40 ✓ · 7×2 = 14, 58−14 = 44 ✓)
36 (40, 44) sts. You are back to the original count. Remove the instep markers if you like, or leave one at BOR.
Foot
With MC, knit every round until the foot measures 2" (5 cm) less than the desired total foot length, measured from the back of the heel.
Trying on is the most accurate method: slip the stitches onto a spare circular (or keep them on magic loop) and put the sock on. Start the toe when the knitting reaches the base of your pinky toe.
Approximate finished foot lengths (including toe): 8–9 (9–10, 10–11½)" / 20.5–23 (23–25.5, 25.5–29) cm.
Toe
Place markers if they are not already there, dividing the stitches in half:
- Instep: 18 (20, 22) sts
- Sole: 18 (20, 22) sts
Rnd 1 (decrease): K1, ssk, knit to 3 sts before the instep marker, k2tog, k1, sm; k1, ssk, knit to 3 sts before the end of the sole, k2tog, k1. 4 sts decreased.
Rnd 2: Knit.
Rep Rnds 1–2 until 16 (16, 20) sts remain.
Then work Rnd 1 only (decrease every round) until 8 sts remain.
8 sts (4 instep + 4 sole).
Cut MC, leaving a 12" (30 cm) tail.
Close the toe — Kitchener stitch
Arrange the remaining 8 stitches on two needles: 4 instep stitches on the front needle, 4 sole stitches on the back needle. Hold the needles parallel, with the wrong sides together and the working tail coming from the back needle on the right.
Thread the tail on a tapestry needle.
Set-up (once only):
- Front needle: go through the first stitch purlwise; leave it on the needle.
- Back needle: go through the first stitch knitwise; leave it on the needle.
Repeat these 4 movements until 1 stitch remains on each needle:
- Front: go through the first stitch knitwise and slip it off.
- Front: go through the (new) first stitch purlwise; leave it on.
- Back: go through the first stitch purlwise and slip it off.
- Back: go through the (new) first stitch knitwise; leave it on.
Last two stitches: Front — knitwise and off. Back — purlwise and off.
Cinch gently so the join matches the surrounding stitches. Weave in the tail on the inside.
Memory aid: knit off, purl on; purl off, knit on.
Dorsal fin (make 2 — one per sock)
Worked flat in garter stitch (knit every row) so the fin lies neatly and needs no extra seaming along the edges.
With MC and US 6 / 4 mm needles, CO 10 sts.
Rows 1–3: Knit.
Row 4 (decrease): K1, ssk, knit to last 3 sts, k2tog, k1. 8 sts.
Rows 5–7: Knit.
Row 8: K1, ssk, knit to last 3 sts, k2tog, k1. 6 sts.
Rows 9–11: Knit.
Row 12: K1, ssk, k2tog, k1. 4 sts.
Rows 13–15: Knit.
Row 16: Ssk, k2tog. 2 sts.
Row 17: K2tog. Fasten off, leaving an 8" (20 cm) tail for sewing.
The fin is about 2" (5 cm) tall and 2" (5 cm) wide at the base.
Optional pectoral fins (make 4 — two per sock)
With MC, CO 6 sts. Knit 2 rows. Next row: K1, ssk, k2tog, k1 (4 sts). Knit 2 rows. Next row: Ssk, k2tog (2 sts). Next row: K2tog. Fasten off.
Finishing
Weave in all ends on the wrong side. Block the socks lightly: soak in lukewarm water, press out water in a towel (do not wring), and lay flat to dry, smoothing the fins.
Sew the dorsal fin. Pin the base of the fin to the back of the leg (heel side), centered, with the bottom of the fin about 1–1½" (2.5–4 cm) below the teeth. The fin should point up toward the cuff. Sew the CO edge firmly to the sock with MC and a tapestry needle, using whipstitch or mattress stitch. Leave the triangle free so it stands out.
Optional pectoral fins: Sew one to each side of the foot, just in front of the heel, pointing slightly backward.
Eyes (make 2 per sock). On the front/sides of the leg, about ¾–1" (2–2.5 cm) below the teeth and about 1½–2" (4–5 cm) apart:
- With CC1 (white), satin-stitch or duplicate-stitch a circle about ½–¾" (1.5–2 cm) across.
- With CC3 (black), stitch a smaller pupil in the center.
- Add a tiny white stitch on the pupil for a highlight, if you like.
Do not use buttons, beads, or safety eyes.
Gills (optional). With black, embroider 3 short diagonal lines (about ½" / 1.5 cm) on each side of the leg, just behind each eye.
Teeth (optional extra). If you want sharper points, use white yarn to embroider small downward triangles along the gray, just under the knitted tooth band.
Slipper soles (optional). If these will be worn as house slippers on hard floors, add non-slip fabric paint dots or iron-on suede patches to the sole after blocking.
Measurements (per sock, after blocking)
- Cuff (red rib): 1½" (4 cm)
- Teeth band: 2 rounds
- Leg, including cuff: 6 (6½, 7)" / 15 (16.5, 18) cm, or as customized
- Heel flap depth: about 2½–3" (6.5–7.5 cm)
- Foot + toe: to fit; start toe 2" (5 cm) before desired length
- Dorsal fin: about 2 × 2" (5 × 5 cm)
Beginner tips
- Cast on loosely. If the cuff fights you when you put the sock on, the CO was too tight — redo it on a larger needle.
- First-round join. After joining, knit the first stitch of rnd 1 through the back loop once if the join looks sloppy; it tightens the gap.
- Ladders (loose lines at needle breaks on DPNs): give the first two stitches of each needle a slightly firmer tug. Magic loop: snug the two stitches on either side of the cable.
- Heel gap: “Knit to 1 stitch before the gap, then decrease across the gap” is the whole trick. Look for the hole; work up to it; eat it with ssk or p2tog.
- Kitchener: Work on a table, say the four steps out loud, and keep the yarn under the needles. If a stitch looks wrong, you can back the tapestry needle out and redo that step.
- Second sock: Make it immediately after the first so your row counts and color joins match.
Wear them. Chomp chomp.
Disclaimer: This pattern was generated by AI and should be reviewed for accuracy before use. While we strive for quality, AI-generated content may contain errors. Please verify measurements, stitch counts, charts, and instructions before beginning your project. Generated by purlJam.uk
Love this pattern?
Save this pattern to your free PurlJam libraryAccess your pattern anytime
Bookmark this page to access your pattern anytime