Type
Knitting
Difficulty
intermediate
Category
custom
AI Thinking Process
Planning
Verification
Pattern
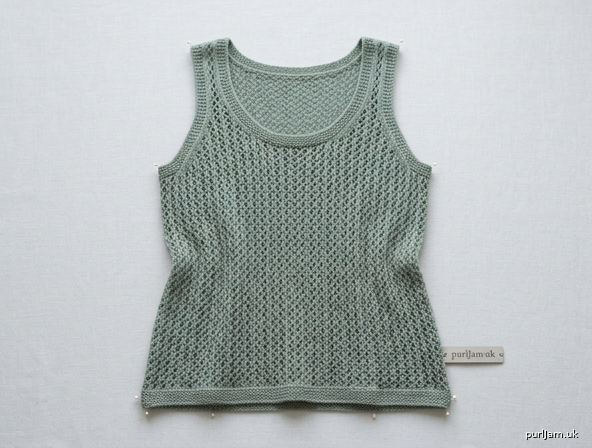
Simple Eyelet Lace Tank
A lightweight, breezy sleeveless top worked in an easy-to-memorize eyelet lace. Perfect for lace-weight yarn and first-time lace knitters. Relaxed fit with gentle positive ease.
Materials
- Yarn: Lace-weight yarn (approx. 880 yd / 800 m per 100 g); 700 (800, 900, 1000, 1100) yd / 640 (730, 820, 915, 1005) m. Sample uses merino or cotton-blend lace.
- Needles: US 5 / 3.75 mm circular needle, 24–32" / 60–80 cm long (for body); same size DPNs or preferred needles for straps if desired; spare needle for three-needle bind-off.
- Notions: Stitch markers, stitch holders or waste yarn, tapestry needle, scissors.
Gauge
24 stitches and 32 rows = 4" / 10 cm in Eyelet Lace Pattern, blocked. Take time to check gauge. Swatch in pattern and block before starting.
Sizes
Women’s XS (S, M, L, XL) Finished bust circumference: 32 (36, 40, 44, 48)" / 81.5 (91.5, 101.5, 112, 122) cm To fit bust: 30 (34, 38, 42, 46)" / 76 (86.5, 96.5, 106.5, 117) cm with 2–4" positive ease Length from shoulder to hem: 22 (22.5, 23, 23.5, 24)" / 56 (57, 58.5, 59.5, 61) cm
Shown in size S. Choose size closest to your bust + desired ease.
Abbreviations (US)
- CO: cast on
- k: knit
- p: purl
- yo: yarn over
- k2tog: knit 2 together
- ssk: slip, slip, knit (slip 1 knitwise, slip 1 knitwise, knit both slipped sts together through back loop)
- st(s): stitch(es)
- rnd(s): round(s)
- RS: right side
- WS: wrong side
- pm: place marker
- sm: slip marker
- BO: bind off
- rep: repeat
Pattern Notes
- Body is worked seamless in the round to the underarms, then front and back are worked flat separately.
- Eyelet Lace is a simple 2-round/2-row repeat: easy for beginners. The fabric is open and drapey—block gently.
- Always slip markers as you come to them unless instructed otherwise.
- When working flat after the split, maintain a 3-st garter border at each armhole edge for stability (knit every row on those 3 sts).
- Stitch counts are given for all sizes at key points. Count after every shaping section.
- Three-needle bind-off creates a neat, sturdy shoulder seam; mattress stitch is used for any remaining seams if needed.
Eyelet Lace Pattern (in the round)
Multiple of 4 sts. Rnd 1: *K2, yo, k2tog; rep from * to end. Rnd 2: Knit. Rep Rnds 1–2 for pattern.
Eyelet Lace Pattern (flat)
Multiple of 4 sts + 6 (for 3-st garter borders each side). Row 1 (RS): K3, *k2, yo, k2tog; rep from * to last 3 sts, k3. Row 2 (WS): K3, purl to last 3 sts, k3. Rep Rows 1–2 for pattern.
Instructions
Body
Using circular needle, CO 192 (216, 240, 264, 288) sts. Place marker for beginning of rnd and join to work in the round, being careful not to twist. (192 ÷ 4 = 48 pattern reps ✓; 216 ÷ 4 = 54 ✓; 240 ÷ 4 = 60 ✓; 264 ÷ 4 = 66 ✓; 288 ÷ 4 = 72 ✓)
Hem: Work 6 rnds garter stitch (knit 1 rnd, purl 1 rnd) ending after a purl rnd.
Begin Eyelet Lace in the round. Work even in Eyelet Lace until piece measures 14" / 35.5 cm from CO edge, ending after Rnd 2. Place underarm markers: From beginning-of-rnd marker, k 96 (108, 120, 132, 144) sts, pm (side marker), k to end. (Each half = exactly half of total sts ✓)
Divide for Front and Back
Next rnd (Rnd 1 of lace): BO 6 (6, 8, 8, 10) sts for underarm, work in pattern as established to side marker, remove side marker, BO 6 (6, 8, 8, 10) sts for second underarm, work in pattern to end. You now have two separate sections:
- Back: 90 (102, 112, 124, 134) sts
- Front: 90 (102, 112, 124, 134) sts Place Front sts on holder or waste yarn. Continue on Back sts only. (BO removed 12 (12, 16, 16, 20) sts total; 192–12=180, half 90 ✓; same proportion for all sizes ✓)
Back
Working flat, attach yarn at armhole edge if needed. Next row (WS): Establish flat lace with garter borders: K3, purl to last 3 sts, k3. Continue in Eyelet Lace (flat version), keeping 3-st garter borders, and at the same time shape armholes: Dec row (RS): K3, ssk, work in pattern to last 5 sts, k2tog, k3. (2 sts dec) Work 1 WS row even. Rep Dec row every RS row 3 (4, 5, 6, 7) more times. Sts remaining: 82 (92, 100, 110, 118). (Initial 90 – 2×4 = 82 for XS ✓; 102 – 2×5 = 92 ✓; 112 – 2×6 = 100 ✓; 124 – 2×7 = 110 ✓; 134 – 2×8 = 118 ✓)
Work even in pattern with garter borders until armhole measures 5.5 (6, 6.5, 7, 7.5)" / 14 (15, 16.5, 18, 19) cm from divide, ending after a WS row. Total armhole depth target 7 (7.5, 8, 8.5, 9)" will be completed after neck shaping.
Shape back neck: Next row (RS): Work 25 (28, 30, 33, 35) sts in pattern, BO center 32 (36, 40, 44, 48) sts, work remaining 25 (28, 30, 33, 35) sts in pattern. Place left shoulder sts on holder. Continue on right shoulder only (25 (28, 30, 33, 35) sts).
Right back shoulder: Next row (WS): Work even in pattern. Neck dec row (RS): K3, ssk, work to end. (1 st dec) Rep Neck dec row every RS row twice more. 22 (25, 27, 30, 32) sts remain. (25–3=22 ✓ etc.) Work even until armhole measures 7 (7.5, 8, 8.5, 9)" / 18 (19, 20.5, 21.5, 23) cm, ending after a WS row. Place sts on holder.
Left back shoulder: With WS facing, join yarn at neck edge. Next row (WS): Work even. Neck dec row (RS): Work to last 5 sts, k2tog, k3. (1 st dec) Rep Neck dec row every RS row twice more. 22 (25, 27, 30, 32) sts remain. Work even until armhole matches right shoulder. Place sts on holder.
Front
Return held Front sts to needle: 90 (102, 112, 124, 134) sts. With RS facing, join yarn at armhole edge. Work exactly as for Back armhole shaping, including garter borders and the same number of armhole decreases, until armhole measures 3.5 (4, 4.5, 5, 5.5)" / 9 (10, 11.5, 12.5, 14) cm from divide, ending after a WS row. Sts: 82 (92, 100, 110, 118).
Shape front neck (deeper scoop): Next row (RS): Work 30 (33, 35, 38, 40) sts in pattern, BO center 22 (26, 30, 34, 38) sts, work remaining 30 (33, 35, 38, 40) sts. Place left front sts on holder. Continue on right front only.
Right front shoulder: Work 1 WS row even. Neck dec row (RS): K3, ssk, work to end. (1 st dec) Rep Neck dec row every RS row 7 (7, 7, 7, 7) more times (8 decs total). 22 (25, 27, 30, 32) sts remain. (30–8=22 ✓; 33–8=25 ✓; 35–8=27 ✓; 38–8=30 ✓; 40–8=32 ✓) At the same time, when armhole reaches same length as Back, end after a WS row and place remaining shoulder sts on holder.
Left front shoulder: With WS facing, join yarn at neck edge. Work 1 WS row even. Neck dec row (RS): Work to last 5 sts, k2tog, k3. Rep every RS row 7 more times (8 decs total) until 22 (25, 27, 30, 32) sts remain. Work until armhole matches Back. Place sts on holder.
Shoulders
Join corresponding Front and Back shoulder sts using three-needle bind-off (RS together for a neat ridge on the inside, or WS together for a decorative ridge on the outside—your choice). 22 (25, 27, 30, 32) sts joined each shoulder ✓.
Finishing
- Armhole edging (optional but recommended for beginners to prevent stretching): With RS facing and circular needle or DPNs, pick up and knit approximately 3 sts for every 4 rows around each armhole. Work 4 rnds garter stitch (or 3 rnds of k1, p1 rib). BO loosely in pattern.
- Neck edging: With RS facing, pick up and knit sts evenly around neckline (about 1 st per BO st and 3 sts per 4 rows along shaped edges). Work 4 rnds garter or ribbing as for armholes. BO loosely.
- Weave in all ends securely on WS.
- Block gently to finished measurements: soak in lukewarm water with mild wool wash, roll in towel to remove excess water, and lay flat to dry, pinning to size. Do not stretch aggressively—lace opens naturally.
- Seam any small gaps at underarms with mattress stitch if needed.
Tips for Success
- Use a lifeline every 10–20 rows while learning the lace—simply thread waste yarn through a row of stitches so you can rip back safely.
- Count stitches after every pattern repeat until the eyelet rhythm feels automatic.
- If your row gauge differs, adjust the number of even rows between shaping to hit the listed inch measurements.
- For a longer tunic, add length before the underarm divide; for cropped, subtract.
Enjoy your new lace tank!
Disclaimer: This pattern was generated by AI and should be reviewed for accuracy before use. While we strive for quality, AI-generated content may contain errors. Please verify measurements, stitch counts, charts, and instructions before beginning your project. Generated by purlJam.uk
Love this pattern?
Save this pattern to your free PurlJam libraryAccess your pattern anytime
Bookmark this page to access your pattern anytime