Type
Crochet
Difficulty
beginner
Category
amigurumi
AI Thinking Process
Planning
Verification
Pattern
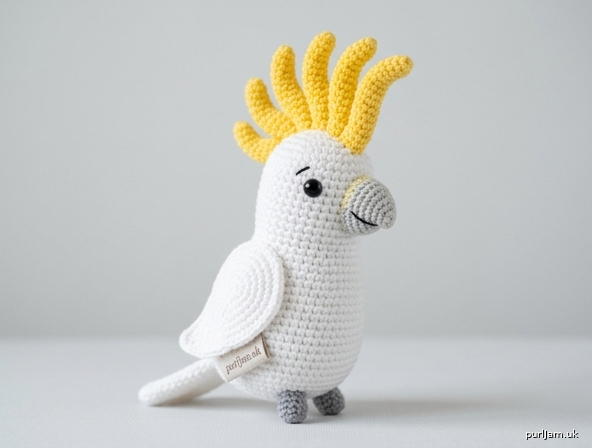
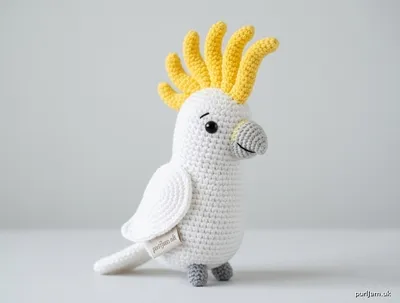
Simple Shapes Cockatoo Amigurumi
Beginner-friendly crochet toy pattern
A cute sulphur-crested cockatoo made from basic amigurumi shapes. Approx. 6.5" (16.5 cm) tall when made in worsted weight.
Materials
- Worsted weight (4) yarn:
- Main color (MC): White – 50 yd (46 m)
- Crest color (CC): Bright yellow – 15 yd (14 m)
- Beak/feet color: Light gray or pale yellow – 10 yd (9 m)
- Small amount black for embroidery (or use black embroidery floss)
- US E-4 (3.5 mm) crochet hook (or size needed to obtain firm fabric; go down 1–2 sizes from yarn label)
- 9 mm safety eyes (pair)
- Polyester fiberfill stuffing
- Yarn needle
- Stitch marker
- Scissors
- Optional: pink embroidery floss for cheek blush
Abbreviations (US terms)
- ch: chain
- sc: single crochet
- inc: increase (2 sc in same stitch)
- dec: invisible decrease (sc2tog through front loops)
- st(s): stitch(es)
- rnd(s): round(s)
- sl st: slip stitch
- BLO: back loop only
- [ ]: total stitch count at end of round
- ( ) : work instructions in parentheses as a set
-
- : repeat instructions following asterisk as directed
- FO: fasten off
Gauge
5 sc × 5 rnds = 1" (2.5 cm) in continuous sc spiral. Gauge is important for a dense fabric that hides stuffing. Adjust hook size if needed.
Finished Size
Approximately 6.5" (16.5 cm) tall × 4" (10 cm) wide (including crest and tail).
Pattern Notes
- Work in continuous spirals unless stated otherwise. Do not join rounds; mark the first stitch of each round with a stitch marker and move it up as you go.
- Stuff firmly as you go, especially the body and head, so the bird holds its shape.
- Use invisible decrease for a smooth surface.
- All pieces are made separately and sewn together.
- Magic ring can be substituted with ch 2 and work into first ch if preferred.
Head (make 1 – white MC)
Sphere shape
Rnd 1: 6 sc in magic ring. [6] Rnd 2: inc in each st around. [12] Rnd 3: (sc, inc) around. [18] Rnd 4: (2 sc, inc) around. [24] Rnds 5–9: sc in each st around. [24] (5 rounds) Insert 9 mm safety eyes between Rnds 6 and 7, spaced about 6 sts apart. Embroider a small curved black smile just below and between the eyes if desired (or wait until assembly). Rnd 10: (2 sc, dec) around. [18] Stuff head firmly. Rnd 11: (sc, dec) around. [12] Rnd 12: dec around. [6] FO, leaving a 8" (20 cm) tail. Thread tail through remaining 6 sts and pull tight to close. Weave in end.
Body (make 1 – white MC)
Oval / elongated sphere
Rnd 1: ch 5. Work around the chain: 2 sc in 2nd ch from hook, sc in next 2 ch, 3 sc in last ch; rotate to work along opposite side of chain: sc in next 2 ch, sc in same ch as first 2-sc. [10]
Rnd 2: inc in first 2 sts, sc in next 2, inc in next 3 sts, sc in next 2, inc in last st. [16]
Rnd 3: (sc, inc) × 2, sc in next 2, (sc, inc) × 3, sc in next 2, (sc, inc). [22]
Rnd 4: (2 sc, inc) × 2, sc in next 2, (2 sc, inc) × 3, sc in next 2, (2 sc, inc). [28]
Rnd 5: sc in each st around. [28]
Rnd 6: (3 sc, inc) around to last 4 sts, 3 sc, inc in last st? Wait – distribute evenly: (6 sc, inc) × 4. [32]
(Actually verified: start from 28 → add 4 increases evenly → 32.)
Rnds 7–12: sc in each st around. [32] (6 rounds)
Rnd 13: (6 sc, dec) around. [28]
Rnd 14: (5 sc, dec) around. [24]
Rnd 15: (4 sc, dec) around. [20]
Stuff body firmly, shaping it slightly elongated (taller than wide).
Rnd 16: (3 sc, dec) around. [16]
Rnd 17: (2 sc, dec) around. [12]
Rnd 18: (sc, dec) around. [8]
FO, leaving a long 12" (30 cm) tail for sewing. Do not close completely yet; finish stuffing through the opening, then thread tail through remaining 8 sts, pull closed, and leave tail for attaching head.
Beak (make 1 – gray/pale yellow)
Small cone
Rnd 1: 4 sc in magic ring. [4] Rnd 2: (sc, inc) around. [6] Rnd 3: sc in each st around. [6] Rnd 4: (2 sc, inc) around. [8] Rnd 5: sc in each st around. [8] FO, leaving 8" (20 cm) tail for sewing. Lightly stuff the tip only.
Crest (make 1 – yellow CC)
Simple chain-loop plume (beginner version)
Ch 12. Starting in 2nd ch from hook, sc in each ch across. [11] Ch 12, turn, sc in each of the 11 previous sc and in the new chain base as needed to form next loop; or simpler method below.
Easier beginner crest (5 separate feathers sewn together): Make 5 feathers: For each feather: Ch 10. Row 1: sc in 2nd ch from hook and in each ch across. [9] FO, leave short tail. Slightly curve each feather with your fingers. Set aside for assembly. (Alternative single-piece: work 5 long loops of ch-14, joining each with sl st to a small base of 5 sc in magic ring.)
Wings (make 2 – white MC)
Flat simple oval
Rnd 1: ch 6. Work around chain: sc in 2nd ch from hook, sc in next 3 ch, 3 sc in last ch; rotate: sc in next 3 ch, 2 sc in last (same as first). [12] Rnd 2: inc, sc in next 3, inc × 3, sc in next 3, inc × 2. [18] Rnd 3: sc in each st around. [18] FO, leaving 10" (25 cm) tail for sewing. Do not stuff; wings remain flat. Weave starting tail in.
Tail (make 1 – white MC)
Simple flat rectangle with slight taper
Ch 8. Row 1: sc in 2nd ch from hook and each ch across. [7] Rows 2–6: ch 1, turn, sc in each st across. [7] Row 7: ch 1, turn, dec, sc in next 3, dec. [5] Row 8: ch 1, turn, sc across. [5] FO, leaving 10" (25 cm) tail. Weave in starting end.
Feet (make 2 – gray)
Tiny cylinders
Rnd 1: 6 sc in magic ring. [6] Rnds 2–3: sc in each st around. [6] FO, leaving 6" (15 cm) tail. No stuffing needed (or tiny pinch). Flatten slightly.
Assembly
- Head to Body: Pin head centered on the closed top of the body (the end opposite the longer body section). Using the long body tail (or new white yarn), sew securely all around. Angle the head slightly forward for a natural look.
- Beak: Pin beak centered on the lower front of the head, just below and between the eyes. Sew firmly around the base, adding a tiny bit more stuffing if needed as you close.
- Eyes & Face: If not already done, secure safety eye washers tightly. With black yarn or floss, embroider two small nostrils on the beak and a gentle curved smile if desired. Optional: add tiny pink cheek circles with embroidery floss.
- Crest: Arrange the 5 yellow feathers in a fan shape on top of the head (slightly toward the back). Sew the base of each feather securely to the head, overlapping slightly so they stand upright. Curve them forward naturally. (If using loop method, sew the base ring to the crown.)
- Wings: Pin one wing to each side of the body, slightly toward the upper back, angled downward. Sew along the top rounded edge only, leaving the lower edge free so wings can lift slightly.
- Tail: Pin tail to the lower back of the body, centered. Sew securely across the top edge.
- Feet: Sew feet side-by-side to the bottom front of the body so the bird can sit stably. Angle toes slightly outward.
Finishing
- Weave in all remaining ends securely on the inside or under pieces.
- Gently reshape the bird with your hands; add more stuffing through any small gaps if needed and close.
- Optional: brush the crest lightly or add a tiny bit of fabric stiffener (diluted white glue) if you want the feathers to stand higher.
- Your cockatoo is ready! Make a flock in different colors for fun.
Customization Tips
- Larger bird: use bulky yarn and 5 mm hook; add 1–2 extra even rounds on head and body.
- Keychain size: use DK yarn, stop head increases at 18 sts, body at 24 sts.
- Color variants: pink body + white crest (Major Mitchell style) or all-white with pale yellow crest.
- No safety eyes: embroider eyes with black yarn using satin stitch or French knots.
Enjoy your beginner cockatoo plush! Happy crocheting.
Disclaimer: This pattern was generated by AI and should be reviewed for accuracy before use. While we strive for quality, AI-generated content may contain errors. Please verify measurements, stitch counts, charts, and instructions before beginning your project. Generated by purlJam.uk
Love this pattern?
Save this pattern to your free PurlJam libraryAccess your pattern anytime
Bookmark this page to access your pattern anytime