Type
Crochet
Difficulty
intermediate
Category
pullover
AI Thinking Process
Planning
Verification
Pattern
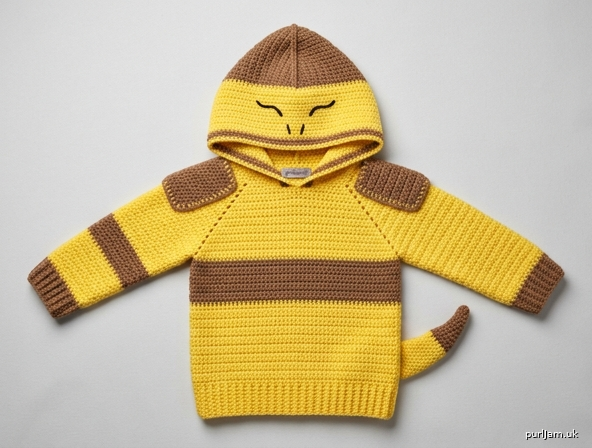
Sleeping Abra Hoodie
Top-down raglan costume pullover
Unofficial fan-made costume inspired by Abra. Not affiliated with Nintendo, Game Freak, or The Pokémon Company.
Construction: Hooded raglan (top-down and seamless). The neckline is a joined chain with four ch-1 raglan points. Increase 2 dc at each point every round, split the sleeves onto waste yarn, chain across each underarm, and finish the body in the round. Return for the sleeves. Pick up around the neck and work the hood upward in rows; close the crown with a flat slip-stitch seam. Abra’s brown crown, shoulder armor, forearm bands, and tail are added without changing the raglan counts.
Skill: Intermediate — raglan rate, underarm joins, and gauge all have to be right, and the costume uses color changes plus simple appliqué. A plain one-color version of this same raglan (skip the brown rounds, appliqué, tail, and embroidery) is achievable by a confident beginner.
For a 1-year-old, make the 1–2 yr size. It is written with room for a light shirt. Use 6–12 mo only if the child is still in 12-month clothes and will not wear a layer underneath. Use 3–4 yr if the costume must go over a thick fleece.
Sizes
Instructions are for 6–12 mo (1–2 yr, 3–4 yr). Where one number is given, it applies to all sizes.
| 6–12 mo | 1–2 yr | 3–4 yr | |
|---|---|---|---|
| To fit chest | 18–19 in (45.5–48.5 cm) | 20–21 in (51–53.5 cm) | 22–23 in (56–58.5 cm) |
| Finished chest | 20 in (51 cm) | 22 in (56 cm) | 24 in (61 cm) |
| Positive ease | about 1.5–2 in (4–5 cm) | about 1.5–2 in (4–5 cm) | about 1.5–2 in (4–5 cm) |
| Yoke depth (neck to underarm) | 4.5 in (11.5 cm) | 5 in (12.5 cm) | 6 in (15 cm) |
| Underarm to hem, including rib | 7 in (18 cm) | 8 in (20.5 cm) | 9 in (23 cm) |
| Total length, shoulder to hem | 11.5 in (29 cm) | 13 in (33 cm) | 15 in (38 cm) |
| Upper arm | 8 in (20.5 cm) | 8.67 in (22 cm) | 9.33 in (23.5 cm) |
| Sleeve, underarm to cuff edge | 7 in (18 cm) | 8 in (20.5 cm) | 9 in (23 cm) |
| Hood depth | 7 in (18 cm) | 8 in (20.5 cm) | 9 in (23 cm) |
| Neckline (unstretched) | 16 in (40.5 cm) | 18 in (45.5 cm) | 18.67 in (47.5 cm) |
Crochet fabric grows when worn. Ease is deliberately smaller than a knit pattern of the same age. Do not add extra width.
The 1–2 yr neckline is 18 in and stretches about 10–15% (to roughly 20 in / 51 cm), enough to pass a typical 1-year-old head (about 18–19 in / 45.5–48.5 cm). Work the foundation chain loosely. If you substitute cotton, the neck will not stretch the same way — cotton fit is less forgiving; do not use cotton for this costume.
Materials
Yarn: Worsted weight (CYC 4), machine-washable acrylic or superwash wool blend. A wool or wool-blend fiber blocks more crisply; acrylic is the practical choice for a toddler costume.
- MC bright yellow: 300 (400, 500) yd / 274 (366, 457) m
- CC warm medium brown: 75 (90, 110) yd / 69 (82, 101) m
- Black (embroidery only): about 5 yd / 4.5 m
Hooks:
- US I/9 (5.5 mm) for yoke, body, sleeves, and hood
- US H/8 (5.0 mm) for ribbing, hood edging, appliqué, and tail — one size down
Notions: 4 locking stitch markers, waste yarn or stitch holders, tapestry needle, scissors, tape measure. No buttons, beads, safety eyes, or plastic charms.
Gauge
12 dc and 8 rows = 4 in (10 cm) in the round, after blocking, with the I/9 (5.5 mm) hook. One dc = 1/3 in; one row = 1/2 in.
Swatch in the round: ch 36, join, work 12 rounds of dc, block, and measure the center. If you have more than 12 dc in 4 in, go up a hook size. If you have fewer, go down. A half-stitch error across a 22 in chest is enough to miss the size.
Appliqué gauge (not critical): about 16 sc and 16 rows = 4 in (10 cm) with the H/8 (5.0 mm) hook.
Color map
- Yellow (MC): yoke, most of the body, upper sleeves, hem rib, lower hood (the face), tail base, first two rows of hood edging
- Brown (CC): two rounds at the top of the body, forearm bands, cuff rib, upper hood, shoulder armor, tail tip, last row of hood edging
- Black: embroidered closed eyes and a small nose only
Stitch guide (US terms)
- ch: chain
- sl st: slip stitch
- sc: single crochet
- dc: double crochet
- BLO: back loop only
- dc2tog: yarn over, insert hook in next st, yarn over and pull up a loop, yarn over and draw through 2 loops; yarn over, insert hook in the following st, yarn over and pull up a loop, yarn over and draw through 2 loops; yarn over and draw through all 3 loops on hook. One stitch decreased.
- sc2tog: insert hook in next st, yarn over and pull up a loop; insert hook in following st, yarn over and pull up a loop; yarn over and draw through all 3 loops.
- sc3tog: pull up a loop in each of the next 3 sts, yarn over and draw through all 4 loops.
Ch 3 at the start of a dc round or row counts as a dc. Do not also work a dc into the base of that ch-3.
Raglan increase — in each ch-1 space work (dc, ch 1, dc). The first dc of that pair is the last stitch of the section just worked; the dc after the ch-1 is the first stitch of the next section. Each of the 4 sections gains 2 dc (+8 dc per increase round). Move a marker up into each new ch-1.
Plain raglan round — dc in every dc of the section, then ch 1 over the corner space. Do not put a dc in the corner. Counts stay the same.
Notes
- The four raglan points are ch-1 spaces. They are never included in the dc counts.
- Count at the end of every increase round. The table below is the pass/fail check.
- Weave ends into solid dc columns, not across ch-1 spaces or along a color join where they will flash through.
- Block before sewing on the armor and tail, and before embroidering the face.
Safety (please read — this is for a 1-year-old)
- Embroider the face. Do not use safety eyes, buttons, beads, or a crocheted spoon. Small hard pieces are a choking hazard.
- Keep the tail short and stitch the base flat to the back for 1.5 in (4 cm) so it cannot swing between the feet.
- This is a costume pullover, not sleepwear. A child wearing it must be supervised.
- Check seams and embroidery after every wash. Trim any loose end before the costume is worn again.
Yoke
With I/9 (5.5 mm) and MC, ch 48 (54, 56). Join with a sl st to the first ch, being careful not to twist. This chain is the neckline: 48 ÷ 3 = 16 in, 54 ÷ 3 = 18 in, 56 ÷ 3 = 18.67 in.
Rnd 1 (setup): Ch 3 (counts as first dc of the back), dc in next 14 (16, 17) ch, ch 1, dc in next 9 (10, 10) ch, ch 1, dc in next 15 (17, 18) ch, ch 1, dc in next 9 (10, 10) ch, ch 1, join with a sl st to the top of the beginning ch-3.
Chains used: 15+9+15+9 = 48 (17+10+17+10 = 54, 18+10+18+10 = 56). Place a marker in each ch-1 space.
Division after Rnd 1: back 15 (17, 18) dc, sleeve 9 (10, 10) dc, front 15 (17, 18) dc, sleeve 9 (10, 10) dc, and 4 raglan ch-1 points. 48 (54, 56) dc.
Rnd 2 (increase): Ch 3 (counts as first dc), dc in each dc across the section to the next ch-1 space, (dc, ch 1, dc) in that space; repeat the same action at each section and each ch-1 space around, join to the top of the beginning ch-3. Each section has gained 2 dc. 8 dc increased. (48+8 = 56; 54+8 = 62; 56+8 = 64.)
Repeat the increase round 4 (4, 5) more times. You have now worked 5 (5, 6) increase rounds (Rnds 2–6 for the first two sizes, Rnds 2–7 for 3–4 yr).
Stitch count after the last increase round — back/front 25 (27, 30) dc, each sleeve 19 (20, 22) dc.
Check: 5 increase rounds add 10 dc to each section (6 increase rounds add 12). 15+10 = 25 and 9+10 = 19; 17+10 = 27 and 10+10 = 20; 18+12 = 30 and 10+12 = 22. Total dc: 25+19+25+19 = 88 (48+40 = 88); 27+20+27+20 = 94 (54+40 = 94); 30+22+30+22 = 104 (56+48 = 104).
Plain rounds: Ch 3, *dc in each dc to the next ch-1 space, ch 1, skip the ch-1 space; repeat from * around, join. Work 3 (4, 5) plain rounds. Yoke is now 9 (10, 12) rounds and should measure about 4.5 (5, 6) in / 11.5 (12.5, 15) cm from the neck chain to the hook. If you are short, work extra plain rounds and note the number — do not add increase rounds or the chest will grow.
Count check (back or front / one sleeve)
| Round | 6–12 mo | 1–2 yr | 3–4 yr |
|---|---|---|---|
| 1 (setup) | 15 / 9 | 17 / 10 | 18 / 10 |
| 2 | 17 / 11 | 19 / 12 | 20 / 12 |
| 3 | 19 / 13 | 21 / 14 | 22 / 14 |
| 4 | 21 / 15 | 23 / 16 | 24 / 16 |
| 5 | 23 / 17 | 25 / 18 | 26 / 18 |
| 6 | 25 / 19 | 27 / 20 | 28 / 20 |
| 7 | 25 / 19, plain | 27 / 20, plain | 30 / 22, last inc |
| 8–end | plain through rnd 9 | plain through rnd 10 | plain through rnd 12 |
Fasten off MC.
Divide for body and sleeves
Slip the next sleeve’s 19 (20, 22) dc onto waste yarn when you reach it, and do the same for the second sleeve. The ch-1 spaces on either side of each sleeve are skipped and are not stitches.
Body Rnd 1 (divide, MC): Join MC with a sl st in the first dc of the back. Ch 3 (counts as dc), dc in the next 24 (26, 29) dc — 25 (27, 30) back dc in all — ch 5 (6, 6) for the underarm, skip the ch-1, the 19 (20, 22) sleeve dc, and the next ch-1, dc in the next 25 (27, 30) front dc, ch 5 (6, 6), skip the second sleeve the same way, join to the top of the beginning ch-3.
Body stitch count: 25+5+25+5 = 60 (27+6+27+6 = 66, 30+6+30+6 = 72). Finished chest 60÷3 = 20 in, 66÷3 = 22 in, 72÷3 = 24 in.
The join sits at the underarm, where the second underarm chain meets the start of the back.
Body Rnds 2–3 (CC band): Join CC. Ch 3, dc in each dc and in each underarm ch around, join. 60 (66, 72) dc. Fasten off CC after Rnd 3.
Body Rnds 4–12 (4–14, 4–16) (MC): Join MC. Ch 3, dc in each dc around, join. Work even until 12 (14, 16) body rounds are complete, including the dividing round. Body from the underarm chain measures about 6 (7, 8) in / 15 (18, 20.5) cm before ribbing. Do not fasten off if you are ready to work the hem; otherwise fasten off and rejoin MC with the smaller hook at the underarm.
Sleeves
Both sleeves are the same. Work one, then the other.
Sleeve Rnd 1 (MC): With RS facing and I/9 (5.5 mm), join MC in the underarm chain as follows.
- 6–12 mo (ch 5, 19 held sts): Join in the 3rd underarm ch. Ch 3 (counts as dc in that ch), dc in the next 2 ch, dc in each of the 19 held sts, dc in the remaining 2 underarm ch, join. 1+2+19+2 = 24 dc.
- 1–2 yr (ch 6, 20 held sts): Join in the 4th underarm ch. Ch 3, dc in the next 2 ch, dc in each of the 20 held sts, dc in the first 3 underarm ch, join. 1+2+20+3 = 26 dc.
- 3–4 yr (ch 6, 22 held sts): Join in the 4th underarm ch. Ch 3, dc in the next 2 ch, dc in each of the 22 held sts, dc in the first 3 underarm ch, join. 1+2+22+3 = 28 dc.
Upper arm: 24÷3 = 8 in, 26÷3 = 8.67 in, 28÷3 = 9.33 in.
Place a marker at the join (center underarm) and move it up as you go. Decrease rounds are worked at this marker: dc2tog over the first 2 sts, dc in each st to the last 2 sts, dc2tog, join (−2 dc).
6–12 mo — 12 rounds, 24 dc down to 16:
- Rnds 1–2: dc even in MC. 24 dc.
- Rnd 3: decrease in MC. 22 dc.
- Rnds 4–5: dc even in MC. 22 dc.
- Rnd 6: decrease in MC. 20 dc.
- Rnds 7–8: dc even in MC. 20 dc.
- Rnd 9: decrease in CC. 18 dc.
- Rnd 10: dc even in MC. 18 dc.
- Rnd 11: dc even in CC. 18 dc.
- Rnd 12: decrease in CC. 16 dc.
Four decrease rounds × 2 = 8 stitches removed. 24−8 = 16. Cuff circumference before ribbing: 16÷3 = 5.33 in (13.5 cm).
1–2 yr — 14 rounds, 26 dc down to 18:
- Rnds 1–3: dc even in MC. 26 dc.
- Rnd 4: decrease in MC. 24 dc.
- Rnds 5–6: dc even in MC. 24 dc.
- Rnd 7: decrease in MC. 22 dc.
- Rnds 8–9: dc even in MC. 22 dc.
- Rnd 10: decrease in MC. 20 dc.
- Rnd 11: dc even in CC. 20 dc.
- Rnd 12: dc even in MC. 20 dc.
- Rnd 13: decrease in CC. 18 dc.
- Rnd 14: dc even in CC. 18 dc.
26−8 = 18. Cuff: 18÷3 = 6 in (15 cm).
3–4 yr — 16 rounds, 28 dc down to 20:
- Rnds 1–3: dc even in MC. 28 dc.
- Rnd 4: decrease in MC. 26 dc.
- Rnds 5–7: dc even in MC. 26 dc.
- Rnd 8: decrease in MC. 24 dc.
- Rnds 9–11: dc even in MC. 24 dc.
- Rnd 12: decrease in MC. 22 dc.
- Rnd 13: dc even in CC. 22 dc.
- Rnd 14: dc even in MC. 22 dc.
- Rnd 15: dc even in CC. 22 dc.
- Rnd 16: decrease in CC. 20 dc.
28−8 = 20. Cuff: 20÷3 = 6.67 in (17 cm).
Sleeve dc section measures about 6 (7, 8) in / 15 (18, 20.5) cm from the underarm. The brown rounds are Abra’s forearm bands; the cuff rib continues the brown hand. Fasten off, leaving the cuff edge ready for ribbing.
Hem ribbing
With H/8 (5.0 mm) and MC, ch 5.
Row 1: Sc in the 2nd ch from the hook and in each ch across — 4 sc. With the RS of the hem facing you, sl st in the next 2 stitches of the body edge. Turn.
Row 2: Skip the 2 sl st, sc BLO in each of the 4 sc. Turn.
Row 3: Ch 1, sc BLO in each of the 4 sc, sl st in the next 2 body stitches. Turn.
Repeat Rows 2–3 around the hem. On the last repeat, join the rib column to the first row with sl sts through both layers. Fasten off.
Rib columns: 60÷2 = 30 (66÷2 = 33, 72÷2 = 36). Rib height is about 1 in (2.5 cm). Underarm-to-hem length including rib: 7 (8, 9) in / 18 (20.5, 23) cm.
Cuff ribbing (both sleeves)
With H/8 (5.0 mm) and CC, work the same sideways rib (ch 5, 4 sc, attach with 2 sl st) around each cuff. Rib columns: 16÷2 = 8 (18÷2 = 9, 20÷2 = 10). Join the last column to the first. Fasten off.
Sleeve length including rib: 7 (8, 9) in / 18 (20.5, 23) cm.
Hood
The hood is worked in turned rows from the neck upward, beginning and ending at center front so the face stays open. Close the crown afterward with a flat seam.
Mark the center of the front foundation chain (the middle of the 15 (17, 18) front chains).
Row 1 (pickup, MC, I/9): With RS facing, join MC at the center-front marker. Ch 3 (counts as dc), dc in each foundation-chain stitch around the neck until you are back at the marker. Do not join. 48 (54, 56) dc. Turn.
That is one dc in each neck chain: 48 (54, 56), matching the neckline. (48÷3 = 16 in of hood base, 54÷3 = 18 in, 56÷3 = 18.67 in.)
Rows 2–8 (2–10, 2–11): Ch 3, dc in each dc across, turn. Still 48 (54, 56) dc. Fasten off MC at the end of Row 8 (10, 11).
The yellow section is the face. It is 8 (10, 11) rows, about 4 (5, 5.5) in / 10 (12.5, 14) cm from the neck.
Join CC.
Continue in CC through Row 14 (16, 18), shaping the crown on the rows named below. Hood depth at the end is 14 (16, 18) rows × 1/2 in = 7 (8, 9) in / 18 (20.5, 23) cm. These are child hood depths, not the 12–14 in adult hood.
Crown decreases (paired dc2tog at the center only; front edges are not decreased, so the face opening stays stable). Each decrease row removes 2 dc.
6–12 mo
- Rows 9–10: Ch 3, dc across. 48 dc.
- Row 11: Ch 3, dc in next 21 dc, dc2tog twice, dc in each remaining st. 22+2+22 = 46 dc.
- Row 12: Ch 3, dc across. 46 dc.
- Row 13: Ch 3, dc in next 20 dc, dc2tog twice, dc in each remaining st. 21+2+21 = 44 dc.
- Row 14: Ch 3, dc across. 44 dc. Fasten off, leaving a long tail for the seam.
1–2 yr
- Rows 11–12: Ch 3, dc across. 54 dc.
- Row 13: Ch 3, dc in next 24 dc, dc2tog twice, dc in each remaining st. 25+2+25 = 52 dc.
- Row 14: Ch 3, dc across. 52 dc.
- Row 15: Ch 3, dc in next 23 dc, dc2tog twice, dc in each remaining st. 24+2+24 = 50 dc.
- Row 16: Ch 3, dc across. 50 dc. Fasten off, leaving a long tail.
3–4 yr
- Rows 12–14: Ch 3, dc across. 56 dc.
- Row 15: Ch 3, dc in next 25 dc, dc2tog twice, dc in each remaining st. 26+2+26 = 54 dc.
- Row 16: Ch 3, dc across. 54 dc.
- Row 17: Ch 3, dc in next 24 dc, dc2tog twice, dc in each remaining st. 25+2+25 = 52 dc.
- Row 18: Ch 3, dc across. 52 dc. Fasten off, leaving a long tail.
Crown seam: Fold the hood in half, RS together, so the last row meets itself. Slip-stitch the two halves together through both layers across 22 (25, 26) stitches (44÷2 = 22, 50÷2 = 25, 52÷2 = 26). Fasten off. Turn the hood RS out. The seam sits at the center of the brown crown.
Hood edging
With H/8 (5.0 mm) and MC, RS facing, join at the neck end of one front edge.
Pick up 2 sc in each row-end. There are 14 (16, 18) row-ends on each side, so pick up 28 (32, 36) sc on the way up and 28 (32, 36) sc on the way down — 56 (64, 72) sc in all. Do not pick up across the crown seam.
Edging Row 2: Ch 1, turn, sc in each sc across. 56 (64, 72) sc. Fasten off MC.
Edging Row 3: Join CC, ch 1, sc in each sc across. Fasten off.
The brown edge frames the yellow face the way Abra’s head plate does. Two yellow rows plus one brown row satisfy the 2–3 row hood edging.
Shoulder armor (make 2, in CC)
Use H/8 (5.0 mm). The foundation edge is the neck end (narrower); the last rows cover the shoulder and the top of the sleeve.
6–12 mo
- Ch 9. Row 1: Sc in 2nd ch and across — 8 sc. Turn.
- Row 2: Ch 1, 2 sc in first sc, sc to last sc, 2 sc in last sc — 10 sc. Turn.
- Row 3: Ch 1, sc across — 10 sc. Turn.
- Row 4: Ch 1, 2 sc in first, sc to last, 2 sc in last — 12 sc. Turn.
- Rows 5–8: Ch 1, sc across — 12 sc. Turn. Fasten off, leaving a sewing length.
- About 3 in wide × 2 in tall (7.5 × 5 cm).
1–2 yr
- Ch 11. Row 1: Sc in 2nd ch and across — 10 sc. Turn.
- Row 2: Increase 1 sc at each end — 12 sc. Turn.
- Row 3: Sc across — 12 sc. Turn.
- Row 4: Increase 1 sc at each end — 14 sc. Turn.
- Rows 5–10: Sc across — 14 sc. Fasten off, leaving a sewing length.
- About 3.5 in wide × 2.5 in tall (9 × 6.5 cm).
3–4 yr
- Ch 13. Row 1: Sc in 2nd ch and across — 12 sc. Turn.
- Row 2: Increase 1 sc at each end — 14 sc. Turn.
- Row 3: Sc across — 14 sc. Turn.
- Row 4: Increase 1 sc at each end — 16 sc. Turn.
- Rows 5–12: Sc across — 16 sc. Fasten off, leaving a sewing length.
- About 4 in wide × 3 in tall (10 × 7.5 cm).
Sew one piece on each shoulder, centered over the raglan line. The foundation edge points toward the neck; the wider last row points down the sleeve. Whipstitch the edge down all the way around so a finger cannot catch under it. The pieces sit on top of the yellow yoke; they do not replace any raglan stitches.
Tail (make 1)
Use H/8 (5.0 mm). A long tail is a trip hazard for a new walker, so this one is short on purpose.
Ch 6.
Row 1 (MC): Sc in 2nd ch from the hook and in each ch across — 5 sc. Turn.
Rows 2–20 (2–24, 2–28): Ch 1, sc in each sc across, turn. That is 20 (24, 28) rows of MC, about 5 (6, 7) in / 12.5 (15, 18) cm. Fasten off MC.
Join CC.
Next 4 rows: Ch 1, sc in each sc across, turn. 5 sc.
Taper row: Ch 1, sc2tog, sc in next sc, sc2tog — 3 sc. Turn.
Last row: Ch 1, sc3tog — 1 sc. Fasten off.
Finished length is about 6.5 (7.5, 8.5) in / 16.5 (19, 21.5) cm before it is sewn down. Sew the MC end (the straight base, not the brown tip) to the center back, with the top of the tail about 1.5 in (4 cm) above the hem rib. Stitch the first 1.5 in (4 cm) of the tail flat against the sweater so the free brown tip hangs only about 5 (6, 7) in. Do not lengthen it.
Face
Use black yarn and a tapestry needle. Split the strand to 2 plies if you want a finer line. Embroider on the yellow part of the hood only, after the hood is seamed and edged. Weave every end through the inside of the hood for at least 2 in (5 cm) and trim close. Nothing should be pullable from the outside.
Abra’s expression is asleep: two shallow downward arcs, not dots or open eyes.
- Place the eyes 1.5 (1.75, 2) in / 4 (4.5, 5) cm in from the front edging, and 3 (3.5, 4) in / 7.5 (9, 10) cm up from the neck join.
- Each arc is about 1 (1.25, 1.5) in / 2.5 (3, 4) cm wide. Space the inner ends 1 (1.25, 1.5) in apart.
- Nose: one short vertical stitch, about 1/2 in (1.3 cm), centered under the eyes. No mouth is required.
If an eye lands on brown, you are too high — move it down into the yellow rows.
Finishing
- Weave in every end along a solid column of dc or sc. Do not carry ends across raglan ch-1 spaces.
- Block to the finished measurements in the size table. Open the hood, even the brown bands, and pin the shoulder pieces flat if they curl. Let the piece dry fully.
- Sew on the shoulder armor and the tail as directed.
- Embroider the face last, so blocking does not distort the stitches.
- Try the neckline over the child’s head before the first wearing. It should pass with a firm but not painful stretch. If it will not, the chain was worked too tightly — the fix is to rework the neck and yoke at a looser gauge, not to cut the chain.
Schematic (in words)
Neck chain 16 (18, 18.67) in, divided back / sleeve / front / sleeve with a ch-1 at each of the four corners. Raglan increases run 2.5 (2.5, 3) in, then the yoke continues even to 4.5 (5, 6) in. At the underarm the sleeves leave the body; a 5 (6, 6)-chain bridge closes each armhole. Body falls straight to a 1 in yellow rib at 20 (22, 24) in chest. Sleeves taper to a brown ribbed cuff. The hood rises 7 (8, 9) in from the same neck chain, yellow below and brown at the crown, and is seamed flat across the top.
Care
Machine-wash gentle in cool water if the yarn label allows, and lay flat to dry, shaping the hood and ribbing. Do not hang the costume by the hood. Recheck embroidery and the tail seam before each wearing.
Disclaimer: This pattern was generated by AI and should be reviewed for accuracy before use. While we strive for quality, AI-generated content may contain errors. Please verify measurements, stitch counts, charts, and instructions before beginning your project. Generated by purlJam.uk
Love this pattern?
Save this pattern to your free PurlJam libraryAccess your pattern anytime
Bookmark this page to access your pattern anytime